Blog
All Blog Posts | Next Post | Previous Post

 Extend TMS WEB Core with JS Libraries with Andrew:
HexaGongs Part 1 of 5: Background
Monday, June 12, 2023

Contents
- Motivation.
- HexaGongs.
- First Steps.
- Background.
- Generating Hexagons.
- Drawing Hexagons.
- I'm Thinking... Pastels!
- Timers.
- Animation.
- Gradient Transitions.
- UI Buttons.
- UI Button Reveals.
- UI Button Code.
- Fullscreen Mode.
- Next Time.
Motivation.
While writing blog posts about TMS WEB Core's many diverse capabilities, it can sometimes take a bit of effort to come up with interesting examples, particularly when the ultimate goal is to provide you, the avid blog reader, with code that you can use in your own projects. While it is likely many of us have made a career out of developing line-of-business apps that are perhaps more in need of a UI overhaul than any of us will readily admit, often it is easier to just use whatever UI elements are on hand and think nothing more of it.
We'll be
embarking on other less colorful subjects shortly, like notifications and reporting - not to worry. But in this
new web paradigm, there are plenty of opportunities to add a splash of color here and there or dispense with
right angles or even rounded corners while building an interface that is more suited to the content we're
interacting with. And while there likely isn't a line-of-business app that will need quite this extensive of an
interface overhaul, there are plenty of bits here that can be directly applied to even the most basic data entry
forms.
There's a general desire to create complete projects that can be downloaded and tinkered with directly. Often, it isn't until you're fiddling with a TWebPageControl that has been nested three levels deep inside another TWebPageControl that you realize something isn't quite right. By working through the entire problem, plenty of little side adventures present themselves. Many are perhaps worthy of their very own blog posts.
There's also a need to get through all the material quickly and efficiently, so we can move on to other topics. Sometimes there's just too much material to cover, as is currently unfolding with the Home Assistant/Catheedral project (see parts 1, 2, 3, 4, 5, 6, 7, 8, 9, etc.).
There are several ideas for these "mega posts", and HexaGongs happens to be one that's been percolating
for a while now, just waiting for us to cover enough of the supporting material to make this workable. The
Survey blog posts (1,
2, and
3) were
another example, as was the Template Project (1,
2, and 3,
and more to come!) in addition to the Catheedral project, also ongoing. HexaGongs was originally planned as a
single post, but things have clearly gotten out of hand, so we've ended up with five, starting with this one.
In this miniseries, we'll be referring back to a larger-than-usual number of previous posts, so keep an eye out for
those if there is anything we're implementing that doesn't seem immediately obvious. While there are a few new
JavaScript libraries that we'll be adding to the mix, many of the other ingredients to this recipe can be found
in other blog posts. The ability to mix and match these kinds of seemingly disparate topics, tools, and
techniques is a big part of what makes TMS WEB Core so very different (and better!) from what we can do with a
traditional VCL or FireMonkey app.
HexaGongs.
You can try it out right now by visiting https://www.hexagongs.com.
So what's a HexaGong? Well, this is the term being used to describe the individual elements that we'll be working with - the equivalent of the pieces on a chessboard, for example. The basic idea is that each HexaGong will consist of a background color, an icon, and an audio clip that will be played when the HexaGong is clicked (or tapped).
We'll need an interface to customize those attributes. We'll also need some kind of UI for
selecting an existing HexaGong, or for placing a new HexaGong - a selection cursor of sorts.
The end goal is that we'll have an interface with many of these HexaGongs, where tapping on each will play an audio clip. What kinds of audio clips? Well, plenty of ideas come to mind. Here are a few.
- A collection of SFX audio clips from a popular movie, or even an actor quote from a movie.
- A collection of animal sounds for a child to play with (duck, cow, camel, etc.).
- General sound effects, maybe to add a bit more fun to reading time for that same child.
- Other sound effects, perhaps to add something a little extra to game night.
- For individuals, both young and old, who might have trouble speaking, pre-loaded common phrases they can use
to help communicate.
Sets of HexaGongs can be created (and shared) for a particular use. And there are likely other applications,
both serious and comical. That's part of the fun!
First Steps.
Let's start this project with the TMS WEB Core PWA application template. Why? Well, we'd ultimately like this to be running on an iPad, and also work offline, both of which point directly at PWA as the obvious choice. And it's a choice that doesn't really impact us at all - nothing about it being a PWA poses any particular problems - we're definitely not losing any capabilities with this choice. Quite the opposite.
As far as JavaScript
libraries, to start with, we'll be using the usual suspects - Bootstrap, Font Awesome,. and Google's Cairo font
(yes, again!). As usual, we can add them to our Project.html file directly or via the Manage JavaScript
Libraries feature of the Delphi IDE. We'll be adding quite a few more before we're done, but this gets us on
our way.
<!-- Google's Cairo Font -->
<link href="https://fonts.googleapis.com" rel="preconnect"/>
<link crossorigin href="https://fonts.gstatic.com" rel="preconnect"/>
<link href="https://fonts.googleapis.com/css2?family=Cairo&display=swap" rel="stylesheet" crossorigin="anonymous">
<!-- Bootstrap 5 -->
<link href="https://cdn.jsdelivr.net/npm/bootstrap@5.3.0-alpha2/dist/css/bootstrap.min.css" rel="stylesheet" crossorigin="anonymous">
<script src="https://cdn.jsdelivr.net/npm/bootstrap@5.3.0-alpha2/dist/js/bootstrap.bundle.min.js" crossorigin="anonymous"></script>
<!-- Font Awesome 6 Free -->
<link rel="stylesheet" href="https://cdn.jsdelivr.net/npm/@fortawesome/fontawesome-free@6.2.1/css/all.min.css" integrity="sha256-Z1K5uhUaJXA7Ll0XrZ/0JhX4lAtZFpT6jkKrEDT0drU=" crossorigin="anonymous">We'll also need a separate CSS file to make it a little easier to make style adjustments. And we'll be making plenty of adjustments.
<link href="hexagongs.css" rel="stylesheet">
All standard fare for many of our recent projects. And while the goal at the outset is often to try and keep the HTML, JavaScript, and CSS to a minimum for those Delphi programmers new to this environment, well, that didn't work out so well here. But hopefully the code provided will help with understanding the nature of those tools and how they integrate seamlessly with the rest of our Delphi code. This is the absolute hands-down best feature of TMS WEB Core, after all!
Background.
Literally. The first thing we need is a background for our app. And, as you might have guessed from the title, we're going to be using hexagons everywhere. In our InteractJS: Moving Elements post, we had a look at using a handful of tiled layouts for a more interesting UI design. Hexagonal grids looked particularly fun, so we're going to use them here instead of a boring rectangular grid. But this will come at a not-insignificant development cost - rectangles are the norm for many reasons, after all. Right out of the gate, we'll have to deal with a few issues here.
- We'll be adding UI buttons to the corners of our hexagonal grid, so we'd rather the layout be arranged a particular way - with hexagons oriented in a specific direction.
- The number of rows and columns should fill the available space we have, but in order to have the most 'usable' hexagons that maintain a consistent aspect ratio, we'll want to fit them in one direction (horizontally) and then center them in the other direction (vertically).
- The number of rows and columns will both be odd so that we get a particular arrangement - with the four corners "jutting out" as it were.
- We want the background to be completely covered, even though not all of the hexagons will be actively part
of our UI.
That's a lot of words to describe what we'll be dealing with, but much easier to see with a picture. The dark hexagons are the "valid" part of our UI. The light hexagons are included but are just cosmetic. Later, they'll be the same color. Note also that we're aiming largely for a "fixed" display here. While we'll be able to change the number of hexagons in the grid, they'll all be visible at the same time. No scrolling around on a larger virtual grid, for example. Not that we couldn't do that, just that it doesn't fit with what we're going for here - we want our UI buttons to be roughly in the same spot all the time.
Plenty of ways to design this differently, of course. Feedback in the comments if you've got a clever idea around this topic. The grid should automatically resize to fit whatever device dimensions or orientation - not too difficult given that we're drawing everything ourselves.
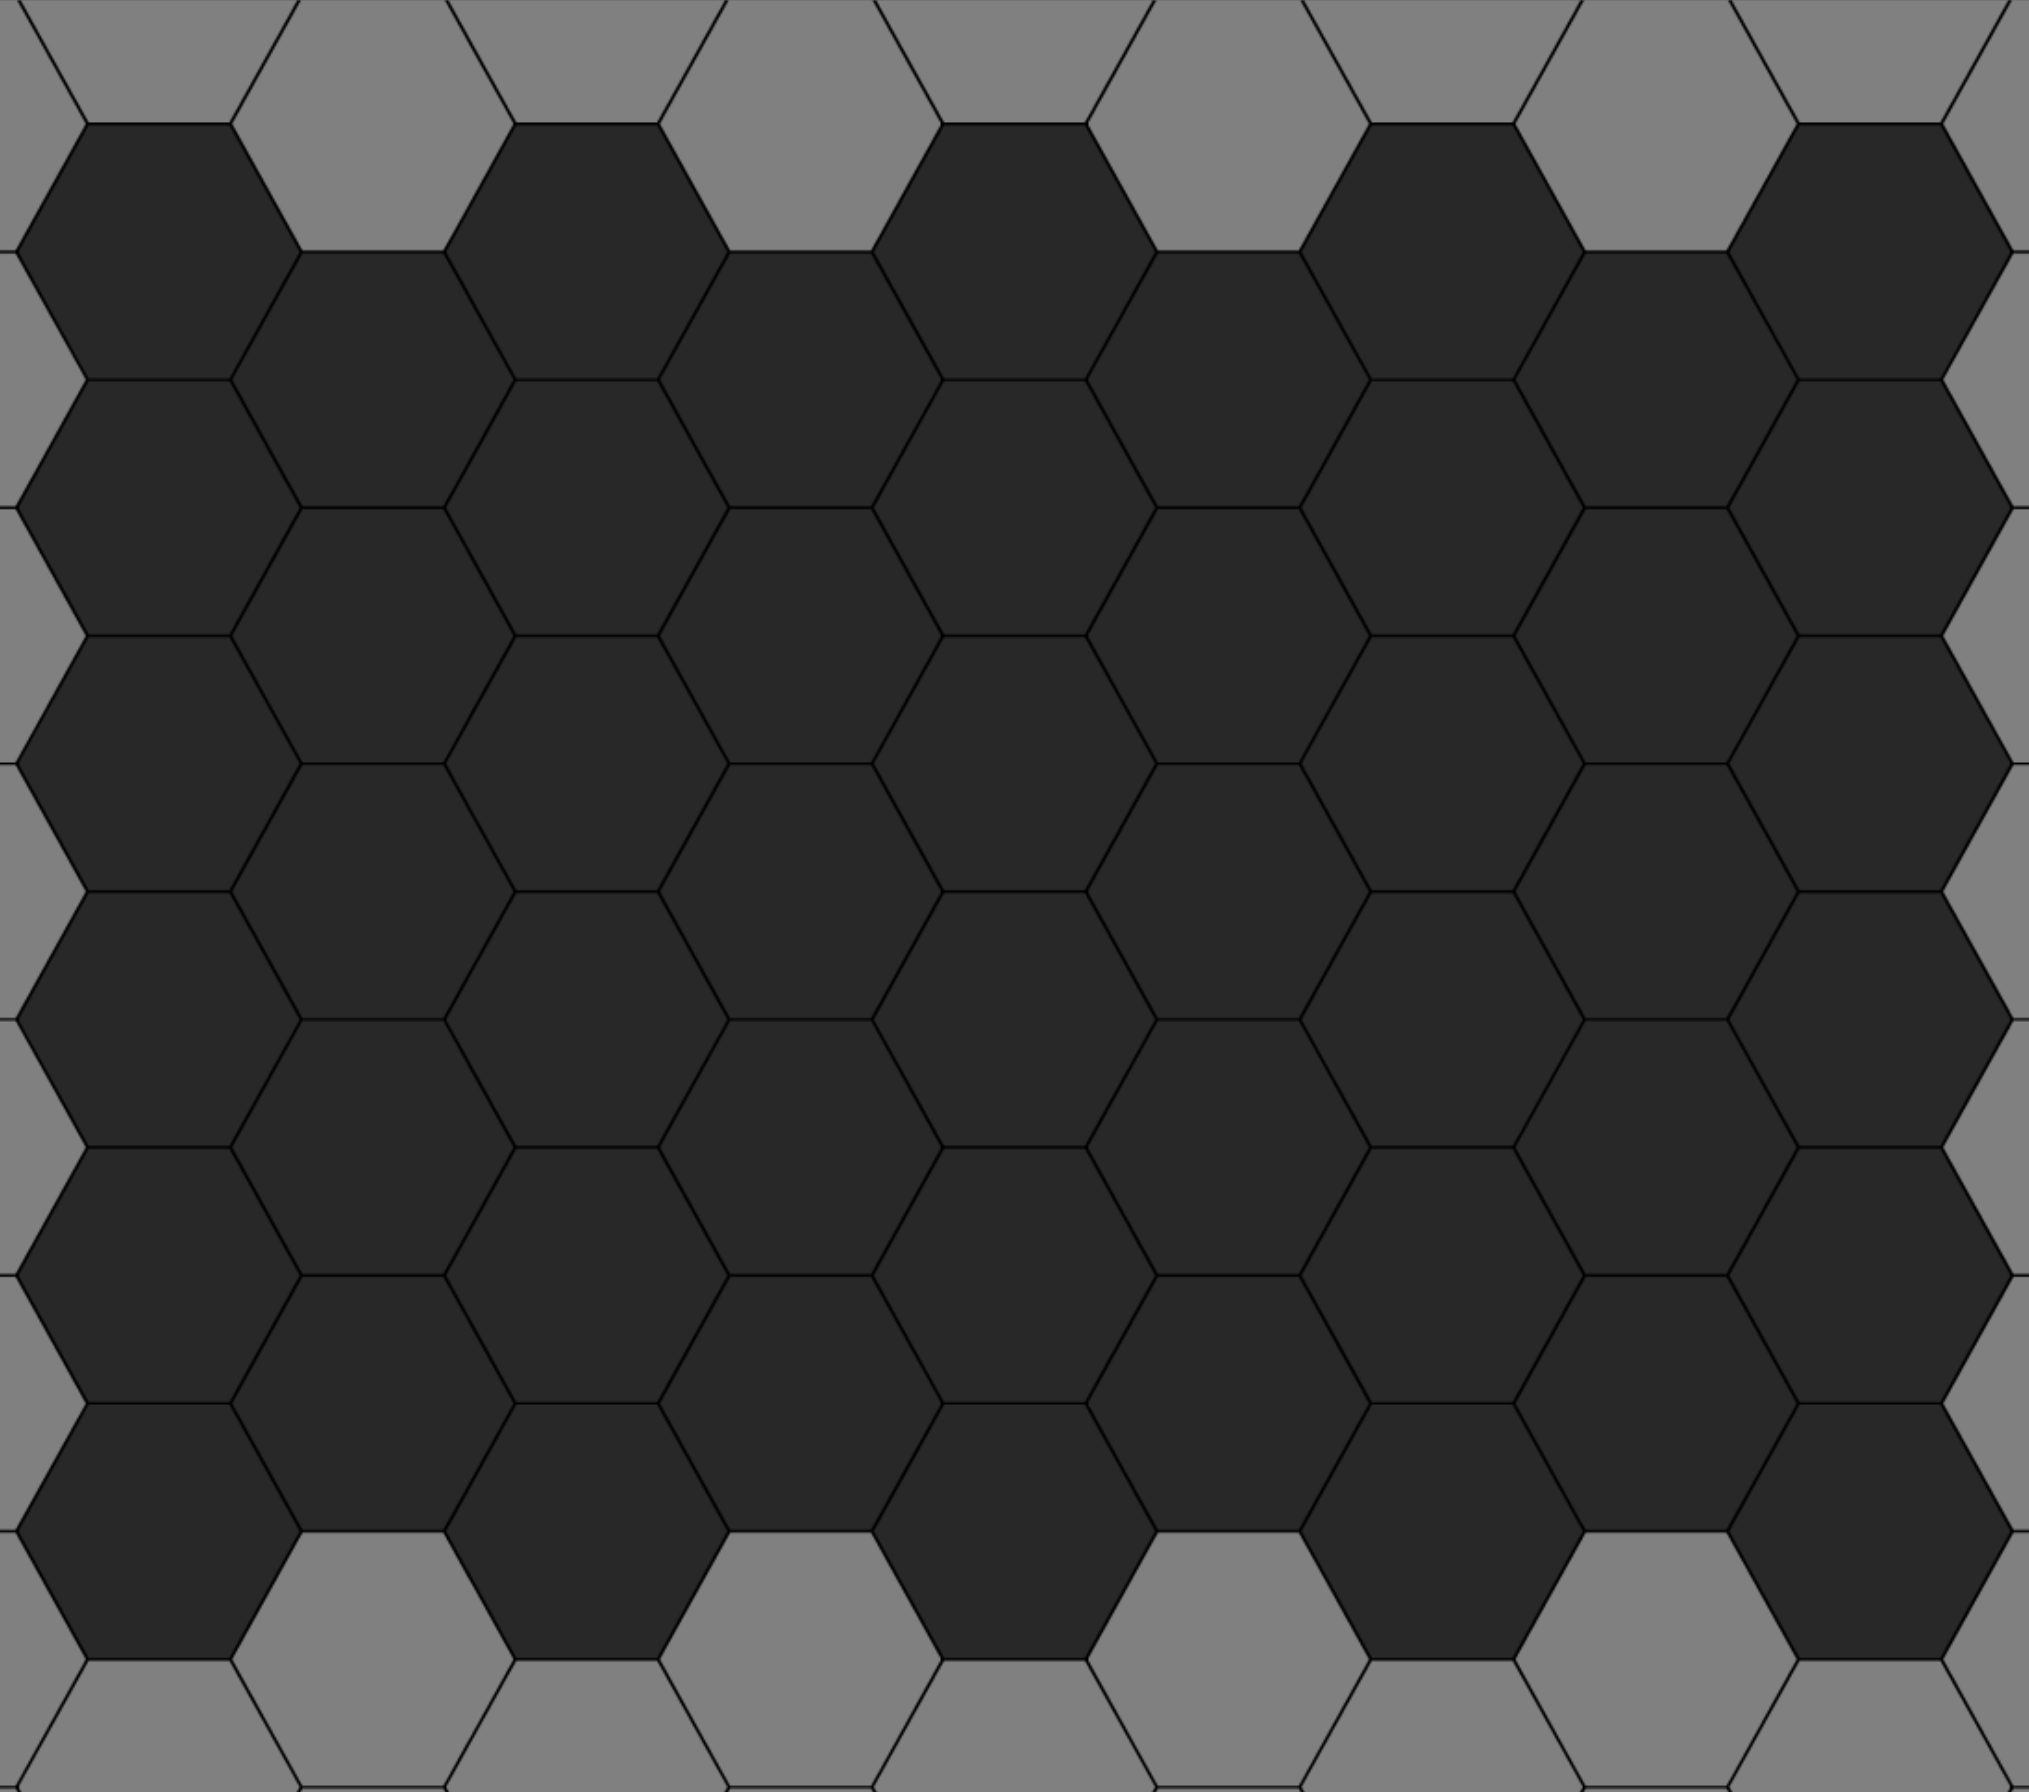
Hexagon Layout.
We'll need a way to reference each of these - a Positions array - one array element for each hexagon that is
drawn. We'll actually end up with several such dynamic arrays, each with different bits of data. This could
have been implemented with a user-defined type of some kind, certainly - an array of records, perhaps. It was
done this way more to make it simpler, and also hopefully as performant as possible. Tradeoffs abound, as
usual. Note that a Delphi dynamic array of variant records isn't supported by the underlying pas2js compiler, if you
run into a situation that calls for that.
Referencing positions is also something that could be open to interpretation. In this project, we're assuming
that hexagons with the same Y-value are in the same row, and hexagons with the same X-value are in the same
column. In the above image, there are five hexagons on the first (valid) row, followed by four on the second
row, alternating down the page, ending up with 11 rows. But that doesn't include the extra hexagons around the
edges. This is a bit confusing, so apologies in advance for that.
Generating Hexagons.
Here's how the Positions are calculated. Rather than an array of TPoint, we use separate arrays for each of the things we want to track, including the X and Y values, and the Row and Column that each position is in. Given that our interface can be scaled in any number of ways, both in terms of the density of the hexagon grid, as well as the browser scaling, just to start with, we're after more than integer precision when it comes to the display.
This code starts with our window size and the number of hexagons in the first row (ZoomLevel) and
determines the X and Y coordinates for all the hexagons on the page, as well as their individual Row and Column
values. We'll get to the other arrays a bit later. Here, we're just ensuring that all the "Positions" dynamic
arrays are the same size and have at least an initial value.
public
    PositionsX: Array of Double;    // X Position
    PositionsY: Array of Double;    // Y Position
    PositionsR: Array of Integer;   // Row number
    PositionsC: Array of Integer;   // Column number
    PositionsV: Array of Boolean;   // Valid for Layout/Mouseover
    PositionsT: Array of Boolean;   // Valid Target for Drag/Swap
    PositionsG: Array of Integer;   // Gong # at a Position

procedure TForm1.GeneratePositions;
var
  I: Integer;
  X: Double;
  Y: Double;

  WindowWidth: Double;
  WindowHeight: Double;

  LeftMargin: Double;

  VertOffset: Double;
  HorizOffset: Double;

begin

  // The space we have available
  WindowWidth := window.innerWidth;
  WindowHeight := window.innerHeight - 10;

  // Note: This is a radius (half hexagon), and we want to end on an odd
  // number. The .04 bit is that we have a slight gap (4%) between them.
  HexRadius := (WindowWidth - 20) / (3.04*ZoomLevel - 1);

  // Offset 10px from left/right
  LeftMargin := 10 - HexRadius*1.5;

  // How much we have to move X/Y after each position
  HorizOffset := HexRadius * 1.52;
  VertOffset := 1.05*HexRadius*Sqrt(3)/2;

  // Start in offset position because the first row will ultimately be clipped
  RowCount := 1;
  ColCount := 0;
  I := 0;

  X := LeftMargin + (RowCount mod 2)*HexRadius*1.52;
  Y := 0;

  while Y < WindowHeight + VertOffset*3 do
  begin

    // Adjust collection of arrays
    setLength(PositionsX, I+1);
    setLength(PositionsY, I+1);
    setLength(PositionsR, I+1);
    setLength(PositionsC, I+1);

    PositionsX[I] := X;
    PositionsY[I] := Y;
    PositionsR[I] := RowCount;
    PositionsC[I] := ColCount;
    PositionsV[I] := False;
    PositionsT[I] := False;
    PositionsG[I] := -1;

    // Fill Row, then wrap to odd or even row
    if (X+HexRadius*3 < WindowWidth) then
    begin
      ColCount := ColCount + 1;
      X := X + HorizOffset * 2;
    end
    else
    begin
      ColCount := 0;
      RowCount := RowCount + 1;
      X := LeftMargin + (RowCount mod 2) * HorizOffset;
      Y := Y + VertOffset;
    end;

    I := I + 1;
  end;

  I := Length(PositionsY) -1;
  ColCount := ZoomLevel;

  // Adjust the top margin to account for an odd (blank) row at the bottom
  if (RowCount mod 2) = 1
  then MarginTop := 5+ -1.05*HexRadius/2 + (WindowHeight - PositionsY[I]) / 2
  else MarginTop := 5+ -1.05*HexRadius/2 + (WindowHeight - PositionsY[I-ColCount]) / 2;

  divBackground.ElementHandle.style.setProperty('margin-top',FloatToStrF(MarginTop,ffGeneral,5,3)+'px');

end;
We covered some of this in the Moving Elements post, particularly calculating offsets so that alternate rows of
hexagons are positioned just far enough down the page to get our alignment as perfect as we can. In this case,
we're deliberately exceeding the bounds of the page so that it is always completely covered. The tricky bit at
the end is what shifts the whole hexagonal grid down so that the "valid" hexagons are more or less centered
vertically on the page. There's a bit of trial and error and fiddling that has gone into how this all works, in
order to get our hexagons arranged with a slight gap between them. More on that shortly. Note that we only
have to do this when the app first starts, and whenever the window is resized - not very often.
Drawing Hexagons.
With the Positions data populated (dynamic arrays PositionsX, PositionsY, PositionsR, and PositionsC), we have
enough information to render them on the page. In this case, we're generating <div> elements for all of
them. This is different than the Moving Elements post - there we just painted them into a <canvas>
element and that was the end of the interaction. In this case, we're creating elements that will end up being a
bit like little precisely positioned cups that we can fill with different things, so we need more than just an
image to work with.
To start with, we'll be using a TWebHTMLDiv component, divBackground, as the container element for our
background. This is of course set to fill the page entirely. It is configured to never show scrollbars, and we
don't much care if anything overflows the element - the page will clip it anyway. The underlying Form will have
a black background, but the divBackground element is deliberately transparent. Our task, then, is to
populate divBackground with a set of <div> elements, each containing a hexagon of some type or other, at a
precise (float, not integer) X and Y coordinate.
To accomplish this, we're building a string that contains all of the HTML that defines these hexagons, and then
we update the divBackground TWebHTMLDiv component with this string by assigning it to that component's HTML.Text
property. Pretty efficient, but a little messy. We're also assigning HTML id attributes, along with several
other HTML attributes and CSS properties, all at once. This works well enough that resizing the page, which
regenerates the Positions arrays and redraws them, takes no time at all. This is also where we do a few other
tasks.
- We determine which hexagons are "valid" and which are not (PositionsV array).
- Some of the animation setup for "jiggle-mode" is also done here, as it is these hexagons that will be
jiggling (along with their contents) when we want to move things around. More on that in the next post.
- We also assign a PositionsT array, which is initially the same as PositionsV, but a bit later we'll also knock out any Positions that have a UI button, leaving us with the "target" Positions that we can use when moving HexaGongs around the page.
We'll add more to this method a bit later, particularly related to the UI buttons (later in this post), and the
HexaGongs themselves (next post).
procedure TForm1.DrawBackground;
var
  I: Integer;
  S: String;
  Classes: String;

begin

  I := 0;
  S := '';

  while I < Length(PositionsX) do
  begin
    Classes := 'Invalid';
    if (PositionsR[I] >= 3) and
       (PositionsR[I] <= (RowCount + (RowCount mod 2) - 5)) and
       (PositionsC[I] >= ((PositionsR[I] + 1) mod 2)) and
       (PositionsC[i] <= (ColCount - ((PositionsR[i] + 1) mod 2))) then
    begin
      Classes := 'Valid';
      PositionsV[I] := True;
      PositionsT[I] := True;
    end
    else
    begin
      Classes := 'Invalid';
      PositionsV[I] := False;
      PositionsT[I] := False;
    end;

    S := S + '<div id="BG-'+IntToStr(I)+'" '+
                   'class="Hexagon '+Classes+'" '+
                   'row="'+IntToStr(PositionsR[I])+'" '+
                   'columm="'+IntToStr(PositionsC[I])+'" '+
                   'position="'+IntToStr(I)+'" '+
                   'style="position:absolute;'+
                          'font-size:'+IntToStr(Trunc(HexRadius))+'px;'+
                          'top:'+FloatToStrF(PositionsY[I],ffGeneral,5,3)+'px;'+
                          'left:'+FloatToSTrF(PositionsX[I],ffGeneral,5,3)+'px;'+
                          'width:'+FloatToStrF(HexRadius*2,ffGeneral,5,3)+'px;'+
                          'height:'+FloatToSTrf(HexRadius*2,ffGeneral,5,3)+'px;'+
                          'transform-origin:'+IntToStr(Trunc(10+Random(80)))+'% '+IntToStr(10+Random(80))+'%;'+
                          'animation-duration:'+FloatToSTr(0.40+Random*0.40)+'s;'+
                          'animation-iteration-count:'+'infinite;'+
                          'animation-timing-function:'+'ease-in-out;'+
                     '"></div>';
    I := I + 1;
  end;

  divBackground.HTML.Text := S;

end;
At this stage, something to keep in mind is that we're regenerating the entire contents of the divBackground element. Any content we've added to these <div> elements will be lost whenever this is called, so we'll need to keep track of that content so that it can be re-added when necessary. More on that a little later.
In terms
of the hexagons being displayed, there's a bit of styling that goes with this, added in our "hexagongs.css" file. We're
going to be using CSS clip-paths quite a lot, but here's the first one - this clips the <div> element into
the shape of a hexagon. To generate our original image above, the Valid class is used to assign a darker shade of
gray.
.Hexagon {
  background: #808080;
  clip-path: polygon(25% 5%, 75% 5%, 100% 50%, 75% 95%, 25% 95%, 0% 50%);
}
.Hexagon.Valid {
  background: #282828;
}
Quite a lot of work to get to just this point, but we've got our hexagonal grid aligned pretty well, with just a thin gap between them. We can resize the page all we like, and the grid is still drawn consistently - a solid base for what is to come. But why do we have a gap between the hexagons? That's a very good question!
I'm thinking... Pastels!
We like shiny things around these parts, so let's see if we can add something a little more dynamic to this background to make it more interesting. What we're after is an entirely superficial effect - something like electricity wriggling through the spaces between the hexagons.
Sort of. It started out as that, at least, and kind of morphed into what we have here. The idea is to move a handful of colorful elements underneath the hexagons to get this effect. And if the hexagons are perfectly spaced, it will seem like something is moving along their perimeters. That's the theory, anyway.
To try this out, we'll start with a set of elements in the middle of the page, moving out in each direction
from the center-most hexagon. Six directions, so let's try six elements to start with. There are a lot of ways
to do this, and a lot of different variables that could come into play with each variation. And as this is
entirely superficial, it doesn't really matter what is done here. But there were a few ideas that came to mind when
coming up with this, with some conflicting with others.
- Elements should move in a hexagonal direction until they reach an edge.
- Elements should try to avoid colliding with one another, if possible.
- It should look as random as possible.
- Avoid anything that could result in a repeating pattern.
To get this up and running, we first need to create our six elements. These will be TWebHTMLDiv components, ultimately ending up being rendered as <div> elements, much like we just used for the background. In this case, we want the initial Position of the animated elements to be the middle hexagon.
There is always a specific
middle hexagon horizontally, but potentially one of two choices vertically. It doesn't matter which is
selected. We're using the same algorithm here as we used in the Moving Elements post to find the nearest
hexagon defined in the Positions arrays. We also have another set of dynamic arrays for tracking what is happening with this animation - more on those in just a moment.
public
    AnimatedElements: Integer;               // How many did you say?
    Animation:        Array of Integer;      // Current Position of this animation
    AnimationDiv:     Array of TWebHTMLDiv;  // <div> for this animation
    AnimationDir:     Array of Integer;      // Direction animation is moving (clockwise, 0 is top left of hexagon)
    AnimationLast:    Array of Integer;      // Last Position of this animation
    AnimationTimers:  JSValue;               // Array of setInterval() timers currently active

procedure TForm1.StartAnimation;
var
  I: Integer;
  StartPosition: Integer;
  MidX: Double;
  MidY: Double;

begin

  StartPosition := -1;
  MidX := (window.innerWidth / 2) - HexRadius;
  MidY := (window.innerHeight / 2) - HexRadius*Sqrt(3)/2 - MarginTop;

  // Find middle position
  asm
    var minDistance = Number.MAX_SAFE_INTEGER;
    var NewX = 0
    var NewY = 0;
    var dist = 0;
    for (var i = 0; i < this.PositionsX.length; i++) {
      dist = Math.sqrt(Math.pow(this.PositionsX[i] - MidX,2) + Math.pow(this.PositionsY[i] - MidY,2));
      if (dist < minDistance) {
        minDistance = dist;
        NewX = this.PositionsX[i];
        NewY = this.PositionsY[i];
        StartPosition = i;
      }
    }
    MidX = NewX;
    MidY = NewY;
  end;

  SetLength(Animation,     AnimatedElements);
  SetLength(AnimationDiv,  Animatedelements);
  SetLength(AnimationDir,  AnimatedElements);
  SetLength(AnimationLast, AnimatedElements);

  for I := 0 to AnimatedElements - 1 do
  begin
    // Create element if it is our first time through
    if not(Assigned(AnimationDiv[i])) then
    begin
      AnimationDiv[i] := TWebHTMLDiv.Create('divAnimation'+IntToStr(i));
    end;

    // Set the size - might have changed since last time
    AnimationDiv[I].Top := Trunc(MidY + MarginTop - 5);
    AnimationDiv[I].Left := Trunc(MidX -3);
    AnimationDiv[I].Width := Trunc(6+HexRadius*2);
    AnimationDiv[I].Height := Trunc(10+HexRadius*2);

    AnimationDiv[i].Parent := divAnimParent;
    AnimationDiv[i].ElementPosition := epAbsolute;
    AnimationDiv[i].ElementClassName := 'Animation';
    AnimationDiv[I].ElementHandle.style.setProperty('opacity','0.9');
    AnimationDiv[I].ElementHandle.style.setProperty('transition','top '+IntToStr(1000+I*200)+'ms linear, left '+IntToStr(1000+I*200)+'ms linear, opacity 5s');

    // Start at the center - 6 elements start moving in 6 directions
    Animation[I] := StartPosition;
    AnimationLast[I] := -1;
    AnimationDir[I] := I mod 6;

    // Launch Animation Timers
    asm
      const index = I;
      const This = this;
      var timer = setInterval(function() {
        This.Animate(index);
      },1050 + index*200);
      this.AnimationTimers.push(timer);
    end;

  end;
end;
Here, we're creating our new animation elements, slightly larger than the hexagons in the background, so that they overlap the edges. These are added to another TWebHTMLDiv component, divAnimParent, which is a sibling to divBackground (not a child). Initially, we'll position divAnimParent above divBackground so we can see what is going on. The start location is set to overlap the background hexagon in the middle Position, and then various other CSS attributes are set. The background and initial opacity are set in the external CSS file.
.Animation {
  /*clip-path: polygon(25% 5%, 75% 5%, 100% 50%, 75% 95%, 25% 95%, 0% 50%);*/
  clip-path: circle();
  z-index: 4;
}
/* Just different colors - pastels preferably! */
#divAnimation0  { opacity: 0; background: #FF000080; }
#divAnimation1  { opacity: 0; background: #00FF0080; }
#divAnimation2  { opacity: 0; background: #0000FF80; }
#divAnimation3  { opacity: 0; background: #FFFF0080; }
#divAnimation4  { opacity: 0; background: #FF00FF80; }
#divAnimation5  { opacity: 0; background: #00FFFF80; }
After the elements are created, the initial values for the animation are set. The AnimationDir and
AnimationLast arrays are used to track the next and last direction used - a value in the range 0-5, with 0 being
the top left, clockwise to 5 being the bottom-left (of the six sides of the hexagon). By setting each element's
direction to its number, they start off heading in each of the six directions. Note that there could be more than
six animated elements, so a simple mod function takes care of that.
Timers.
The code for the timers is perhaps a little different than what we've seen before. Here, we're essentially creating interval timers (the repeating kind (setInterval) rather than the one-off kind (setTimeout)), and telling them to set the next animation step. A different delay is used so that the elements each move at a different (but constant) speed. We also store the variables pointing at the timers that are created so that we can clear the timers later, just by pushing them onto another array. If we call setInterval (or setTimeout) without keeping track of this, we'd not be able to find the timers we need to disable.
This has been written in JavaScript (note the asm... ...end block). A TWebTimer is of course available as part of
TMS WEB Core, providing a setInterval-style mechanism that could have been used instead. Just as tricky when it
comes to creating and destroying TWebTimer components at runtime.
The "This = this" and "index = I" business has to do with how JavaScript references variables inside of event
handlers. If we just passed the variable "I" from our loop, it wouldn't work properly. And the value of "this"
doesn't match up to what we might think it does when it is used in a JavaScript event. So a few little puzzles,
but the result is that we've got timers generated at runtime that we can set however we like. Ultimately, these
just call our Animate() method (Delphi, not JavaScript) which updates the direction according to our rules.
Animation.
The last part of our animation then involves selecting a new Position value based on the current Position value and direction, keeping in mind the general rules we wanted to implement. The approach taken here is to select the current direction and determine the next Position value. Then check and see if it "works" based on our rules. If it doesn't, pick another random direction and check again. Until either a new valid direction is found, or we've given up on this animation cycle and will instead wait out the delay.
The most common cause for hitting
this limit is when multiple elements end up in a corner. There's only one way out of a corner, typically - as
there are only two exits and the element arrived on one of them. And if the outbound Position is already
occupied, then the element is stuck. Sort of. A few more random values are used to ensure that nothing really
gets stuck for too long. Here's what we've got.
procedure TForm1.Animate(Anim: Integer);
var
  I: Integer;
  CurrPos: Integer;
  CurrRow: Integer;
  CurrCol: Integer;
  Direction: Integer;
  NextPos: Integer;
  Loop: Integer;

begin

  CurrPos := Animation[Anim];
  CurrRow := PositionsR[Animation[Anim]];
  CurrCol := PositionsC[Animation[Anim]];
  NextPos := CurrPos;

  Direction := -1;
  Loop := 0;

  while (Direction = -1) and (Loop < 20) do
  begin
    if (Loop = 0) and (Random > 0.1)
    then Direction := AnimationDir[Anim]    // Mostly go in same direction until it isn't possible.  But only mostly.
    else Direction := Trunc(Random*5.999);  // Veer off in one of 6 available random directions.

    // Determine Next Position based on Current Position and a Direction
    if      Direction = 0 then NextPos := CurrPos - ColCount - 1      // Top Left
    else if Direction = 1 then NextPos := CurrPos - ColCount * 2 - 1  // Top
    else if Direction = 2 then NextPos := CurrPos - ColCount + 0      // Top Right
    else if Direction = 3 then NextPos := CurrPos + ColCount + 1      // Bottom Right
    else if Direction = 4 then NextPos := CurrPos + ColCount * 2 + 1  // Bottom
    else if Direction = 5 then NextPos := CurrPos + ColCount + 0;     // Bottom Left

    // Check if Next Position is a valid Position
    if (NextPos < 0) or (NextPos > (Length(PositionsV) - 1)) then Direction := -1   // Position Range (code saftey check)
    else if PositionsV[NextPos] = False then Direction := -1                        // Must move to a Valid position
    else if NextPos = AnimationLast[Anim] then Direction := -1;                     // Must not move back where we just came from

    // Try to avoid collisions, but don't try too hard
    if (Direction <> -1) and (Loop <= 3) then
      for I := 0 to AnimatedElements do
        if NextPos = Animation[I] then Direction := -1;

    // If we haven't come up with a better move, than stay put for now
    if Direction = -1
    then NextPos := CurrPos;

    Loop := Loop + 1;
  end;

  // Trigger the Movement
  AnimationDiv[Anim].ElementHandle.style.setProperty('top',FloatToSTrF(PositionsY[NextPos] + MarginTop - 5,ffGeneral,5,3)+'px');
  AnimationDiv[Anim].ElementHandle.style.setProperty('left',FloatToSTrF(PositionsX[NextPos] - 3,ffGeneral,5,3)+'px');

  // Set Animation States for next time
  AnimationDir[Anim] := Direction;
  AnimationLast[Anim] := Animation[Anim];
  Animation[Anim] := NextPos;

end;
The business of determining the next Position is complicated by the hexagon rows having different numbers of elements. And once the next position is chosen and validated, we have to update the assorted arrays with the new information. The CSS transition property is used to time the movement from one Position to the next, with the delay being set to just slightly less than the timer that triggers the animation. Here's what the animation looks like.
Animation Algorithm.
Extra care is taken in the algorithm to try and ensure that we don't end up with a situation where the elements
overlap for any period of time. By having different timings for each, and trying to select different next
Position values, we end up with a randomized effect that works pretty well. It isn't strictly required that they
don't overlap, it just tries to avoid that scenario if it comes up.
Now, if we put the elements behind the
background instead of in front of it, and change all the background hexagons to have a darker radial style, we
end up with the desired result. Note that the screen capture rate obscures some of the fluidity here.

Final Animation.
This is more or less the desired effect. There are many variations that could be applied. For example, instead
of solid circles, a radial-gradient could be used for those as well. Circles that are dramatically larger or
smaller also produce interesting results. With the animation system in place, it is easy to experiment with
these kinds of things until you find something more to your liking.
Gradient Transitions.
One more obstacle before we move on, though. In the above, the hexagons have been styled with a lovely radial-gradient background. It turns out that if you have one radial-gradient background and want to seamlessly transition to another radial-gradient background, well, you can't. At least not using the usual transition CSS property. That just won't do!
To get around this, we'll have to do a little more CSS work (attribution). Here's what
that CSS looks like - using a pseudo-element to help us out when we hover over a "Valid" element.
#divBackground {
  z-index: 2;
}

.Hexagon {
  background: radial-gradient(#000000, #101010);
  clip-path: polygon(25% 5%, 75% 5%, 100% 50%, 75% 95%, 25% 95%, 0% 50%);
  z-index: 3;
}
.Invalid {
  background: radial-gradient(#000000, #0A0A0A);
}
.Valid {
  cursor: pointer;
}
.Valid::before {
  z-index: 2;
  position: absolute;
  content: '';
  top: 0;
  right: 0;
  bottom: 0;
  left: 0;
  background: radial-gradient(#000000, #303030);
  transition: opacity 1000ms;
  opacity: 0;
}
.Valid:hover::before {
  opacity: 1.0;
}
This gets us the intended effect, which can be seen here.

Gradient Transitions.
As these elements are under the rest of our UI, it is worth a little extra effort to ensure that it works as
planned. In order for it to still work when other content is placed over it, however, we're going to include
that content inside the hexagon <div> element, typically with a transparent (or at least
translucent) background. If we just overlaid the content (say, a button) in the spot above the hexagon
(normally my first choice), then the underlying background element doesn't get triggered properly with the hover
event, and our effect is lost. Tricky business.
And this is what gives rise to using the background hexagon
<div> elements like "cups" instead of just an image background. This also happens to be super-useful when
we get to jiggle mode but introduces a complication when we want to move the contents around. Lots of material
for the next post.
UI Buttons.
With the background largely taken care of, our attention now turns to the buttons that are part of the UI. The rationale behind the extra work to get a particular hexagon arrangement was so that there was a hexagon in each corner. This is where we'll place our four "primary" UI buttons. Clicking on one will reveal a trio of "secondary" buttons that go with each - 16 buttons in total. To set these up, we'll need to add 16 TWebButton components to our form. To start with, they'll live inside another TWebHTMLDiv component, divButtons, another sibling of divBackground and divAnimParent.
Ultimately, we'll want these buttons placed inside a specific
hexagon element, both for positioning and for styling. After the background is generated, we'll then move them
from the divButtons container to their hexagon "cup". Figuring out which hexagon to move into is not
particularly trivial. This is done near the beginning of DrawBackground, prior to the <div> background
elements being added to the page.
    if      (PositionsR[I] = 3) and (PositionsC[I] = 0)  then ConfigButton(btnMain,     I, 'MainButton')
    else if (PositionsR[I] = 3) and (PositionsC[I] = 1)  then ConfigButton(btnUpload,   I, 'Button')
    else if (PositionsR[I] = 4) and (PositionsC[I] = 1)  then ConfigButton(btnDownload, I, 'Button')
    else if (PositionsR[I] = 5) and (PositionsC[I] = 0)  then ConfigButton(btnShare,    I, 'Button')

    else if (PositionsR[I] = 3) and (PositionsC[I] = ColCount - 1) then ConfigButton(btnScale, I, 'MainButton')
    else if (PositionsR[I] = 3) and (PositionsC[I] = ColCount - 2) then ConfigButton(btnScalePlus, I, 'Button')
    else if (PositionsR[I] = 4) and (PositionsC[I] = ColCount - 1) then ConfigButton(btnFullScreen, I, 'Button')
    else if (PositionsR[I] = 5) and (PositionsC[I] = ColCount - 1) then ConfigButton(btnScaleMinus, I, 'Button')

    else if (PositionsR[I] = (RowCount + (RowCount mod 2) - 5)) and (PositionsC[I] = ColCount -1) then ConfigButton(btnChange, I, 'MainButton')
    else if (PositionsR[I] = (RowCount + (RowCount mod 2) - 5)) and (PositionsC[I] = ColCount -2) then ConfigButton(btnTrash, I, 'Button')
    else if (PositionsR[I] = (RowCount + (RowCount mod 2) - 6)) and (PositionsC[I] = ColCount -1) then ConfigButton(btnEdit, I, 'Button')
    else if (PositionsR[I] = (RowCount + (RowCount mod 2) - 7)) and (PositionsC[I] = ColCount -1) then ConfigButton(btnClone, I, 'Button')

    else if (PositionsR[I] = (RowCount + (RowCount mod 2) - 5)) and (PositionsC[I] = 0) then ConfigButton(btnVolume, I, 'MainButton')
    else if (PositionsR[I] = (RowCount + (RowCount mod 2) - 7)) and (PositionsC[I] = 0) then ConfigButton(btnVolumeUp, I, 'Button')
    else if (PositionsR[I] = (RowCount + (RowCount mod 2) - 6)) and (PositionsC[I] = 1) then ConfigButton(btnVolumeMute, I, 'Button')
    else if (PositionsR[I] = (RowCount + (RowCount mod 2) - 5)) and (PositionsC[I] = 1) then ConfigButton(btnVolumeDown, I, 'Button');
Once we've identified the row and column Position for the button, we can then configure the other button attributes. We can't position these directly on the page yet because the containing <div> hexagon hasn't yet been added to the page. Here's what we can configure though. This is where we also exclude all of the button positions from being "targets" when it comes to dragging and dropping our other elements - by updating the PositionsT array.
Also, note that this is where the appendChild() method moves the buttons into a
separate place (divButtons) so they don't get discarded when the background is regenerated. Ultimately, these
are just buttons on our Form that we can interact with in the Delphi IDE like any other buttons. We just happen
to be moving them around.
procedure TForm1.ConfigButton(btn: TWebButton; HexPosition: Integer; ClassName: String);
begin

  divButtons.ElementHAndle.appendChild(btn.ElementHandle);
  btn.ElementHandle.setAttribute('position',IntToStr(HexPosition));
  btn.ElementHandle.classList.Add(ClassName,'d-flex','justify-content-center','align-items-center');
  btn.ElementHandle.style.setProperty('top','0px');
  btn.ElementHandle.style.setProperty('left','0px');
  btn.ElementHandle.style.setProperty('width',FloatToStrF(HexRadius * 2,ffGeneral,5,3)+'px');
  btn.ElementHandle.style.setProperty('height',FloatToStrF(HexRadius * 2,ffGeneral,5,3)+'px');
  btn.ElementHandle.style.setProperty('font-size',IntToStr(Trunc(HexRadius))+'px');
  btn.Tag := HexPosition;

  if HexPosition >= 0 then PositionsT[HexPosition] := False;

end;
Once we're done generating all the positions and the background <div> elements have been added to the page, we can move the buttons into their final resting place - until the page is resized, at least.
  document.getElementById('BG-'+IntToStr(btnMain.Tag)).appendChild(btnMain.ElementHandle);
  document.getElementById('BG-'+IntToStr(btnShare.Tag)).appendChild(btnShare.ElementHandle);
  document.getElementById('BG-'+IntToStr(btnDownload.Tag)).appendChild(btnDownload.ElementHandle);
  document.getElementById('BG-'+IntToStr(btnUpload.Tag)).appendChild(btnUpload.ElementHandle);

  document.getElementById('BG-'+IntToStr(btnScale.Tag)).appendChild(btnScale.ElementHandle);
  document.getElementById('BG-'+IntToStr(btnScalePlus.Tag)).appendChild(btnScalePlus.ElementHandle);
  document.getElementById('BG-'+IntToStr(btnFullScreen.Tag)).appendChild(btnFullScreen.ElementHandle);
  document.getElementById('BG-'+IntToStr(btnScaleMinus.Tag)).appendChild(btnScaleMinus.ElementHandle);

  document.getElementById('BG-'+IntToStr(btnChange.Tag)).appendChild(btnChange.ElementHandle);
  document.getElementById('BG-'+IntToStr(btnTrash.Tag)).appendChild(btnTrash.ElementHandle);
  document.getElementById('BG-'+IntToStr(btnEdit.Tag)).appendChild(btnEdit.ElementHandle);
  document.getElementById('BG-'+IntToStr(btnClone.Tag)).appendChild(btnClone.ElementHandle);

  document.getElementById('BG-'+IntToStr(btnVolume.Tag)).appendChild(btnVolume.ElementHandle);
  document.getElementById('BG-'+IntToStr(btnVolumeUp.Tag)).appendChild(btnVolumeUp.ElementHandle);
  document.getElementById('BG-'+IntToStr(btnVolumeMute.Tag)).appendChild(btnVolumeMute.ElementHandle);
  document.getElementById('BG-'+IntToStr(btnVolumeDown.Tag)).appendChild(btnVolumeDown.ElementHandle);
This essentially moves each of the 16 buttons into a specific background hexagon <div> element. Perhaps
not the most efficient way to go about it (lots of document.getElementById() calls which we'd rather avoid if we
could) but as this only happens when the page is first created or resized, it isn't particularly worrisome or
burdensome. But with that, all 16 buttons are where they need to be.
UI Button Reveals.
To help reduce UI clutter, we'd like to see only the primary buttons initially, and then show the secondary buttons for a particular corner only after clicking on the primary button. And to be perhaps a bit too fancy here, we'd like the secondary buttons to appear in a sequence with a slight delay. When they aren't visible, we don't want them to be interactive either, so we'll do the reverse when this function is called by something other than the primary button itself. This gives us a way to turn off the secondary buttons when we click somewhere else, particularly when clicking on another primary button in another corner.
We also have an extra
bit of work to do to ensure that anyone who is a little too click-happy doesn't mess up the UI. So we only
accept clicks after we're sure everything has been animated into or out of place. It wouldn't be good to have an
active primary button but missing secondary buttons. This is a problem of our own making, however, as without
the delay effect, this wouldn't be necessary. Here's what the "Main" button (top left corner) looks like. The
others are roughly the same.
procedure TForm1.btnMainClick(Sender: TObject);
begin

  if (MillisecondsBetween(Now, LastClick) > 1000) or (Sender = nil) then
  begin
    LastClick := Now;

    if (Sender = btnMain) and (MainMode = False) then
    begin
      MainMode := True;
      btnMain.ElementHandle.classList.add('Selected');
      btnShare.ElementHandle.style.setProperty('visibility','visible');
      btnDownload.ElementHandle.style.setProperty('visibility','visible');
      btnUpload.ElementHandle.style.setProperty('visibility','visible');

      asm
        setTimeout(function() { btnShare.style.setProperty('opacity','0.2'); }, 0 );
        setTimeout(function() { btnDownload.style.setProperty('opacity','0.2'); }, 200 );
        setTimeout(function() { btnUpload.style.setProperty('opacity','0.2'); }, 400 );
      end;

      btnScaleClick(nil);
      btnChangeClick(nil);
      btnVolumeClick(nil);
    end
    else
    begin
      MainMode := False;
      btnMain.ElementHandle.classList.remove('Selected');
      asm
        setTimeout(function() { btnShare.style.setProperty('opacity','0'); }, 0 );
        setTimeout(function() { btnDownload.style.setProperty('opacity','0'); }, 200 );
        setTimeout(function() { btnUpload.style.setProperty('opacity','0'); }, 400 ) ;
        setTimeout(function() {
          btnShare.style.setProperty('visibility','hidden');
          btnDownload.style.setProperty('visibility','hidden');
          btnUpload.style.setProperty('visibility','hidden');
        },1000);
      end;
    end;
  end;

end;
LastClick is a Form variable we use to help track how often the clicks are coming in. We're using setTimeout() to get the delayed effect - showing the three buttons in a sequence. Kind of tedious, to be honest, but that's often the case for a lot of UI work, right? After a few adjustments to the CSS, and after applying the same approach to all four sets of buttons, we end up with our UI working as intended.
UI Button Code.
The code for the secondary buttons in some cases isn't very complicated. Here's what happens when we click on
the button to increase the number of hexagon columns. A similar approach works for reducing the number of
hexagon columns. The other sets of buttons will be covered in subsequent posts as they're not really related to
our background layer here.
procedure TForm1.btnScalePlusClick(Sender: TObject);
begin

  if Zoomlevel < 20 then
  begin
    ZoomLevel := ZoomLevel + 1;
    StopAnimation;
    GeneratePositions;
    DrawBackground;
    StartAnimation;
  end;

end;
Primary and Secondary Button Interactions.
There are other ways to accomplish the same effect that we get from our LastClick mechanism. For example, we
can add or remove the "pe-none" Bootstrap class, which is equivalent to the "pointer-events: none" CSS, making
it impossible to click on the buttons when that is applied. We could also use another common approach - having
an overlay of some kind slide in from the corner, separate from the hexagon grid entirely, when tapping on the
primary buttons. Lots of choices, as usual.
Fullscreen Mode.
The third (middle) button in the top right corner is a "fullscreen" button - intended to move the browser into
a fullscreen mode, naturally. But alas, this is one of the areas where browsers can be a little bit
inconsistent. For example, using F11 to toggle fullscreen mode doesn't trigger any of the fullscreen-specific
events that JavaScript can pick up. But when programmatically adjusting fullscreen mode, everything but F11
seems to work out fine events-wise. Kind of bizarre. To get around this, we'll simply call WebFormResize
whenever we think something has changed. In WebFormCreate, we'll handle this by monitoring events.
  // Detect Fullscreen mode changes via browser controls
  asm
    document.documentElement.addEventListener("fullscreenchange", (event) => {
      pas.Unit1.Form1.WebFormResize(null);
    });
    window.onresize = function (event) {
      pas.Unit1.Form1.WebFormResize(null);
    }
  end;
For the button itself, we can programmatically change the mode (attribution).
procedure TForm1.btnFullScreenClick(Sender: TObject);
begin

  asm
    const container = document.documentElement;

    if (document.fullscreenElement) {
      if (document.exitFullscreen) {
              document.exitFullscreen();
      } else if (document.mozCancelFullScreen) {
          document.mozCancelFullScreen();
      } else if (document.webkitCancelFullScreen) {
          document.webkitCancelFullScreen();
      } else if (document.msExitFullscreen) {
          document.msExitFullscreen();
          }
    } else {
      if (!document.mozFullScreen && !document.webkitFullScreen) {
        if (container.requestFullscreen) {
            container.requestFullscreen();
        }
        else if (container.mozRequestFullScreen) {
            container.mozRequestFullScreen();
        }
        else if (container.webkitRequestFullScreen) {
            container.webkitRequestFullScreen();
        }
        else if (container.msRequestFullscreen) {
            container.msRequestFullscreen();
        }
        }
    }
  end;

  // Trigger WebFormResize to account for new window dimensions
  asm setTimeout(() => { pas.Unit1.Form1.WebFormResize(null); }, 50);  end;

end;
And in the WebFormResize event, we can make a guess as to whether we are in fullscreen mode or not, and adjust the icon shown, and the Form variable, accordingly. Several variations on how to do this can be found (eg: attribution). None worked consistently across Chrome and Firefox except for this simple approach. It likely won't work so well in all scenarios, but it worked for at least some.
  // Do our best to detect fullscreen mode?
  asm
    FullScreenMode = (window.innerHeight === screen.height);
  end;

  if FullScreenMode = False
  then btnFullScreen.Caption := '<i class="fa-solid fa-expand text-white"></i>'
  else btnFullScreen.Caption := '<i class="fa-solid fa-compress text-white"></i>';
Sure, it's a mess, but it seems to get the job done. Shouldn't be this hard! One of the main issues (unresolved) is that if you use F11 to go into Fullscreen mode, you have to use F11 to get out of Fullscreen mode.
Next Time.
That about covers everything related to the background of our HexaGongs project. Quite a lot of effort to get
to the end of this first post, but it is important to have a good foundation to build on, quite literally. Next time out,
we're going to focus on the main part of the interface - interacting with the contents of our "cup" elements
and moving HexaGongs around, while keeping our background foundation in good working order.
HexaGongs website.
HexaGongs repository on GitHub.
HexaGongs XData repository on GitHub.
Related Posts.
HexaGongs Part 1: Background
HexaGongs Part 2: Interface
HexaGongs Part 3: Options (Edits, Memos, Buttons, Colors, Trackbars)
HexaGongs Part 4: Options (Image and Audio)
HexaGongs Part 5: Deployment
Follow Andrew on 𝕏 at @WebCoreAndMore or join our 𝕏 Web Core and More Community.
Andrew Simard

This blog post has received 6 comments.
 2. Wednesday, June 14, 2023 at 9:57:37 PM
Thanks for the feedback, it is always appreciated. The intent, and my sincere hope, when crafting this particular miniseries has been to provide an end-to-end example of how to incorporate many of the JavaScript libraries that have been covered so far into a single project. And to do this in a way that also helps demonstrate how a TMS WEB Core developer has the ability to completely control every aspect of the UI of their projects, with no limitations of any kind.
2. Wednesday, June 14, 2023 at 9:57:37 PM
Thanks for the feedback, it is always appreciated. The intent, and my sincere hope, when crafting this particular miniseries has been to provide an end-to-end example of how to incorporate many of the JavaScript libraries that have been covered so far into a single project. And to do this in a way that also helps demonstrate how a TMS WEB Core developer has the ability to completely control every aspect of the UI of their projects, with no limitations of any kind.And while I agree that many of us (myself included) have made a career out of developing business-style apps (something I mentioned near the very beginning of this post, in fact), often many of the challenges in moving to a web environment are the same kinds of things encountered in this project. Getting data from XData and displaying it in a table. Having a TWebMemo that automatically resizes with its contents. Displaying charts. Multi-select-style lists. Custom sorted lists. These are all things that could just as easily find their way into a payroll app. I have written a few myself!
Having a project that doesn''t shy away from the details, even if it isn''t ultimately a line-of-business app itself, will hopefully still spark ideas or feedback or even some a-ha moments for anyone looking to use any of these concepts or techniques in their own projects, no matter what kinds of projects those may be. Often, we can be moving along in a project just fine until a roadblock appears. In this project, one of them is CORS - and it comes up (and is addressed) in a way that I think is likely how most might encounter it - entirely unexpectedly. This is why it is sometimes helpful to see these projects through to their end - there are always a few little side adventures that take up the majority of the development time. The missing duck head was another example of this.
And the intent isn''t to stop here - there are many other JavaScript libraries and tools to explore. DevExtreme has been on the to-do list since I first started writing posts. I have been a big fan of their VCL grids. And some upcoming miniseries will focus on things like reporting and notifications - items that may very well be of interest to a payroll app developer, assuming they''re not hung up on the data entry aspects that are covered in this post. I''m not familiar with some of the others that you have mentioned, so those have been added to the list as well.
And a final note about Tabulator - this is a JavaScript datagrid/table library that is on par with any other component in this project or any of the other projects that have been covered by me in this blog. It makes a couple of appearances in this project, but you might not even notice if you were not looking for it, when using the app. Many of the libraries that we have covered are behind-the-scenes kinds of things that are broadly applicable to many projects. If I am working on a project where a table needs to be used anywhere, Tabulator is likely to be what I reach for first. Seeing JavaScript libraries put to use in different contexts helps show how flexible they can be, and how versatile TMS WEB Core itself can be.
I hope you enjoy the rest of this miniseries, and I very much look forward to further feedback from everyone as we move into other topics in the near future.
Andrew Simard
3. Thursday, June 15, 2023 at 5:06:01 PM
Andrew I agree with you; indeed thank you for your invaluable help.But precisely because we have to port VCL applications with Dexpress we need a "guide" to get a product that is equal (or similar in the eyes of users) but on the web. TMS Web Core is very powerful in its simplicity and certainly allows a better programming strategy and resource optimization compared to other products used by our competition (for ex. Wisej) by combining simplicity and all the power on the client side (without loading the server too much). But TMS Web Core is still a young product and there is a need all together to focus on what the users'' needs are so that they can use the product and complete projects without getting stuck on elementary problems (for example: fast imputation in a grid with auto append, like in the Dbgrid VCL).
Not surprisingly, I''m testing Tabulator and the JQX components to try to obtain the CRUD directly in the grids and a better management of DBLookups on the rows, in order to obtain the same functioning of the VCL (which is a plus on the web).
Therefore, thank you in advance for the precious help you will give us and which we expect :-)
Monterisi Stefano
4. Thursday, June 15, 2023 at 7:59:10 PM
Be sure to check out the miniseries here on the blog about Tabulator: https://www.tmssoftware.com/site/blog.asp?post=948And Dr. Holger Flick just posted a video about Tabulator today: https://www.youtube.com/watch?v=qOp_KDRXuWs
The Delphi VCL model of having a TDataset, and then TDBGrid, TDBEdit and so on are not really how modern JavaScript grids work. Instead, the most popular approach is to just hand over a JSON object with all of the data, and let the grid deal with everything in terms of display and editing, with it passing back some indication about what has changed, at either the cell, row, or table level. Very different, but also very simple and powerful if the gird component supports everything you need. In the case of Tabulator, this is highly likely.
Andrew Simard
5. Thursday, June 15, 2023 at 8:12:42 PM
And also be sure to check out the Actorious project -> https://www.actorious.comThis is an example of using Tabulator in a TMS WEB Core app where there are various custom table filters, hundreds of images, and very fast performance, all while retrieving data as JSON from XData. Tabulator is an excellent component and there are many other examples in this blog covering its use in TMS WEB Core.
Andrew Simard
6. Friday, June 16, 2023 at 11:58:34 AM
Thanks Andrew! :-)
Monterisi Stefano
All Blog Posts | Next Post | Previous Post
the contribution provided by Andrew is really valuable and shows the potential of integrating WebCore with powerful libraries already available on the net.
But I would like to draw your attention to the fact that most of the applications developed in Delphi concern management and organization, accounting, payroll and other business activities, and not beautiful showcases or games. I think that many, like our small reality, need to understand how to integrate DevExtreme, SyncFusion, Telerik, using JQX components with datasets, and all the other libraries that have components that are used to produce advanced "commercial" products on the web, because currently TMS WebCore doesn''t have them.
I think Andrew''s contribution would be much more "productive" and valuable for us in that case. Anyway thanks for the great help, Andrew
Monterisi Stefano