Blog
All Blog Posts | Next Post | Previous Post

 Extend TMS WEB Core with JS Libraries with Andrew:
HexaGongs Part 2 of 5: Interface
Tuesday, June 13, 2023

In the first post of our HexaGongs miniseries, we were focused on creating the background layer for our TMS WEB Core project - a hexagonal grid arrangement. We also added a background animation to make it a little more interesting visually and sorted out how and where to place our main UI buttons. In this post, we're going to work through creating a key part of the interface - placing and arranging the "HexaGong" elements within that same grid structure. We've covered some of this approach recently, in the Moving Elements blog post. This time out, we'll expand on that work, adding support for a cursor of sorts, as well as addressing issues that crop up when the dimensions of the hexagonal grid change.
Contents.
- InteractJS.
- Change Mode.
- Cursor.
- HexaGongs.
- Drag and Swap.
- Jiggle Mode.
- Dimensionally Challenged.
- Next Time.
InteractJS.
To get started today, we'll need another JavaScript library, the same InteractJS
library that we used previously. This library helps simplify a great deal of the drag-and-drop and resizing
operations that we'll be using in this project. The basic idea is that it allows us to simply add HTML classes
to the elements we want to interact with (or don't want to interact with, just as importantly), while also
giving us the ability to precisely control how these operations work, using JavaScript. To add this to our
project, we can use the Manage JavaScript Libraries feature of the Delphi IDE, or add it directly to our
Project.html file. And as usual, we can use a CDN for this or just include it in our project directly. Let's
go with the usual CDN approach here.
    <!-- InteractJS -->
    <script src="https://cdn.jsdelivr.net/npm/interactjs/dist/interact.min.js"></script>
No CSS is required in this case, as it doesn't do anything in terms of styling.
Change Mode.
In our last post, we created the background as a collection of <div> elements, with each element displaying a single hexagon. These are then used as holders or "cups" into which we can add other elements, ensuring that they are positioned properly by being bounded by the hexagon they are added to. During the normal use of our app, we'll just be tapping on them to play whatever audio is linked to that particular "HexaGong". When we want to make changes to the contents or rearrange them on the hexagonal grid, we'll need to enter a "Change Mode" as it is referred to internally. We'll see a little later how this is the same as "jiggle mode" we've used before but as we don't have anything to jiggle just yet, we'll revisit that a bit later.
The icon in the bottom-right corner is what we'll use to toggle this Change Mode, and it works much like the
set of buttons we covered last time. In this case, the primary button will enable or disable this mode, and the
secondary buttons include "edit", "clone", and "delete" functions. For today, we'll only be concerned with
creating new HexaGongs, and just the stubs at that. What is of more immediate concern is where are they
going to be created. We'll need some kind of way to indicate which HexaGong we want to clone or delete, or
where we want to drop a new HexaGong. Basically, we need a cursor.
Cursor.
To implement a cursor, we're going to use another TWebButton component and move it around just like we did with the other UI buttons. It will even start out in the divButtons TWebHTMLDiv component, and return there when not needed, or temporarily when the window is resized, so it doesn't get deleted when the hexagons are regenerated.
Within our "cup" hexagon, we'll need to be mindful of what is placed inside, and in what order, so that we
don't obscure the contents. But we also have to be mindful of what the order is when it comes time to drag
elements around - the topmost element will be selected by default. In the case of the cursor, we'll try and
ensure that it stays in the middle (z-index: 5 in this case). To ensure we can still see what is beneath the
cursor, we'll use a translucent background. It would also be ideal if anything above the cursor was also
translucent, otherwise, the cursor will be obscured. Here's what our CSS for the cursor button looks like.
.CursorButton {
  display: flex;
  clip-path: polygon(25% 5%, 75% 5%, 100% 50%, 75% 95%, 25% 95%, 0% 50%);
  background: radial-gradient(#000000, #FFFF00); /* yellow but mostly transparent */
  border: none;
  opacity: 0.4;
  transition: opacity 1000ms;
}
.CursorButton:hover {
  opacity: 0.8;
}
Note that we're using the same clip-path to draw the cursor as a hexagon shape. Much of the time, the cursor will be within a hexagon, so this might seem redundant - the hexagon parent will clip the cursor button just fine all on its own. But as we'll see shortly, sometimes the cursor button will not be nestled inside its parent like this, so we need to configure it the same as if it wasn't contained within a parent hexagon.
There are several ways the cursor can be moved. The most obvious way is by clicking on one of the hexagons
in the background. But we didn't add a "click" event handler to those <div> elements. Because we don't
need to. JavaScript automatically uses a "bubble" or "propagation" mechanism. Clicking on an element will
trigger a "click" event on that element, but also on all of its parent elements, all the way up the DOM tree. The event object that is generated also indicates what was originally clicked on. So we can instead just
add an event handler to the divBackground element and then look and see whether it was a hexagon, and if so,
which one. And then move the cursor there.
  // Deal with button clicks that aren't on buttons directly
  asm
    divBackground.addEventListener('click', (event) => {
      // Cursor handling
      if (event.target.classList.contains('Valid')
            && (This.ChangeMode == true)
            && !event.target.classList.contains('Button')
            && !event.target.classList.contains('MainButton') ) {
        // Remove jiggle if hexagon is otherwise empty
        if (This.PositionsG[btnCursor.parentElement.getAttribute('position')] == -1) {
          btnCursor.parentElement.style.removeProperty('animation-name');
        }
        // Move cursor to new position
        event.target.appendChild(btnCursor);
        btnCursor.setAttribute('position',event.target.getAttribute('position'));
        btnCursor.style.setProperty('z-index','5');
        // Set to jiggling (might be jiggling already)
        btnCursor.parentElement.style.setProperty('animation-name','jiggle');
      }
      // If not cursor and not primary button and not secondary button, then hide buttons
      else if (! (
         event.target.classList.contains('Button') ||
         event.target.classList.contains('MainButton')
        )) {
        This.btnMainClick(null);
        This.btnScaleClick(null);
        This.btnChangeClick(null);
        This.btnVolumeClick(null);
      }
    });
  end;
We'll have to update this later when we have actual HexaGongs to click on while not in Change Mode.4 And there are extra calls to deal with jiggle mode, but we'll get to those shortly. All this is really doing is checking for a "Valid" hexagon click, and then using appendChild() to move our btnCursor TWebButton component directly into that element (the event.target element). If we click on anything else, like the background hexagons around the edges for example, then we disable Change Mode (or really, any mode we were in) and things are reset to the normal non-Change Mode interface.
If we click on any of the primary or secondary buttons, then we'll ignore
it here and expect that those button events will be handled separately. We also have to be careful that we're
not clicking on something else within the hexagon (like the cursor itself) that would return a different
event.target element than we're expecting. This is largely done by ignoring anything without the "Valid" class.
And one more thing - we're keeping track of the cursor "position" by adding an HTML attribute - "position" of course - to indicate where in the Positions array the cursor is located, where this is set to -1 if the cursor isn't visible. We can then use this value later when we want to know where to drop a new HexaGong or to check and see if one is available for cloning or deletion.
There are other ways to move the cursor, such as moving a HexaGong that is currently highlighted by the cursor,
or by dragging the cursor itself around. This functionality will be incorporated directly into the code we'll
need for dragging the HexaGongs themselves. So let's get started on that.
HexaGongs.
To manage the HexaGong elements, we'll need another set of dynamic arrays - Gongs, GongsP, and PositionsG to start with. Clicking the "edit" button (pencil) while a hexagon is highlighted with our btnCursor will add a new HexaGong in that Position to our set of arrays, or edit an existing one if that Position is already occupied. There are of course many options we'll need to manage - that's the entire focus of the next post in this miniseries. For today, we'll just be creating stubs of a sort. We can create them dynamically, much like we're doing with the animation situation, as TWebHTMLDiv components.
Initially, we'll just add a background color and
a number. Structurally, the background <div> elements, our "cups", will contain these new TWebHTMLDiv components. But as with the primary and secondary buttons and the cursor, we'll have to move them out and back
in whenever the window size changes, to prevent them from being deleted from the page. Here, we're setting the
z-index value to 10 to ensure that they are the top-most element, specifically above the cursor. As these are
also translucent, we still get the highlighting effect of the cursor, but the contents are not as obscured as
would be the case if the cursor was on top. Also, when we go to drag this element, it is on top instead of the
cursor, which is more important when it comes to this choice for z-ordering.
public
    Gongs: Array of TWebHTMLDiv;    // HexaGong UI elements
    GongsP: Array of Integer;       // Position of HexaGong
    PositionsG: Array of Integer;   // Gong # at a Position

procedure TForm1.btnEditClick(Sender: TObject);
var
  CursorPosition: Integer;
begin
  CursorPosition := StrToInt(btnCursor.ElementHandle.getAttribute('position'));

  // Position of the cursor
  if CursorPosition <> -1 then
  begin

    // New Gong
    if PositionsG[CursorPosition] = -1 then
    begin
      GongID := Length(Gongs);
      SetLength(Gongs, GongID + 1);
      SetLength(GongsP, GongID + 1);
      PositionsG[CursorPosition] := GongID;
      GongsP[GongID] := CursorPosition;

      Gongs[GongID] := TWebHTMLDiv.Create('Gong-'+IntToStr(GongID));
      Gongs[GongID].Parent := divButtons;

      Gongs[GongID].ElementHandle.setAttribute('gongid',IntToStr(GongID));
      Gongs[GongID].ElementHandle.setAttribute('position',IntToStr(CursorPosition));
      Gongs[GongID].ElementHandle.setAttribute('row',IntToStr(PositionsR[CursorPosition]));
      Gongs[GongID].ElementHandle.setAttribute('column',IntToStr(PositionsC[CursorPosition]));

      Gongs[GongID].ElementHandle.classList.Add('Gong','d-flex','justify-content-center','align-items-center','dragswap');

      Gongs[GongID].ElementHandle.style.setProperty('top','0px');
      Gongs[GongID].ElementHandle.style.setProperty('left','0px');
      Gongs[GongID].ElementHandle.style.setProperty('width',FloatToStrF(HexRadius * 2,ffGeneral,5,3)+'px');
      Gongs[GongID].ElementHandle.style.setProperty('height',FloatToStrF(HexRadius * 2,ffGeneral,5,3)+'px');
      Gongs[GongID].ElementHandle.style.setProperty('z-index','10');
      Gongs[GongID].ElementHandle.style.setProperty('background','radial-gradient(#00000080,#FFFFFF80)');
      Gongs[GongID].ElementHandle.style.setProperty('font-size',IntToStr(Trunc(HexRadius))+'px');

      Gongs[GongID].HTML.Text := '<div class="GongContent" style="color:white;">'+IntToStr(GongID+1)+'</div>';

      document.getElementById('BG-'+IntToStr(CursorPosition)).appendChild(Gongs[GongID].ElementHandle);
      (document.getElementById('BG-'+IntToStr(CursorPosition)) as TJSHTMLElement).style.setProperty('animation-name','jiggle');
    end;
  end;
end;
With this in place, we can, while in Change Mode, click on any "valid" background hexagon (IE, not one of the
hexagons containing a primary button) and then click the pencil to add a new HexaGong to the mix. If it isn't
already populated. Ultimately, this will bring up an Options interface which we'll touch upon a little
later in this post and then explore more fully in the next post. For now, we've got our HexaGong placeholders. Let's look at moving them around.
Drag and Swap.
In our Moving Elements post, we looked at a variety of different options when dragging and dropping elements on the page, particularly when there are fixed positions and those positions are already populated. The existing element could be left as-is and the new element added on top. Or the existing element could be removed entirely. Or it could be moved out of the way. Or it could swap positions with the incoming element. This is the option we're going to use here, coined "drag and swap".
Dragging a HexaGong to an empty spot will simply move it there. Dragging it to an occupied spot will send the existing HexaGong to wherever the dragged HexaGong came from. And we'd like this to be animated a little - both moving the new HexaGong into place, as well as moving the existing HexaGong into the original place.
We covered much of this in the Moving Elements post, but here we have a few more wrinkles. First, there are only certain positions we can drag a HexaGong to - the PositionT (targets) array will help us with this. Second, we've got a pesky cursor that we could be moving, or if we're not moving the cursor, we'd like the cursor to end up with whatever we've moved.
But the biggest problem we have is that the elements we're moving
are children of divBackground. So whenever we move one of them (the current HexaGong, a
HexaGong potentially occupying a destination, and the btnCursor element), they first have to be removed from the
starting "cup" and placed at a level higher, moved, and then dropped into the destination "cup". This could
potentially happen three times for one drag-and-drop operation. And this is in addition to the work we were
already doing in finding the target position based on where we dropped the Hexagon, to begin with.
Fortunately, InteractJS has all the mechanisms we need to make this work. This is implemented in JavaScript. As in the Moving Elements post, this code sets up the "dragswap" class, so any element that has this class can be dragged and swapped with this mechanism. This is applied to all of the HexaGong elements and the cursor, all configured as children of the background hexagon <div> elements. There are three top-level code blocks to note.
- on click event: This deals with moving the cursor to the HexaGong when it is clicked. This is
similar to what happens when an empty background element is clicked on, but when clicking on an actual
HexaGong, that event will (deliberately) not catch this event, so we handle it separately here.
- on start drag: Extract the HexaGong (or the cursor) from the "cup" that it is in and position it
above the same location in preparation for dragging it around.
- on end drag: Find out where the nearest target Position is. Then figure out what has to move. Either just the cursor, just one HexaGong (and the cursor), or two HexaGongs (and the cursor). Then set them in motion, potentially having to move a HexaGong in the target Position out of its cup, over to the original position, and back into that cup instead.
Not for the squeamish, but here's what we've got.
  // Configure InteractJS for Drag & Swap functionality
  asm
    var This = pas.Unit1.Form1;
    interact('.dragswap')

      .on('click', event => {
          event.stopImmediatePropagation();
          if (This.PositionsG[btnCursor.parentElement.getAttribute('position')] == -1) {
            btnCursor.parentElement.style.removeProperty('animation-name');
          }
          event.target.parentElement.appendChild(btnCursor);
          btnCursor.setAttribute('position',event.target.parentElement.getAttribute('position'));
          btnCursor.parentElement.style.setProperty('animation-name','jiggle');
        }, { capture: true })

      .draggable({
        inertia: true,
        modifiers: [],

        onstart: function(event) {
          // When dragging begins, remove element from its hexagon and add it to the background at the same spot
          if (event.target.classList.contains('CursorButton')) {
            btnCursor.parentElement.style.removeProperty('animation-name');
          } else {
            event.target.parentElement.style.removeProperty('animation-name');
          }
          divBackground.appendChild(event.target);
          event.target.setAttribute('data-x',This.PositionsX[event.target.getAttribute('position')]);
          event.target.setAttribute('data-y',This.PositionsY[event.target.getAttribute('position')]);
          event.target.style.setProperty('top','0px');
          event.target.style.setProperty('left','0px');

          // Ensure that it is above everything else, and stop whatever jiggling might be going on
          event.target.style.setProperty('z-index',10);
          event.target.parentElement.style.removeProperty('animation-name');
        },

        onend: async function(event) {
          // When dragging ends, apply the InteractJS movement data to the element
          var PosX = parseFloat((parseFloat(event.target.style.left.replace('px','')) + parseFloat(event.target.getAttribute('data-x'))));
          var PosY = parseFloat((parseFloat(event.target.style.top.replace('px','')) + parseFloat(event.target.getAttribute('data-y'))));
          event.target.style.setProperty('top', PosY + 'px');
          event.target.style.setProperty('left', PosX + 'px');
          event.target.style.removeProperty('transform');
          event.target.removeAttribute('data-x');
          event.target.removeAttribute('data-y');

          btnCursor.style.setProperty('top', '-1000px');
          btnCursor.style.setProperty('left', '-1000px');


          // Find nearest Position
          var minDistance = 999999;
          var NewX = 0
          var NewY = 0;
          var dist = 0;
          var position = -1;
          for (var i = 0; i < This.PositionsX.length; i++) {
            dist = Math.sqrt(Math.pow(This.PositionsX[i] - PosX,2) + Math.pow(This.PositionsY[i] - PosY,2));
            if ((dist < minDistance) && (This.PositionsT[i] == true)) {
              minDistance = dist;
              NewX = This.PositionsX[i];
              NewY = This.PositionsY[i];
              position = i;
            }
          }

          // If we're just draging the cursor around....
          if (event.target.classList.contains('CursorButton')) {
            document.getElementById('BG-'+position).appendChild(btnCursor);
            btnCursor.setAttribute('position',position);
            btnCursor.style.setProperty('top','0px');
            btnCursor.style.setProperty('left','0px');
            btnCursor.style.setProperty('z-index','5');
            btnCursor.parentElement.style.setProperty('animation-name','jiggle');
          }

          else {

            // Figure out where it started from
            var gongid = event.target.getAttribute('gongid');
            var oldposition = This.GongsP[gongid];

            // When dropping on populated Position, prepare to swap
            if ((This.PositionsG[position] !== gongid) && (This.PositionsG[position] !== -1)) {

              // Get the element that we're swapping
              var swapid = This.PositionsG[position];
              var swapel = document.getElementById('Gong-'+swapid);

              // And this is where it is ultimately headed
              var OldX = This.PositionsX[oldposition];
              var OldY = This.PositionsY[oldposition];

              // Move it from its hexagon container into the same background as the element we're working wtih
              divBackground.appendChild(swapel);
              swapel.style.setProperty('top', NewY + 'px');
              swapel.style.setProperty('left', NewX + 'px');
              swapel.style.setProperty('transition','top 0.2s linear, left 0.2s linear');
              swapel.style.setProperty('z-index',9);
              swapel.parentElement.style.removeProperty('animation-name');

              // Update data about this element we're swapping
              swapel.setAttribute('position',oldposition);
              swapel.setAttribute('row',This.PositionsR[oldposition]);
              swapel.setAttribute('column',This.PositionsC[oldposition]);
              This.GongsP[swapid] = oldposition;
              This.PositionsG[oldposition] = swapid;
            }

            // When dropping on empty positionm, just update the old position information
            else if (This.PositionsG[position] == -1) {
              This.PositionsG[oldposition] = -1
            }

            if (This.PositionsG[btnCursor.getAttribute('position')] == -1) {
              document.getElementById('BG-'+btnCursor.getAttribute('position')).style.removeProperty('animation-name');
            }

            // Update Position Information
            This.PositionsG[position] = gongid;
            This.GongsP[gongid] = position;
            event.target.setAttribute('position',position);
            event.target.setAttribute('row',This.PositionsR[position]);
            event.target.setAttribute('column',This.PositionsC[position]);

            // This gives the page a chance to update everything we just changed
            await sleep(0);

            // Move our element to its new position
            event.target.style.setProperty('transition','top 0.2s linear, left 0.2s linear');
            event.target.style.setProperty('top', NewY + 'px');
            event.target.style.setProperty('left', NewX + 'px');

            // After it has been moved, drop it back into its hexagon holder
            // Also, move the cursor to this position as well
            setTimeout(function(){
              event.target.style.removeProperty('transition');
              event.target.style.setProperty('top','0px');
              event.target.style.setProperty('left','0px');
              document.getElementById('BG-'+position).appendChild(event.target);
              event.target.parentElement.style.setProperty('animation-name','jiggle');

              btnCursor.setAttribute('position',position);
              btnCursor.style.setProperty('top', '0px');
              btnCursor.style.setProperty('left','0px');
              document.getElementById('BG-'+position).appendChild(btnCursor);

            },200);

            // If we were swapping elements, move the swapped element to the prior location
            // and then drop it into its hexagon holder too
            if (swapel !== undefined) {
              swapel.style.top = OldY + 'px';
              swapel.style.left = OldX + 'px';
              setTimeout(function(){
                swapel.style.removeProperty('transition');
                swapel.style.setProperty('top','0px');
                swapel.style.setProperty('left','0px');
                document.getElementById('BG-'+oldposition).appendChild(swapel);
                swapel.parentElement.style.setProperty('animation-name','jiggle');
              },400);
            }
          }
        },
        listeners: {
          move: dragMoveListener
        }
      });

    function dragMoveListener (event) {
      var target = event.target
      var x = (parseFloat(target.getAttribute('data-x')) || 0) + event.dx
      var y = (parseFloat(target.getAttribute('data-y')) || 0) + event.dy
      target.style.transform = 'translate(' + x + 'px, ' + y + 'px)'
      target.setAttribute('data-x', x)
      target.setAttribute('data-y', y)
    };
    window.dragMoveListener = dragMoveListener
There's a hack-ish little await() thrown in to help ensure that the browser gets updated with some of the intermediate steps. And plenty of extra jiggling handled by the addition or removal of the "animation-name" property whenever we want to start/stop the jiggling. The idea is that everything we can interact with will jiggle, but not while we're directly interacting with it (dragging it or moving it).
Jiggle Mode.
While we're on the topic of jiggling, we can update our Change Mode function to start all of the existing
HexaGongs jiggling by using the following. We also assign the "dragswap" class at the same time, as we don't
want to be able to drag anything around unless we are in Change Mode. When Change Mode stops, the reverse removes the "dragswap" class and any "animation-name" properties so that there's no residual jiggling
going on. This is in addition to dealing with the presentation of the primary and secondary buttons, which we
addressed in the last post.
procedure TForm1.btnChangeClick(Sender: TObject);
var
  i: Integer;
begin

  if (MillisecondsBetween(Now, LastClick) > 1000) or (Sender = nil) then
  begin
    LastClick := Now;

    if (Sender = btnChange) and (ChangeMode = False) then
    begin
      ChangeMode := True;

      i := 0;
      while i < Length(Gongs) do
      begin
        Gongs[i].ElementHandle.classList.add('dragswap');
        (Gongs[i].ElementHandle.parentElement as TJSHTMLElement).style.setProperty('animation-name','jiggle');
        i := i + 1;
      end;

      btnChange.ElementHandle.classList.add('Selected');
      btnTrash.ElementHandle.style.setProperty('visibility','visible');
      btnEdit.ElementHandle.style.setProperty('visibility','visible');
      btnClone.ElementHandle.style.setProperty('visibility','visible');

      asm
        setTimeout(function() { btnTrash.style.setProperty('opacity','0.2'); }, 400 );
        setTimeout(function() { btnEdit.style.setProperty('opacity','0.2'); }, 200 );
        setTimeout(function() { btnClone.style.setProperty('opacity','0.2'); }, 0 );
      end;

      btnSCaleClick(nil);
      btnVolumeClick(nil);
      btnMainClick(nil);
    end
    else
    begin
      ChangeMode := False;

      i := 0;
      while i < Length(Gongs) do
      begin
        Gongs[i].ElementHandle.classList.remove('dragswap');
        i := i + 1;
      end;

      divButtons.ElementHandle.appendChild(btnCursor.ElementHandle);
      btnCursor.ElementHandle.setAttribute('position','-1');
      btnChange.ElementHandle.classList.remove('Selected');
      asm
        // Just in case some stragglers are left behind?!
        var hex = document.querySelectorAll('.Hexagon');
        hex.forEach((h)=> h.style.removeProperty('animation-name'));

        setTimeout(function() { btnTrash.style.setProperty('opacity','0'); }, 400 );
        setTimeout(function() { btnEdit.style.setProperty('opacity','0'); }, 200 );
        setTimeout(function() { btnClone.style.setProperty('opacity','0'); }, 0 );
        setTimeout(function() {
          btnTrash.style.setProperty('visibility','hidden');
          btnEdit.style.setProperty('visibility','hidden');
          btnClone.style.setProperty('visibility','hidden');
        },1000);
      end;
    end;
  end;

end;
With that in place, we end up with the following. Here, we're adding three HexaGongs, using the cursor to select the Position, and then dragging them (and by extension, the cursor) around to different Positions. And when dragging to an occupied Position, the two HexaGongs are swapped. All with a bit of animation to smooth things over.
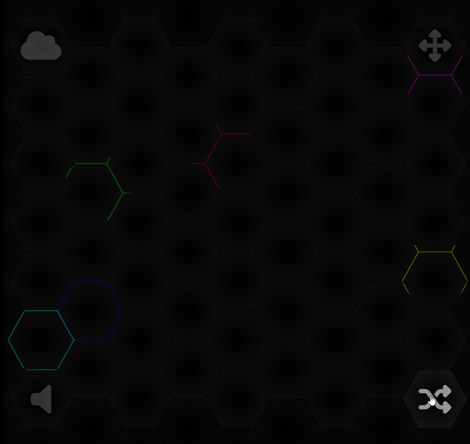
HexaGong Movement.
That takes care of everything we're after here - the ability to move things around, so we can arrange our
HexaGongs in a particular way.
Dimensionally Challenged.
But there's a bit of a wrinkle here. If we have a certain arrangement of HexaGongs on a particular hexagonal grid, what happens when we change the dimensions of the grid? Nothing good! As the Positions for the HexaGongs are just an integer, the default behavior would simply re-flow the HexaGongs within a different set of dimensions, messing up whatever pattern was in place previously.
To address this, we'll need to update our grid
resizing to include an algorithm to adjust the Positions of the HexaGongs. Here's what it looks like when
adding an extra pair of columns. Something similar is done when they are removed. We're basically copying the
row and column Positions from one set of dimensions to another.
procedure TForm1.btnScalePlusClick(Sender: TObject);
var
  i: Integer;
  j: integer;
  r: integer;
  c: integer;

begin

  if Zoomlevel < 20 then
  begin
    ZoomLevel := ZoomLevel + 1;
    StopAnimation;
    GeneratePositions;

    // Update Gong Positions within new hexagon arrangement

    for i := 0 to Length(PositionsG) -1  do
      PositionsG[i] := -1;

    i := 0;
    while i < Length(Gongs) do
    begin
      r := StrToInt(Gongs[i].ElementHandle.getAttribute('row'));
      c := StrToInt(Gongs[i].ElementHandle.getAttribute('column'));
      j := 0;
      while ((PositionsR[j] <> r) or (PositionsC[j] <> c)) and (j < Length(PositionsR)) do
        j := j + 1;
      if j < Length(PositionsR) then
      begin
        GongsP[i] := j;
        PositionsG[GongsP[i]] := i;
        Gongs[i].ElementHandle.setAttribute('position', IntToStr(j));
        Gongs[i].ElementHandle.setAttribute('row', IntToStr(PositionsR[j]));
        Gongs[i].ElementHandle.setAttribute('column', IntToStr(PositionsC[j]));
      end;
      i := i + 1;
    end;

    DrawBackground;
    StartAnimation;
  end;

end;
With this in place, we can easily add extra columns to our grid without any adverse effects. If we want to reduce the columns, that's fine too, just that if any HexaGongs are on the right edge, they may end up getting wrapped. Not much can be done about that. Likewise, if there are fewer rows available, the HexaGongs simply won't be displayed. They will still be there, so increasing the rows again will restore them.
Note also that whenever the window is resized, the hexagonal grid is regenerated. This means that we have to
take all the HexaGongs out of the "cup" hexagons that are in the background, and then add them back in
afterward. The removal is taken care of with the ConfigureButtons method we covered previously. Adding them
back in involves the following. Note the last call to appendChild again.
  if StrToInt(btnCursor.ElementHandle.getAttribute('position')) <> -1
  then document.getElementById('BG-'+btnCursor.ElementHandle.getAttribute('position')).appendChild(btnCursor.ElementHandle);

  I := 0;
  while I < Length(Gongs) do
  begin
    Gongs[I].ElementHandle.style.setProperty('font-size',IntToStr(Trunc(HexRadius))+'px');
    Gongs[I].ElementHandle.style.setProperty('width',FloatToStrF(HexRadius * 2,ffGeneral,5,3)+'px');
    Gongs[I].ElementHandle.style.setProperty('height',FloatToStrF(HexRadius * 2,ffGeneral,5,3)+'px');
    document.GetElementById('BG-'+IntToStr(GongsP[I])).appendChild(Gongs[I].ElementHandle);
    I := I + 1;
  end;
This means that we can then resize, reorient, or otherwise mess around with the dimensions and it won't interfere with our HexaGongs unless we run out of space for them. All good!
Next Time.
Now that we've got our basic interface sorted out - moving HexaGongs around the page - our next post will focus
on what goes into the HexaGongs themselves. The Options dialog. And plenty of JavaScript, HTML, and CSS to
work hexagons into every nook and cranny of our interface.
HexaGongs website.
HexaGongs repository on GitHub.
HexaGongs XData repository on GitHub.
Related Posts.
HexaGongs Part 1: Background
HexaGongs Part 2: Interface
HexaGongs Part 3: Options (Edits, Memos, Buttons, Colors, Trackbars)
HexaGongs Part 4: Options (Image and Audio)
HexaGongs Part 5: Deployment
Follow Andrew on 𝕏 at @WebCoreAndMore or join our 𝕏 Web Core and More Community.
Andrew Simard

This blog post has not received any comments yet.
All Blog Posts | Next Post | Previous Post