Blog
All Blog Posts | Next Post | Previous Post

 TMS WEB Core and More with Andrew:
TMS XData: An Extended Example Part 2 of 3
Thursday, November 3, 2022

If you'd like to access the survey directly, rather than using the <iframe> embedded in this post, please use this link. If you encounter anything noteworthy or otherwise problematic at any point during the survey, please submit feedback using the icon in the top-right corner. Note that the survey should work equally well on a mobile device.
Part 1 of 3
- Introduction
- Bargain: Three Apps For The Price of One!
- Survey Client Initial Layout
- Survey Server Initial Setup
- Swagger
- First Contact - Getting Data from XData
- Survey Admin Client Initial Setup
- Serviceability - Getting Logged In
- More Service Endpoints
- Survey Admin Client: Login
- Survey Admin Client: Managing Surveys
- Connecting SQL to Tabulator
- Global Save and Cancel
- Editing HTML
- QR Codes
- Custom Dropdown
- Survey Client Questions
- Saving Responses
- Storing Data - JSON versus Structure
- Displaying Responses
- To-Do List
- Roadblocks Overcome
- All Done!
Survey Admin Client Initial Setup.
The architecture of the Survey Admin Client needs to accommodate four basic lists to start with, which will evolve as we get our footing in designing the interface.
- A list of surveys. A survey consists of a number of configuration items, along with a list of questions
that can be arranged in a "graph" of some kind.
- A list of questions. Think of this as a "question bank" to help reduce the tedious nature of recreating the same responses to questions all the time.
- A list of responses. Once someone fills out a survey, we'll need to see the results.
- A list of users. Who can manage a survey? Who can view the results? Who can manage the users?
As far as the "graph" is concerned, this refers to the idea that, based on the responses to individual questions, the progression through the list of questions isn't necessarily strictly linear. Maybe there are optional sections of a survey, or maybe different paths through a survey are presented, depending on previous responses. Ideally, we'll be able to manage this just through lists without needing to display an actual graph of any kind. More complexity here likely means more testing on behalf of those creating the surveys, however.
We don't really want to spend a great deal of time covering all the intricacies of access control in this post, but we'll implement it all the same. We'll obviously need a way to authenticate users and control what they access. These topics are solid candidates for further refinement, customization, and so on based on your own particular interests/needs/preferences, so we'll not get too hung up on it at the moment. Instead, we'll try to compartmentalize it all as best we can to make these kinds of things easy to augment or replace if needed.
As with the first two applications (the Survey Client and the Survey Server), here we're interested in building
a basic app to begin with. We'll get back to the gritty details of XData authentication and the rest of it in
just a moment. For the UI, we're going to follow along in the same manner as we did with the recent Labels and
Barcodes post, which you can check out here.
The essence of this is that we'll use Tabulator tables whenever we need a list for something, TWebPageControl components when we want to have pages, and something other than the TWebPageControl's tabs when
we want a UI for switching pages. Throw in a whole bunch of Bootstrap classes, Font Awesome icons, and a smattering
of obscure color choices, mix, and serve. Here's where we're starting from.
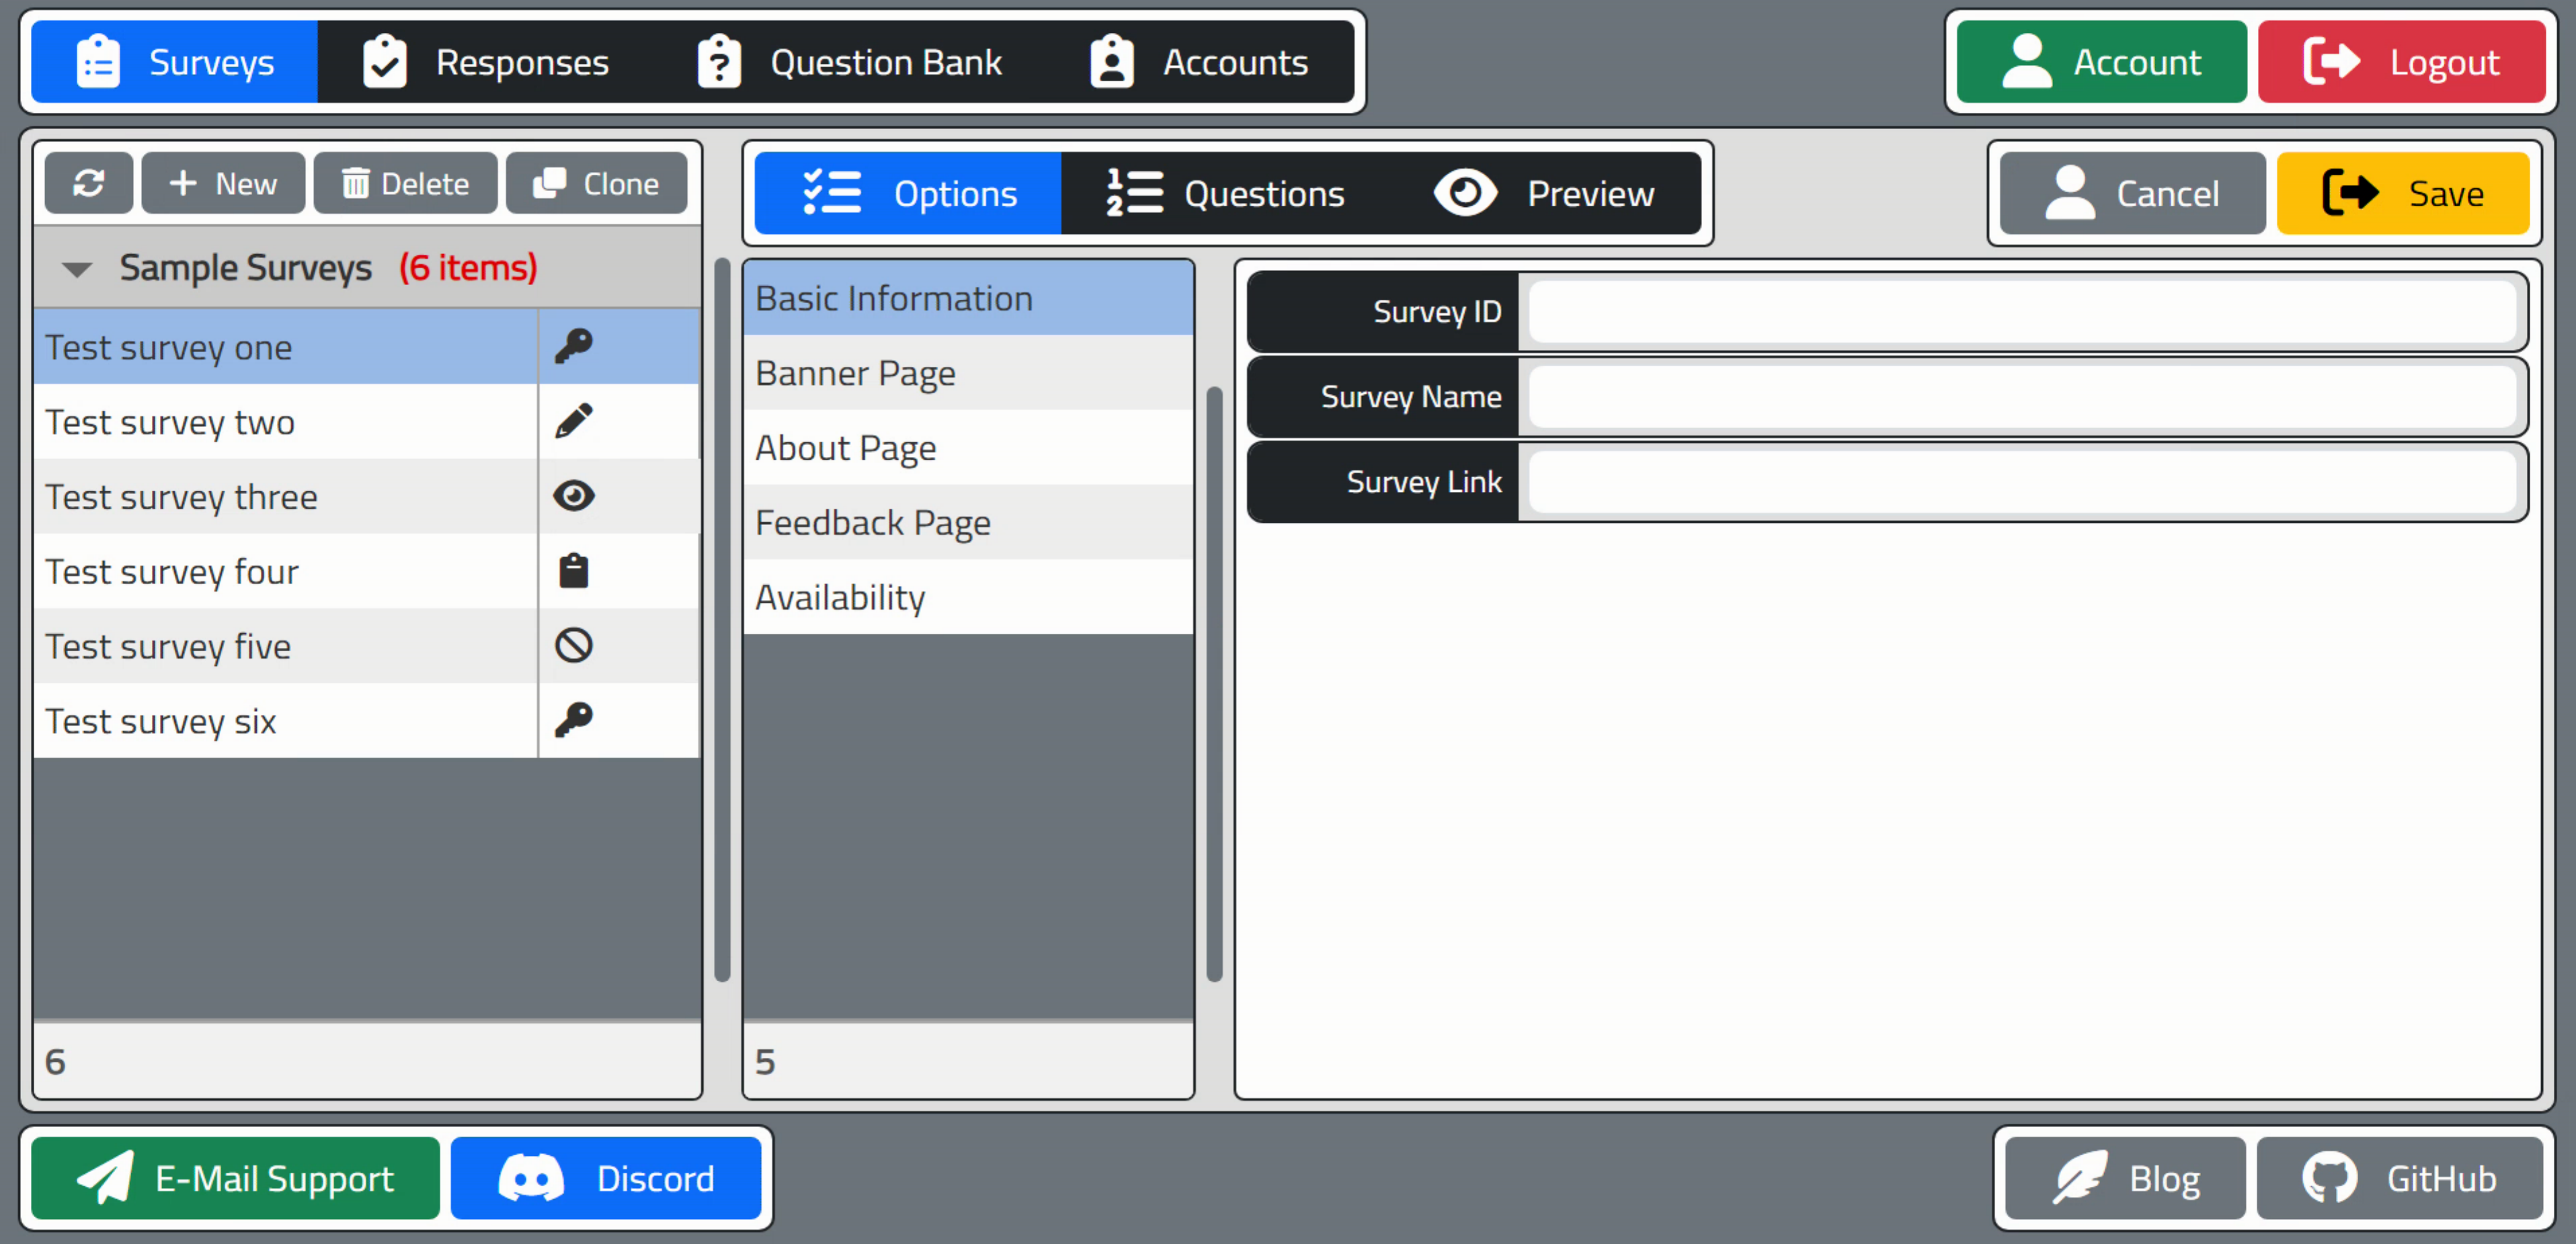
Beginnings of the Survey Admin Client UI.
Lots going on here in terms of UI, but actually not much different than what we've covered previously. The row
of buttons at the top left control a TWebPageControl component, with the first tab showing a list of surveys on the left,
and the details of the selected survey on the right. The details include things like options, questions, and a
preview tool. Those are set up within another TWebPageControl component with another set of buttons.
The Options page is selected in the screenshot above, which contains a list of options on the left, and, yes, a third TWebPageControl component showing the UI for that particular Option. The Options list is built with Tabulator, and selecting a different option will change the page of this third TWebPageControl component, with the "Basic Information" page shown above, where we can see the UI elements for changing the survey name, among other things. Think of it as a TWebPageControl with tabs on the left, but instead of tabs, we've got a Tabulator list.
Wiring up the code
to manipulate the TWebPageControl components isn't very difficult, and there are lots of ways to do it. As we've got a
few of them now, maybe it is worth having some functions to handle this. For example, we can define an array of
buttons as a form variable, and populate it with the buttons related to a certain control. Then wire all
those buttons up such that their individual Tag property corresponds to the TabIndex of the TWebPageControl, and
set the Click events all call the same function. Here's an example of the main menu at the top. The Options list
does something similar but uses Tabulator data instead of a group of buttons to select the page.
procedure TForm1.btnSurveyMenuClick(Sender: TObject);
var
  i: Integer;
begin
  // Menu at the top of the survey page
  if (Sender is TWebButton) then
  begin

    for i := 0 to Length(SurveyMenuButtons) - 1 do
    begin
      if (Sender as TWebButton) = SurveyMenuButtons[i]
      then SurveyMenuButtons[i].ElementHandle.classList.replace('btn-dark','btn-primary')
      else SurveyMenuButtons[i].ElementHandle.classList.replace('btn-primary','btn-dark');
    end;

    pagecontrolSurveys.TabIndex := (Sender as TWebButton).Tag;

  end;
end;
The main idea I'd like to convey with the overall approach here is that you can use TMS WEB Core to design a web application in pretty much the same way that you might design a VCL application, complete with PageControls, Buttons, Edits, Labels, and the rest of the usual suspects. In fact, there really isn't anything that limits what you can do, particularly when compared to a traditional VCL app. Many familiar VCL components have a TWeb equivalent and work very well when it comes to quickly building a comprehensive and extensible user interface.
And for those who are very particular about how things look or function in terms of UI/UX, when using the default components in TMS WEB Core, along with some CSS, it is entirely possible to control literally every pixel on the page. From rounded corners to colors, to spacing, to icon and font sizes and placement, everything can be adjusted. This aspect alone could help support the argument that the UI for a web app is more easily built, and more quickly built, and far more customizable, than an equivalent UI for a VCL app. So if you have plenty of VCL UI experience but comparatively little Web UI experience, this should be a very smooth and empowering transition. Or it can be once you figure out how CSS (and optionally, Bootstrap) works.
Building an app by throwing a bunch of components on a page might seem haphazard, and indeed this approach has certain trade-offs. Particularly if you have a team where one group is responsible for the UI and another is responsible for the backend, or something along those lines. In our project today, however, this is a quick way to discover or otherwise determine what we'll be needing from XData, and maybe even a bit informative as to how we might want to organize our XData service endpoint calls.
For example, we might want a service endpoint to
retrieve a list of surveys containing enough information to populate the left-most table above, separate from
everything else. And we'll need a login function. Doing this kind of design work ahead of time may help reduce
the instances of flipping back and forth between changes in the Survey Server app and changes in the Survey
Admin Client app. This isn't critically important for a single developer but can be hugely impactful in a
larger team. With that in mind, let's get back to the Survey Server and XData and add a few more building
blocks.
SurveyAdminService - Getting Logged In.
Previously, we had setup the SurveyClientService, focused on providing an interface for the Survey Client to communicate with the Survey Server. Here, we're going to do the same for the Survey Admin Client, providing a list of service endpoints (functions) that the Survey Admin Client will use when going about its business, kept separate from those service endpoints used by the Survey Client.
Let's be boring and call it the SurveyAdminService. The main feature separating the two groups of service endpoints is that nearly all of the SurveyAdminService endpoints will require authentication of some kind, whereas none of the SurveyClientService endpoints will require any authentication. But in order to provide an authentication mechanism, we'll need something to authenticate against.
Note also that for certain projects, you might
split these functions out into separate XData applications entirely, with perhaps the SurveyAdminService running
somewhere on a private network, not accessible to interlopers at all. Lots of options here, but as we're
ultimately interested in outsiders (aka potential clients) designing their own surveys, we'll keep everything
here under the same umbrella.
Typically, users are authenticated by comparing a set of login credentials against a set of known credentials stored in a protected database somewhere. And XData is readily capable of connecting to any database in the same way that any other VCL application can (it is a 100% VCL app, after all), which means that virtually any database can be used for this kind of thing.
To try and make this as broadly usable as possible, we're going to use a
SQLite database, with the idea that it is simple and doesn't require much of anything to get started. In fact,
we'll set it up so that when the Survey Server starts, it will try and connect to its database, and if it
doesn't exist, it will just create one on the fly. Not normally how these things are done, but workable all the
same.
Note that this project was developed using Delphi 10.3. When Delphi 10.4 was released, it contained many updates that changed how SQLite databases are handled. Nothing that should impact what we're up to today, but something to bear in mind. We'll also be using FireDAC for our example, which should make it trivial to switch between databases if your preferred database also happens to be supported by FireDAC.
If you're using something
else (a database not supported by FireDAC, or even something other than FireDAC itself), it should be easy enough to follow what we're doing with FireDAC. Nothing too adventurous database-wise.
But a good reminder of one of the key reasons why we're using XData - a REST API server - in the first place: to hide whatever we're doing in terms of database access. We can even change the database technology entirely
without changing a single line of code in our two connecting applications. Here's what our initial test
database setup looks like. This can be found in Unit1.pas (ServerContainer).
procedure TServerContainer.DataModuleCreate(Sender: TObject);
var
  sha2: TSHA2Hash;
  password: string;
begin

  // Setup SwaggerUI Content
  TXDataModelBuilder.LoadXMLDoc(XDataServer.Model);
  XDataServer.Model.Title := 'Survey API';
  XDataServer.Model.Version := '1.0';
  XDataServer.Model.Description :=
    '### Overview'#13#10 +
    'This is the REST API for interacting with the Survey project.';


  // FDConnection component dropped on form
  // FDPhysSQLiteDriverLink component droppoed on form
  // FDQuery component dropped on form


  // This creates the database if it doesn't already exist
  FDManager.Open;
  FDConnection1.Params.Clear;
  FDConnection1.Params.DriverID := 'SQLite';
  FDConnection1.Params.Database := 'SurveyData.sqlite';
  FDConnection1.Params.Add('Synchronous=Full');
  FDConnection1.Params.Add('LockingMode=Normal');
  FDConnection1.Params.Add('SharedCache=False');
  FDConnection1.Params.Add('UpdateOptions.LockWait=True');
  FDConnection1.Params.Add('BusyTimeout=10000');
  FDConnection1.Params.Add('SQLiteAdvanced=page_size=4096');


  // Create the tables if they don't already exist
  FDQuery1.Connection := FDConnection1;
  with FDQuery1 do
  begin
    SQL.Clear;

    SQL.Add('create table if not exists accounts ('+
              'account_id char(38),'+
              'email varchar(50),'+
              'first_name varchar(50),'+
              'last_name varchar(50),'+
              'password_hash text);');

    SQL.Add('create table if not exists surveys ('+
              'survey_id char(38),'+
              'name varchar(100),'+
              'survey text);');

    SQL.Add('create table if not exists permissions ('+
              'survey_id char(38),'+
              'account_id char(38),'+
              'permissions char(4));');

  end;
  FDQuery1.ExecSQL;


  // if there are no accounts, create a default account
  // Default Username: setup
  // Default Password: password1234
  with FDQuery1 do
  begin
    SQL.Clear;
    SQL.Add('select count(*) usercount from accounts;');
  end;
  FDQuery1.Open;

  if FDQuery1.FieldByName('usercount').AsInteger = 0 then
  begin

    // Generate password hash
    sha2 := TSHA2Hash.Create;
    sha2.HashSizeBits := 256;
    sha2.OutputFormat := hexa;
    sha2.Unicode := noUni;
    password := sha2.Hash('password1234');
    sha2.Free;

    with FDQuery1 do
    begin
      SQL.Clear;
      SQL.Add('insert into accounts values("{D10C19DE-7253-42FB-85CB-A1E0F378BFC0}","setup","Default","User","'+password+'");');
    end;
    FDQuery1.ExecSQL;
  end;

end;
A few notes here about the password. It is stored as an SHA-256 hash which is generated using the TMS
Cryptography Pack. Supporting units from there were added to the uses clause for this unit (MiscObj,
HashObj). Certainly not the only way to generate an SHA-256 hash. But after using TMS WEB Core for a while, it
feels strange when using the VCL, not being able to pop over to JavaScript for some obscure function whenever
we want.
The idea here is that the password is stored in a one-way encoded format, so nobody can guess what
the password is, nor can anyone get a list of passwords - they're not stored anywhere. Instead, to validate a
password, we get a password to check, and then generate the same one-way encoded value (a hash) and see if it
matches the hashed value we have on hand. Where this hashing takes place can be important, but less so if
you're using HTTPS on your production server.
A few notes here about SQLite. This is actually my first time using SQLite in any meaningful way. It isn't a very complex database engine, to be fair, but I did encounter a few hiccups. One is that, as we'll see, our XData application is multi-threaded. Accessing SQLite using FireDAC by default is not at all compatible with that arrangement. This is bad news as it is entirely possible (and in fact highly likely) that the database will end up corrupted very quickly. Even the slightest hint of that possibility is a solid reason to select a different database engine.
The good news is that we can change how FireDAC works, and adjust how we're doing things in XData, to compensate. In the code above, several parameters have been added to help with this. I suspect some of those parameters are superfluous but things are working well at this stage so I'm hesitant to make any changes.
There's a lot to like about SQLite (mostly its simplicity) and a lot to not like (also, mostly
its simplicity). Great for testing but longer-term perhaps not the best choice for anything more substantial. But did I mention it's simplicity? I don't know if there is another database engine that just works without
installing or configuring anything else. Handy.
The tables and their columns are going to change and evolve as we add new functionality, but here we can see how tables are created automatically if they didn't exist previously. All we're really storing is identifiers (GUIDs, often) and then JSON stored in TEXT columns, which can in theory be quite large (GB-range, typically). As long as your database of choice can deal with that (highly probable), you're not likely to run into any problems.
There are of course a million ways to deal with the database side of things, but this will be enough
for now. Note that we're not doing anything with foreign keys, fancy data types, triggers, or anything like
that. In fact, as we'll see, we're going to be storing a lot of structured data as JSON in TEXT columns. This
is a bit odd to me, as a long-time SQL fan, but as we'll see, this certainly simplifies things that don't really
need to be complex most of the time.
With that out of the way, it is time to create a login function as part of a new service, the
SurveyAdminService. The parameters are going to simply be username and password. We're not going to worry
about them being passed "in the clear" because this is ultimately going to be accessed over SSL, so the whole
communication aspect will be encrypted anyway. The return value is going to be either an error message (invalid
password, invalid user, or something along those lines) or a valid JWT.
What's a JWT, you ask? In short, it is a token that will be used to simplify passing credentials and related information for the rest of the service endpoints. There is more information on JWT and XData in the XData Developer's Guide section on Authorization and Authentication. This token will be automatically included in subsequent requests, in effect implementing a chunk of the "state" that we were discussing earlier. It will be added as part of the HTTP header when making subsequent requests.
We'll see some examples of how JWTs are
used in other service endpoints, but in the Login service endpoint, we're generating it. We added the JWT
middleware to the XDataServer component earlier in anticipation of this. Here's what the implementation of our
Login service endpoint looks like.
function TSurveyAdminService.Login(Email, Password: string): string;
var
  qry: TFDQuery;
  JWT: TJWT;
  sha2: TSHA2Hash;
  password_hash: String;

begin

  // Query to validate the password
  qry := TFDQuery.Create(nil);
  qry.Connection := ServerContainer.FDConnection1;
  with qry do
  begin
    SQL.Clear;
    SQL.Add('select password_hash,account_id from accounts where email=:EMAIL;');
    ParamByName('EMAIL').AsString := EMail;
  end;

  qry.Open;

  if (qry.RecordCount = 1) then
  begin
    // Get SHA-256 hash of password supplied by the user
    sha2 := TSHA2Hash.Create;
    sha2.HashSizeBits := 256;
    sha2.OutputFormat := hexa;
    sha2.Unicode := noUni;
    password_hash := sha2.Hash(Password);
    sha2.Free;

    // Check if it matches the hash stored in the database
    if (qry.FieldByName('password_hash').AsString = password_hash) then
    begin
      // It does! So create a JWT
      JWT := TJWT.Create;
      try
        // Setup some Claims
        JWT.Claims.Issuer := 'XData Survey Server';
        JWT.Claims.IssuedAt := Now;
        JWT.Claims.Expiration := Now + 1;
        JWT.Claims.SetClaimOfType<string>( 'eml', EMail );
        JWT.Claims.SetClaimOfType<string>( 'acc', qry.FieldByName('account_id').asString );
        JWT.Claims.SetClaimOfType<string>( 'now', FormatDateTime('yyyy-mm-dd hh:nn:ss.zzz', Now));

        // Generate the actual JWT
        Result := 'Bearer '+TJOSE.SHA256CompactToken(ServerContainer.XDataServerJWT.Secret, JWT);
      finally
        JWT.Free;
      end;
    end
    else
    begin
      // Passwords didn't match
      Result := 'Incorrect E-Mail / Password';
      raise EXDataHttpUnauthorized.Create('Incorrect E-Mail / Password')
    end;
  end
  else
  begin
    // Account not found
    // Lots of good reasons to NOT distinguish this error from an incorrect
    // password error but the option is here either way.
    Result := 'Incorrect E-Mail / Password';
    raise EXDataHttpUnauthorized.Create('Incorrect E-Mail / Password')
  end;

  qry.Close;
  qry.Free;
end;
Note that the JWT is configured with various 'claims'. These can contain whatever information we like and are
a good place to put information about the client (some of its "state") for future use. For example, if the
same user has access to different databases, perhaps the login mechanism will include a database selection, and
the selected database would be stored as a JWT claim as well.
If you're producing time-stamped reports in your XData server, and you want to put the local time on the report, perhaps the Login function could pass in the local timezone as well, which would then be stored as a JWT claim, and used by the report generation service endpoint. Lots of options.
The only other item to be mindful of is that there is a handful of reserved (registered) claims that should be avoided - just choose a different name for the claim. The list can be found here. A list of extended claims can also be found via the same link.
Note also that we're using user input values to generate SQL queries, so we must be mindful of SQL
Injection attacks. Here, we're using a parameterized query to address that issue.
With that in place, the service endpoint can be tested with the SwaggerUI we set up earlier. entering a username/password, you will either get an authorization error message, or you'll end up with a proper JWT. This is roughly equivalent to having "logged In" as once the client has access to a valid JWT, they can then access the rest of the protected functions without having to authenticate again.
Note that with a bit more work we could configure our XData server with endpoints to renew or revoke JWTs, but by default, they will already have an expiration mechanism. We're setting it to 24 hours here. Here's what a JWT looks like.

Successfully Logged In.
You can even copy & paste the code (leaving out the "Bearer " prefix) to a website like JWT.io
and it will decode it for you if you want to check that it contains what was expected. Keep in mind
this isn't a security risk, so long as you don't put anything particularly sensitive into the JWT. We didn't,
for example, include the original password or password_hash values. Instead, we'll rely on the account value
(account) for subsequent data access, and we'll include the e-mail address (email) just to save having to look
it up if we want to send notification emails later.
And we can be confident that nobody else can fabricate a JWT, even knowing what is in one, because we're using our "secret" from the XDataServer's JWT middleware to create the JWT in the first place. That's what that 32-character code was needed for. Here's what we can see if we decode a JWT (not the same as the one above).
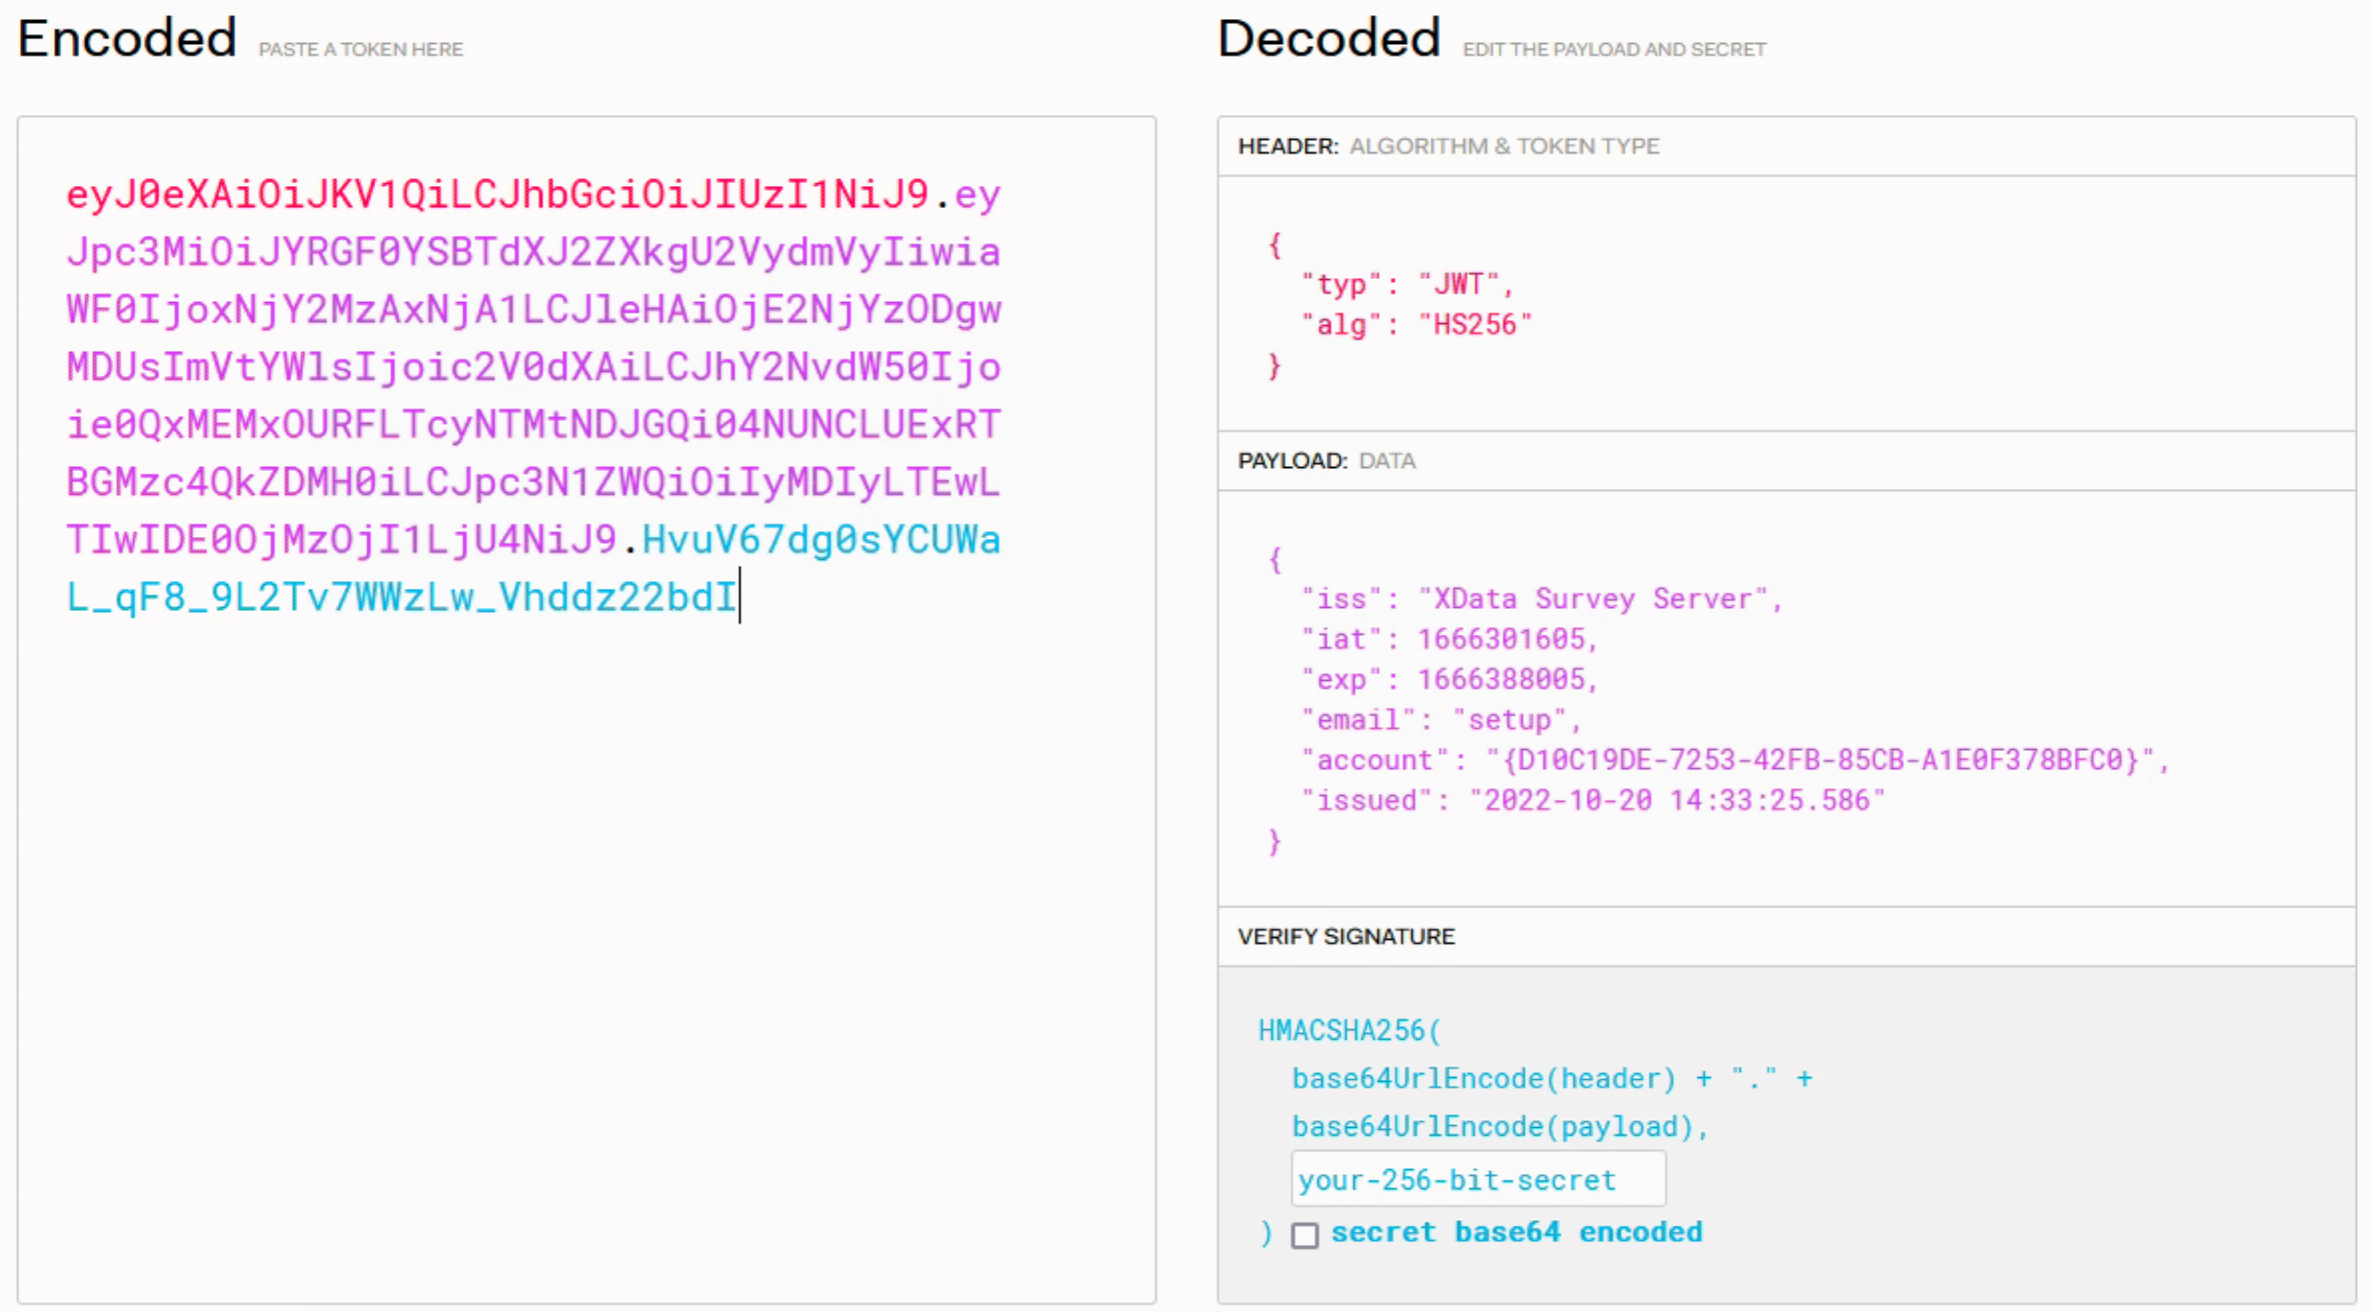
Using JWT.io to Examine the Contents of a JWT.
Note that the first three claims (iss, iat, and exp) and generated using specific properties when we created the
JWT. The "issued at" and "expiry" claims are stored using a Unix timestamp (int64) value. We've added an
"issued" claim which has the iat value stored as a human-readable value, and we're issuing JWTs that expire
after one day (the difference between iat and exp above is 86400 - the number of seconds in one day).
A JWT
could be issued with a considerably shorter validity period, like 15 minutes, and then renewed continually as
long as the user is active. This is how we could implement a global application time-out for example - once the
JWT expires, a new one has to be issued to continue working. This could (and generally should) happen without user interaction, if the
application detects that the user is still present based on some minimal interaction, just like in a traditional
VCL application.
More Service Endpoints
With all that out of the way, it is now open season on other service endpoints. They'll all be setup largely the same way. We'll start by getting the account value from the JWT and combine that with the parameters of a given service endpoint to craft an SQL query to perform whatever function is needed. And we'll add a service endpoint for each type of interaction that the Survey Admin Client will need in order to perform its functions.
If you have a project with an existing database with hundreds of tables and thousands of functions, there may be
other tools that can be used here to help lighten the workload. Or service endpoints can be created that
function more like generic SQL queries themselves, or CRUD endpoints, that kind of thing. There are
entirely separate ways of addressing these challenges using products like TMS
Aurelius - an object management framework that works with XData to do just this kind of thing. Our
application today is simple enough that we can just deal with the manual SQL approach easily enough.
One common function that we'll need involves returning the results of an SQL query as JSON, and in a structure that is suitable for use directly in the client application. A complex topic to be sure. The native version of FireDAC JSON contains a lot of information, particularly datatypes and other field definition information, that can be quite useful if the client doesn't know what kind of data is coming in. This is what you get when using something like qry.SaveToStream(Result,sfJSON), for example.
What we're after is a simplified version, just a JSON array of rows, with a set of key:value pairs for each column in each row. We can get the JSON in that format by using some additional FireDAC features. Here's a procedure that we'll use to take care of this, with the added bonus that it is already a TStream, ready to be passed back to the client.
procedure TSurveyAdminService.FireDACtoSimpleJSON(qry: TFDQuery; JSON: TStream);
var
  bm: TFDBatchMove;
  bw: TFDBatchMoveJSONWriter;
  br: TFDBatchMoveDataSetReader;
begin
  bm := TFDBatchMove.Create(nil);
  bw := TFDBatchMoveJSONWriter.Create(nil);
  br := TFDBatchMoveDataSetReader.Create(nil);
  try
    br.Dataset := qry;
    bw.Stream := JSON;
    bm.Reader := br;
    bm.Writer := bw;
    bm.Execute;
  finally
    br.Free;
    bw.Free;
    bm.Free;
  end;
end;
With that, we can then implement a GetSurveys function that will return a list of surveys that the user has access to, based on what we find in the JWT. We don't even need any other parameters for the service endpoint, as we won't allow access without a valid JWT, and the JWT can provide us the "account" value that might otherwise have been a parameter.
To restrict access based on having a valid JWT, we'll need to add the [Authorize] attribute to the method declaration in the service endpoint interface, as well as add XData.Security.Attributes to the uses clause. Note that we don't do this for the Login function as we'll be calling that to get the JWT in the first place. Our SurveyAdminService.pas interface now looks like this.
unit SurveyAdminService;

interface

uses
  System.Classes,
  XData.Security.Attributes,
  XData.Service.Common;

type
  [ServiceContract]
  ISurveyAdminService = interface(IInvokable)
    ['{18375DB7-2E25-4688-B286-270FA7417C89}']

    function Login(Email: string; Password: string):string;
    [Authorize] function GetSurveys: TStream;

  end;

implementation

initialization
  RegisterServiceType(TypeInfo(ISurveyAdminService));

end.
The implementation of GetSurveys just needs to get the account value from the JWT and run a query to get all of
the surveys that are linked to that account, returning a result set that is then converted to JSON and passed
back as a TStream. Naturally, we can do whatever we like with the SQL here without concern about things like SQL
injection, but using parameters is still a great practice. We'll need to add another unit, Sparkle.Security, to
our uses clause to be able to access the JWT contents. Here's what the GetSurveys implementation looks like.
function TSurveyAdminService.GetSurveys: TStream;
var
  usr: IUserIdentity;
  qry: TFDQuery;
begin
  // Returning JSON
  TXDataOperationContext.Current.Response.Headers.SetValue('content-type', 'application/json');
  Result := TMemoryStream.Create;

  // Got a usable JWT?
  usr := TXDataOperationContext.Current.Request.User;
  if (usr = nil) then raise EXDataHttpUnauthorized.Create('Failed authentication');
  if not(usr.Claims.Exists('account')) then raise EXDataHttpUnauthorized.Create('Missing account');

  // Create a query
  qry := TFDQuery.Create(nil);
  qry.Connection := ServerContainer.FDConnection1;

  // Populate query
  with qry do
  begin
    SQL.Clear;
    SQL.Add('select surveys.survey_id, surveys.name, permissions.permissions');
    SQL.Add('  from surveys, permissions');
    SQL.Add(' where surveys.survey_id = permissions.survey_id');
    SQL.Add('   and permissions.account_id = :ACCOUNT;');
    ParamByName('ACCOUNT').AsString := usr.Claims.Find('account').AsString;
  end;
  qry.Open;

  // Return query as JSON stream
  FireDACtoSimpleJSON(qry, Result);

  // Cleanup
  qry.Close;
  qry.Free;
end;
In order to test this, we can use Swagger. But as we've set this up as a service endpoint that requires authorization, we'll need to simulate a "login". We can also do this entirely within Swagger.
First, find the Login service endpoint, fill in the parameters for username and password, and execute it. You'll get a JWT that has a "Bearer" prefix, just as when we tested it earlier. Each time you execute the login, you should get a slightly different JWT because the contents are slightly different each time due to the included timestamps.
Copy the JWT to the clipboard manually (including the "Bearer" at the beginning, all the way to the end, but leaving off the outermost quotation marks). Then, click one of the lock icons to the right of any of the service endpoints, or click the Authorize button at the top of the Swagger page, paste in the JWT token, and click "login".
Now try out the GetSurveys service endpoint. If you didn't perform this Swagger login, it should have returned with "Forbidden". Once you log in, the GetSurveys function executes as expected and you get..... an empty JSON result (which looks like an open and closed square bracket: []). This is because we've not added any permissions, or surveys for that matter, in the default database initialization. How anticlimactic! But not to worry, we'll get to that soon enough.
A few more points before moving on. First, this is how we'll structure virtually all of the other SurveyAdminClient service endpoints - we expect a JWT with a valid account value, and from there we just run whatever SQL we need to implement the function in question. Often we'll pass in a few parameters. And we'll return a value, either JSON or a string value, typically.
For such a simple application, this works fine. More complex applications, with more complex data, can certainly pass more complex data types back and forth. Any traditional Delphi objects work pretty well. If you find that you have many parameters (more than a handful at most) it might also be an idea to combine them into a JSON representation and pass that back and forth, with a bit of extra steps to validate the JSON and ensure it has what you're expecting (at either end).
Generally, there are many ways to pass data back and forth from XData in this fashion. Just be mindful that any data is being passed back and forth between a remote web server and a potentially underpowered browser with a slow network connection, so limiting the amount of data traveling back and forth is generally sound advice.
The second thing to touch on is that we've not really covered what the XData server is doing internally, and it is pretty remarkable. Essentially, whenever someone connects to an XData service endpoint, a separate thread is launched to process the request. You don't generally have to think much about that - the thread is launched when the request comes in and is disposed of when the request is completed.
On the client end, something similar happens, where the request is generated and remains active until the XData server sends its response. This could be milliseconds later, or several minutes, depending on what the service endpoint is actually doing.
All of this happens in a very small VCL app. The end result is a very performant application server that can easily scale to a very large number of users, with limitations usually arising from the underlying database technology rather than XData itself.
And finally, just a note about our project organization. I've set up our three apps as entirely separate
projects with nothing shared between them. This was deliberate. There are other ways to organize things. For
example, sharing a few units that might allow you to reference the service endpoints directly from client apps. Particularly if your clients are VCL apps themselves, like XData. Or sharing CSS files. Or any number of other
things. I find separating them to be the cleanest approach, but there are examples provided with XData and TMS WEB Core
where there is no such separation - Delphi "projects" that contain multiple applications. Depends on how much overlap there is between the projects. In this case, there really isn't much duplication of effort - each project is doing something quite different.
Now that we're clear on how to create service endpoints, we'll do a little hand-waving here and assume that
we'll just create what we need as we continue along, with the understanding that they're all very similar, just
running different SQL queries with different parameters as needed. We'll also assume that any adjustments to the
underlying SQL tables, columns, and so on will be made to accommodate our needs as well. Just to save some time
here. The code is available, so you can readily check that our hand-waving here is just a way to quickly get us
to the next topic.
Survey Admin Client: Login.
Alright. Back in the Survey Admin Client, we can start implementing more useful features, rather than just
fiddling with UI elements, despite how much fun that can be. Continuing on with the idea of creating service
endpoints as we need them, we'll make some assumptions here about functionality. But we'll start with a few to
give an idea of how this will work. First up? We'll need the ability to log in.
In the first Labels post (mentioned previously), we created a separate popup form. We're going to do the same here, but it will pop up immediately when the app starts. This allows us to put all of that UI stuff into a separate unit, so it doesn't have to clutter up our main project. The login function will also be responsible for initializing the connection to the Survey Server (XData) and when it's done, we'll have what we need to proceed - a valid JWT. A little extra effort on the UI here goes a long way toward setting the bar for the rest of the experience. Here's what we've got for our Survey Admin Client's login Form.
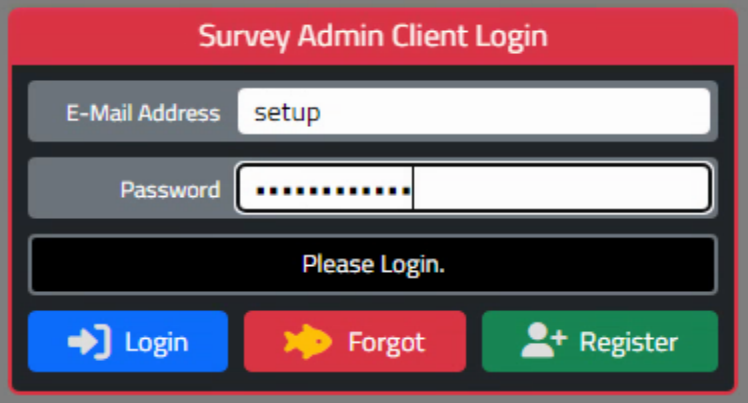
Typical Login Interface.
Pretty standard fare here. I have a habit of adding buttons that I think we'll use later, for better or for
worse. Here we've got a "Forgot" button and a "Register" button that we very likely won't get to today, but
good to sort out where they'll go and what they look like while we're setting up everything else. As one would
expect, we've got a username/password field of some kind, with the password obscured.
Nothing special here, all implemented with the usual TMS WEB Core components with a dash of Bootstrap and a pinch of Font Awesome, as well as InteractJS just for fun. And that's supposed to be a goldfish - short memory, right?? Hard to come up with icon ideas. Don't get me started on the silliness of using a floppy disk icon to represent "save" for example...
The code for logging in is similar to the way we retrieved data in the Survey Client a while back. In this case, we're doing a bit more once we've got a valid JWT. One of the more interesting things is that we're going to pull out a value from the list of JWT Claims - a new one that just came to mind - "security". We'll use this to determine which of the main tabs is initially visible.
A JWT is composed of a set of three text blocks delimited by periods. The middle text block contains Base64-encoded JSON which holds the claims. By extracting that text block and decoding the Base64 text, we get a JSON object that we can then extract the individual claims from.
Typically you don't need to do this at the client, but we're doing it here to save the trouble of asking for the values in the claims separately. We'll do the same for the email, first, and last name while we're at it, more new claims.
This is also where you could extract the expiration timestamp from the list of
claims and set a timer to automatically renew the JWT before it expires. To renew a JWT, one approach is to
just have another endpoint that takes the existing (valid) JWT, copies over the relevant claims, and returns a
new JWT. No user intervention is required at all.
For our initial "setup" user, we'll set the "security" field to indicate that all tabs are available (aka a
superuser) so that we can hit the ground running. As soon as the tabs are set, we can also refresh the list of
available surveys before setting the user loose into the rest of the app. Here's what the Login function looks
like.
procedure TLoginForm.btnLoginClick(Sender: TObject);
var
  Response: TXDataClientResponse;
  ClientConn:   TXDataWebClient;
  Data: JSValue;
  Blob: JSValue;
  JWTClaims: TJSONObject;
begin

  // Development server or Production server?
  if GetQueryParam('Dev') <> '' then
  begin
    Form1.ServerName := 'http://localhost:2001/tms/xdata';
    Form1.LogActivity('Development Mode Specified');
  end
  else
  begin
    Form1.ServerName := 'https://carnival.500foods.com:10101/tms/xdata';
  end;
  Form1.LogActivity('Connecting to '+Form1.ServerName);
  labelLoginProgress.Caption := 'Connecting to '+Form1.ServerName;


  // Try and establish a connection to the server
  if not(Form1.ServerConn.Connected) then
  begin
    Form1.ServerConn.URL := Form1.ServerName;
    try
      await(Form1.ServerConn.OpenAsync);
      Form1.LogActivity('Connected to '+Form1.ServerName);
      labelLoginProgress.Caption := 'Connected to '+Form1.ServerName;

    except on E: Exception do
      begin
        Form1.LogActivity('Connnection Error: ['+E.ClassName+'] '+E.Message);
        console.log('Connnection Error: ['+E.ClassName+'] '+E.Message);
        labelLoginProgress.Caption := 'Connection Failed. Please Try Again.';
      end;
    end;
  end;


  // We've got a connection, let's make the request
  Form1.LogActivity('Authorizing');
  labelLoginProgress.Caption := 'Authorizing';
  if (Form1.ServerConn.Connected) then
  begin
    try
      ClientConn := TXDataWebClient.Create(nil);
      ClientConn.Connection := Form1.ServerConn;
      Form1.JWT := '';
      Response := await(ClientConn.RawInvokeAsync('ISurveyAdminService.Login', [
        edtLoginEmail.Text,
        edtLoginPassword.Text
      ]));
      Blob := Response.Result;
      asm
        Data = Blob.value;
      end;
    except on E: Exception do
      begin
        Form1.LogActivity('Authorization Error: ['+E.ClassName+'] '+E.Message);
        console.log('Authorization Error: ['+E.ClassName+'] '+E.Message);
        labelLoginProgress.Caption := 'Authorization Error. Please Try Again.';
      end;
    end;
  end;


  // Do we have any data?
  if (Length(String(Data)) > 0) then
  begin
    // Yes we do!
    if Copy(String(Data),1,7) = 'Bearer ' then
    begin
      Form1.JWT := String(Data);
      Form1.LogActivity('Login Successful.');
      labelLoginProgress.Caption := 'Login Successful';

      // Get various claims values from the JWT
      JWTClaims := TJSONObject.ParseJSONValue(Window.atob(Copy(Form1.JWT, Pos('.',Form1.JWT)+1, LastDelimiter('.',Form1.JWT)-Pos('.',Form1.JWT)-1))) as TJSONObject;
      Form1.Account_ID := (JWTClaims.Get('account').JSONValue as TJSONString).Value;
      Form1.Account_EMail := (JWTClaims.Get('email').JSONValue as TJSONString).Value;
      Form1.Account_First := (JWTClaims.Get('first').JSONValue as TJSONString).Value;
      Form1.Account_Last := (JWTClaims.Get('last').JSONValue as TJSONString).Value;
      Form1.Account_Security := (JWTClaims.Get('security').JSONValue as TJSONString).Value;
      JWTClaims.Free;

      // Five elements in security field
      // 1st - Access to Surveys tab
      // 2rd - Accdss to Responses tab
      // 3nd - Access to Questions tab
      // 4th - Access to Administration tab
      // 5th - Access to Logging Tab

      if Copy(Form1.Account_Security,1,1) = 'N' then Form1.btnSurveys.ElementHandle.remove;
      if Copy(Form1.Account_Security,2,1) = 'N' then Form1.btnResponses.ElementHandle.remove;
      if Copy(Form1.Account_Security,3,1) = 'N' then Form1.btnQuestions.ElementHandle.remove;
      if Copy(Form1.Account_Security,4,1) = 'N' then Form1.btnAccounts.ElementHandle.remove;
      if Copy(Form1.Account_Security,5,1) = 'N' then Form1.btnLogging.ElementHandle.remove;

      if      Copy(Form1.Account_Security,1,1) <> 'N' then Form1.btnMainMenuClick(Form1.btnSurveys)
      else if Copy(Form1.Account_Security,2,1) <> 'N' then Form1.btnMainMenuClick(Form1.btnResponses)
      else if Copy(Form1.Account_Security,3,1) <> 'N' then Form1.btnMainMenuClick(Form1.btnQuestions)
      else if Copy(Form1.Account_Security,4,1) <> 'N' then Form1.btnMainMenuClick(Form1.btnAccounts)
      else if Copy(Form1.Account_Security,5,1) <> 'N' then Form1.btnMainMenuClick(Form1.btnLogging);

      // Refresh list of surveys
      Form1.BtnSurveyReloadClick(Sender);

      // Close Login Form and continue in main application
      ModalResult := mrOk;
      Form1.divBlocker.Visible := False;
    end
    else
    begin
      Form1.LogActivity('Incorrect E-Mail / Password. Please Try Again.');
      labelLoginProgress.Caption := 'Incorrect E-Mail or Password. Please Try Again.';
      edtLoginPassword.SetFocus;
      edtLoginPassword.SelectAll;
    end;
  end;

end;
That's a lot of code, but mostly due to being thorough and it is a bit repetitive in places. It should be readily apparent how easily the call to the Survey Server fits in. If we get back a JWT (a string starting with 'Bearer") then we're off to the races. Otherwise, we ask the user to try again.
There are plenty of other little tweaks that we're not going to go into detail about here, related to handling the enter key, having the background fade in via CSS and that sort of thing, so be sure to have a look at the project source code if you're interested. One tip though - to "hide" a Bootstrap button from a button group and still have the rounding work properly, the button needs to be removed from the DOM completely. Which is what we're doing here.
Once the user has logged in, we leave the popup (form), never to return. One way to "log out" of a web app, after all, is to just reload the page. This is exactly what we do in this case, so no need to come back to the form when we're done logging in. This also means we don't have to figure out how to put back the buttons that were removed.
If you'd like a logout function that doesn't reload the page, be sure to reset the JWT to a blank string. This essentially logs the user out of the Survey Server, as without a valid JWT nothing can be accessed. Resetting the JWT and clearing all the various Tabulator tables, entry fields and so on might be a workable approach, particularly if the app is usable in a logged-out state. We'll look at this in more detail in Part 2 of Labels and Barcodes, coming soon to a blog near you. But for now, let's just keep adding features.
Survey Admin Client: Managing Surveys.
We've already written the Survey Server code for returning a list of surveys that a user has access to.
Implementing the other end in the Survey Admin Client is just a matter of making the call and displaying the
results. There are at least a couple of ways we might want to trigger this action, such as after logging in or
when clicking the "reload" button at the top of the survey list. Let's use the reload button as the place to
implement this.
procedure TForm1.btnSurveyReloadClick(Sender: TObject);
var
  Response: TXDataClientResponse;
  ClientConn:   TXDataWebClient;
  Data: JSValue;
  Blob: JSValue;
begin
  if (ServerConn.Connected) then
  begin
    try
      ClientConn := TXDataWebClient.Create(nil);
      ClientConn.Connection := ServerConn;
      Response := await(ClientConn.RawInvokeAsync('ISurveyAdminService.GetSurveys', []));
      Blob := Response.Result;
      asm
        Data = await Blob.text();
      end;
    except on E: Exception do
      begin
        Form1.LogActivity('GetSurveys Error: ['+E.ClassName+'] '+E.Message);
        console.log('GetSurveys Error: ['+E.ClassName+'] '+E.Message);
      end;
    end;
  end;

  // Do we have any data?
  if (Length(String(Data)) > 0) then
  begin
    // Load up tabSurveyList Tabulator with the new data
    asm
      this.tabSurveys.setData(Data);
    end;
  end;
end;
Nothing complicated about that, really. Just retrieve the JSON and hand it off to Tabulator with the setData() call. Don't even have to pass parameters to get our result set back, and all of the logic related to JWTs and the rest of it is hidden away out of sight.
We could even simplify this further by making a generic function to deal with the XData calls and conversion back to JSON. Here we're calling a function with an open array of JSValue elements, roughly equivalent to an open variant array. And all we're going to do with that is pass it along to the call to RawInvokeAsync, which has this same open array of JSValue elements as its second parameter.
This means that we can call various endpoints with whatever parameters we like, so long as it
returns JSON destined for one of our Tabulator tables. Which happens quite a lot. Here's what our reload
function looks like with this new function in place.
procedure TForm1.UpdateTable(Endpoint: String; Params: Array of JSValue; Table: JSValue);
var
  Response: TXDataClientResponse;
  ClientConn:   TXDataWebClient;
  Blob: JSValue;
begin
  if (ServerConn.Connected) then
  begin
    try
      ClientConn := TXDataWebClient.Create(nil);
      ClientConn.Connection := ServerConn;
      Response := await(ClientConn.RawInvokeAsync(Endpoint, Params));
      Blob := Response.Result;
      asm
        Table.setData(await Blob.text());
      end;
    except on E: Exception do
      begin
        Form1.LogActivity(Endpoint+' Error: ['+E.ClassName+'] '+E.Message);
        console.log(Endpoint+' Error: ['+E.ClassName+'] '+E.Message);
      end;
    end;
  end;
end;

procedure TForm1.btnSurveyReloadClick(Sender: TObject);
begin
  UpdateTable('ISurveyAdminService.GetSurveys', [], tabSurveys);
end;
That should simplify things quite a bit! Much of the time, we'll send data to the server that ultimately translates into a CRUD operation of some kind against the database (Create, Read, Update, Delete). Once the operation is complete, we'll want to refresh the UI with the new contents that reflect the impact of the CRUD operation.
Sometimes we can do it all in one call. Sometimes the result of such an operation results in changes to more than one UI element. Either way, we're well-positioned in terms of keeping the UI and the underlying (remote) database consistent.
We've seen what a "read" operation looks like, but we can also quickly put together a pair of "create" functions and a "delete" function. All we need to provide for a new survey is a SurveyID, a Name, a Group, and some JSON that defines the rest of the survey information. We'll have the Survey Server return a fresh copy of the survey list, hopefully with our new survey included, and update the same table, just as we did with the reload function above.
The permissions in this case will be set automatically on the server, granting full permissions for this particular survey to the user who created it. We don't really even need to pass much in the JSON for this part to work, though later we'll set some usable defaults, or in the case of the clone function, set the data to be the same as the currently selected survey. The functions are largely the same.
procedure TForm1.btnSurveyNewClick(Sender: TObject);
var
  NewSurveyID: String;

begin
  NewSurveyID := TGUID.NewGUID.ToString;
  UpdateTable('ISurveyAdminService.NewSurvey', [NewSurveyID, 'New Survey', CurrentSurveyGroup, '[]'], tabSurveys);
end;

procedure TForm1.btnSurveyCloneClick(Sender: TObject);
var
  NewSurveyID: String;
begin
  NewSurveyID := TGUID.NewGUID.ToString;
  UpdateTable('ISurveyAdminService.CloneSurvey', [NewSurveyID, 'Clone of '+CurrentSurveyName, CurrentSurveyGroup, CurrentSurveyData], tabSurveys);
end;

procedure TForm1.btnSurveyDeleteClick(Sender: TObject);
begin
  UpdateTable('ISurveyAdminService.DeleteSurvey', [CurrentSurveyID], tabSurveys);
end;
With those in place, the main list of surveys is editable. The "Current" variables shown in the functions above are kind of a lazy way of getting the Tabulator values from the table. Whenever the row selection changes in Tabulator, these values are set so we don't have to look them up in Tabulator as that's a bit of a nuisance.
When we're dealing with that first table, we're not really too worried about the underlying JSON that defines the table - in fact, we don't even retrieve it when updating the list of surveys. This is because if there were hundreds of surveys that would be a huge amount of data. Instead, we go and retrieve the survey only when a row is selected, using the SurveyID value we got originally. Just trying to be more efficient.
We're doing things the hard way when it comes to handling that JSON. Basically, we're kind of using the JSON as a dataset, and populating components based on its contents. When we want to save changes, we'll read those component values and create a new JSON value to be written back. Sort of like a clientdataset arrangement, but without using any db-aware components that we might use in the VCL. Those exist in TMS WEB Core as well, if we wanted to approach it that way.
To finish up our "CRUD" operations, we'll then need to write back this JSON. We keep a CurrentSurveyData and
OriginalSurveyData just for this purpose, and there's a button in the UI that gets enabled/disabled based on
whether these values are the same. Connecting the data to the UI, we have an UpdateUIData function and a RetrieveUIData function. These just parse the JSON and set the component values, or get the component values and build the
JSON, respectively.
Connecting SQL to Tabulator.
For much of the rest of the interface, what we're ultimately doing is connecting a grid of some kind (Tabulator in our case) to the contents of a query of some kind (which is ultimately a SQL query run against the SQLite database on the Survey Server). We're using XData and JSON as a conduit between the grid and the query. And we've already done the hard work on that conduit, so now it is just a matter of making the call and directing the JSON to the table. Not so bad.
Note that this is very similar (conceptually) to connecting a TQuery component to a TDBGrid using a TDataSource/TDataset as the conduit in a traditional VCL app, but this is implemented very differently. The TDataset approach is possible in TMS WEB Core, but as FireDAC is not part of TMS WEB Core, this is a bit more work. And as Tabulator doesn't know about anything but JSON, it is a bit more work again. Ultimately bypassing all that and just streaming JSON everywhere seems to work really, really well.
For those not that familiar (or comfortable) with Tabulator, this might be a bridge too far. But Tabulator
does simplify a lot of things. For example, the Survey list is created by adding a TWebHTMLDiv component to a page and
then calling Tabulator to populate it with a table. Here's the code for the first cut of the Survey table.
  // Main Survey List
  asm
    this.tabSurveys = new Tabulator("#divSurveysSurveyList",{
      index: "survey_id",
      initialSort: [{column:"survey_name", dir:"asc"},{column:"survey_group", dir:"asc"}],
      groupBy: 'survey_group',
      headerVisible: false,
      columns: [
        { title: "ID", field: "survey_id", visible: false },
        { title: "Group", field: "survey_group", visible: false },
        { title: "Survey", field: "survey_name", bottomCalc: "count" },
        }
      ]
    });
  end;
We can load the data coming from the Survey Server with a simple setData(JSON) call. Makes things pretty simple. As we get into more complex tables, we can add other columns with custom formatting and other niceties, but that's the basics of what we're up to here. More tables. More queries. But the same basic principles. As of this writing, there are more than a dozen Tabulator tables in the Survey Admin Client, all working the same way. Just with different columns or other options set.
Now that we can display data from the Survey Server in a Tabulator table, much of the UI can be taken care of. Tedious sometimes, but not particularly difficult, particularly once we set up the UpdateTable function as described.
We also have to deal with other UI elements, not just tables. So while it would've been handy to
have a TDataSource component and use TDBWeb controls, we don't have that many of them to worry about.
When a TWebEdit component is changed, for example, we can use the OnChange event handler to write back changes
to the underlying JSON. When the underlying JSON changes, we update the relevant TWebEdit controls. Sort
of a manual approach, but works well enough.
Global Save and Cancel.
One way to think about this approach is that we're essentially using JSON as the equivalent of a TClientDataset. This means we're making changes to it, and we can tell whether it has changed from what it was originally.
For example, when editing the survey name (a TWebEdit component), the OnChange event will fire. We then go and update the JSON with the new name. And we compare it to the JSON that we had gotten originally. If it is different, then we enable the big "Save" and "Cancel" buttons in the UI. If it is still the same, then we disable those same buttons.
This also means that if we change the name back to what it was originally, the JSON will then match the original JSON, and the buttons become disabled. Not really anything remarkable about that. Well, except that this works for every bit of data that is in the UI. Every TWebEdit field, date field, and anything else, including other Tabulator tables that are included in the JSON that makes up the full survey. So that's kind of fun.
To elaborate a bit more on that, there are lots of things that are part of the JSON that describe a survey. For example, the survey name and survey group. But also the entire set of records that describe the availability for the survey. It is just unceremoniously included as another JSON object in the larger survey JSON. When we make a change to the date in the availability, that JSON is changed, which means the survey JSON changes, which means the Save button is enabled. If we change the date back, the reverse happens.
Easy to
conceptualize I suppose but it turned out to be a good test that things were wired up properly. If the Save
button didn't change, then there was some JSON somewhere that wasn't being updated. Certainly a little bit more
fun now! In fact, we generate a change history log automatically just by making a note of what is different
between sets of JSON. If the survey name has changed, we can make a note of that, and even log what the new name
is.
Some content is not included in the survey JSON, however. In fact, there are all kinds of examples in this project related to how tables are accessed, whether they are related or not, whether they are included with calls to one endpoint, or whether you have to do extra work to get at them.
For the survey itself, the survey data only encapsulates what is needed to run the survey in the Survey Client application. Availability is important for this, so it is included. The change history that is created automatically is not included, so an extra call needs to be made to populate that table in the UI. Similarly, there is a "Notes" table just for people to put in notes about what is happening with a particular survey. So, not included. Same for permissions - these are handled outside of the survey JSON.
And, perhaps unexpectedly, so are the questions. Because sometimes a survey is not yet available, so we want to keep the questions to ourselves. We do include the questions JSON in the big "Save" and "Cancel" buttons, and add entries to the change log, just to try and keep the UI simple and consistent.
Editing HTML.
When it comes to designing the pages of the survey, all we're really doing is presenting HTML pages. We even display the radio buttons or checkmark buttons using HTML <input> tags in the HTML page. Loading and saving these pages involves just converting them to text and storing them in JSON as usual. Even uploaded images are stored directly in the page if needed, rather than referencing an image URL elsewhere. Which is also an option.
In this project, we used SunEditor as our WYSIWYG HTML editor. We previously covered Summernote vs. SunEditor. These are both being updated continually, so either would be a solid choice. I just happen to like SunEditor more (this week, anyway).
When selecting an option from the Tabulator list, the
TWebPageControl component switches between the different pages, many of which have their own SunEditor control embedded. It was structured this way in part because it makes it easier to copy/paste between different editors without
having to find your place again - each editor instance just remains where it was as you flip between the different
pages. Here's what it looks like with an image loaded up.
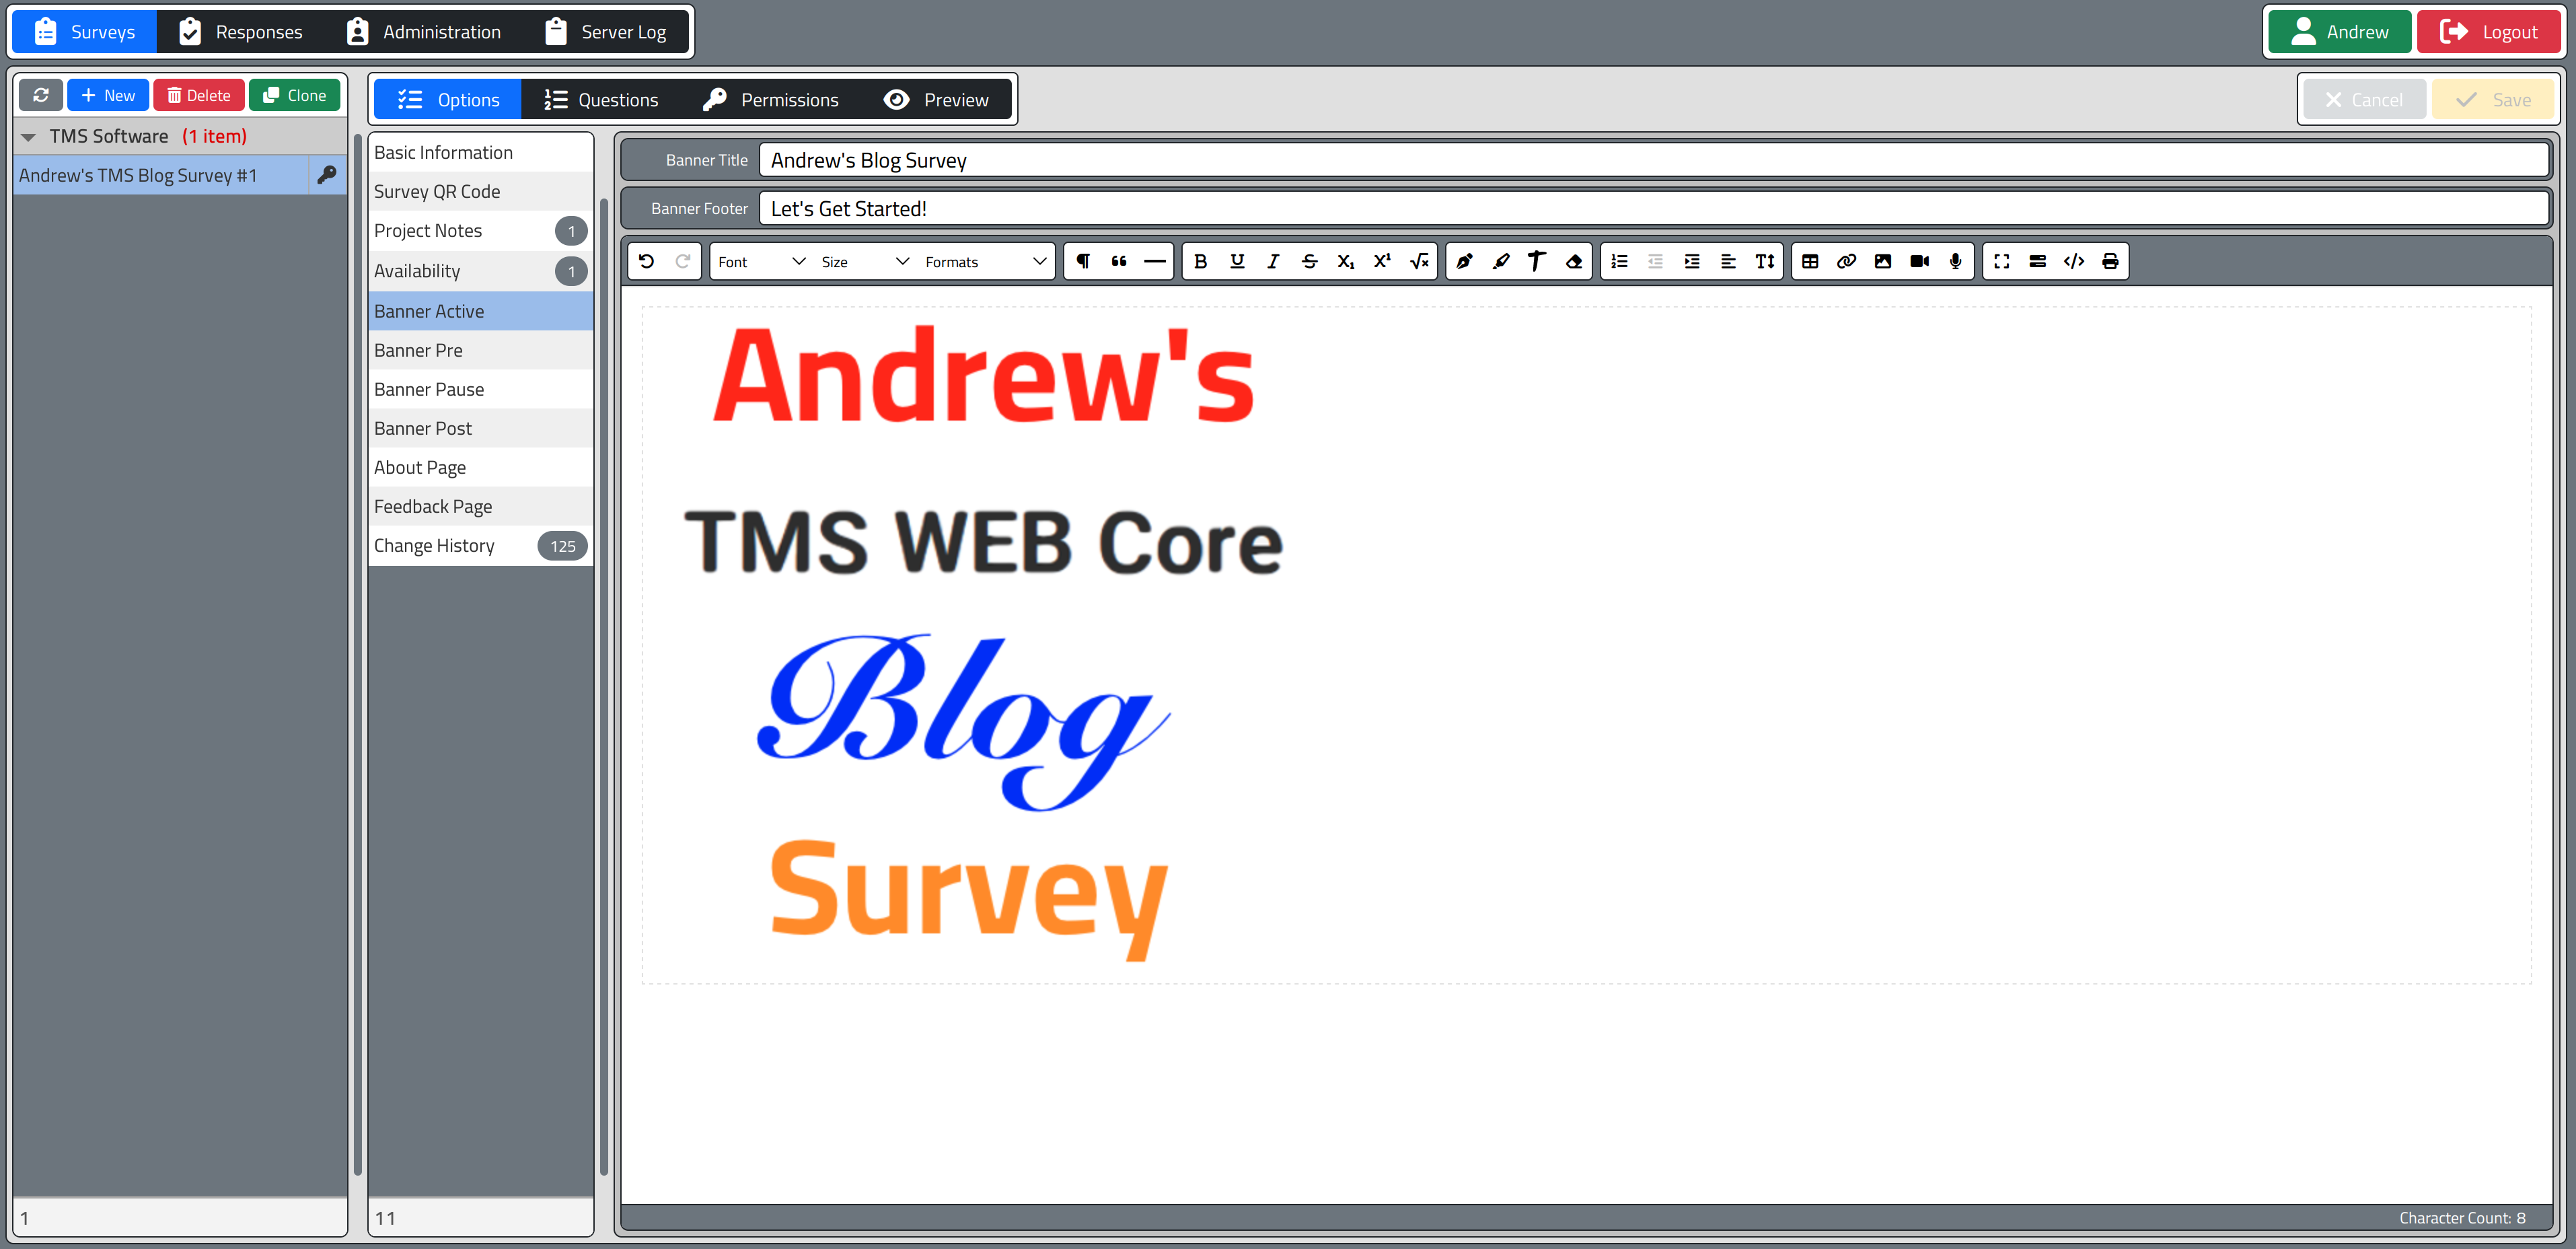
Embedded HTML Editor.
The underlying HTML code can also be directly edited and endlessly tweaked to get the final result desired. And because HTML and CSS really need to be tested, a Preview function is available that makes it easy to see
various page sizes and test that everything fits or scrolls properly.
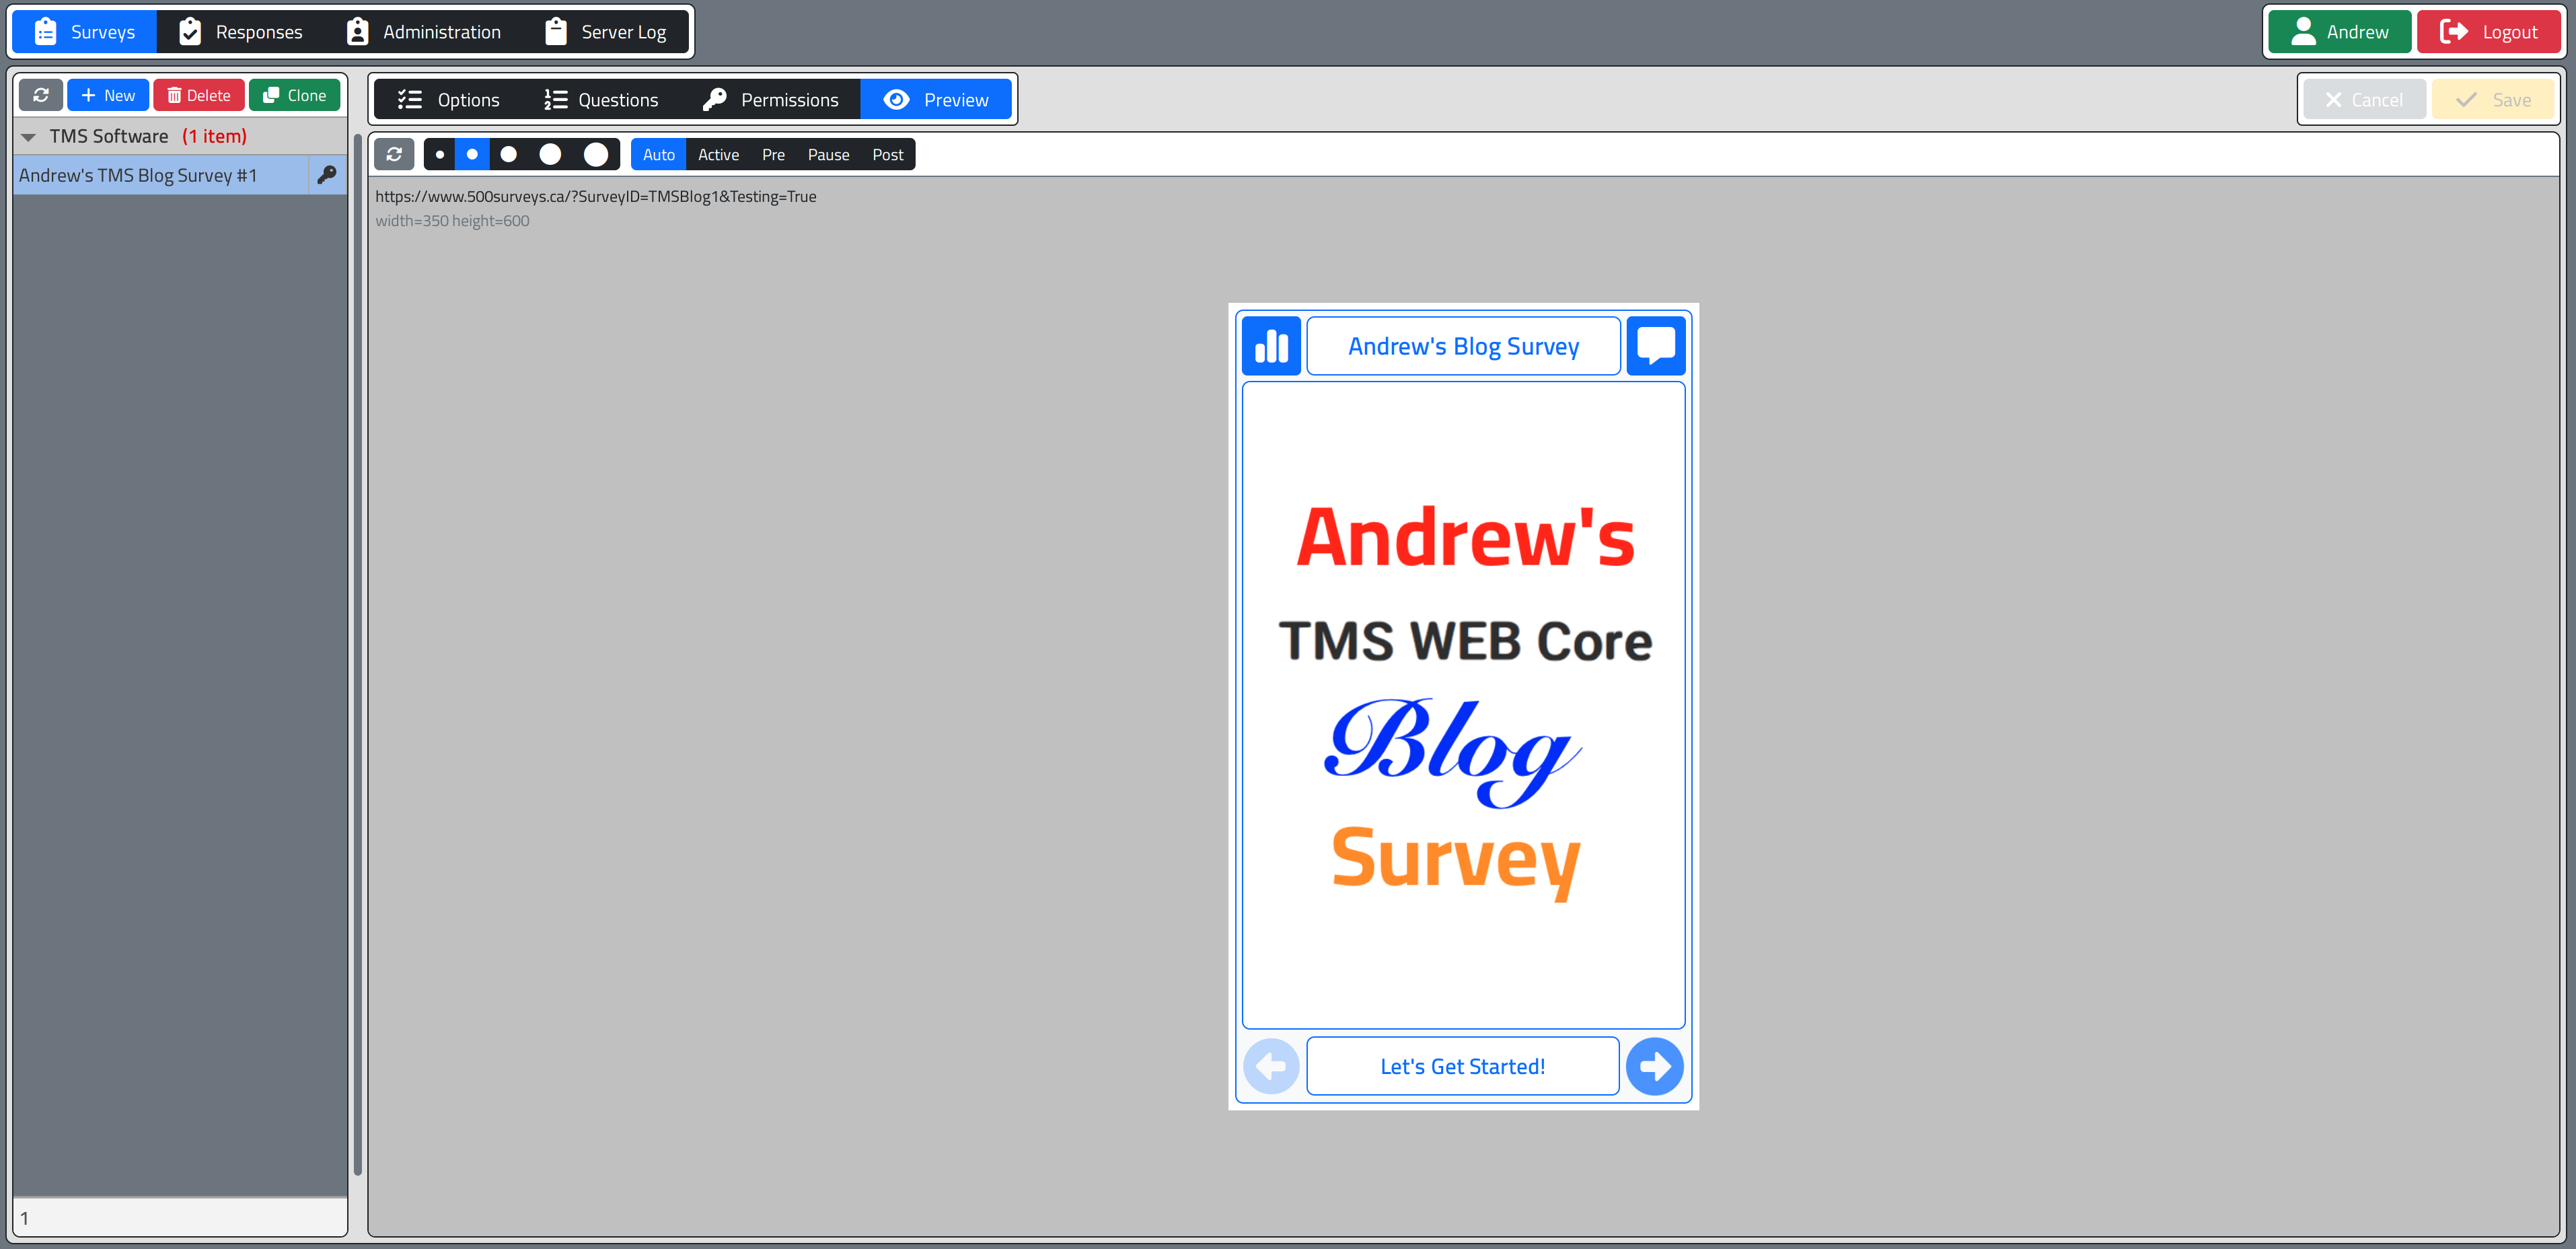
Previewing Content.
The preview tab also includes buttons for overriding the current state of the survey, so you can see what it
looks like before, during, or after its availability windows.
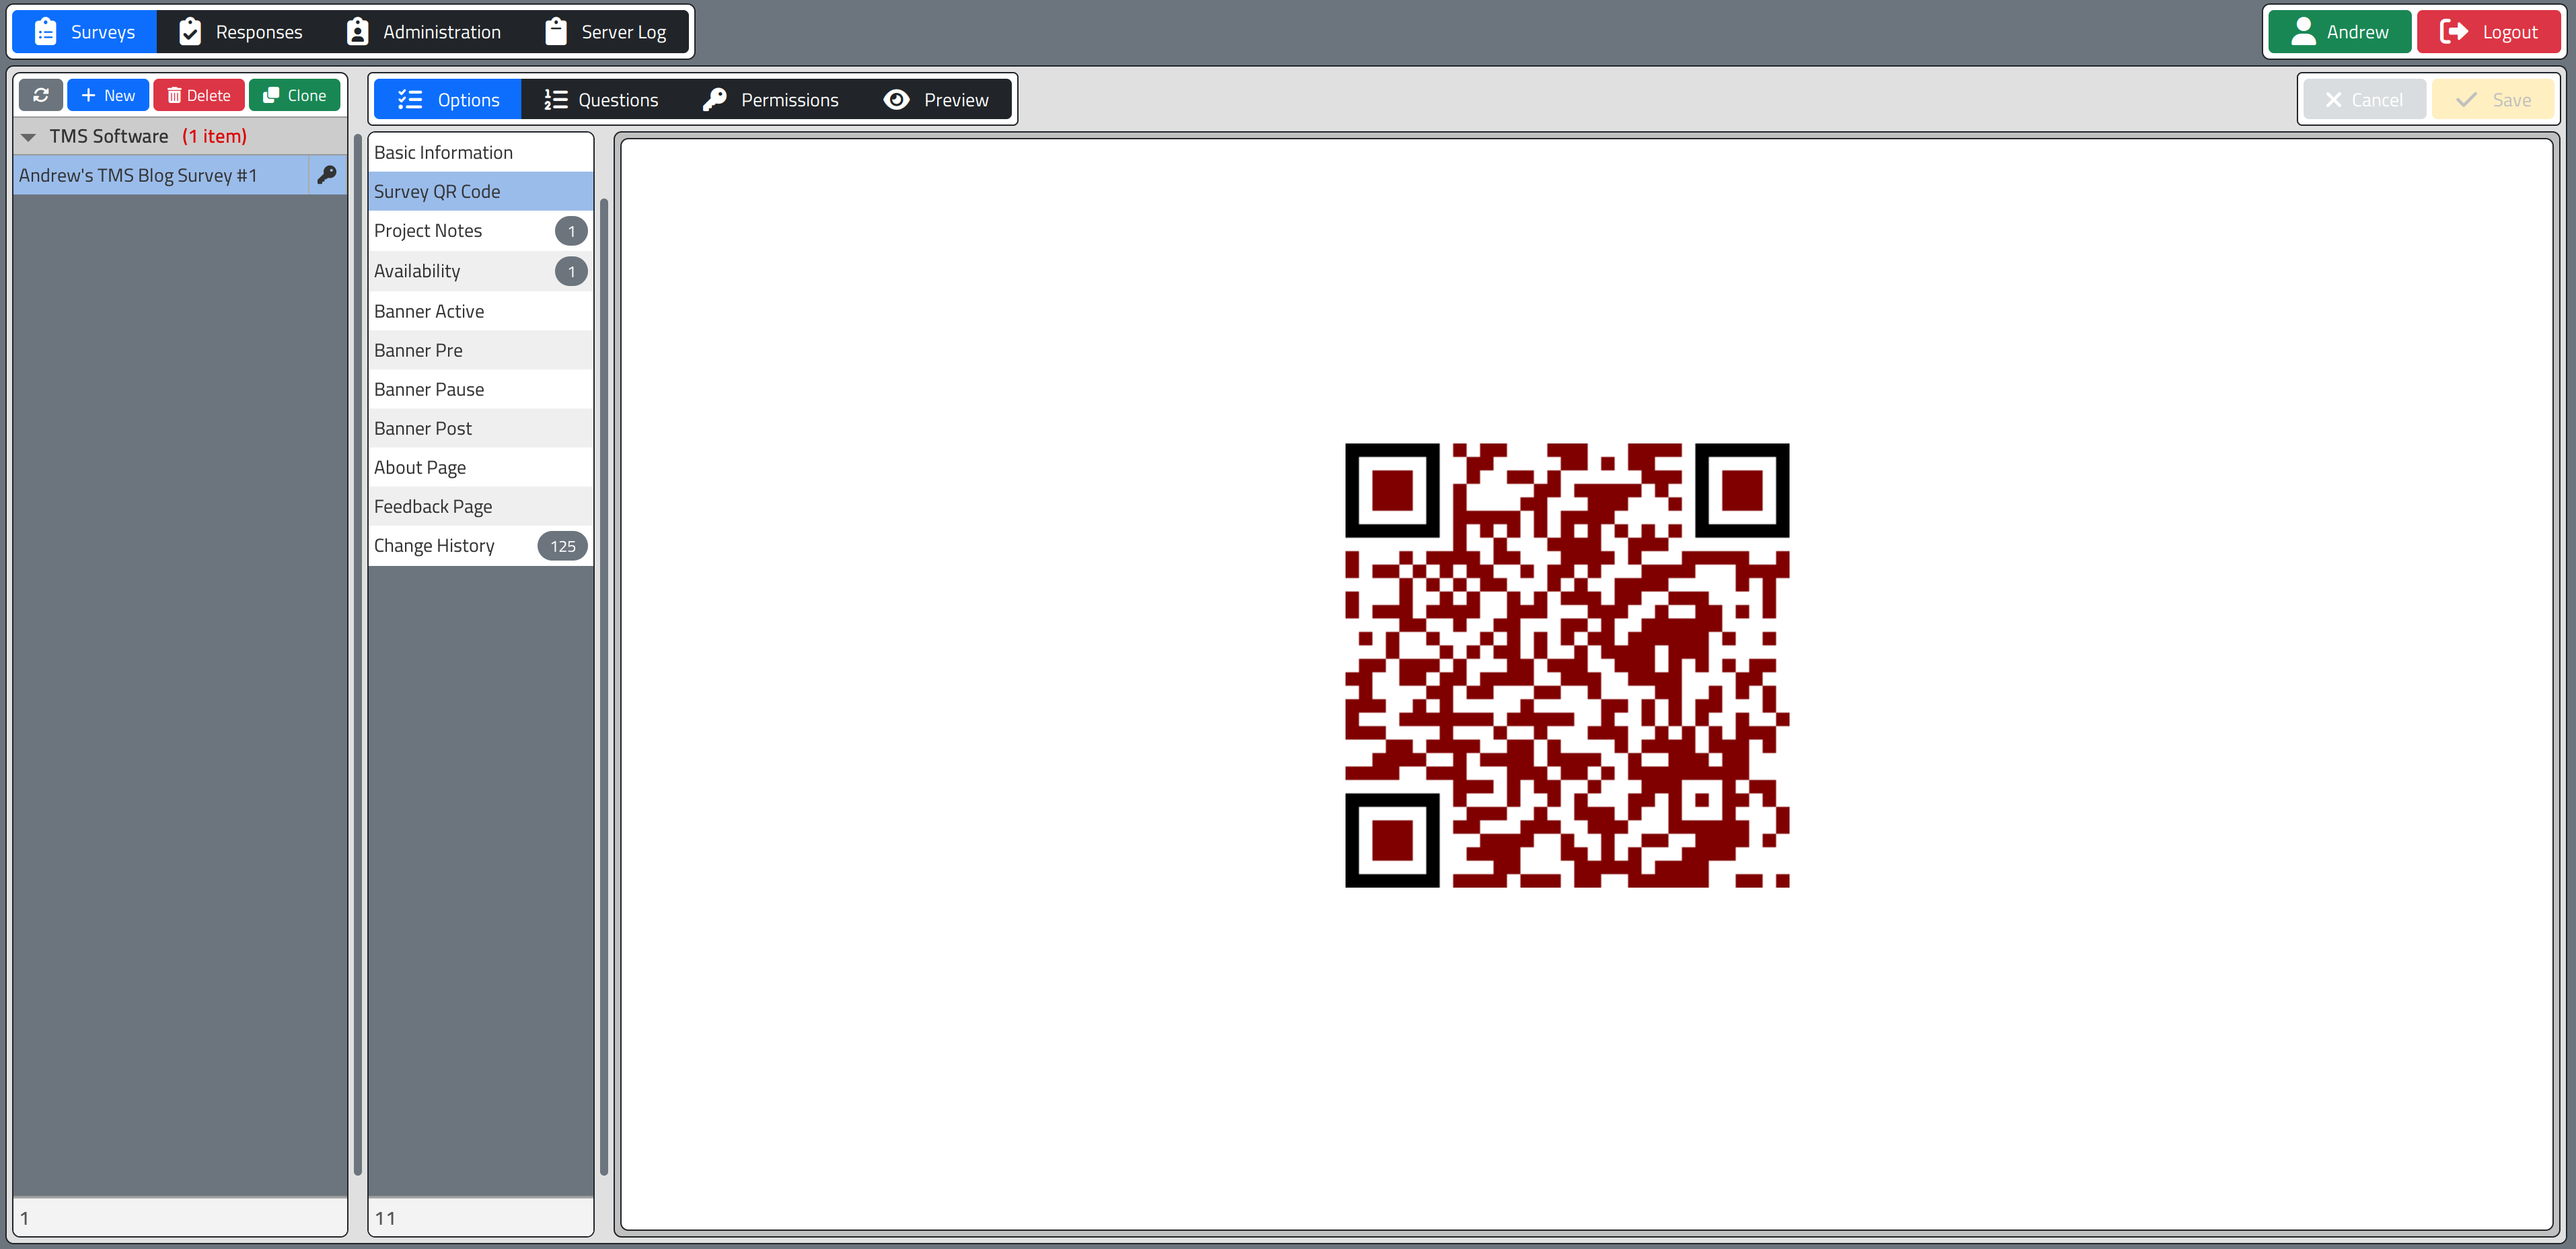
QR Codes
If you're going to be publishing a survey, having a QR Code that provides a URL link to the survey is a handy thing to have. Not particularly difficult either. Here we use a component from the TMS FNC WX Pack to display the QR code. A little fiddling with the colors and size, and we're done with it. Might be an idea to expand the options to include a logo or customize the colors, but the basic function is there.
This is likely
something that would just be copied and pasted into some advertising or another website, so not really a need
for anything fancy either way. Scanning the code with a mobile device will drop you into the survey. That's all
we're after here.
QR Code Ready for Scanning.
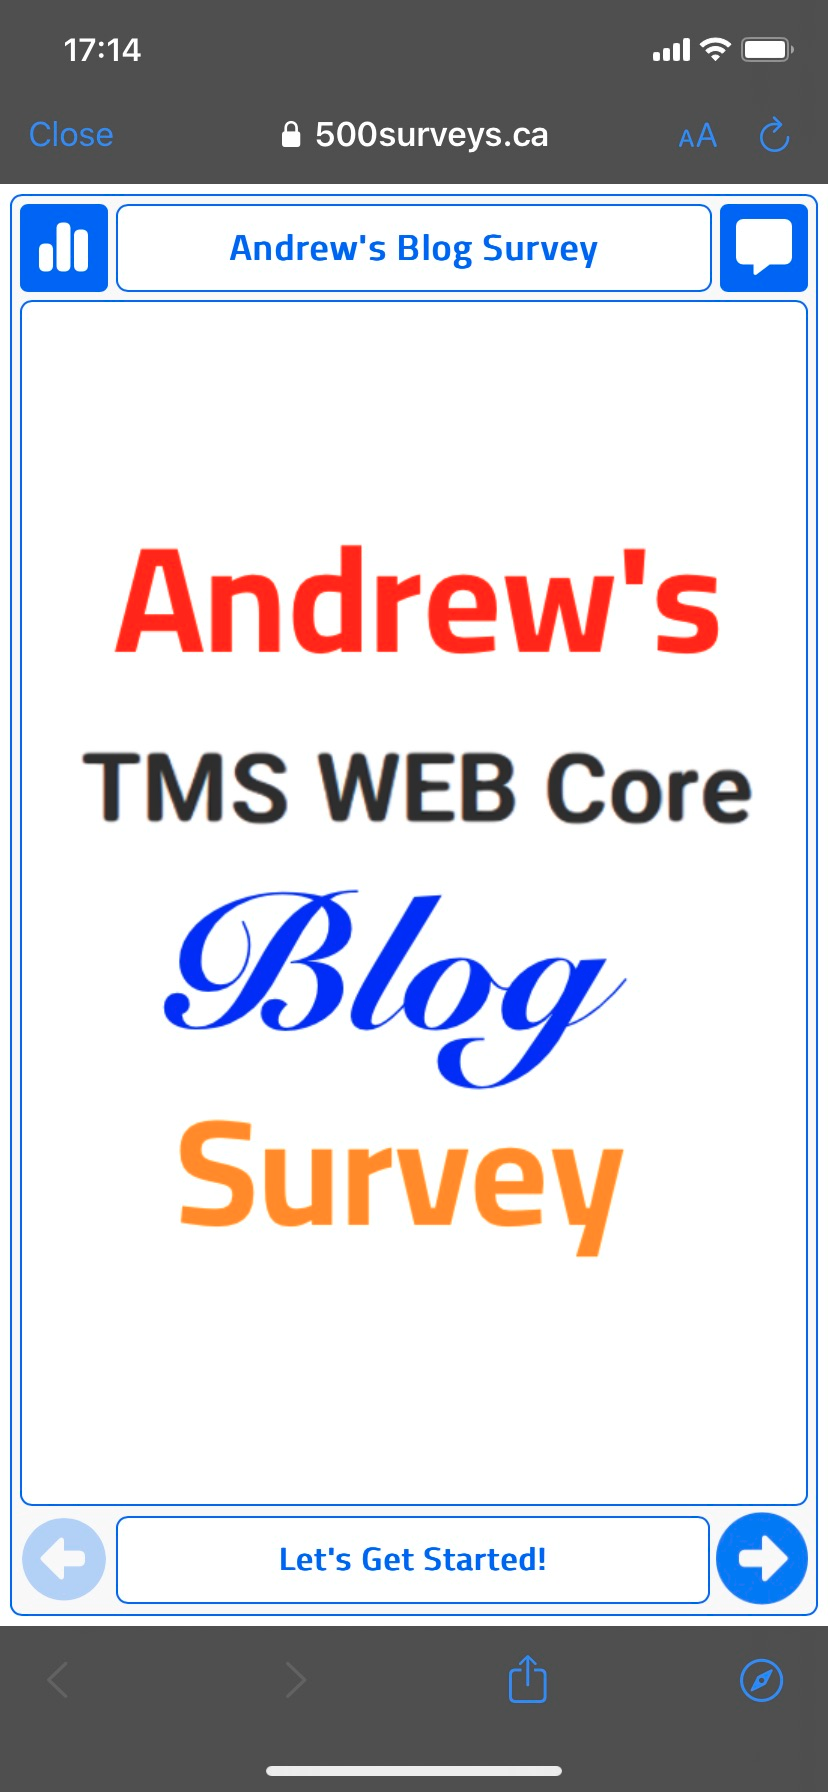
After QR Scan on iPhone.
Custom Dropdown.
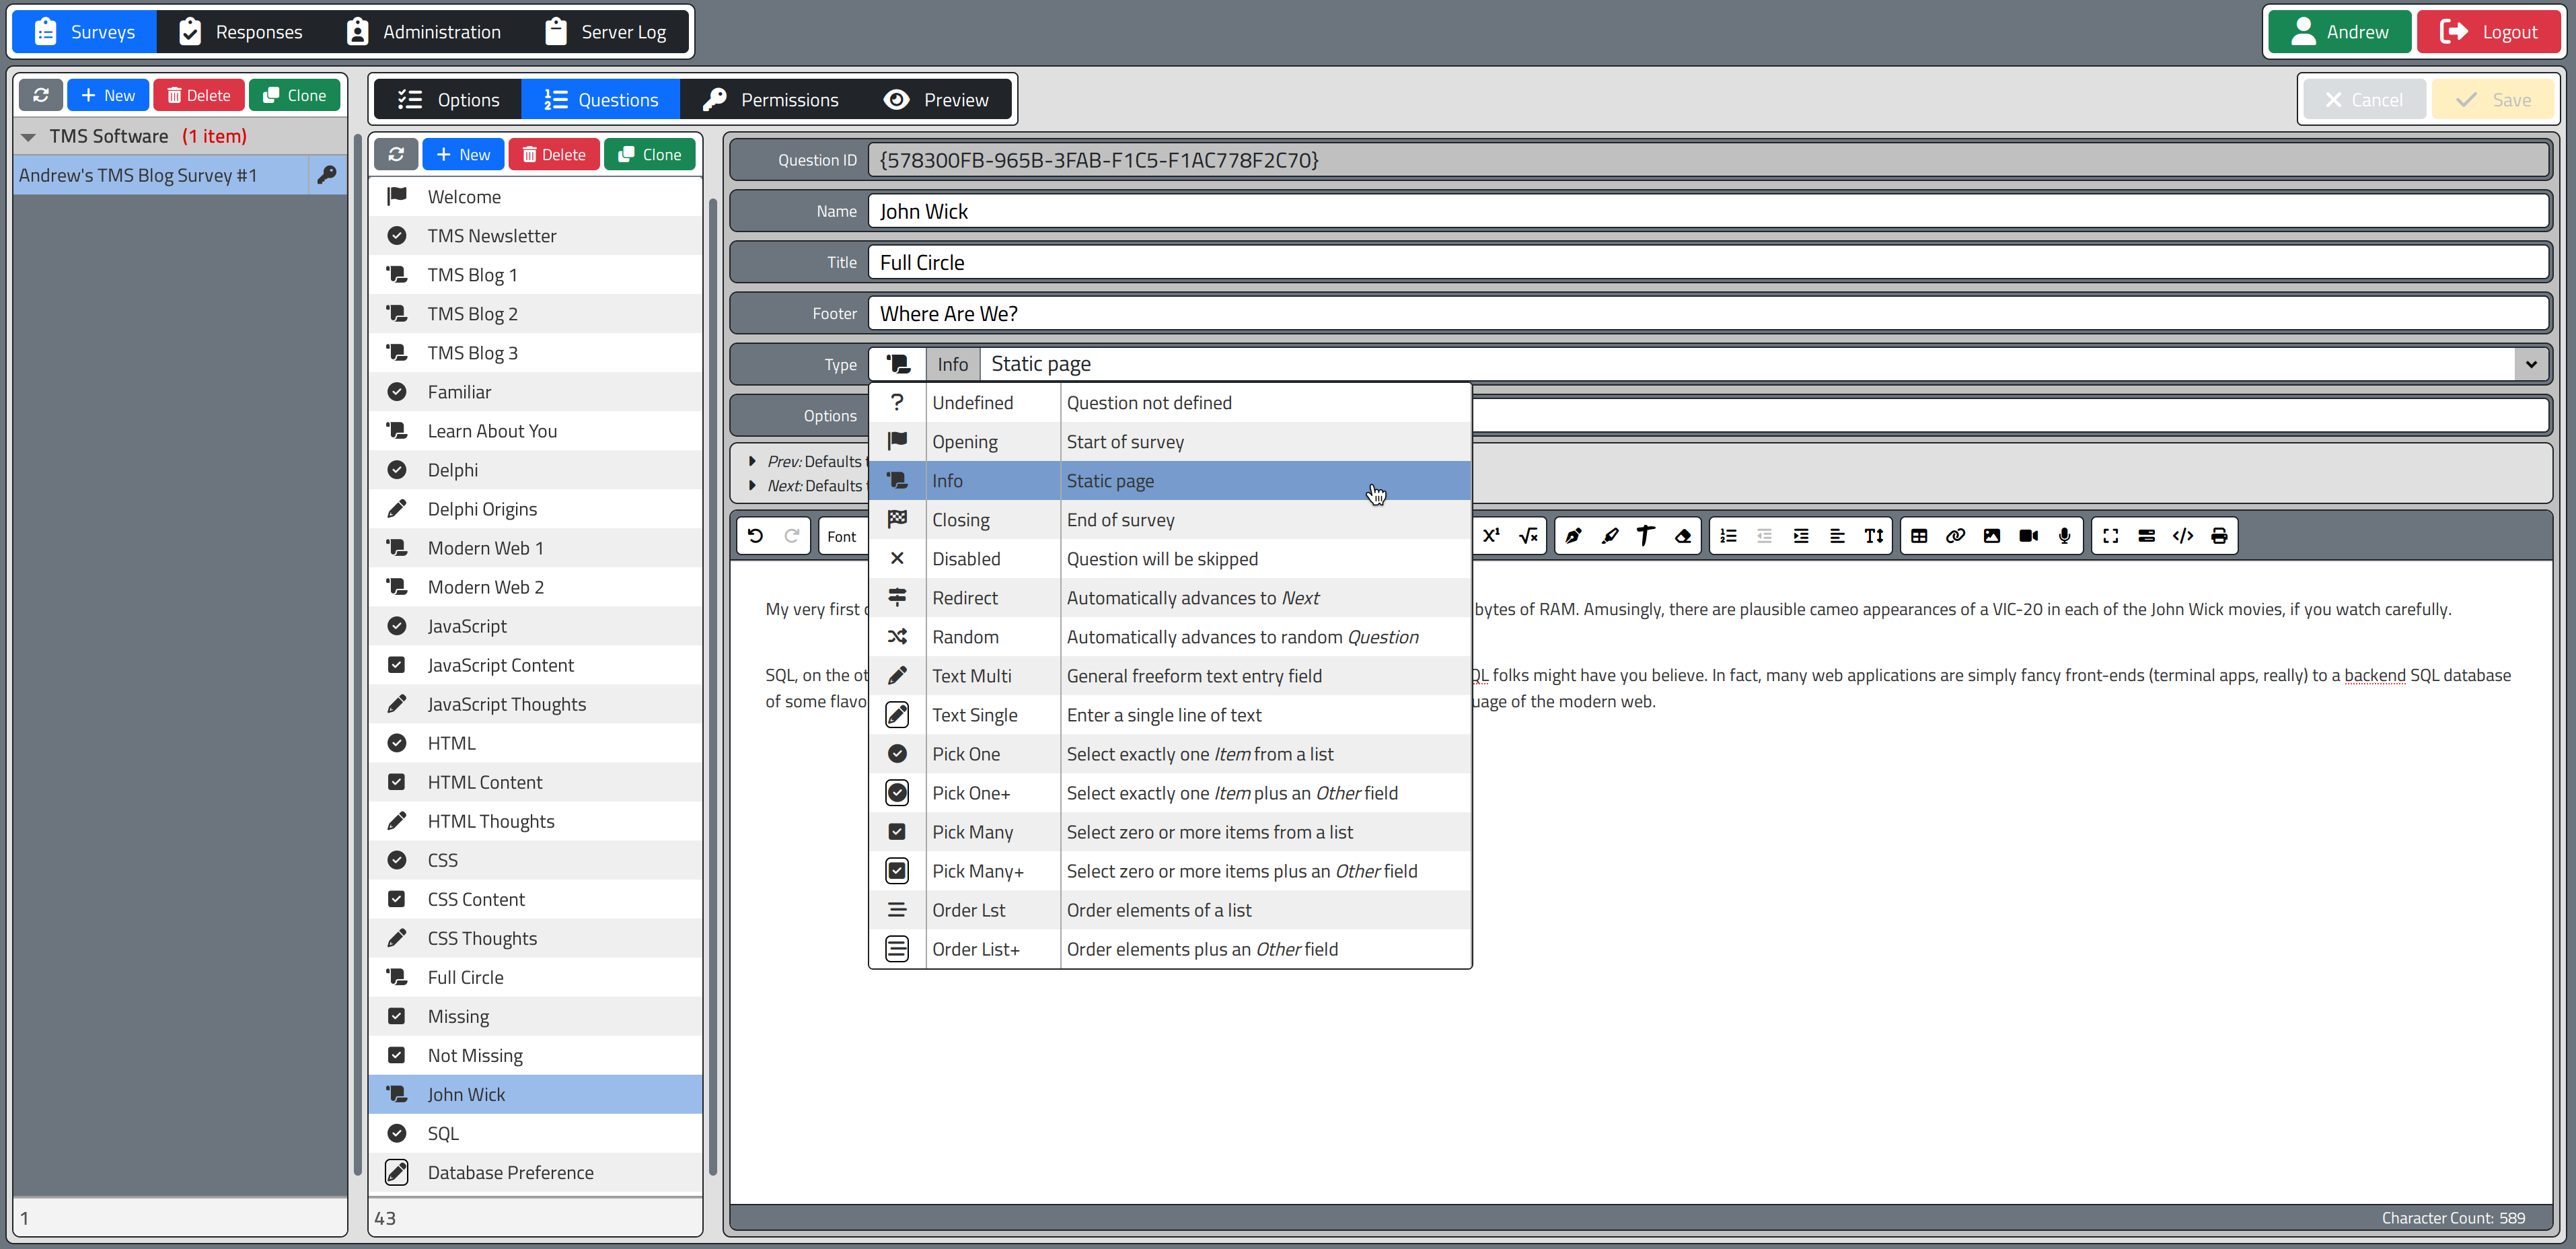
Editing text fields? Check. Editing HTML content? Check. That covers the bulk of what we need to do. But sometimes you need something else. In this case, there's a need to define a question type. Maybe it's a question that just displays a static page of content, like a welcome page or a thank you page. Or maybe it displays three choices and needs one of them to be selected. Nothing mysterious, really.
But it would be helpful to have a list of these question types along with maybe an icon and a brief description of what the type does. Maybe even a not-brief description. TMS WEB Core has a TWebDropDown component that allows us to display another component when it is selected. So let's make a fancy combo box. We'll use a Tabulator table for the list, and display it when someone wants to change the question type.
For the Tabulator part, we have something like this. We define the contents explicitly (and we can re-use this elsewhere in the app). Then load up a Tabulator with it. I've left out most of the types for brevity here.
   asm
    var caret = '<i class="fa-solid fa-caret-right fa-fw mx-1"></i>';
    var border = 'style="border-radius:4px; padding:2px 1px; margin-left:8px !important; border-color:#000;"';
    var typedata = [
      { "ID": 2,
        "HINT": "Info",
        "ICON": "<i class='fa-solid fa-scroll ms-2 fa-fw'></i>",
        "DESC": "Static page",
        "INFO": caret+"<em>Prev:</em> Defaults to <em>Prev</em><br />"+
                caret+"<em>Next:</em> Defaults to <em>Next</em>"
      },
      { "ID": 9,
        "HINT": "Pick One",
        "ICON": "<i class='fa-solid fa-circle-check ms-2 fa-fw'></i>",
        "DESC": "Select exactly one <em>Item</em> from a list",
        "INFO": caret+"<em>Prev:</em> Defaults to <em>Prev</em><br />"+
                caret+"<em>Next:</em> Defaults to <em>Next</em>"
      }
    ];
    window.typedata = typedata;
  end;


  asm
    this.tabQuestionTypes = new Tabulator("#panelQuestionTypes",{
      data: typedata,
      headerVisible: false,
      columns: [
        { title: "ID", field: "ID", visible: false },
        { title: "ICON", field: "ICON", visible: true, formatter: "html", width: 43, minWidth: 43, maxWidth: 43 },
        { title: "HINT", field: "HINT", visible: true, width:100 },
        { title: "DESC", field: "DESC", visible: true, formatter: "html" },
        { title: "INFO", field: "INFO", visible: false }
      ]
    });
    this.tabQuestionTypes.on("rowClick", function(e,row){
      row.select();
      var id = row.getCell("ID").getValue();
      var icon = row.getCell("ICON").getValue();
      var hint = row.getCell("HINT").getValue().slice();
      var desc = row.getCell("DESC").getValue().slice();
      var info = row.getCell("INFO").getValue().slice();
      var qtable = pas.Unit1.Form1.tabQuestions;
      var qrows = qtable.getSelectedRows();
      if (qrows.length > 0) {
        var qid = qrows[0].getCell('question_id').getValue();
        pas.Unit1.Form1.NewQuestionTypeSelected(qid, id, icon, hint, desc, info, true);
      }
    });
  end;
With that in place, we can wire up the TWebDropDown component. And it looks like this. Pretty fancy!
Custom DropDown for Question Type.
The full description of the selected question type appears just above the HTML editor, which is defined in the
table. That description adjusts to fit whatever is selected. An extra resize event had to be added to get it
to resize when the number of lines changed, but that's the only instance of that being an issue. Here, for
example, the description for the "closing" page has an extra detail that a survey writer might want to know
about.
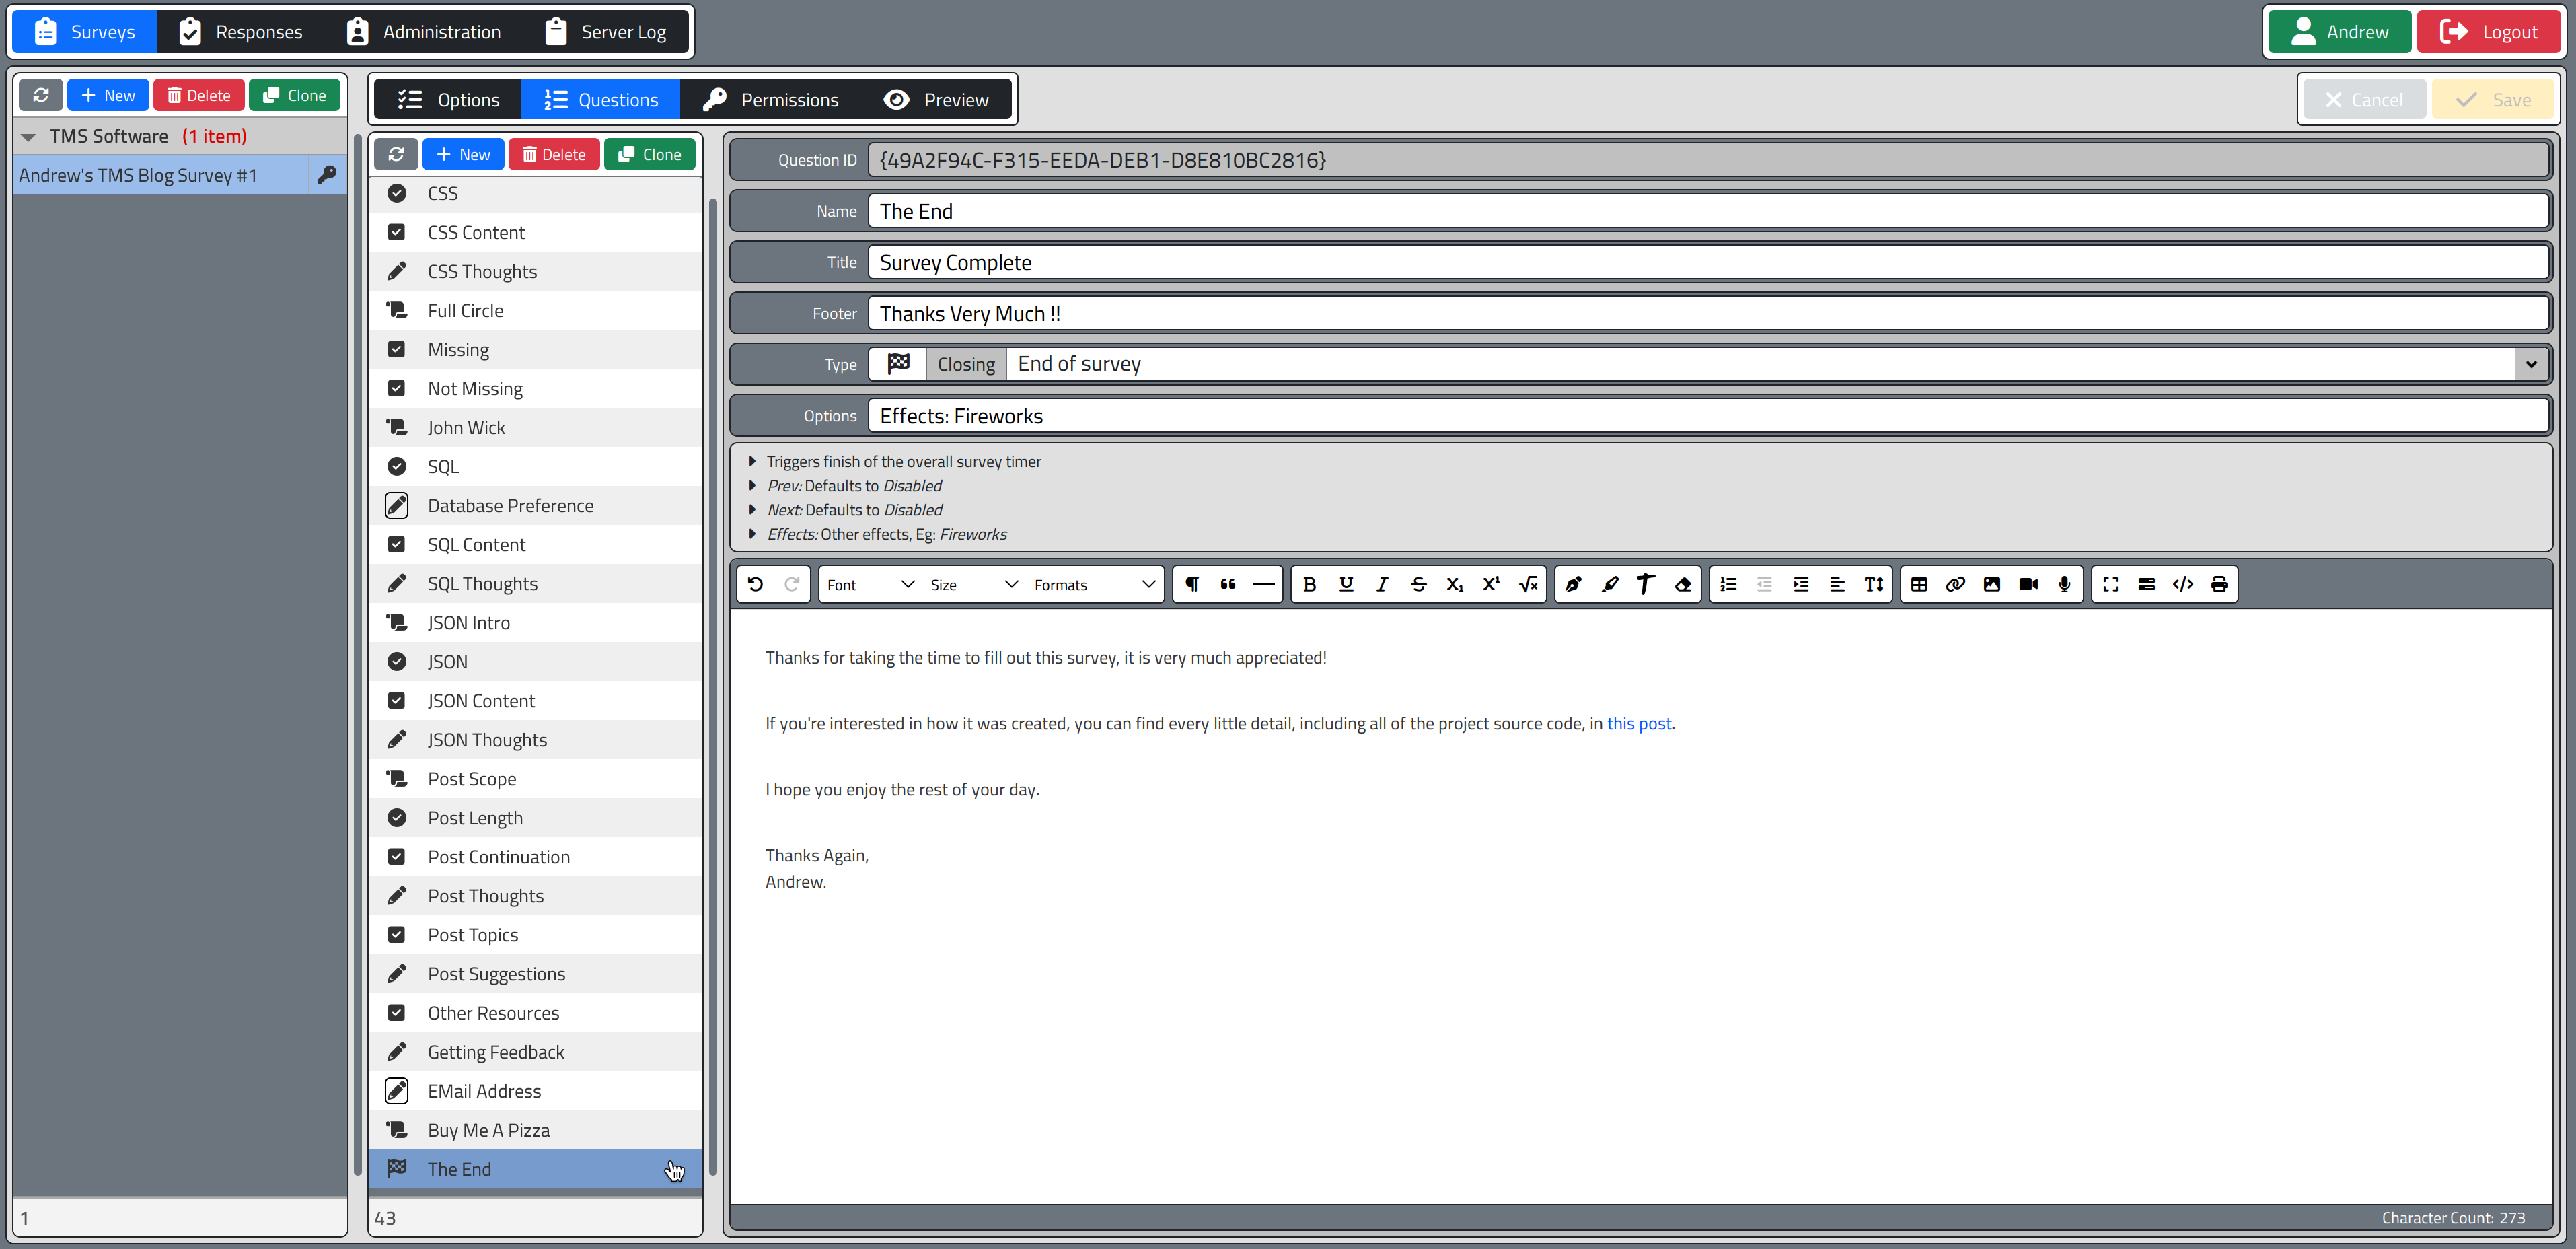
Extra Detail for Custom DropDown.
And with that, we've got the pieces in place for creating everything that goes into the survey. Sure, we
skipped some of the work but not really any of the relevant parts. Lots of copy & paste though. The next task, then, is to actually work on the survey presentation.
Related Posts
TMS XData: An Extended Example Part 1 of 3
TMS XData: An Extended Example Part 2 of 3
TMS XData: An Extended Example Part 3 of 3
Andrew Simard

This blog post has not received any comments yet.
All Blog Posts | Next Post | Previous Post