Blog
All Blog Posts | Next Post | Previous Post

 TMS WEB Core and More with Andrew:
Working with Home Assistant - Part 1: Introduction
Monday, January 30, 2023

In today's post, we're going to kick off a mini-series that will explore Home Assistant, and how we can craft TMS WEB Core projects to interact with it in all kinds of interesting ways. There's quite a lot of ground to cover. We'll start with the basics, and then quickly work our way up to something considerably more substantial before we're done with this topic. Hopefully there will be a bit of something for everyone before we're done, even if you have no interest in Home Assistant or home automation.
Motivation.
When it comes to the home automation space, there is a very broad spectrum of products and services available, along with many players, big and small. With every one of them trying to carve out their own niche. Some vendors are content to offer devices with basic functionality, like the aforementioned smart lights and smart outlets. Other vendors are more ambitious, like Apple and their HomeKit offerings, creating what amounts to an entire ecosystem. And there are other ecosystems that exist as well, sometimes created by product vendors themselves.
Unfortunately, plenty of barriers have also been erected between devices and services in competing ecosystems. This is nothing new of course, and hardly surprising. These barriers might be thought of as potential customer pain points, essentially. A big chunk of the value that we, as developers, might offer a potential customer in the home automation space might well be derived from hiding exactly this ecosystem interoperability issue.
Often, the ultimate goal of a smart home is to just have it run itself in the most efficient, cost-effective, and unobtrusive manner possible, after all. Our primary objective, then, is to see how we might build TMS WEB Core apps (or perhaps even other apps) that can participate in this home automation space, addressing whatever pain points we run across, while also contributing towards that ultimate goal.
Quick Home Automation Backgrounder.
As this is such a large topic generally, let's cover a bit of background, so we have a better understanding of where Home Assistant fits in, and what kinds of projects we might want to develop using TMS WEB Core. This isn't intended to be an exhaustive overview, just enough to make sense of the rest of this post and the other posts to come in this miniseries.And while the focus is generally on the "home", these topics, tools, and technologies could just as easily be applied to a small office, a vacation home, a workshop, a studio, or any number of other locations. And we'll be covering a great deal of material related to using REST APIs, WebSocket APIs, and other bits and pieces that could be useful in any number of projects.
At its most basic, the idea is that you have "smart" or "connected" devices in your immediate vicinity that are networked in some way. This is also related to the "Internet of Things" or IoT concept, where devices
generally are connected using some protocol or other. And also similarly, these are typically accessible over the internet, with just the most basic capabilities,
to keep the cost and complexity of such devices to their very minimum. As a home is outfitted with more and more of these
kinds of devices, it falls more under the umbrella of a "smart home". Particularly when many such devices are used
together to reduce energy costs or automate at least some of their functionality. Currently, devices usually fall
into one of these categories.
- Smart Lighting. Likely the most popular category, there are "smart lights" for virtually every kind
of bulb you're likely to use in your home regularly. Often, these are LED-based lights, offering limitless
color choices. LED strips fall under this category as well, providing all kinds of novel lighting solutions
that can be set to a schedule, and triggered by other devices like motion sensors or sunlight sensors. Philips
Hue is a particularly popular brand with a variety of product offerings. But there are many different vendors
that offer smart lighting products in every imaginable size and shape, with a steady stream of new entrants
into this space seemingly every week.
- Smart Switches. As smart lighting has risen in popularity, an array of smart switches have been
created to control them. These include things like dimmer switches, buttons, scene switchers, and a host of
other little devices that control lights, or sets of lights, much like a traditional light switch might do.
But with a great deal more variety, and of course no wires and no limits on where the lights they control
might be located, or even where the switches themselves are located. Like the smart lighting vendors, there is no end to switch vendors either, with the lighting vendors frequently having offerings in this space as
well.
- Smart Outlets. Sometimes also referred to as switches, these are little devices that fit between a
device, like a household appliance, and a power outlet. The "smart" aspect might be something simple, like
the ability to switch power to the connected device on or off. Some products include features to monitor
power usage over time. These are often used to add a bit of "smarts" to devices that don't have any smart technology of their own, like a typical household fan, for example. These can expand the reach of a
given smart home network considerably, by essentially bringing connectivity to many previously non-networked
devices.
- Smart Thermostats. As you might guess, these control the heating and/or cooling of your home. There are as many variations here as there are ways to heat your home. Newer homes already equipped with
low-voltage thermostats usually get the best smart thermostats. But even if you just have high-voltage
electric baseboard heaters, there are smart thermostats tailored for that application. Sometimes you end up
with the need for a thermostat for each heating/cooling zone in your home. Sometimes you can get away with
fewer. This is also one of the smart home products that can save you a considerable amount of money - by more efficient heating or cooling your home, just as would be the case with a traditional programmable
thermostat, but with far greater control. Popular techniques here include having thermostats make changes
automatically as you enter or leave your home, or connecting to local weather services to better predict the
weather and make more informed choices when it comes to adjusting thermostat settings. These often include at
least a basic energy monitoring component, while more advanced systems are able to juggle your climate needs
along with multiple energy sources to ensure you're getting the best value for every bit of energy consumed (or generated!).
- Smart Sensors. This covers an array of different devices that can detect changes in your home. From simple things like sensors that monitor motion, light, temperature, humidity, or even water leaks, to more advanced sensors that track air quality, smoke or CO detectors, or even complex surveillance cameras that track the presence of specific people in your home.
- Smart Devices. And then there is an even larger category of "smart" or "connected" devices that cover everything else. Things like bathroom scales or blood pressure monitoring devices, exercise equipment, kitchen appliances, laundry appliances, and so on. More and more of these kinds of devices are appearing all the time. And there are other devices from other industries (and the IoT community, generally) that can usually be incorporated into a smart home system with little effort. Things like tank level monitoring, advanced weather systems, more complex alarm systems, and so on.
- Smart Media. Smart TVs are of course a thing, and any recently made device that can stream Netflix or other online content likely has a bit of smart technology in it as well. These devices might be paired with smart lights to offer a synchronized and enhanced level of ambient lighting. Or whole-home audio solutions that allow you to listen to whatever you want wherever you are in your home.
- Smart Security. Highly-integrated home security systems can now play a central role in your home
automation as well. From 4K PTZ security cameras, cloud recording, alarm keypads, an endless array of
sensors, and a bit of help from an alarm monitoring company, home security can be enhanced considerably.
Basically, if you can think of something that might have value in being connected to your home network, there's
likely a smart version of it available, or at least a handful of options that might facilitate such a
connection. And to be fair, there are plenty of smart devices that really have no business being "smart" other
than as a gimmick, but here we are anyway. |
Getting Connected.
How these devices all connect to your home is an interesting question. What does it even mean to be connected to your home, technically? Well, that's also a big topic. When some of these devices first started to appear, they often required the use of some kind of hub - a device you'd plug into your network (either with an Ethernet cable or later via Wi-Fi). This hub would then serve as the gateway between your home network and the smart devices, where the smart devices might very well use a different communications technology, like Bluetooth, Z-Wave, Zigbee, or perhaps something more proprietary.
Philips Hue lights, for example, required the use of a hub, the Philips Hue Bridge, which provided this gateway, facilitating communications with its lighting products, which did not use Wi-Fi or Bluetooth initially.
This could be a bit of a nuisance (and added cost and
complexity) if you used smart devices from different vendors, as you'd need a hub to support each different vendor's product suite. And instead of just having to worry about Wi-Fi coverage in your home, you might have to
deal with things like mesh networks and the challenge of reaching that bulb way off in the far corner of your
basement. Newer smart devices, including those from Philips, typically now support Bluetooth or Wi-Fi directly,
reducing the need for separate hubs much of the time.
As smart devices have become more popular, a more centralized means to control a variety of devices has become important. And something that could talk to many different kinds of devices with one interface. It was kind of tiresome to have to use two different apps on your phone to control lights from two different vendors, for example. This gave rise to a few different smart home ecosystems. Legacy home automation providers were around long before things like Wi-Fi and Bluetooth came to be. Many have adapted. But Apple, Google, and Amazon also entered the fray, providing what amounted to competing ecosystems of their own, along with a suite of products and services (and hubs!) to manage an entire home from a single app.
Apple, being Apple, introduced something like a "Works with HomeKit" program, making it super-easy to add smart devices to their ecosystem, just by scanning a barcode. And devices could be controlled by Siri or via the Home app on any modern Apple device, even making it possible to control devices while away by using something like an iPad or an AppleTV to serve as their own local hub. Very slick, particularly compared to the competition.
But not very open - if a vendor didn't sign up for the "Works with HomeKit" program, getting their devices to work in Apple's ecosystem was a challenge. More on that in a moment.
Google (Home) and Amazon (Alexa) predictably
did something similar, but somewhat less proprietary and potentially less easy to use. Almost like we've
collectively learned nothing from smartphone ecosystems. As making smart devices for Google/Amazon was a cheaper
proposition with a lower barrier to entry, there are, predictably, considerably more devices available outside
of Apple's ecosystem than there are within it. Which might be a problem. For Apple, at least, and potentially
its customers.
Addressing Problems.
There have been recent and significant steps toward removing some of the barriers between these competing ecosystems. As vendors naturally want to sell more products, their support for different ecosystems is gradually increasing. The largest vendors tend to support as many ecosystems as possible as a result. But gaps remain.
And inevitably solutions appear to help address those gaps and the other problem areas within the home automation space. One notable step is Matter - a protocol that promises to make it much easier to add smart devices from many vendors to many different ecosystems. Many vendors have committed to upgrading existing products to use Matter as well, but that's kind of a hit-and-miss scenario. Over time, this will hopefully be less and less of an issue, but it won't get fixed overnight, unfortunately. In the interim, other solutions have come into play to help address this and many other problems.
One example of this is HomeBridge. This is an open-source project that allows you to add devices to Apple's HomeKit that are not natively supported. They use a plugin system, with more than 2,000 different devices. In my home, for example, I have a handful of overhead kitchen lights that use MR16 bulbs. To my knowledge, there are no HomeKit-compatible MR16 bulb vendors currently. However, there are MR16 bulbs available from different vendors, like MiLight. HomeBridge, well, bridges the gap by providing a plugin for MiLight on one side, and then appearing as a "bridge" in HomeKit, where the lights can then appear as normal and be used in the same way as any other HomeKit light. Pretty handy if you're in that kind of situation.
In terms of ease of use, HomeBridge
involves running a fairly complex application, typically packaged up as a virtual machine (VM) that you
download and run on a local PC of some kind. Setting up devices can be a bit technical as well, and involves
tracking down compatible plugins, editing JSON, and that kind of thing. Very workable, and fills a very
specific and much-needed gap, but not necessarily something everyone is going to be able to take advantage of. And also very specific to HomeKit in this case.
A common requirement for any offering that tries to address shortcomings in the home automation space is that, most often, there is code that needs to run somewhere. Sometimes it can run as a separate application on a regular (stationary) PC, running Windows, macOS, Linux, or even on a Raspberry Pi. Stationary because it wouldn't be great if your home automation control system left your home (as might be the case if it was installed on a laptop, for example).
Apple got around this by making it possible to use an AppleTV or an iPad as the hub for the home. Other vendors get around this by using, as you might have guessed, hubs of one form or another. Smart speakers might also perform a similar role, playing host to an application of some kind, much like HomeBridge has done.
But - if you have a local PC that has a bunch of home automation "smarts" in it, maybe it could be expanded to
do a whole lot more at the same time?
Home Assistant Introduction.
This is where Home Assistant comes in. Like HomeBridge, it is a fairly complex application and is generally installed as a VM running on a PC, on a Raspberry Pi, or even on something like a Synology storage device. It works as you might expect a typical client/server app to work. It contains the state, plugins, and history of the smart devices that are in your home, along with whatever other data you wish to feed into it. And it serves up a dashboard interface, a REST API, a WebSockets API, and even a bridge to HomeKit. This means it can do a lot of what HomeBridge does, and considerably more, in theory anyway. Here's a screenshot of my Home Assistant dashboard at the moment. A work in progress, but examples of many of the "smart" device types we referenced earlier can be found here.
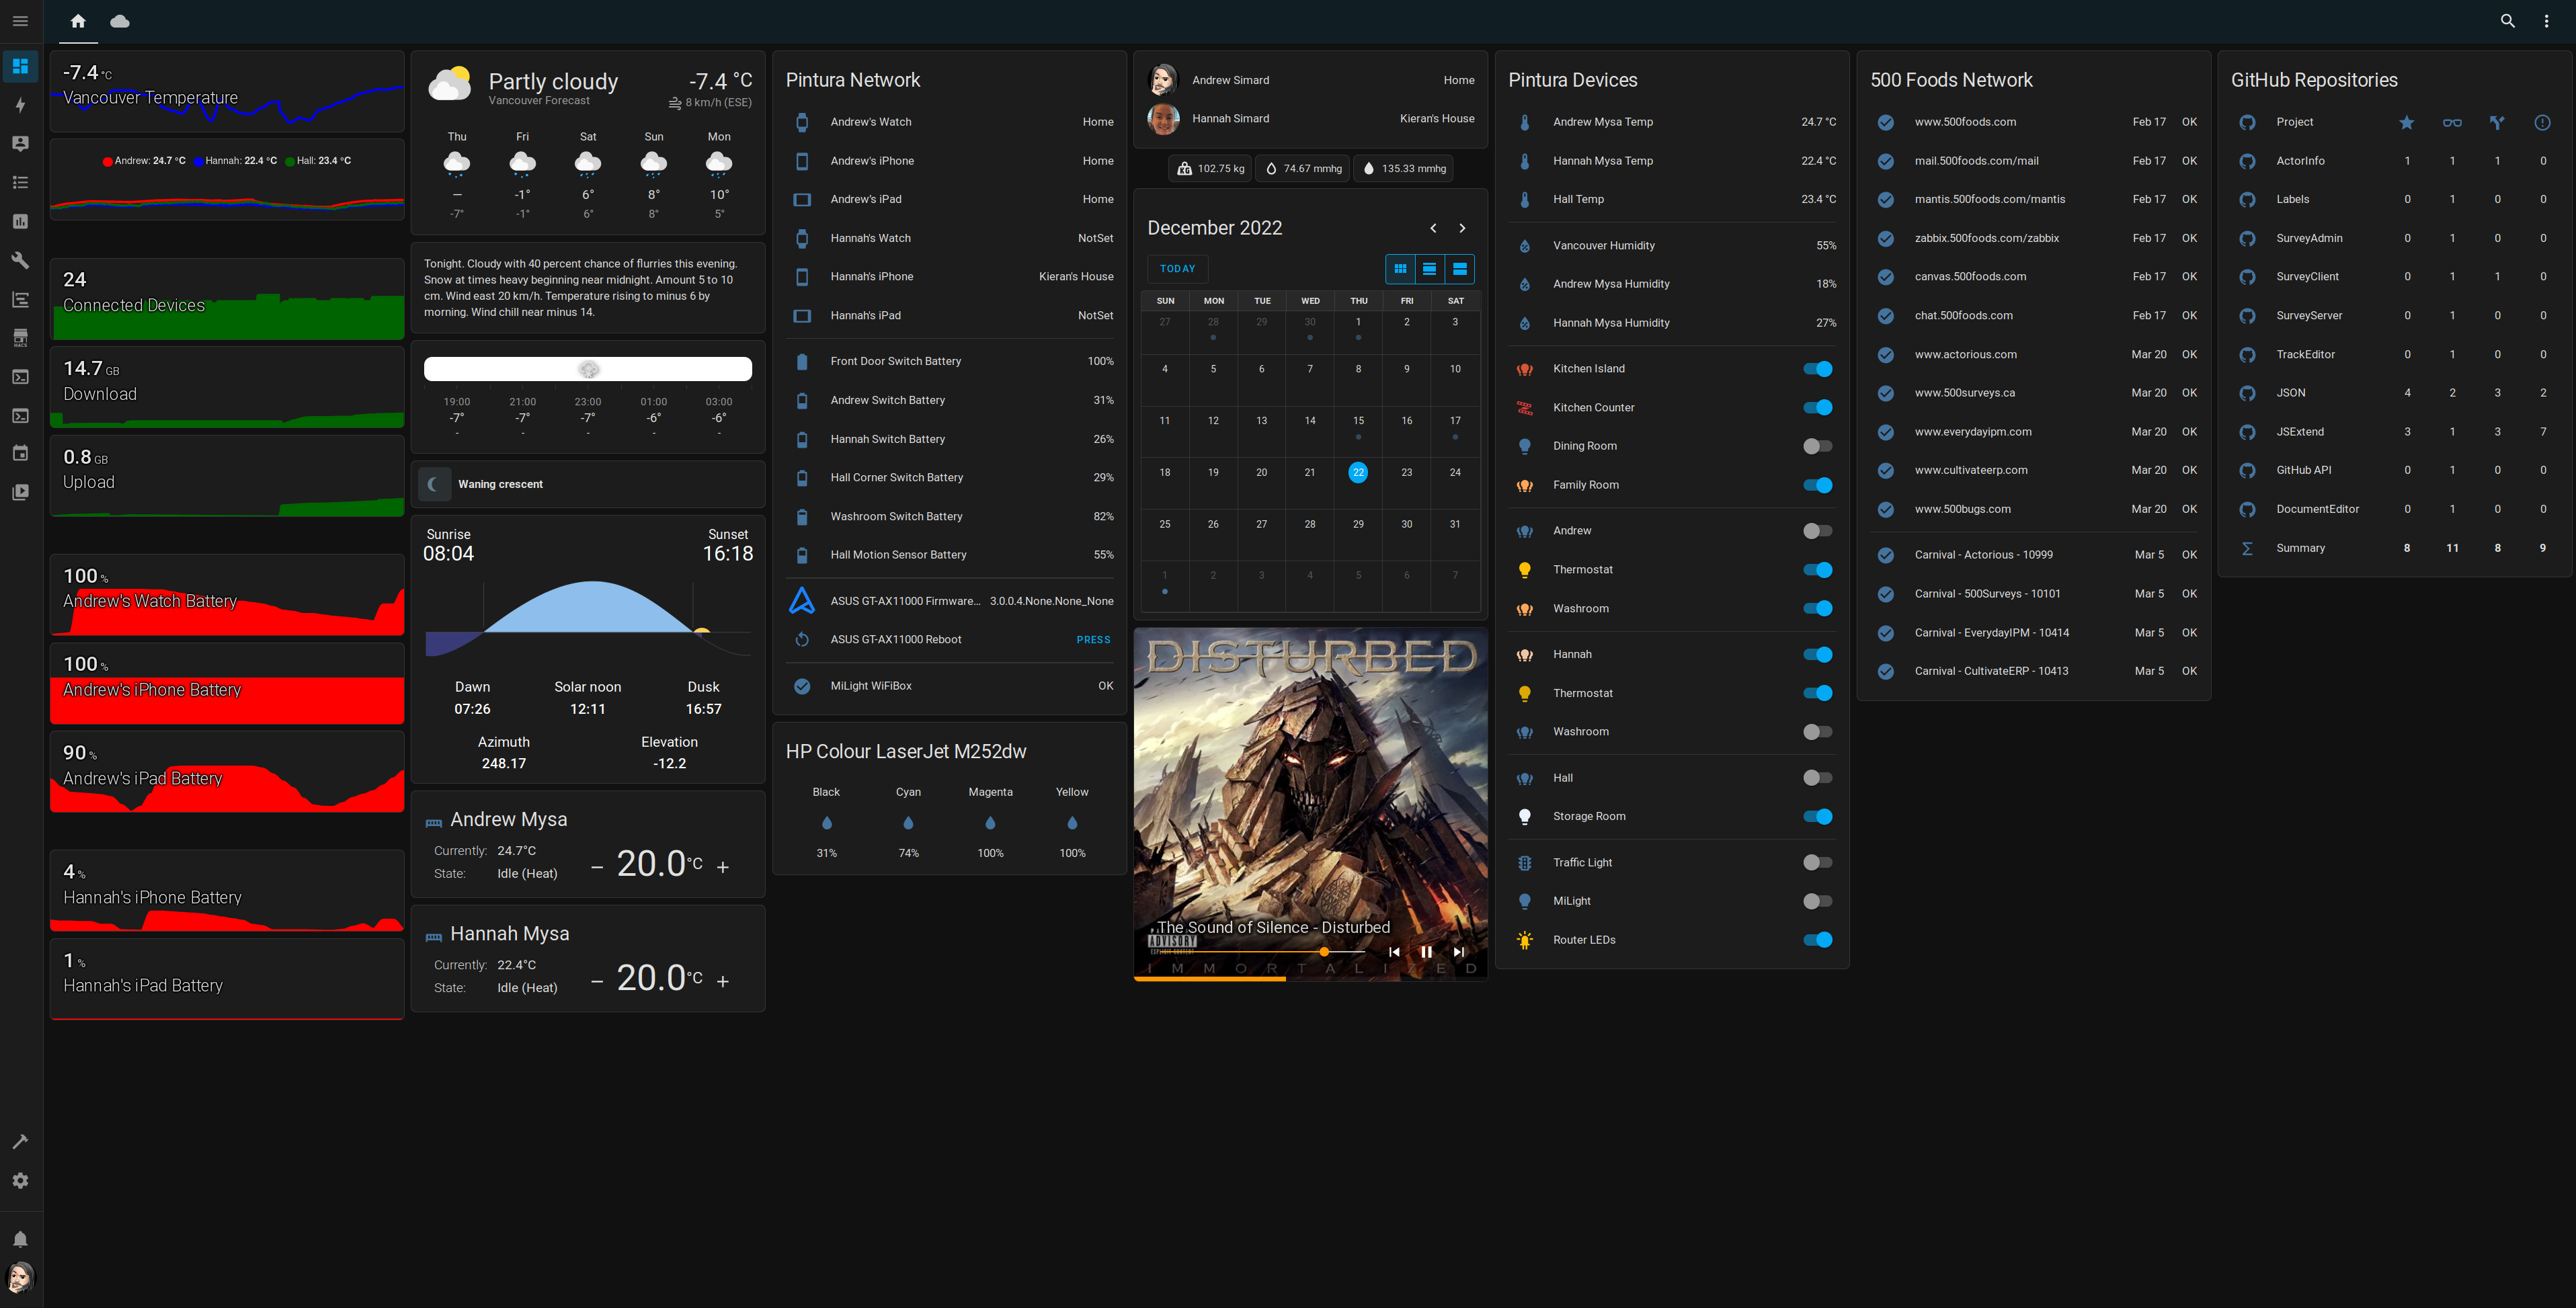
Home Assistant: Dashboard Example.
While I am a big fan of Home Assistant, I've only been using it for the past month or two. And, like HomeBridge, this is not necessarily the easiest thing to set up or use. Very high learning curve, and lots of fiddling to get things to work. And while I could write many pages about using Home Assistant generally, I'd like to cover a number of things, both positive and perhaps less positive, to help you decide whether this is something of interest for your projects.
- I've got Home Assistant running as a KVM/QEMU guest VM on a Fedora Linux host system. A VM image was
available for download directly from their website, already configured. Which made this incredibly easy to
set up and it started working right away. Surprisingly few issues have come up with regard to this method of
app deployment. No question that the people involved in this project know their stuff in this area.
- The main dashboard interface is called "Lovelace" and is managed through the use of "cards", where each card
contains a template for how the data is laid out. There are dozens and dozens of cards to choose from. And
many cards can be customized even further using a template system of sorts. Plugins can be used to alter how
the layout of the dashboard works, changing the flow of cards, adjusting their size, the overall theme, and so
on.
- Additional cards are available that can be downloaded and installed that can offer
additional functionality. All the charts on the left, for example, use ApexCharts, a JavaScript charting library we
haven't covered, to do its work. Grafana could also be used. There are custom cards available for many specific use cases, or even
classes of devices, like thermostats and so on. The built-in cards are also comprehensive, covering most
things without the need for additional cards (including multiple chart options).
- Connecting to devices or other systems is handled through what they call "Integrations". Numerous
Integrations are available covering a broad spectrum of information, from various device-specific
Integrations to weather data service providers, other cloud-based vendors, and much more.
- Data within Home Assistant is organized around concepts like "entities" and "sensors". These map generally
to things like lights and switches, and many aspects of their use include a detailed history. You can even
see how often you turn a given light switch on or off, for example. Internally, this is managed through the
Home Assistant database. And there are various ways to get data into and out of that database, and even
options for changing the database engine itself.
- When interacting with Home Assistant programmatically, it is also important to understand the difference
between things like "state" and "service". For example, you can change the "state" of a light switch all day
long and nothing is going to happen - the database entry for the light will be updated, but it is a call to
the "service" that actually turns the light on or off (which also updates its state).
- The dashboard interface makes it easy to not worry about vendors - the list of lights on my dashboard, for example, includes Philips Hue, MiLight, and others, without any obvious distinction - they're just lights and they all can be switched on or off or their RGB values can be adjusted. Different icons can be used to indicate whether it is a single bulb, many bulbs, an LED strip, or something else.
- Device-specific data is typically well-supported using Integrations. It does a pretty good job of detecting many kinds of devices on your home network already, or you can include other integrations explicitly.
- Things that are not strictly home automation-related can be added as well, via Integrations or other means. Things like calendars, GitHub data, router data, bathroom scales, and so on.
- You can also add whatever custom data you like via several means. On the right side of the screenshot,
there is a list of websites as well as when their SSL certificates expire (the 500 Foods Network card). This
particular card was created using data generated with a few lines of code directly within the Home Assistant
configuration files. These run "curl" with various parameters to get the bits of data, and then add them to
entities or sensors in the Home Assistant database. See below for more details.
- Home Assistant has to do a bit of a dance to get HomeKit devices to both work within Home Assistant and HomeKit at the same time. First, you add a device using the normal HomeKit pairing mechanism. Then delete the device from HomeKit. This means the device is configured for your network but no longer tied to HomeKit, which is exactly what Home Assistant needs. Once set up in Home Assistant, a connection to the device is then provided back to HomeKit using a Home Assistant-supplied bridge (a virtual hub, if you will). Crazy. But it works. This is what was done to connect my Mysa thermostats for example. They work fine in HomeKit natively.
- Some Integrations are a bit tricky. For example, it took me the better part of a day to get the Withings data (bathroom scale, blood pressure monitor) to finally integrate properly. There's a lot of technology in Home Assistant, and sometimes it takes a bit of time to figure out what is wrong when things don't work right away (fun times with configuring webhooks, in this case).
- Documentation is a bit sparse. As an open-source project, there is a lot of helpful content to be found, but often not in the documentation. I was able to do everything I set out to do, and then some, but lots of Google searches!
- Most everything HomeKit/iCloud/iOS/Apple-related works pretty well, eventually at least. If you're
interested, use the "iCloud3" interface instead of the default iCloud gateway included with HomeAssistant. It
does a much better job, and gets more information from Apple's "FindMy" collection of services than the
default Home Assistant iCloud gateway does, and, so far at least, with fewer issues. But it, too, takes a bit
of patience to work through.
- The default install is really missing a lot of key things. Easily added, but not sure why they aren't added by default. For example, a tool for editing configuration files is not added by default. And I don't think the REST API is enabled by default either. This post was very helpful in getting these kinds of things sorted out initially.
- And those configuration files - what can I say? I've edited many configuration files in my day, certainly,
and these are, well, a little bit different. Indentation is critical, for example, unlike many configuration
files where whitespace is ignored. Seems like a good application for JSON, but that's not what is used here. They use YAML, which is fine. But when looking at examples, be sure to follow them closely. The configuration
files tend to be a little on the fragile side. Fortunately, there are syntax highlighters used (along with
constant error checking) to help make sure files are validated so you don't somehow end up with a
non-functioning system. And for the most part, you won't need to edit many of them, and usually only one.
Here's someone's take on just that topic: Home
Assistant Configuration YAML (The Beginner's Guide).
- It can take a bit of time and effort to tweak everything. Lots of Google searches to find out how to do some
of the most trivial things, like adding dividers in a list of entities. They try really hard with the UI for
cards, for example, but as soon as you want to do something a little different, you'll be back to editing text
files or searching for card add-ons or tweaks or other things to help. Which is fine, honestly, just
something to be mindful of. It really is quite flexible, but not really all that friendly.
Whew. Could go on for days like that, but all I'm trying to convey, really, is that it is a complex system to set up and run. Not so complex as to want to avoid it, but not so simple as to be able to recommend it to someone non-technical. But with this kind of flexibility comes the opportunity to use the Home Assistant Dashboard to display all kinds of information to help us get through our day. And the gap between technical and non-technical users? That's an opportunity we can work with!
Another point is super-important here. While Home
Assistant is complex and can be a bit of a pain, it can also be a central repository for so many different bits
of data. Home Assistant can very quickly evolve into a key resource, then, as we can write our own applications
to access this data, and they only need to know how to talk to Home Assistant, not the five different smart
lighting protocols that might be in use in your home network. And that's just for the lights! By extending the
reach of Home Assistant, it becomes a much more interesting and useful tool even if we don't particularly want
to interact with Home Assistant directly as our daily interface.
Generating Data.
If the data you want to incorporate is simple enough, you can add content to the Home Assistant configuration files to retrieve and store the data. For example, the URL information in the example above is retrieved using the Linux "curl" command. One is used to determine the status of a website (whether it returns an expected HTTP status code or not). Another is used to retrieve and format the expiration date of the website's SSL certificate. These can be added directly to the Home Assistant's main "configuration.yaml" file. Here's what they look like for just one website.
binary_sensor:
  - platform: command_line
    unique_id: monitoring-actorious
    name: https://www.actorious.com
    command: response=$(curl -Lik -m 3 https://www.actorious.com/ -o /dev/null -w "%{http_code}\n" -s); test "$response" -eq 200 && echo "OFF" || echo "ON"
    scan_interval: 60
    value_template: '{{ value }}'
    device_class: 'problem'

sensor:
  - platform: command_line
    unique_id: ssl-actorious
    name: Actorious SSL Expiration
    command: 'curl https://www.actorious.com -vI --stderr - | grep "expire date" | cut -d":" -f 2- | cut -c2-7'
    scan_interval: 86400
Here we can see that there are different kinds of sensors (binary_sensor and a regular sensor) that we can use
to store information, along with additional fields that help control their operation. Workable? Certainly. Intuitive? Not especially. But the flexibility means that it is possible to expand the reach of Home Assistant
into many areas that are well beyond anything you'd remotely consider with something like, say, HomeKit.
Opportunities for TMS WEB Core Projects.
While there certainly may be others, there are three categories of TMS WEB Core projects that immediately come
to mind.
First, displaying external data in a card on the Home Assistant Dashboard. The dashboard is "just" a web
page. Well, it is likely a more complex web page than what we're normally accustomed to, using things like shadow
DOM elements extensively. This makes customizing the Home Assistant Dashboard itself a very complex and
convoluted affair. There are numerous add-ons to help with bending the Home Assistant dashboard to your will,
but it does take some effort. For the most part, the only thing that can be displayed on a Home Assistant card
is, naturally, data from within the Home Assistant database. However, there is one card that can display an
<iframe>. This means you can display something from another website within a card on the dashboard. So
we could craft a TMS WEB Core project tailored specifically for that. In fact, we will do exactly that a bit
later in this post.
Second, perhaps we don't want to use an <iframe> but instead want to feed data to Home Assistant
directly, and then use its built-in card system to display that data. Let's imagine that we have an application
that collects some bit of data that we want to process, filter, augment, or otherwise fiddle with before
providing it to Home Assistant for subsequent storage or display. This is what the built-in Home Assistant
"Integrations" do - they go and get a bit of data from some external source and then store that data into some
kind of structure within the Home Assistant database. In my setup, I do something like this using "curl" to get
data about websites that I'm interested in tracking, as shown above. We can also do this directly from within a
TMS WEB Core project, or even an XData project, using the Home Assistant REST API. We'll have a look at that in
detail in the second post of this miniseries.
And finally, what if we wanted to dispense with the Home Assistant UI entirely? The Home Assistant Dashboard does work pretty well, and the card system is well-designed and flexible (with a bit of work). And their mobile apps take advantage of this as well, making it possible to view the same dashboard on a variety of screen sizes in a reasonable way. So no criticism, really, other than the complexity and effort involved in fine-tuning everything.
But what if, instead, you don't want to use a card-based system? Perhaps you're after an entirely different kind of display, and would rather not use the Home Assistant website as the main UI. Let's say you want to use a Raspberry Pi with a fancy touch display to show just a few bits of data from Home Assistant, maybe a light switch or something, or maybe something more complex, using your very own UI to navigate around. Perhaps with a goal of creating a wall-mounted interactive display panel of some kind. This, too, is entirely possible.
But the Home Assistant REST API comes up rather short, surprisingly enough, when it comes to pulling
out all of the data that might be needed. Fortunately, they also offer a WebSocket API. This is considerably
more powerful, and perhaps even a little easier to use in some respects. And it is far better suited to this
task, given the bi-directional nature of the communications required for such a feat. In the third post in this
mini-series, we'll get started with the WebSocket API and then build out a full-featured Miletus app in
the posts that follow. Along the way, we'll be making heavy use of quite a number of previous posts, bringing
in additional JavaScript libraries to help get the job done. Should be fun! But be warned - this is a bit of a
marathon, not a sprint.
Embedding a TMS WEB Core Project in a Home Assistant Card.
As an <iframe> involves just embedding one website in another, we can create whatever content we like in a TMS WEB Core project, and then format the output to fit within the bounds of a card in the Home Assistant Dashboard. In this case, we're not really interacting with Home Assistant in any meaningful way. But the embedded app is fully interactive, so buttons and the rest will still work, just that it doesn't necessarily know that it is running inside another website.
You might use this kind of mechanism to display data formatted
in a way that is not possible with Home Assistant. Or data that you don't want to include in Home Assistant's
database. Or when you don't really have any reason to interact with Home Assistant at a lower level just to
display information. Almost any website could be used here, not just one crafted with TMS WEB Core, of course. City traffic cameras, stock information, weather data, or whatever else you might want to look at regularly
would be good candidates as well. Note that some websites block their use within an <iframe> element.
For our example here, we're going to take the app we created in our last post about GitHub. The app took a GitHub "personal access token" and created a chart showing page views for each repository connected to a particular account. We're going to adjust the app slightly to just display the chart itself in a smaller format so that it fits nicely within a card.
To help it along, we'll need to pass it a few parameters. The GitHub token will be needed, as well as the dimensions for drawing the chart. As the application already handles everything else that we're after (creating the chart) we'll just need to insert something to parse these parameters and then make the necessary adjustments. We can pick these parameters up directly when the application starts, just by adding a bit of code to the end of WebFormCreate.
   // Automatic?
  automate := false;
  if ((GetQueryParam('GPAT') <> '')    and
      (GetQueryParam('WIDTH') <> '')   and
      (GetQueryParam('HEIGHT') <> '')) then
  begin
    WebEdit1.Text := GetQueryParam('GPAT');
    GitHubToken := WebEdit1.Text;
    automate := true;
    divTabulator.Visible := False;
    divMain.ElementClassName := '';
    divChart.ElementClassName := 'overflow-hidden bg-dark order-1';
    divChart.ElementPosition := epAbsolute;
    divChart.HeightStyle := ssAbsolute;
    divChart.WidthStyle := ssAbsolute;
    divChart.Width := StrToInt(GetQueryParam('WIDTH'));
    divChart.Height := StrToInt(GetQueryParam('HEIGHT'));
    divChart.Top := 0;
    divChart.Left := 0;
  end;
This gets us most of the way there. A few more minor tweaks were needed, like adjusting the background color to match the Home Assistant theme. Likewise with the rounded corners. Check out the updated GitHub Repository for all the details. But this gets us the final desired result - a chart generated from a TMS WEB Core project displayed on a card in Home Assistant.
To add the chart, we just need to add a card of the type "Webpage" and set
the URL to wherever our TMS WEB Core project is being hosted. In this case, the project was just copied over
into an existing Apache webserver, and into its own folder off the document root of an existing VirtualHost, so
nothing more was needed when it came to things like SSL. The URL should be something like the following.
https://<servername>/<projectname>/Project1.html&<GitHub Personal Access Token>&WIDTH=400&HEIGHT=200
The dimensions can be adjusted to fit your theme precisely as well, just by adjusting the width and height parameters. That particular card also supports adding a Title, and can even change its height based on an
aspect ratio. Fiddly, as I mentioned previously, but workable. Here's the result.
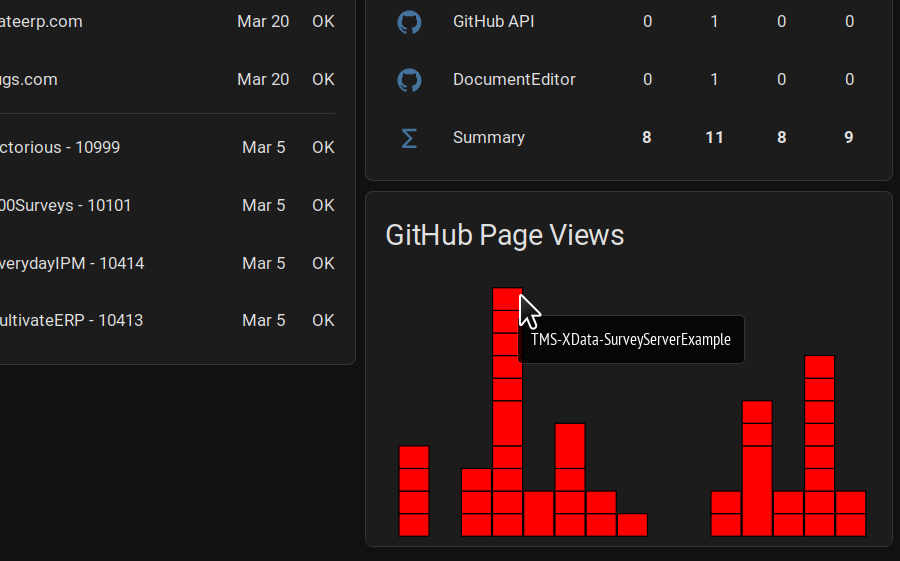
TMS WEB Core App Visible in Home Assistant.
The axes of the chart were also omitted as they were too small to be of much use (not readable). But it is
otherwise the same TMS WEB Core app as before. In the screenshot, you can see the hover text showing the
repository, which works just as you'd expect. Nothing else was really needed in terms of getting the app to
work in an <iframe>. Just a matter of fitting within the confines of the width and height passed as
parameters. More complex parameters could also be passed to the app. You might add more parameters that adjust
the background color, left/right offset, or other elements that affect how the content is displayed.
Note that while displaying data from GitHub doesn't seem like it has anything to do with home automation (it
doesn't, really), the exact same approach could be used for anything you might want to display. I personally
like having the GitHub data and other website and work-related elements as part of the Home Assistant Dashboard
because, well, I'm not so good at managing my work-life balance! But it should also be noted that you can
create separate dashboards for these kinds of things (what Home Assistant refers to as "panels"). If you have a
lot of cards to display, this can make it easier to organize them all.
If you're strictly interested in tools for server monitoring and that kind of thing, Home Assistant might not
be the best choice. There are many such applications better suited to this kind of task. I've been using Zabbix
for many years. It uses a similar card-type system and dashboard for displaying all kinds of detailed
server-specific information. Much of what we're doing here is equally applicable to that environment as well,
including displaying a TMS WEB Core app in an <iframe>.
Another Example.
Sticking with GitHub, one of the more popular charts you might run across is the "Contributions" chart, typically showing each day of the past year and the relative number of contributions you've made to GitHub. This tends to get a lot of publicity around the end of the year, naturally. This is readily available on the GitHub "profile" page.
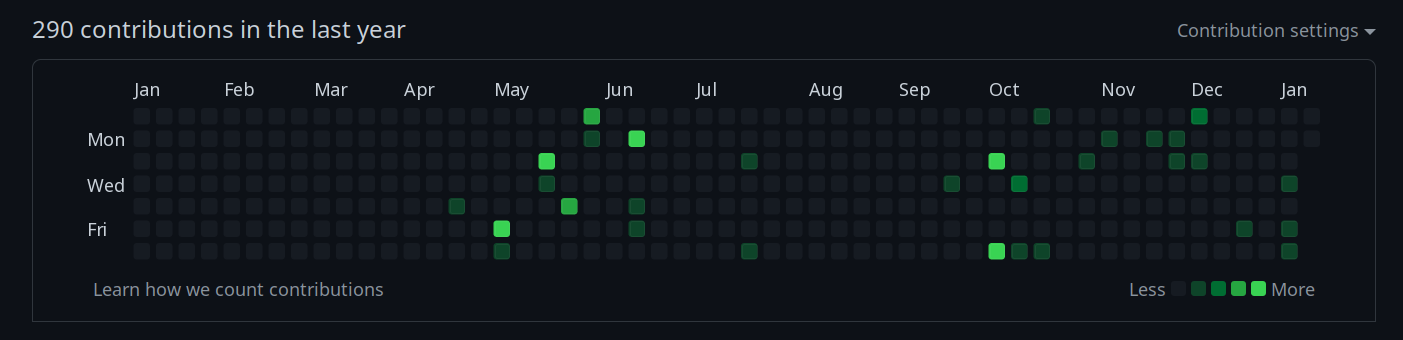
GitHub Contributions - Directly From GitHub.
Surprisingly, there is a GitHub Integration available to Home Assistant, but I don't believe it includes this chart. So let's add it! In our existing GitHub project, we can add a "CALENDAR" parameter and pass the name of the GitHub account that we want to use for the chart data. Note that this data isn't protected, so we don't need to use the GitHub "personal access token" for this. But we can use a JavaScript library to help us out. In this case, let's try out this one: https://github.com/Bloggify/github-calendar.
Rather than link to a CDN, we'll just add the necessary files to our project. The GitHub API Example repository from our GitHub blog post has been updated to include this. The main trouble getting this working was that the CSS file seemed to
be missing a few things. Here's the CSS file (the responsive version) that we'll be using here. The main
highlights are that it removes the borders and background, adjusts the square colors to be the reverse of what
they were originally (closer to the GitHub colors), and changes the colors of some of the text.
:root {
  --color-calendar-graph-day-L4-bg: #dddbdb;
  --color-calendar-graph-day-L3-bg: #39dd34;
  --color-calendar-graph-day-L2-bg: #45a045;
  --color-calendar-graph-day-L1-bg: #047526;
  --color-calendar-graph-day-bg: #104030;
}

#divChart > div.position-relative > div {
  border: none !important;
}

.color-fg-muted {
  color: #BBBBBB;
}

.text-muted {
  font-size: 18px;
  color: #BBBBBB !important;
}
rect.ContributionCalendar-day[data-level='0'] {
    fill: var(--color-calendar-graph-day-bg);
}

rect.ContributionCalendar-day[data-level='1'] {
    fill: var(--color-calendar-graph-day-L1-bg);
}

rect.ContributionCalendar-day[data-level='2'] {
    fill: var(--color-calendar-graph-day-L2-bg);
}

rect.ContributionCalendar-day[data-level='3'] {
    fill: var(--color-calendar-graph-day-L3-bg);
}

rect.ContributionCalendar-day[data-level='4'] {
    fill: var(--color-calendar-graph-day-L4-bg);
}

.calendar .width-full > .float-left {
    display: none;
}

.calendar {
    font-family: Helvetica, arial;
    border: 0px solid #DDDDDD;
    border-radius: 6px;
    min-height: 243px;
    text-align: center;
    margin: 0 auto;
}

.calendar-graph text.wday,
.calendar-graph text.month {
    font-size: 10px;
    fill: #aaa;
}

.contrib-legend {
    text-align: right;
    padding: 0 14px 10px 0;
    display: inline-block;
    float: right;
}

.contrib-legend .legend {
    display: inline-block;
    list-style: none;
    margin: 0 5px;
    position: relative;
    bottom: -1px;
    padding: 0;
}

.contrib-legend .legend li {
    display: inline-block;
    width: 10px;
    height: 10px;
}

.text-small {
    font-size: 16px;
    color: #767676;
}

.calendar-graph {
    padding: 5px 0 0;
    text-align: center;
}

.contrib-column {
    padding: 15px 0;
    text-align: center;
    border-left: 0px solid #ddd;
    border-top: 0px solid #ddd;
    font-size: 11px;
}

.contrib-column-first {
    border-left: 0;
}

.table-column {
    display: table-cell;
    width: 1%;
    padding-right: 10px;
    padding-left: 10px;
    vertical-align: top;
}

.contrib-number {
    font-weight: 300;
    line-height: 1.3em;
    font-size: 24px;
    display: block;
    color: yellow;
}

.calendar img.spinner {
    width: 70px;
    margin-top: 50px;
    min-height: 70px;
}

.monospace {
    text-align: center;
    color: #000;
    font-family: monospace;
}

.monospace a {
    color: #1D75AB;
    text-decoration: none;
}

.contrib-footer {
    font-size: 11px;
    padding: 0 10px 12px;
    text-align: left;
    width: 100%;
    box-sizing: border-box;
    height: 26px;
}

.left.text-muted {
    float: left;
    margin-left: 9px;
    color: #767676;
}
.left.text-muted a {
    color: #4078c0;
    text-decoration: none;
}
.left.text-muted a:hover,
.monospace a:hover {
    text-decoration: underline;
}

h2.f4.text-normal.mb-3 {
    display: none;
}

.float-left.text-gray {
    float: left;
}
#user-activity-overview{
    display:none;
}

.day-tooltip {
    white-space: nowrap;
    position: absolute;
    z-index: 99999;
    padding: 10px;
    font-size: 12px;
    color: #959da5;
    text-align: center;
    background: rgba(0,0,0,.85);
    border-radius: 3px;
    display: none;
    pointer-events: none;
}
.day-tooltip strong {
    color: #dfe2e5;
}
.day-tooltip.is-visible {
    display: block;
}
.day-tooltip:after {
    position: absolute;
    bottom: -10px;
    left: 50%;
    width: 5px;
    height: 5px;
    box-sizing: border-box;
    margin: 0 0 0 -5px;
    content: " ";
    border: 0px solid transparent;
    border-top-color: rgba(0,0,0,.85)
}

text.ContributionCalendar-label {
    fill: #ccc;
    font-size: 11px;
}
Adding this feature to our project is then just a simple JavaScript call for the most part. Something like this.
    if GetQueryParam('CALENDAR') <> '' then
    begin
      divChart.Visible := True;
      calname := GetQueryParam('CALENDAR');

      divChart.Left := ParamLeft;
      divChart.top := ParamTop;
      asm
        GitHubCalendar(".calendar", calname, { responsive: true, tooltips: true });
      end;

      exit;
    end;
When ultimately displayed on the Home Assistant dashboard, it looks something like this.
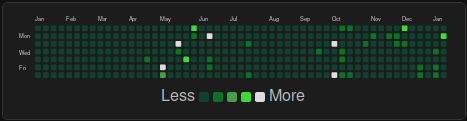
GitHub Contributions Calendar.
Within Home Assistant, the "Webpage card" is used as it was in our previous example, but in this case, the card
was shortened to show only this graph and not the text normally appearing below it. If you scroll the card in
Home Assistant, you can see the rest of the data.
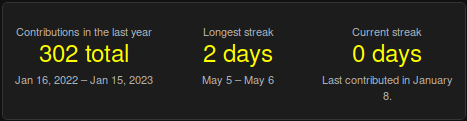
GitHub Contributions Calendar - Part 2.
This isn't as nicely formatted, so hiding it isn't so bad. The main numbers are visible, which is primarily
what is of value here. On a larger display, this doesn't look quite as proportionately challenged. Also, note
that Firefox is being used to display the Home Assistant dashboard, so scrollbars aren't visible - one of the
few instances where this is actually the desired state.
One More Example.
Let's try something a little simpler. In our travels in previous blog posts, there have been a few that make
reference to TMS XData and its REST API. So it would be handy to be able to retrieve data from such a REST API
and format it for display in a card on the Home Assistant dashboard. To demonstrate this, a new feature has been
added to the Actorious XData
Server - an endpoint that returns the names and photos of the top 30 actors with a birthday on a date supplied
as parameters to the endpoint. We'll have a look at the XData side of this when we revisit that project in an
upcoming blog post. But for now, we can pass the endpoint a date and a month (and a "secret") and we'll get
back a block of JSON that looks something like this.
[
  {
    "DAT": "2023-01-07 10:07:20",
    "ORD": 1,
    "TID": 19961,
    "NAM": "Nina Dobrev",
    "PIC": "/67A1s3I8k831MJ7VRLX59hBNdNt.jpg"
  },
  {
    "DAT": "2023-01-07 10:07:20",
    "ORD": 2,
    "TID": 62105,
    "NAM": "Kerry Condon",
    "PIC": "/8l5zehb9sc9cgRCLD713rf5Xmz3.jpg"
  },
  {
    "DAT": "2023-01-07 10:07:20",
    "ORD": 3,
    "TID": 18999,
    "NAM": "J.K. Simmons",
    "PIC": "/jPoNW5fugs5h8AbcE7H5OBm04Tm.jpg"
  },
...
]
The JSON is created in advance, which means that there is not much delay at all when making the XData call. Far quicker than our previous two examples. Also, the data always returns a set of 30 results. There was the
thought of passing a parameter to XData to return a certain number of results. But as this is all cached, the
work to parse the JSON (on the server) to limit the number would be more work (and consume more resources) than
just passing the existing JSON as-is. The set of 30 records amounts to about 3k-4k of data transferred, so not
necessarily worth the trouble and the client can decide what photos are actually needed.
This will be the larger block of data requested by the client in any event - the photos themselves. The XData server is basically just sending back JSON records with pointers to these photos, so practically no overhead here. What we're after then is a way to display some or all of these photos, along with anchor links back to Actorious, and to include the names as title attributes so they are visible on mouse hover events.
To provide for maximum flexibility, all we're doing here is parsing a bunch of parameters that set up the page,
mostly the container, that holds the images. We don't even need to use Bootstrap or any other JavaScript
library. We can use CSS flex to help with wrapping photos onto new rows. And a CSS scale attribute to adjust
the overall size. The main thing to be aware of is that the photos being used are 185x278 (mostly!) and that
the size of the container is set before it is scaled. So if you want to see five photos across, you'd need to
set a width of around 950px, accounting for a little bit of padding, and then the photos will wrap onto the next
row.
Here's the code for the entire application. Mostly, it is just one function call.
unit Unit1;

interface

uses
  System.SysUtils, System.Classes, JS, Web, WEBLib.Graphics, WEBLib.Controls,
  WebLib.WebTools, jsdelphisystem, System.DateUtils, WeBLib.JSON,
  WEBLib.Forms, WEBLib.Dialogs, Vcl.Controls, WEBLib.ExtCtrls,
  WEBLib.WebCtrls,WEBLib.REST;

type
  TForm1 = class(TWebForm)
    divPhotos: TWebHTMLDiv;
    tmrStart: TWebTimer;
    procedure WebFormCreate(Sender: TObject);
    [async] procedure tmrStartTimer(Sender: TObject);
  private
    { Private declarations }
  public
    { Public declarations }
  end;

var
  Form1: TForm1;

implementation

{$R *.dfm}

procedure TForm1.WebFormCreate(Sender: TObject);
begin
  tmrStart.Enabled := True;
end;

procedure TForm1.tmrStartTimer(Sender: TObject);
var
  i: Integer;

  Background: String;
  PhotoCount: Integer;
  FirstPerson: Integer;
  BorderRadius: String;

  URL: String;
  Endpoint: String;
  Secret: String;
  aMonth: Integer;
  ADay: Integer;

  WebRequest: TWebHTTPRequest;
  WebResponse: TJSXMLHTTPRequest;
  Data: String;
  JSONData: TJSONArray;

begin

  tmrStart.Enabled := False;

  // Number of People to Display
  if GetQueryParam('N') <> ''
  then PhotoCount := StrToIntDef(GetQueryParam('N'),10)
  else PhotoCount := 10;

  // Starting person to display
  if GetQueryParam('F') <> ''
  then FirstPerson := StrToIntDef(GetQueryParam('F'),1) - 1
  else FirstPerson := 0;

  // Width of Container
  if GetQueryParam('W') <> ''
  then divPhotos.Width := StrToIntDef(GetQueryParam('W'),972)
  else divPhotos.width := 972;

  // Height of Container
  if GetQueryParam('H') <> ''
  then divPhotos.Height := StrToIntDef(GetQueryParam('H'),574)
  else divPhotos.Height := 574;

  // X (Left) Offset of Container
  if GetQueryParam('X') <> ''
  then divPhotos.Left := StrToIntDef(GetQueryParam('X'),0)
  else divPhotos.Left := 0;

  // Y (Top) Offset of Container
  if GetQueryParam('Y') <> ''
  then divPhotos.Top := StrToIntDef(GetQueryParam('Y'),0)
  else divPhotos.Top := 0;

  // Scale of Container (Origin: Top Left)
  if GetQueryParam('S') <> ''
  then divPhotos.ElementHandle.style.setProperty('transform', 'scale('+GetQueryParam('S')+')')
  else divPhotos.ElementHandle.style.setProperty('transform', 'scale(1)');

  // Background (Color, etc.)
  if GetQueryParam('B') <> ''
  then Background := GetQueryParam('B')
  else Background := 'black';
  asm
    document.body.style.setProperty('background', Background, "important");
  end;

  // Border Radius
  if GetQueryParam('R') <> ''
  then BorderRadius := GetQueryParam('R')
  else BorderRadius := '6px';

  // Select a different month than today's month
  if GetQueryParam('M') <> ''
  then aMonth := StrToIntDef(getQueryParam('M'), MonthOfTheYear(Now))
  else aMonth := MonthOfTheYear(Now);

  // Select a different day than today's day
  if GetQueryParam('D') <> ''
  then aDay := StrToIntDef(getQueryParam('D'),DayOfTheMonth(Now))
  else aDay := DayOfTheMonth(Now);

  // Setup for Query
  URL := 'https://carnival.500foods.com:10999';
  Endpoint := '/tms/xdata/ActorInfoService/TopToday';
  Secret := '<insert secret here>';


  // Make the request
  WebRequest := TWebHTTPRequest.Create(Self);
  WebRequest.URL := URL+Endpoint+'?Secret='+Secret+'&aMonth='+IntToStr(aMonth)+'&aDay='+IntToStr(aDay);
  WebResponse := await(TJSXMLHTTPRequest, WebRequest.Perform());

  try
    // This will hopefully raise an exception if we didn't get valid data
    // Which should end up in a blank page as a result, with the error logged to the console
    Data := String(WebResponse.Response);
    JSONData := TJSONObject.ParseJSONValue(Data) as TJSONArray;

    asm
      // The result is a JSON array with each array element corresponding to a person
      // The array should already be in the correct order, so we just need to display them.
      var photos = JSON.parse(Data);

      // This just encodes an integer value into a diffrent Base numbering, kind of like a link shortener. Sort of. Base48 in this case.
      // The idea was to get a value that didn't have any values or characters that are easily confused with one another, in case someone
      // actually had to type one out. Also, to reduce the likelihood of assigning an actual valid word (no vowels for example).
      // https://github.com/marko-36/base29-shortener
      const c = ['B','b','C','c','D','d','F','f','G','g','H','h','J','j','K','k','L','M','m','N','n','P','p','Q','q','R','r','S','s','T','t','V','W','w','X','x','Z','z','0','1','2','3','4','5','6','7','8','9'];
      function obscure(i){
        i = i + 10000;
        var sLen = Math.floor(Math.log(i)/Math.log(c.length)) +1;
        var s = '';
        for(var ex=sLen-1; ex>-1; --ex){
          s += c[Math.floor(i / Math.pow(c.length,ex))];
          i = [i % Math.pow(c.length,ex)];
        }
        return s;
      }

      // Setup <div> that holds all the photos
      divPhotos.style.setProperty("transform-origin","top left");
      divPhotos.style.setProperty("background","transparent");
      divPhotos.style.setProperty("display","flex");
      divPhotos.style.setProperty("gap","4px");
      divPhotos.style.setProperty("padding","4px");
      divPhotos.style.setProperty("align-content","flex-start");
      divPhotos.style.setProperty("overflow","hidden");
      divPhotos.style.setProperty("flex-wrap","wrap");

      // Do this for as many photos as we'd like to see
      for (var i = FirstPerson; i < (FirstPerson + PhotoCount); i++) {

        // Create a <div> element to hold the photo
        var div = document.createElement("div");
        div.setAttribute("id","divPhoto"+i);
        div.style.setProperty("display","flex");
        div.style.setProperty("order",i);
        div.style.setProperty("width","185px");
        div.style.setProperty("height","278px");

        // Within that, we want an <a> element to provide a link to the Actorious website with a valid identifier
        var anchor = document.createElement("a");
        anchor.setAttribute("target","_blank");
        anchor.setAttribute("href","https://www.actorious.com/?R=P"+obscure(parseInt(photos[i].TID))+'-'+photos[i].NAM.replace(' ','-'));

        // Within that, add the actual image
        var img = document.createElement("img");
        img.setAttribute("id","imgPhoto"+i);
        img.setAttribute("class","Photo border border-2 border-dark");
        img.setAttribute("title",photos[i].NAM)
        img.setAttribute("src","https://image.tmdb.org/t/p/w185"+photos[i].PIC);
        img.setAttribute("onerror","this.src='https://www.actorious.com/img/person-placeholder.png';this.onerror='';");
        img.style.setProperty("display","flex");
        img.style.setProperty("width","185px");
        img.style.setProperty("height","278px");
        img.style.setProperty("border-radius", BorderRadius);

        // Add them to the page
        divPhotos.appendChild(div);
        div.appendChild(anchor);
        anchor.appendChild(img);
      }
    end;
  except on E: Exception do
    begin
      console.log('[ '+E.ClassName+' ] '+E.Message);
    end
  end;
end;

end.
There isn't much error handling when it comes to the REST API call. We just check that valid JSON comes back
and assume it is correct from there. The bit about the obscure function relates to how the identifier for
Actorious is encoded in a different base, so you get an alphanumeric value using only certain letters/numbers
(case-sensitive) rather than just a number. Think of it as something like a Base X converter, where X is the
length of the array of characters used for the conversion.
And with all that in place, we can deploy this app in
a folder on the server (like "today") and then pass it parameters like the following.
Here, we're setting these parameters very precisely so that they fit within the Home Assistant Webpage card.
Note that a given Home Assistant dashboard might have different widths, so more work could be done here to have
the dimensions scaled automatically. Likewise, the background color here is set to match a particular theme, as
is the rounding value. The %23 in the background parameter is the ASCII code for #. You could also pass a CSS
color name (eg: blue) or anything else that fits in the "background" CSS attribute (eg: rgba(0,0,0,0.5)). The
scale is likely the trickiest bit, and is more of an adjust-to-fit kind of thing. But the result is a
reasonable display of the first five people in the JSON file that is returned for the current date.

ActoriousToday Example #1.
If we wanted to display more photos, or perhaps multiple rows, we just need to pass different parameters. Let's
say that, for the same day, we'd like to display the next 24 people, but smaller. Maybe 8 people across by three
people high. Inputting a few different parameters, we end up with the following URL.
Here, F=6 is used to indicate that we want to start with the 6th photo, and N=24 means to show the next 24
photos. A different scale typically means a different matching corner radius, so we update that as well. And
the scale is adjusted to match the same width that we had previously but with the larger underlying width prior
to scaling.

ActoriousToday Example #2.
Other variations can of course be created by varying the parameters, with the only restriction being that there
are only 30 images at most to draw from. Credit goes to The
Movie Database for the images and actor information, and to WikiData
for the birthday information, which Actorious uses to generate its JSON in the first place.
As an aside, this application was set up to do all its work in a timer event so that the images would refresh,
perhaps daily. This turned out to not really be needed in this case as the page is retrieved frequently enough
anyway. But I also struggled a bit with just doing all this in the WebFormCreate event. Setting the page
background there never seemed to work properly. Moving it to this event, outside of WebFormCreate, fixed that
problem.
Next Time.
That's it for this post. We've got a variety of TMS WEB Core apps showing up in the Home Assistant Dashboard. Not a bad start. But this is just the very tip of the iceberg. Next time, we'll have a look at using the built-in Home Assistant REST API to feed data directly into the Home Assistant database, which can then be displayed on a card on the Home Assistant Dashboard.
Follow Andrew on 𝕏 at @WebCoreAndMore or join our 𝕏 Web Core and More Community.
Andrew Simard

This blog post has not received any comments yet.
All Blog Posts | Next Post | Previous Post