Blog
All Blog Posts | Next Post | Previous Post

 Extend TMS WEB Core with JS Libraries with Andrew:
Basics Part 4 - Images, Icons, iFrames, and Initialization
Tuesday, April 11, 2023

Contents.
Image Formats.
In a traditional Delphi VCL app, the general way to display images is through the use of a TImage visual component or something similar. Handling images in code is usually done with something like a TBitmap non-visual component. Over the years, new components have become available for handling new image formats, like TPNGImage for example, which arrived somewhere around Delphi 2009. Third-party components were usually available to fill in the blanks when a new image format was needed, so this isn't in any way a criticism of Delphi, just a discussion about how things have generally been done.
In TMS WEB Core applications, and web applications generally, image handling is very
different. So long as a browser supports a particular image format, there's really not much involved in getting
an image onto a page. Handling images in code is also a much simpler affair, where the format of the image is
often irrelevant when it comes to how it is handled. But before we get into all that, let's have a quick look at the image
formats that we're likely to encounter while developing modern web applications.
- JPEG. Certainly one
of the most popular image formats over the past few decades, its rise in popularity coincided in large part
with the advent of the internet generally. Many of us may recall (fondly or otherwise) visiting websites where JPEG
images would be displayed progressively as they downloaded over slow modem connections. With a lossy compression
algorithm, relatively good image quality could still be maintained while dramatically reducing file sizes. This is likely still the most popular image format in use today, used by virtually all digital cameras,
including those found in mobile devices. In terms of capabilities, JPEG images are best for storing
photography-style images (large resolutions, large number of colors) but generally don't support other
capabilities like animation or transparency.
- GIF. Even older than JPEG, GIF images have been around for a very long time, but became less popular with the advent of digital cameras, as this format didn't originally support images with more than 256 colors. Could be any 256 colors you liked, but only 256 colors. This limitation was addressed long ago, but JPEG has long since overtaken it for typical high-color images. GIF has enjoyed a bit of a resurgence, though, due to its support for animation, with websites like Giphy hosting countless animated GIFs to suit nearly any occasion. Perhaps the most fun aspect of this image format has been related to its pronunciation. I'm going with the soft-g approach, pronounced like "giraffe" if anyone is still keeping score.
- PNG. This format has been steadily increasing in popularity, and from the perspective of developing web-based user interfaces, it may well be the most common now. Primarily because it readily supports transparency. This means that you can place an image on a page without it having to be rectangular - any part of the image can be made transparent, allowing the background to show through. This makes it really easy to use PNG images in user interface elements like navigation icons or logos, and more convenient when adding them to themes where they can better fit in without additional customization. PNG images are compressed but use a lossless compression algorithm. So while they may not always be as small as an equivalent JPEG File, they are generally going to be of excellent quality - another factor in favor of their use in user interface design. And while there is apparently broad support for an animated PNG format (APNG), it might not be something anyone is actually using.
- SVG. The newest member of the club (but just barely), the main thing to know about SVG is that it is vector-based, meaning that an SVG file is essentially a bunch of drawing instructions, telling the app where to draw text, lines, circles, or other shapes, as well as the parameters for stroke, fill, weight, colors, transparency, and so on, to render the image. The internals of an SVG file actually look a lot like a web page with its elements, support for CSS rules, and other formatting similarities. SVG files can be animated, support transparency, and can be easily scaled to virtually any size without obvious artifacts, due to this vector approach. This makes it very appealing for web design, where scaling image content is often problematic. More recently, SVG has become a very popular format used for displaying icons. Which we'll go into in more detail in a little bit.
There are of course many other image formats that are readily available and have been in use for many years. BMP and TIFF deserve an honorable mention here and do occasionally come up, but generally in very specific instances. For example, we ran across some TIFF images when looking at astronomy data in this post. Google seems to think we should all be using WebP as an alternative to JPEG, but they're fighting a bit of an uphill battle there. There are also icon image formats (.ico) that we encounter from time to time as well. And dozens of others. But generally, we're almost guaranteed to encounter at least PNG and SVG on a daily basis in a modern web app, and JPEG and GIF if you have any kind of photographic or user-generated content in your projects.
Over the years, support for these four formats in browsers has sometimes been a hit-or-miss kind of affair. But in this relatively modern browser era, with the current nefarious gang of some pairing of Chrome, Safari, or Firefox running on one of either Windows, Linux, macOS, iOS, or Android, they're
all very consistently supported and shouldn't pose any problems at all. Any potential new rivals in this space (like WebP) are likely to support these same pairings (and many others) if they hope to capture even a minimal amount of market share.
PDF is also a file format that should be mentioned, though I'd consider it a document format more than an image
format. Its predecessor, PostScript, is likely in the same boat, though PostScript has largely faded away as a
file format that people use directly. Creating and displaying PDF files is certainly something we're interested
in, but it has an entirely different role to play than the image formats we're looking at here.
Displaying Images.
From an HTML perspective, typically an image is shown on a web page wherever an <img> tag appears, normally with a "src" attribute, where the value is the URL for an image. Let's create an example TMS WEB Core application using the usual Bootstrap template, and then add four TWebImageControl components to the page, with corresponding TWebLabels - one for each of the four image formats.We're going to use an example set of image files that have been added to an "image" folder within our project, and then also added to our project
directly using the Delphi IDE project manager. This ensures that the images are copied into the debug or release folders
when we run our project. Then, within each TWebImageControl component, we can set the URL property to be
"image/filename" where the filename corresponds to the image filename in the folder. We can also set the
HeightStyle property to "auto" so that the images retain their original aspect ratio. We'll configure each of the components to
have the same 200x200 size on the page. Here are the attributions for the images.
- JPEG: Gratisography - flower.jpg
- GIF: Giphy - multiplass.gif
- PNG: PNGWing - balloons.png
- SVG: Font Awesome -
cart-shopping-solid.svg
When the app starts, these are automatically loaded and should be visible on the page. Note that we didn't need to do anything to specify the image format anywhere - the images loaded up fine all on their own and the browser figured out how to display each one. Note also that although the SVG example is very simple (an icon), it is scaled without introducing any artifacts. The other images are very large relative to the size on the page, so they've been scaled down - no artifacts would be visible normally in that case either.

Sample Images.
While the screenshot above is a static image, on the actual page, the GIF is an animation clip. The heights of
the first two images are less than the last two, as the source images are not square. The scaling was done as a
result of having the HeightStyle set to "auto". There are many options when it comes to displaying images that have a different aspect ratio than their container. Here are just a few possibilities.
- If HeightStyle and WidthStyle are both set to "absolute", the image will be stretched to fill the container.
- If HeightStyle is "automatic" and WidthStyle is "absolute" (as above), the image will be scaled to fit the width of the container, and the height will be set proportionately.
- If HeightStyle is "absolute" and WidthStyle is "automatic", the image will be scaled to fit the height of
the container and the width will be set proportionately.
- If HeightStyle is "automatic" and WidthStyle is also "automatic", the image will be displayed in its native dimensions on the page. In this case, some of the images are (relatively) huge and likely wouldn't fit on the page.
If we look at the HTML content that is generated from one of these images, we can see what is going on.
<img id="TForm1_ImageControl1"
     zindex="0"
     src="image/flower.jpg"
     tabindex="-1"
     role=""
     style="color: rgb(1, 1, 1);
            overflow: hidden;
            outline: none;
            top: 40px;
            left: 48px;
            width: 200px;
            position: absolute;
            box-sizing: border-box;
            user-select: none;
            -webkit-tap-highlight-color: transparent;
            font-family: Tahoma;
            font-style: normal; font-size: 11pt;">
Lots in there, but the only thing we're concerned with for now is the "src" attribute, which has been set to the very same value we set in the Delphi IDE - the TWebImageControl component's URL property. The TWebImageControl component itself is converted into the <img> tag on the page. We've not set a value for the ElementID property, so in this case, one is generated automatically.
Image Sources.
This works pretty well, getting our images onto the page and with some initial ability to adjust how they're
positioned or scaled. When thinking about a traditional Delphi VCL application, images can be added to a form
using a similar component, perhaps, but there are at least a few sources of image data that come into play, and
we'll want to be sure we can do the same in our TMS WEB Core project. In order to use an image, then, we must
first consider where the image is stored. Traditionally, we might get images from one of these sources.
- Local file storage, perhaps in the same folder or a subfolder of our application, might be used for
displaying UI elements in our application.
- Network file storage, as in a network file server, might still be the same folder of our application if it is
run from a shared network drive, but could be elsewhere as well. Might be used when there are many shared images
that any number of users of the same application might access.
- In a variation of this, images might be stored in a database that our application can access.
- Images might be embedded directly in components, like a DBNavigator for example, or a TImage control where
an image is loaded at design time.
For the first scenario above, local images in a web application context generally refer to images that are
stored in the same location as the application - served by the same web server, for example. In this case, the
src URL can point to a location that is relative to our app. This is essentially what we did in our example above.
We added an "images" folder to our project, and added images to it, while also adding those images to our
project directly using the "Project Manager" window in the Delphi IDE. This is roughly analogous to having a
"local application folder" in a traditional Delphi VCL application. The URL property starts with "image/" to
indicate that the location is relative to our project folder.
For images that are not in our app directly, in the second scenario above, we can reference images using a fully qualified URL, where images can be accessed from any other location. The URL property will start with "http://" or "https://" and will generally refer to a different web server than the one that is serving up our application. Often, images are served without any kind of access controls, mostly for performance reasons, so just entering an appropriate URL is all that is required.
See an image you like somewhere? You can often right-click on it and get the URL directly. Keeping in mind whether or not you have appropriate rights to use the image in your project, then everything else works the same way as we've seen already. Sometimes, images are protected - hidden behind some kind of authentication or authorization requirement, which may be a factor. For things like product images, there's often no need for this, as serving up images quickly to anyone asking may be the top priority, and adding security involves complexity that is perhaps not worth the implementation headaches or overhead that it might cost.
In the third scenario, a database may store images that we can then request via something like XData or another
REST API, or perhaps something else entirely, to get at our image. The image data stored in the database field
may take many forms, so we'll have to potentially do a bit more work to get at the image itself.
- The image field could be a text field that contains a reference or a link to the image, where the image itself is served separately as a file. In this case, we might have to add a server prefix to the image reference to be able to use it directly. For example, if the database field contains "product_variation_blue.png", then we might have to add something like "https:\\products.example.com\images\" to the beginning of the field in order to tell the browser where to find it. The details of what URL is used and what conventions are used for storing the name of the image will naturally be specific to that particular implementation.
- The image field could contain a binary version of the image directly, like in a BLOB field of some kind. For images that need to be accessed securely, this may be a solid option. When we get this data from the
database, we'll have to do something to it before it gets added to our src attribute, as we can't include
binary data directly in an attribute. Converting it into a Base64-encoded string is one such option.
- The image field could contain a text-encoded version of the image. For example, binary files of any kind can be converted to Base64-encoded files. These are essentially the same file but in a readable text format, so they can be passed around the same way we pass around strings - though they may be considerably larger (several MB or more). And if they're formatted properly, with a header that describes the image format, we can even assign them directly to the src attribute in our application. More on that in a moment. Storing images in a database in this format would likely be done for the same reasons that you'd store a binary image - restricting access to the images, particularly when they may not be accessed as frequently. By storing the text version, it might be a bit more efficient to handle in some cases, as there may not be any need to do the Base64 conversion back and forth that might be required in the binary storage scenario. But it may also result in a bit more storage overhead.
For the fourth scenario, a component may provide its own images. These may be links to local images, subject
to having those included in the project directly or perhaps using links to a CDN where the images can be
retrieved automatically. Or perhaps they might be embedded directly using the same "text" version of the images
we were just discussing. Or perhaps there are no images at all. Some components are designed in a way that allows them to "draw" in a <canvas> element, where things like arrows or other buttons may simply be drawn
directly. Fortunately, we don't have to worry much about these, as the component developer will have done all the work
for us.
Data URIs.
So about those strings representing images. The idea here is that an HTML page can contain files that have been encoded a
certain way, directly in the page content. This was originally designed for small files. Once upon a time, these were referred to as "Data URI" elements but now they are just as often referred to using the equally confusing "Data URL" moniker. Typically these will be strings starting with "data:" followed by a descriptor for the image format, and then the Base64-encoded string representation of the original binary image file. There are numerous websites we can use to convert back and forth between binary and Base64-encoded representations, or we can do the conversion directly ourselves. Here are some examples.
NOTE: What we're after here are simple Delphi functions that we can call to move between binary and text representations of images. But what is inside these functions - the JavaScript code - is anything but "basic" code. There is a lot going on in this code that we'd rather not have to think about too much, so, by all means, feel free to skip over it. Also, there are dozens of ways to do these kinds of things. If these code examples aren't to your liking, there are many other variations to choose from.
To convert an <img>, one that has already been populated using a normal URL, into a Data URI string, we
can use something like this. We might use this if we want to take an image of any kind and convert it into a
string that then gets uploaded to a database, for example. Or if we wanted the Data URI so that we could embed
the image somewhere else in our application. Here, the image is recreated internally and then converted to
a JPEG-formatted Data URI. It could just as easily be converted to a PNG by leaving off the parameter of that
last function call, as PNG is the default.
function TForm1.ImageURLToDataURL(ImageURL: String; Background: String): String;
begin
  asm
    const loadImage = src =>
      new Promise((resolve, reject) => {
        const img = new Image();
        img.crossOrigion = "anonymous";
        img.onload = () => resolve(img);
        img.onerror = reject;
        img.src = src;
      });

    var image = await loadImage(ImageURL);
    var canvas = document.createElement('canvas');
    var context = canvas.getContext('2d');

    canvas.height = image.naturalHeight;
    canvas.width = image.naturalWidth;

    context.fillStyle = Background;
    context.fillRect(0, 0, canvas.width, canvas.height);
    context.drawImage(image, 0, 0);

    Result = canvas.toDataURL('image/jpeg');
  end;
end;
Doing the reverse, converting a Data URL back into a binary file, might look like the following. What we get back is a JavaScript "file" which is essentially an unsigned 8-bit integer array. We also pass it a filename which gets added to the file descriptor as well. We could then stream this file back to an XData server for storage in a database perhaps, or set up a download link or do whatever else we might want to do where a binary format is expected.
function TForm1.DataURLtoBinaryImage(ImageString, Filename:String): JSValue;
begin
asm
function dataURLtoFile(dataurl, filename) {
var arr = dataurl.split(","),
mime = arr[0].match(/:(.*?);/)[1],
bstr = atob(arr[1]),
n = bstr.length,
u8arr = new Uint8Array(n);
while (n--) {
u8arr[n] = bstr.charCodeAt(n);
}
return new File([u8arr], filename, { type: mime });
}
Result = dataURLtoFile(ImageString, Filename);
end;
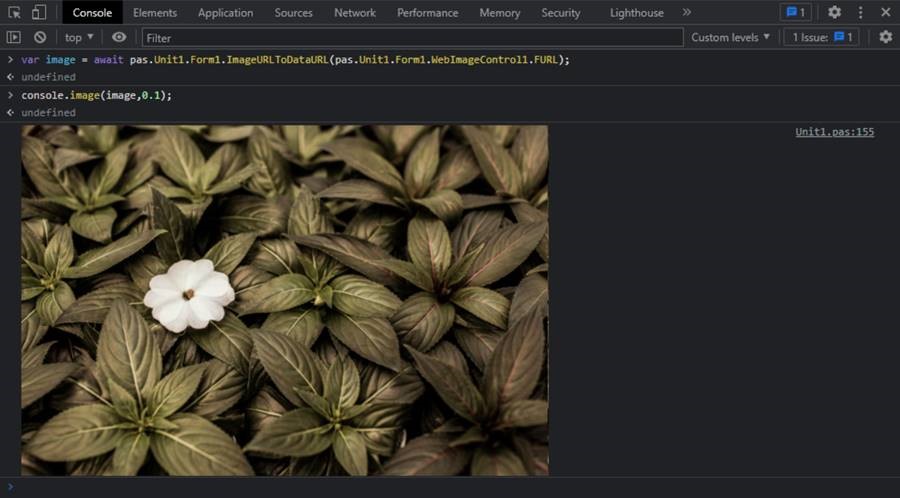
end;And, just for fun, if you want to display the Data URI in the browser console (or any image), we can define a function for that as well. Normally, in the browser developer tools, you can see an image that is included in an <img> src attribute by hovering your mouse over the value in the "elements" page of the developer tools. It then displays a small thumbnail popup with some additional details. But if you have a Data URI and want to check what the image looks like without having it attached to an <img> element, then this might come in handy.
procedure TForm1.console_image(ImageString: String; Scale: Double);
begin
asm
// use console.image(img, scale) to output image to console
function getBox(width, height) {
return {
string: "+",
style: "font-size: 1px; padding: " + Math.floor(height/4) + "px " + Math.floor(width/2) + "px; line-height: " + height/2 + "px;"
}}
const loadImage = src =>
new Promise((resolve, reject) => {
const img = new Image();
img.onload = () => resolve(img);
img.onerror = reject;
img.src = src;
});
var image = await loadImage(ImageString);
var dim = getBox(image.width * Scale, image.height * Scale);
console.log("%c" + dim.string, dim.style + "background: url(" + ImageString + "); background-size: " + (image.width * Scale) + "px " + (image.height * Scale) + "px; color: transparent;");
end;
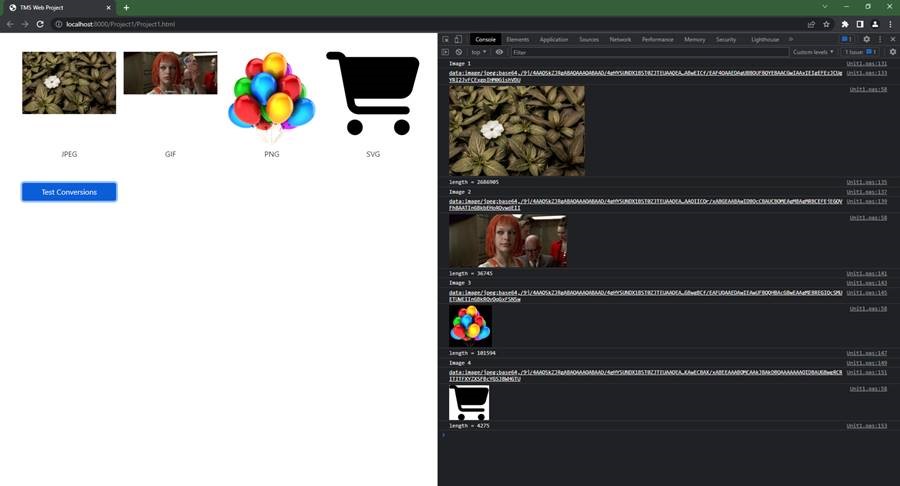
end;To test all these functions, we can take our four images and run them through a series of calls, converting them into Data URIs and then back again.
procedure TForm1.WebButton1Click(Sender: TObject);
var
  ImageString: String;
begin
  console.log('Image 1');
  ImageString := await(ImageURLtoDataURL(WebImageControl1.URL,'transparent'));
  console.log(Copy(ImageString,1,1000));
  await(console_image(ImageString, 0.1));
  asm console.log('length = '+this.DataURLtoBinaryImage(ImageString,'test.jpg').size); end;

  console.log('Image 2');
  ImageString := await(ImageURLtoDataURL(WebImageControl2.URL,'transparent'));
  console.log(Copy(ImageString,1,1000));
  await(console_image(ImageString, 0.5));
  asm console.log('length = '+this.DataURLtoBinaryImage(ImageString,'test.gif').size); end;

  console.log('Image 3');
  ImageString := await(ImageURLtoDataURL(WebImageControl3.URL,'transparent'));
  console.log(Copy(ImageString,1,1000));
  await(console_image(ImageString, 0.5));
  asm console.log('length = '+this.DataURLtoBinaryImage(ImageString,'test.png').size); end;

  console.log('Image 4');
  ImageString := await(ImageURLtoDataURL(WebImageControl4.URL,'white'));
  console.log(Copy(ImageString,1,1000));
  await(console_image(ImageString, 0.5));
  asm console.log('length = '+this.DataURLtoBinaryImage(ImageString,'test.svg').size); end;
end;
The console output should then show the image number, the image encoded as a Data URL (abbreviated here), and then
an indication of the binary file size after converting it back. Note that the background image is a parameter
so that you can see the background separately, which is important in the case of the SVG file, otherwise, it
will be a black image on a black background. Also, our conversion ends up with JPG binary files each time.
Logging Images in the Console.
The console output then shows the images as we'd like, just by calling console_image. A separate JavaScript
copy, console.image() was also added so you can call it more easily from the console.
Using the Console to View Images.
There are other approaches that don't involve using a <canvas> element or even an <img> element to
do the conversions, which may help, particularly if you want to retain an animated image or if you're working
with other image formats. The main takeaway here, though, is that you should be able to move seamlessly
between any binary format and any Data URI format as needed to get to wherever you need to be.
Images Everywhere.
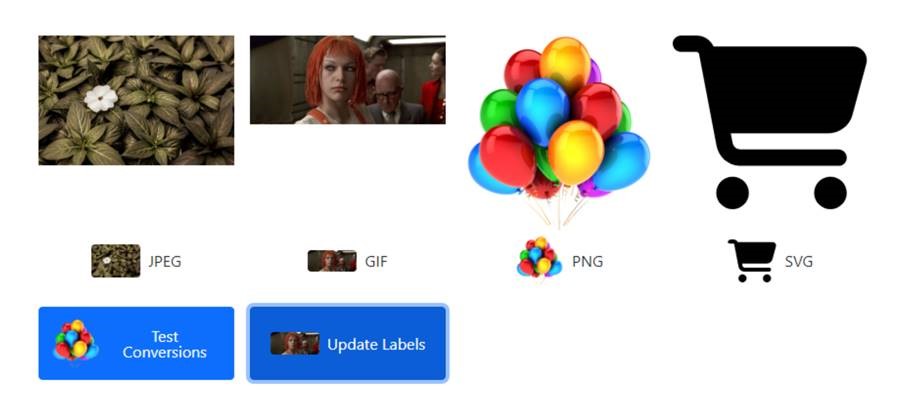
One of the more interesting aspects of HTML <img> tags is that they can be inserted and displayed
typically anywhere that text can be displayed, and often just as easily. Let's say we wanted to add an image
thumbnail beside the captions below each image. We can just update the TWebLabel component's HTML property to include an
image, a bunch of <div> elements, and then some Bootstrap classes to align and center everything
perfectly. Buttons are also a great candidate for this kind of thing, where the Caption property can accept
HTML directly. A stark departure from the VCL, where custom components might be needed to arrange images on buttons in various ways.
procedure TForm1.WebButton2Click(Sender: TObject);
begin
  WebLabel1.HTML := '<div class="d-flex w-100 justify-content-center align-items-center"><img width=50 height=auto class="rounded" src='+WebImageControl1.URL+'><div class="ps-2">'+WebLabel1.Caption+'</div></div>';
  WebLabel2.HTML := '<div class="d-flex w-100 justify-content-center align-items-center"><img width=50 height=auto class="rounded" src='+WebImageControl2.URL+'><div class="ps-2">'+WebLabel2.Caption+'</div></div>';
  WebLabel3.HTML := '<div class="d-flex w-100 justify-content-center align-items-center"><img width=50 height=auto class="rounded" src='+WebImageControl3.URL+'><div class="ps-2">'+WebLabel3.Caption+'</div></div>';
  WebLabel4.HTML := '<div class="d-flex w-100 justify-content-center align-items-center"><img width=50 height=auto class="rounded" src='+WebImageControl4.URL+'><div class="ps-2">'+WebLabel4.Caption+'</div></div>';

  WebButton1.Caption := '<div class="d-flex justify-content-center align-items-center"><img width=50 height=auto src='+WebImageControl3.URL+'><div class="ps-2 lh-1">Test Conversions</div></div>';
  WebButton2.Caption := '<div class="d-flex justify-content-center align-items-center"><img width=50 height=auto class="rounded" src='+WebImageControl2.URL+'><div class="ps-2">Update Labels</div></div>';
end;
This gets us a label with a thumbnail that is 50px wide, and the thumbnail+caption is then centered horizontally and vertically so that they all line up together. The animated GIF is also still animated, just not in this screenshot. Likewise for the buttons.
Note that by default, the images will be displayed even
without the extra <div> work or the extra Bootstrap classes. The default layout may even be more to your
liking, depending on what you're after. So while I tend to go overboard, and while I'm particularly fond of
"d-flex justify-content-center align-items-center" as well as "rounded", this kind of thing is entirely
subjective. Likewise, the "ps-2" class is used to add padding to the left (ps=padding start) of the text so
that it is not so close to the image. Little touches like this may help with the layout, or may just be a
distraction from working on other more important parts of the project....
Adding Images to TWebLabels and TWebButtons.
This same kind of thing can be done with other components, particularly those with an HTML property that can be
assigned this way. A TWebHTMLDiv component is an excellent choice for such things, generally, as they don't
really carry along any unnecessary baggage, producing just a simple <div> on the page when rendered, along
with whatever is contained within its HTML property. There's even a popup editor that can be used in the Delphi IDE when
the HTML is more than what can be comfortably edited in a single line of text.
Buttons are another great
candidate, as we've seen, and most buttons, ideally, will have an image as an extra visual cue as to the
button's purpose. There's also no limit on how many images can be included - you could have a button with two or
more images, for example, maybe even overlapping if that is what the situation calls for.
Icons.
This brings us to our next topic - icons. Icons, generally speaking, are just a special case of images. They don't typically use the <img> tag but instead use their own tag or even just classes. Depending on the type of icons being used, there may be differences in how the icons are selected. The first thing to do, though, is to add a library of icons to your project.
Or add multiple libraries. Normally it would make sense to use
just one library, as we normally would want to have a consistent look across all of the icons in our project. But
there's nothing preventing the use of multiple icon libraries. Adding an icon library can be done using the "Manage
JavaScript Libraries" function within the Delphi IDE, or just added to the Project.html file directly. Just for
fun, we're going to add a handful of icon libraries and then see how we can use them.
    <!-- Bootstrap Icons -->
    <link href=" https://cdn.jsdelivr.net/npm/bootstrap-icons@1.10.3/font/bootstrap-icons.min.css " rel="stylesheet" crossorigin="anonymous">
    <!-- Google Material Icons -->
    <link href="https://fonts.googleapis.com/css?family=Material+Icons|Material+Icons+Outlined|Material+Icons+Two+Tone|Material+Icons+Round|Material+Icons+Sharp" rel="stylesheet" crossorigin="anonymous">
    <!-- Iconify -->
    <script src="https://cdn.jsdelivr.net/npm/iconify-icon@1.0.7/dist/iconify-icon.min.js"></script>
    <!-- FontAwesome 6 Free -->
    <link href="https://cdn.jsdelivr.net/npm/@fortawesome/fontawesome-free@6/css/all.min.css" rel="stylesheet" crossorigin="anonymous">
    <!-- Flag Icons -->
    <link href="https://cdnjs.cloudflare.com/ajax/libs/flag-icon-css/2.3.1/css/flag-icon.min.css" rel="stylesheet" crossorigin="anonymous">
For Bootstrap Icons, one option is to use a WebFont, where we can add icons to any block of text simply by adding an <i> tag with an additional class to indicate which icon we'd like to use. This is the simplest approach, and variations on this are available for all of the above icon libraries. We can also add style information to make other kinds of changes. Let's try them out by adding a TWebHTMLDiv component with its HTML property set to the following.
<strong>Bootstrap Icons</strong><br />
<i class="bi-airplane pe-2"></i><i class="bi-eye pe-2"></i><i class="bi-hand-thumbs-up"></i><br />
<i class="bi-arrow-left pe-2"></i><i class="bi-arrow-right"></i><br />
<i class="bi-arrow-left pe-2" style="color:blue;"></i><i class="bi-arrow-right" style="color:red;"></i><br />
<i class="bi-arrow-left pe-2" style="color:blue;font-size:1.5em;"></i><i class="bi-arrow-right" style="color:red;font-size:1.5em;"></i><br />
<i class="bi-arrow-left pe-2" style="color:blue;font-size:2em;"></i><i class="bi-arrow-right" style="color:red;font-size:2em;"></i><br />
When the page is displayed, we get the following. This icon set has a good selection of icons that work well
for most applications. A great place to start.
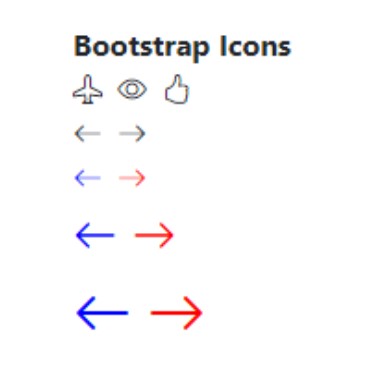
Bootstrap Icons.
For Google
Material Icons, a class is used to select the overall family (outline, filled, rounded, sharp, or
two-tone), and the icon itself is specified inside the tag. This icon library is likely best for those who happen
to like Google's particular styling, if many of your users will be using your app on an Android device, or if
you're after two-tone icons but don't want to pay for Font Awesome's Duotone icons. It is a bit more typing to get
a similar result to the Bootstrap icons, but there are more families to choose from here. By default, the icons
are also much larger, 24px instead of the normal 16px. This is compensated for by including the "fs-6"
Bootstrap class.
<strong>Google Material Icons</strong><br />
<i class="material-icons-outlined pe-2 fs-6">flight</i><i class="material-icons-outlined pe-2 fs-6">visibility</i><i class="material-icons-outlined pe-2 fs-6">thumb_up</i><br />
<i class="material-icons pe-2 fs-6">flight</i><i class="material-icons pe-2 fs-6">visibility</i><i class="material-icons pe-2 fs-6">thumb_up</i><br />
<i class="material-icons-round pe-2 fs-6">flight</i><i class="material-icons-round pe-2 fs-6">visibility</i><i class="material-icons-round pe-2 fs-6">thumb_up</i><br />
<i class="material-icons-sharp pe-2 fs-6">flight</i><i class="material-icons-sharp pe-2 fs-6">visibility</i><i class="material-icons-sharp pe-2 fs-6">thumb_up</i><br />
<i class="material-icons-two-tone pe-2 fs-6">flight</i><i class="material-icons-two-tone pe-2 fs-6">visibility</i><i class="material-icons-two-tone pe-2 fs-6">thumb_up</i><br />
<i class="material-icons-outlined pe-2 fs-6">arrow_left</i><i class="material-icons-outlined fs-6">arrow_right</i><br />
<i class="material-icons-outlined pe-2 fs-6" style="color:blue;">arrow_left</i><i class="material-icons-outlined fs-6">arrow_right</i><br />
<i class="material-icons-outlined pe-2" style="color:blue;font-size:1.5em;">arrow_left</i><i class="material-icons-outlined" style="color:red;font-size:1.5em;">arrow_right</i><br />
<i class="material-icons-outlined pe-2" style="color:blue;font-size:2em;">arrow_left</i><i class="material-icons-outlined" style="color:red;font-size:2em;">arrow_right</i><br />
Note also that when switching between icon libraries, we might very well find that the same icons have different names.
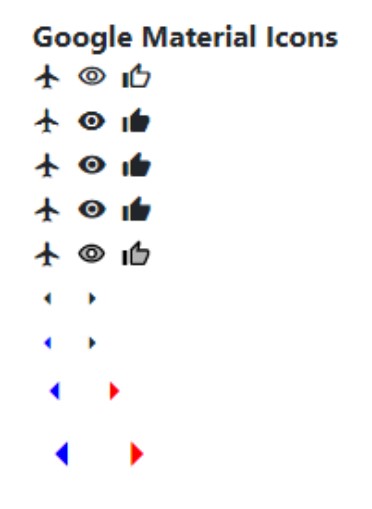
Google Material Icons.
The Font Awesome 6 Free icon library
is another "solid" choice, but of all the different families available from Font Awesome (as many as 8),
typically only their "solid" family is included in their free tier. Also, roughly the same number of icons
(2,000) are available in the free tier as can be found in the other icon sets. We'll cover a bit more about
their Pro (paid) tier in just a moment. But for now, these can be configured in a way that is similar to the
Bootstrap icons. An <i> tag with the class used to select the icon. There are quite a few modifiers
that can also be used to change the size, add animation (spinning, pulsing, etc.), and various other tweaks.
<strong>Font Awesome 6 Free</strong><br />
<i class="fa-solid fa-plane-up pe-2"></i><i class="fa-solid fa-eye pe-2"></i><i class="fa-solid fa-thumbs-up"></i><br />
<i class="fa-solid fa-arrow-left pe-2"></i><i class="fa-solid fa-arrow-right"></i><br />
<i class="fa-solid fa-arrow-left pe-2" style="color:blue;font-size:1em;"></i><i class="fa-solid fa-arrow-right" style="color:red;font-size:1em"></i><br />
<i class="fa-solid fa-arrow-left pe-2" style="color:blue;font-size:1.5em;"></i><i class="fa-solid fa-arrow-right" style="color:red;font-size:1.5em;"></i><br />
<i class="fa-solid fa-arrow-left pe-2" style="color:blue;font-size:2em;"></i><i class="fa-solid fa-arrow-right" style="color:red;font-size:2em;"></i><br />
There are also some icons from their "regular" family included in their free tier, which might look more like the "outline" version of the other icon libraries if that's of any interest. If one is available, "fa-solid" can be swapped for "fa-regular". When searching for icons on their website, be sure to click the "free" button to filter the results. Nothing worse than finding the perfect icon only to find out it isn't available in the free library!
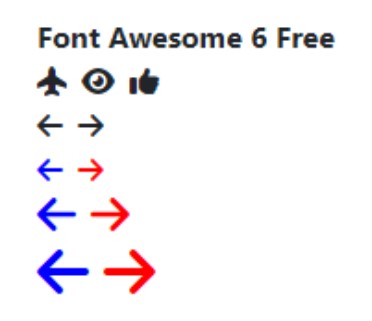
Font Awesome 6 Free Icons.
The Iconify icons are another very
popular choice, likely with the most icons overall, as well as numerous ways to add them to your project. For
our purposes, we're going to take the Iconify
API route, where we select an icon using the <iconify-icon> tag with an "icon" attribute. This is a
departure in a couple of ways. First, the library that we linked to above is to a JavaScript file rather than a
CSS file. This is much smaller to download because it doesn't actually include any icons.
Instead, it adds code to our project that looks for
the <iconify-icon> tag and then downloads just the icons that are needed. Second, instead of displaying a
glyph as part of a font, it downloads and displays a full-blown SVG file. When looking at the HTML in the
browser developer tools, the other libraries we've covered will display the contents of the TWebHTMLDiv
component just as we've entered it, more or less. But in this case, the contents are filled with SVG references.
<strong>Iconify API Icons</strong><br />
<iconify-icon icon="mdi:plane" class="pe-2"></iconify-icon><iconify-icon icon="mdi:eye" class="pe-2"></iconify-icon><iconify-icon icon="mdi:thumbs-up"></iconify-icon><br />
<iconify-icon icon="mdi:arrow-left" class="pe-2"></iconify-icon><iconify-icon icon="mdi:arrow-right"></iconify-icon><br />
<iconify-icon icon="mdi:arrow-left" class="pe-2" style="color:blue;font-size:1em;"></iconify-icon><iconify-icon icon="mdi:arrow-right" style="color:red;font-size:1em"></iconify-icon><br />
<iconify-icon icon="mdi:arrow-left" class="pe-2" style="color:blue;font-size:1.5em;"></iconify-icon><iconify-icon icon="mdi:arrow-right" style="color:red;font-size:1.5em;"></iconify-icon><br />
<iconify-icon icon="mdi:arrow-left" class="pe-2" style="color:blue;font-size:2em;"></iconify-icon><iconify-icon icon="mdi:arrow-right" style="color:red;font-size:2em;"></iconify-icon><br />
<iconify-icon icon="noto:two-hump-camel" style="font-size:2em;"></iconify-icon>
in the above, the "family" of icons is specified in the icon prefix, with "mdi" corresponding to "Material Design Icons". There are dozens of families available to choose from. A camel has even managed to sneak its way into this example, from the "noto" family. Iconify is a great choice if you don't know in advance what icons are going to be available, as might be the case when users of your app select their own icons.
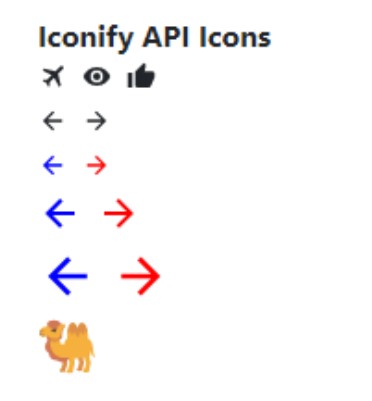
Iconify API Icons.
Internally, things are more complicated with SVG icons. We don't need to be particularly concerned about this
(the camel SVG is many times this size) but something to keep in mind if we're adding a lot of icons to a page
at one time.
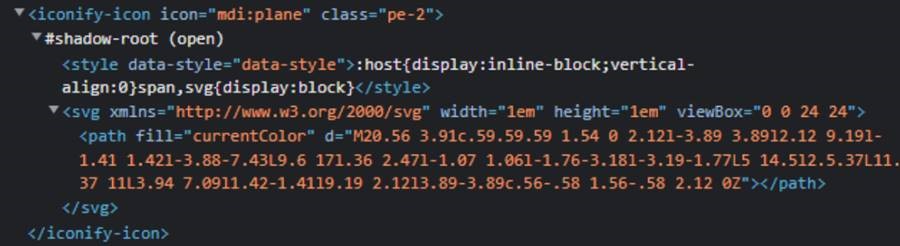
Iconify Icons as SVG.
And if camels, specifically, are of interest, there are quite a few to choose from! And a camel is a pretty
obscure icon choice. Most icons have many more options available, from the many icon families and related libraries, which also include
Font Awesome Free and several emoji libraries, among others. There are more than 100 "thumbs-up" variations, for
example.
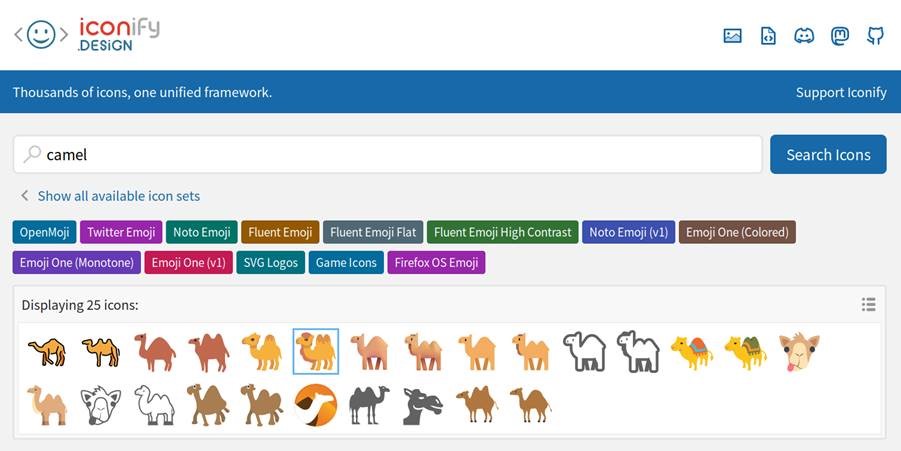
Iconify Camel Icons.
Using SVG images to display icons seems to be where things are headed generally. There are options for using
SVG with Bootstrap and Font Awesome as well. In the case of Font Awesome, their Pro (paid) tier works with Font
Awesome "kits", where the kits can be configured to use SVG, subsets of icons, and all manner of other
optimizations to make using icons as simple and as efficient as possible. In fact, moving between the SVG and
WebFont versions is seamless - the icons just get converted to SVG after the fact, from the same starting point.
The benefit of using a set of icons from one family is that there is a reasonable expectation that they will all
work well together in terms of alignment, sizing, and so on. While mixing and matching icons from different
vendors can be great, particularly if you're in need of a camel icon (no camel icon in Font Awesome,
unfortunately), having a consistent interface is likely just as important much of the time. Here's a look at
the different Font Awesome families for just the thumbs-up icon, for example.

Font Awesome Families.
Regardless of what the priorities are for a given project (massive array of icon choices vs. highly polished
user interface, or anywhere between), there is likely to be a great set of icons that we can readily use in our
TMS WEB Core projects. And if we can't restrict ourselves to just one, we can use more than one without issue. Further optimizations are possible depending on the icon library chosen, and the range of icons that need to be made
available to the application. Sometimes SVG icons can be referenced directly or even cached in advance. And
icons can be accessed using a CDN or hosted locally if necessary. Lots of options.
And speaking of options, we've got one more icon set to cover - flags. These can be displayed with the same
<i> element, supplying an ISO-3166-2
two-letter country code. There's also the option to display a squared version of the flags.
<div class="d-flex w-100 h-100 justify-content-between align-items-center" style="font-size:5em;">
  <i class="flag-icon flag-icon-ca flag-icon-squared rounded"></i>
  <i class="flag-icon flag-icon-be flag-icon-squared rounded"></i>
  <i class="flag-icon flag-icon-fr flag-icon-squared rounded"></i>
  <i class="flag-icon flag-icon-gb flag-icon-squared rounded"></i>
  <i class="flag-icon flag-icon-us flag-icon-squared rounded"></i>
  <i class="flag-icon flag-icon-ua flag-icon-squared rounded"></i>
  <i class="flag-icon flag-icon-br flag-icon-squared rounded"></i>
</div>
I think that the Canadian flag is slightly unbalanced (the left side is at least a gigantic 1px wider than the right side - very troubling!!) but the rest look pretty good. The corners were also rounded. Note also that these, for the most part, are just countries. While there might be the temptation to use these for languages, there may not be enough options to make that work. Many countries have more than one commonly or officially spoken language, after all.

Squared Flag Icons.
With images and icons covered, we're able to add quite a bit of polish to a typical user interface. Each can
be customized to fit within other elements, like buttons or labels, or displayed in their own <div>
element, endlessly customized to suit our needs. Sometimes, though, we'd like to display something on our page
that is more than just an image or an icon.
<iframe>
The <iframe> element is a bit special. With the <img> element, we can set a "src" attribute that tells the browser to go off and find an image to display. Sometimes the src attribute will contain a Data URL that the browser can use without looking anywhere else. Sometimes the src attribute will point to a file in our project, where the browser can retrieve it from the same place our app is running from. And sometimes it will point to a remote file on some other server on another continent.
The browser is perfectly capable of locating
and finding content to display, no matter where it resides, and can in fact download and otherwise manage this situation all on its own. But why stop at images? The <iframe> tag is
used to display entire websites within an element on our page. But it also introduces quite a few restrictions
on the content that it displays.
Let's start with an example. Adding another TWebHTMLDiv component, inside its HTML property, we can add the following <iframe> element.
<iframe src="https://satellitemap.space/"
        width="100%"
        height="100%"
        frameborder="0"
        title="Starlink Satellite Map"
        style="border: 3px solid gray; border-radius:30px; overflow:hidden;">
</iframe>
Then, when we run our project, it automatically loads up an entirely separate application and runs it inside that element on the page.
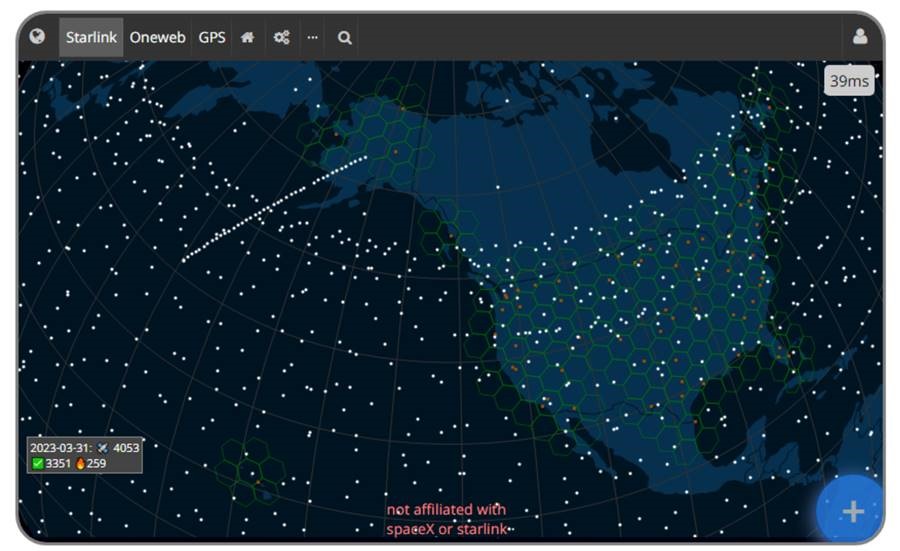
Interactive Map Displayed In <iframe> Element.
How fun is that?! One bit of code and a fully functioning (and rather complex) app appears on our page. In this case, there wasn't
even an API key required - just point the src attribute at a URL and away we go. Hard to imagine anything much
easier. It is a little bit surprising that there isn't an endless series of apps that can be served up in this
fashion. Well, actually, there are, and we likely run across embedded content all the time that use
<iframe> elements without necessarily realizing it.
- Ads.
- Social Media feeds on other pages (adding a Twitter or Instagram feed to a page).
- Video or Audio (YouTube players, embedded Spotify playlists, integrated Podcasts, etc.).
- Interactive Maps (often, but not always - Leaflet doesn't use <iframe> for example).
- Weather data.
- Third-party Authentication pop-up windows.
While these are (mostly) great to have, and we likely use them all the time, there are some limitations.
First, we don't have much control over what is displayed within the <iframe> element. It is a remote website,
after all, so it is going to display whatever the remote website owner wants to display. This may include ads
of their own, or it may require users to login, or require us to acquire an API key or license to display their application or other content.
In some cases, the remote application can be customized using options provided by the remote service. The MeteoBlue
website, for example, offers a number of free widgets. Their "three hour" widget" allows customizing
the number of forecast days, the location, whether a background is displayed, and so on. As options are
selected, an <iframe> link is generated that we can simply embed directly in our project. RainViewer
does something similar, which we're using in the Home
Assistant / Catheedral project. Here's an example of the <iframe> offered by MeteoBlue.
<iframe src="https://www.meteoblue.com/en/weather/widget/three/vancouver_canada_6173331?geoloc=fixed&nocurrent=0&noforecast=0&days=4&tempunit=CELSIUS&windunit=KILOMETER_PER_HOUR&layout=image" frameborder="0" scrolling="NO" allowtransparency="true" sandbox="allow-same-origin allow-scripts allow-popups allow-popups-to-escape-sandbox" style="width: 460px; height: 593px"></iframe><div><!-- DO NOT REMOVE THIS LINK --><a href="https://www.meteoblue.com/en/weather/week/vancouver_canada_6173331?utm_source=weather_widget&utm_medium=linkus&utm_content=three&utm_campaign=Weather%2BWidget" target="_blank" rel="noopener">meteoblue</a></div>
Based on the options chosen, we then end up with this display.
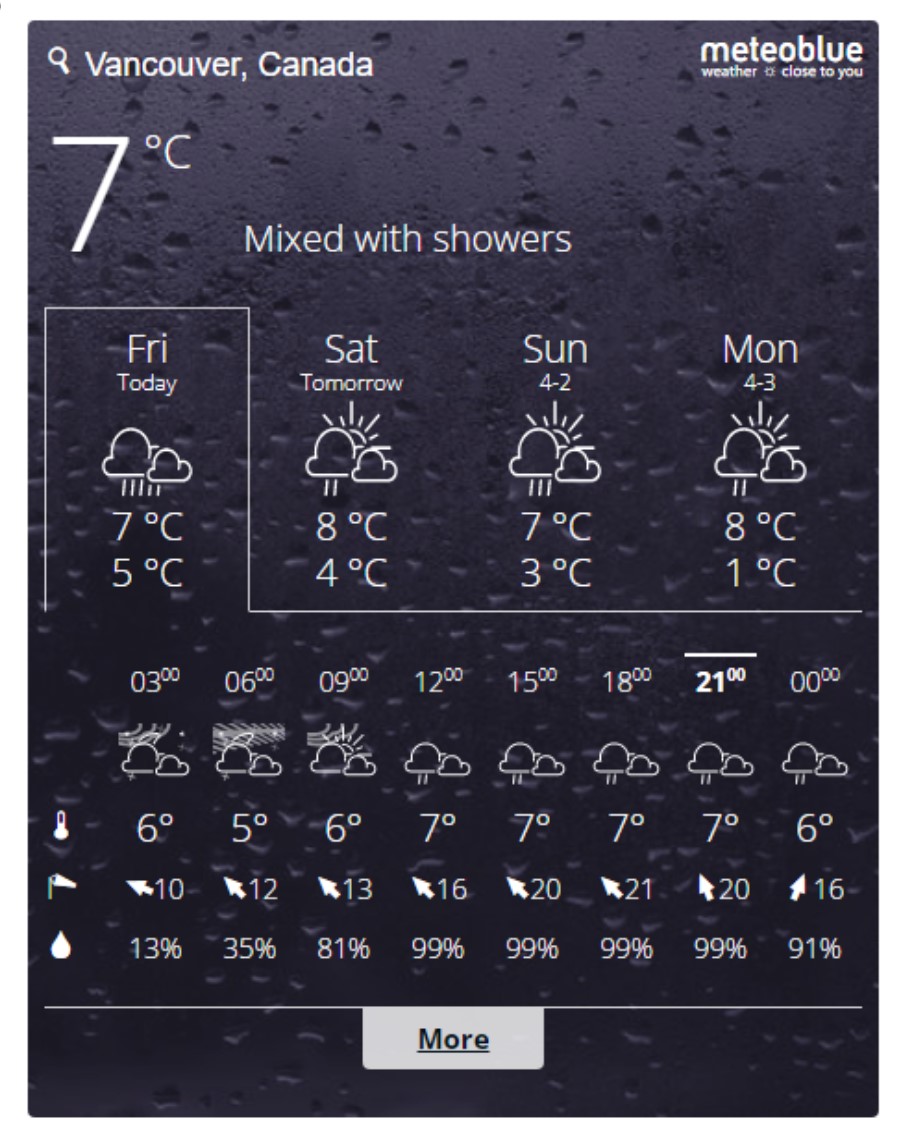
Blue Meteo <iframe> Content.
This all works pretty great, but what are the downsides to using an <iframe>? Well, there are several key
differences to using an <iframe> versus having just our own app running natively in the browser.
- The hosting app (our app, in this case) doesn't have direct access to the app running inside the
<iframe>. What does this mean? Well, we can't really tell what is going on - JavaScript applications
are explicitly blocked from traversing the DOM and seeing what is inside the <iframe>. Likewise, if we
try and render a copy of the DOM, for example using a screenshot-style JavaScript library, the <iframe>
won't be included. We covered this recently in this
post.
- We can communicate with the embedded app using messages, if the app allows it. We had an example of this in this blog post about Draw.io, where we pass messages back and forth to save and load files and other content. Possible, but more work certainly, and only when the embedded app is designed explicitly with support for this mechanism.
- There isn't any way to tell what the remote app is doing, or how much of an impact it is having on the rest of our app. The first example above, for example, is fairly CPU intensive. If our app is also CPU intensive, this may impact how well our app is performing. And there's little we can do to even tell that something is wrong, particularly if the embedded app's resource usage can change dramatically during use.
- If there's an issue with the embedded app, it is usually outside of our control, so we can't do much to support our users in this regard. For example, if the weather app shows incorrect data or someone would like it to display more or less data, or otherwise change what is being viewed, there's not generally much we can do about it. If we're offering bespoke premium web app development services, this isn't going to be the kind of news our customers want to hear.
- If space is limited, and we want to overlay our own controls over an <iframe>, this is entirely
possible - effectively merging our two apps, at least from a visual standpoint. But we don't often have the
opportunity to move elements on the embedded app around. So if we've got a button in the same place that they
have a button, well, that's just problematic. We also covered this in the Catheedral app, where some of our
buttons overlap some of the RainViewer buttons.
- If the embedded app is large, it may take a bit of time for it to initialize - something we also have virtually
no control over. In our example above, it does indeed take a few seconds for the embedded apps to become
usable. We could do extra work could mitigate this by adding a "loading in progress" kind of display for however long we expect it to take for the remote application to load, but it is more
work, certainly.
Generally speaking, however, if there's a bit of functionality that we can add to our project with just the use
of an <iframe>, it is often a fantastic situation to be in. We just need to be mindful of its
limitations.
Hosting Content.
It may also be that we want to set up an app of our own, destined to be used inside an <iframe> of someone else's website. Perhaps we have some statistical data or other information that might be of interest to others, or perhaps we just want to collect data using a small form that can easily be embedded elsewhere. Whatever the reason, there really isn't anything for us to do differently, other than try to lay out our application in a way that can fit well into other websites. Building responsive websites is one way to do this, which we should be doing already. And offering parameters to our app that can customize its behavior, just as BlueMeteo and RainViewer do, is another.
We had a run
at this in the post about displaying Actorious data in an <iframe> in a Home Assistant dashboard (a
website) where we could customize the parameters to adjust what information was displayed. For example, we
could set the number of people to show (8), the size of the underlying element (1520px by 300px), the offset
(10px by 10px), the scale to draw that element (0.5), and the background color to use (maroon) - all just
parameters to our own TMS WEB Core application.
https://www.actorious.com/today/?N=8&S=0.5&B=maroon&X=10&Y=10&W=1520&H=300
Then, when we add it as the src attribute in an <iframe>, it gets rendered in our project.

Hosting Content In <iframe> Elements.
It can also be the case that we specifically do not want our apps to be available in this fashion. This can be a bit tricky, but one option is to add a header (x-frame-options) that can be set by the web server
hosting our application. It can have values of "allow-from", "sameorigin" and "deny". This can be set in an
.htaccess file for those using more restrictive shared hosting servers, or directly in an Apache or NGINX
configuration file if access is available.
Initialization.
At last, we've arrived at our final topic for this Basics post, brought to you by the letter I - Initialization. In the last example above, we were passing a bunch of parameters to our TMS WEB Core project, used essentially to initialize our app. In a traditional Delphi VCL app, a lot of our initialization happens in FormCreate methods - code that we run immediately when a form is first created, before it is even displayed.
In TMS WEB Core projects, we have the same mechanism available - either TWebFormCreate for a regular TMS WEB Core app, or TMiletusFormCreate or TElectronFormCreate if one of those frameworks is being used. But what kinds of things are we interested in doing in our project at this stage? There are four that come immediately to mind.
- Determine or report data about the application itself - version and release information.
- Process any incoming parameters.
- Retrieve saved state from local storage.
- Load options or settings from a configuration file.
Whether a given project needs to cover any or all of these will depend on the project. And there may very well
be other steps needed as well. But these are common enough that we can have a quick look at each and see how we
might address them.
Version Information.
In a traditional Delphi VCL application, we can get the version information from Delphi itself. In a TMS WEB Core project, however, that same version information isn't used. And versioning isn't turned on by default. It can be enabled in Project | Options | TMS WEB | Compile | Auto-increment version. Note carefully that this option can be set differently for each build configuration (eg: Debug vs. Release).
But then how do we get at that
value? And, in a Delphi VCL app, we can look at the generated executable file to retrieve a datetime value corresponding to when it was last compiled. That, too, is a little more difficult here. But we have options. And
if none of these are workable for your project, there are no doubt others. Plenty of choices, as usual.
One approach is to just explicitly set these values whenever we release a build - a completely manual
approach. Setting a few Form variables simplifies things pretty well, and doesn't require any kind of extra
work to get up and running. These values might be output initially to the console when the app starts, for
example, or displayed somewhere in the UI, so we (as developers) can at least confirm that we're using the
version of our project that we think we are.
  AppProject := 'Basics 4';
  AppVersion := '1.0.0';
  AppRelease := '2023-Mar-31';
  AppStarted := Now;
  console.log('App Version: '+AppProject+' v'+AppVersion);
  console.log('App Release: '+AppRelease);
  console.log('App Started: '+FormatDateTime('yyyy-MMM-dd hh:nn:ss',AppStarted));
We can do better. If we enable auto-versioning, this value is available when the project is built, so we can add a line to the end of our Project.html file to save this value for later use.
<script type="text/javascript">window.ProjectName="$(ProjectName)";</script>
For the date (release) information, we can get this by asking the web server for the document revision date,
which it gets from the datetime of the file that is serving up (our Project.html file's timestamp). It returns
a value that we have to adjust (it is in a specific format), so we'll use Luxon for that. And we have to do a bit of work to parse all this
information, but we can get there doing something like this.
  asm
    this.AppProject = window.ProjectName.split('_')[0];
    this.AppVersion = window.ProjectName.split('_').slice(1).join('.');
    this.AppRelease = new luxon.DateTime.fromISO(new Date(document.lastModified).toISOString()).toFormat('yyyy-MMM-dd');
  end;
  AppStarted := Now;
  console.log('App Version: '+AppProject+' v'+AppVersion);
  console.log('App Release: '+AppRelease);
  console.log('App Started: '+FormatDateTime('yyyy-MMM-dd hh:nn:ss',AppStarted));
Note that with auto-versioning, a new "project.js" file is created after each application run (not just build
events). This complicates deployment, as there are now all the old versions hanging around. Something to be
mindful of. This is what the console output might look like.
App Version: Project1 v1.0.14
App Release: 2023-Apr-04
App Started: 2023-Apr-04 22:32:58
This can naturally be customized in any number of ways, or not output to the console at all.
Parameters.
For TMS WEB Core regular web projects, parameters are passed in typically as "query parameters". Meaning they are part of the URL, starting with "?param1=value1" and followed with "¶m2=value2" and so on. We can access these using the HasQueryParam and GetQueryParam methods, which can be found in the WEBLib.WebTools unit.
Note that the parameters, in this case, are case-sensitive, but the order isn't important. If we were potentially
expecting a "width" and a "height" parameter, we could get at them using the following. Naturally, we'll have to
do a bit of error checking to ensure that if a value does come in, it is something we can use, and not
height=camel or something like that.
  if GetQueryParam('width') <> ''
  then console.log('Parameter [width]: '+GetQueryParam('width'));
  if GetQueryParam('height') <> ''
  then console.log('Parameter [height]: '+GetQueryParam('height'));
If we're working on a Miletus app, then we do indeed have regular Delphi-style parameters that can be used. Here, we can decide for ourselves whether we want the parameters to be case-sensitive or order-specific. And we can also have parameters defined however we like, not just Key=Value pairs.
  await(Boolean, TTMSParams.Execute);
  for i := 0 to ParamCount do
  begin
    if Pos('SOMETHING', Uppercase(ParamStr(i))) > 0
    then console.log('Parameter [something] detected: '+ParamStr(i));
  end;
Either way, we end up with parameters that we can use during our initialization. Both variations support a very large amount of parameter data - thousands of characters at a minimum, in most cases. Plenty of room to pass in a few parameters to get started. Could even pass in a small image (Base64-encoded naturally) if absolutely necessary.
Local Storage.
In a traditional Delphi VCL app, "local storage" typically means something like an .INI file, or perhaps even the Windows Registry in some instances. For regular TMS WEB Core applications, the closest equivalent is likely to be JavaScript's "localStorage" facility - essentially a persistent key:value store. How persistent, you ask? Very! Items stored here will even survive browser restarts. In fact, values are never deleted automatically under normal circumstances. But they can be deleted by the user in certain circumstances - such as using the browser developer tools.
How much storage is an interesting question, but plan on having 5 MB
available. Maybe considerably more with certain browsers, and so long as the device has the storage available. Not really where you'd want to put a database, but enough to handle a considerable amount of state data. To
access localStorage from Delphi, we'll first need to add the TWEBLib.Storage unit.
  if TWebLocalStorage.GetValue('FirstVisit') = '' then
  begin
    ShowMessage('Welcome new visitor!');
    TWebLocalStorage.SetValue('FirstVisit',StrToFloat(Now));
  end;

  if TWebLocalStorage.GetValue('LastVisit') <> '' then
  begin
    if StrToFloat(TWebLocalStorage.GetValue('LastVisit')) < (Now - 7) then
    begin
      ShowMessage('Been awhile, welcome back!');
    end;
  end;

  TWebLocalStorage.SetValue('LastVisit',FloatToStr(Now));
To remove a key entirely, we can use the TWebLocalStorage.RemoveKey(keyname) method. Unfortunately, though, localStorage isn't available to Miletus apps. As an alternative, an .INI facility can be used, similar to a traditional Delphi VCL .INI file.
procedure TForm1.somethingchanged;
var
  AppINIFile: TMiletusINIFile;
begin
  AppINIFile := TMiletusINIFile.Create(StringReplace(ParamStr(0),'.exe','',[])+'.ini');
  AppIniFile.WriteString('Configuration', 'something', something_value);
end;

procedure TForm1.loadsomething;
var
  AppINIFile: TMiletusINIFile;
  StoredValue: String;
begin
  AppINIFile := TMiletusINIFile.Create(StringReplace(ParamStr(0),'.exe','',[])+'.ini');
  StoredValue := await(String, AppINIFile.ReadString('Configuration', 'something', ''));
  if StoredValue <> '' then something_value := StoredValue;
end;
The TMiletusINIFile class is available as part of any Miletus project. The Create statements are intended to
refer to an .INI file that is in the same folder and that has the same name as the application executable. We're
also not restricted to string-based key:value pairs, but can use the usual INI tools pertaining to different
data types, sections, and so on. Be sure to check the TMS WEB Core documentation for more information - there are
more than a dozen other methods available.
Configuration File.
Local storage is great for storing state information about an application with respect to the current user. Sometimes, though, we need some information just to get the app running properly. For example, if we have a TMS WEB Core project that uses XData, we'll need to know the URL for the XData server, so that we can connect to it. During development, we might want to use a local development XData server. And in production, we might want to use a different XData server.
We could include code to try and figure out if our application is running locally or
remotely, but another approach is to have it look somewhere for that additional bit of configuration data. Perhaps in the
development environment, no configuration data is available, so defaults (focused on the same development
environment) would be used. If, instead, the application finds configuration data, then it will use that
information instead.
Let's consider having a "configuration.json" file. In the development environment, we'll perhaps just not have a file at all. But in the production environment, we can add entries for things like the XData server, or perhaps even the application name, a project icon (Base64-encoded, naturally), or anything else we like (it is JSON after all - no limits!). Often, it can be the case that the very same application is used under different domain names or different environments, so having configuration data to "personalize" the application for a specific environment can be very useful.
Assuming that nothing in the configuration data is proprietary, we can just place this file
in the same location as our application, and then check for it when our application starts. We can drop a
TWebHTTPRequest component on the form to help with retrieving the file. The trickiest part of this is
constructing a URL that finds the configuration file under different conditions. Let's say that there is a JSON
value for "Server" inside this configuration.json file that we'd like to get.
procedure TForm1.WebFormCreate(Sender: TObject);
var
  ConfigResponse: TJSXMLHttpRequest;
  ConfigData: TJSONObject;
  ConfigURL: String;
begin

  // Figure out what our server connection might be - Server_URL is a form variable
  Server_URL := '';
  try
    asm ConfigURL = window.location.origin+(window.location.pathname.split('/').slice(0,-1).join('/')+'/configuration.json').replace('/\/\//g','/'); end;
    WebHTTPRequest1.URL := ConfigURL;
    ConfigResponse := await( TJSXMLHttpRequest, WebHTTPRequest1.Perform() );
    if String(ConfigResponse.Response) <> '' then
    begin
      ConfigData := TJSONObject.ParseJSONValue(String(ConfigResponse.Response)) as TJSONObject;
      Server_URL := (ConfigData.GetValue('Server') as TJSONString).Value;
    end;
  except on E:Exception do
    begin
    end
  end;
  if (Server_URL = '') then
  begin
    Server_URL := 'http://localhost:12345/tms/xdata';
  end;
end;
Another consideration is whether the web server will allow access to the configuration file. Some web servers
are restricted to only serving up known file types (typically HTML, CSS, and JavaScript, naturally) so a JSON
file might be problematic. Before checking elsewhere, it should be possible to get at the configuration.json
file just using the browser (https://example.com/configuration.json
for example), where the domain name and anything that comes after it is the same for your main application HTML
file as it is for the configuration file.
The tricky bit is to handle the situation where the file is either at
the root of the server where the project is being served from, in an arbitrarily deep sub-directory, or
where "project.html" forms part of the URL. Ultimately, if the configuration.json value isn't accessible from
the browser, then that needs to be sorted before looking elsewhere, in case of problems.
Once the file is read in, the JSON can then be parsed for whatever values are of interest at the initialization stage, such as the XData server URL that we're after here.
Another idea is to have the "Server" value in the JSON be an array. We might do this if, for example, we have a number of available XData servers to choose from. This might be the case if we want to do a bit of load balancing for a busy XData server, where perhaps the order was specific to the current loads being experienced. Or if we want to provide some redundancy, we could automatically select a different XData server if any of the choices were unavailable.
Initialized.
Once we've had a chance to look at the version information, parameters, local storage, and any available configuration file, we should be all set to complete any possible initialization tasks. This might involve setting up a connection to XData, filling in default values for UI elements, or updating TWebLabel components with version information. It may even be necessary to provide feedback to the user in case something in our initialization is preventing the app from continuing, like having no XData server connection available, for example.
Many, many years ago, when Windows NT was first released, it was commonly reported that it had roughly the same
number of lines of code as the leading mainframe operating system of the day - MVS. Mainframe operating systems
in general are obsessive about error checking and error handling in general. They need to be 100%
reliable, and this is a key reason why they (still!) are. It was also reported at the time that something like
95% of MVS' code was focused on exactly that. On the other hand, Microsoft was (and arguably still is) focused
more on having things look pretty (clearly beauty is in the eye of the beholder here... What was that about Microsoft having no taste?!). The claim was also that 95% of Windows NT was focused on the user interface
aspects of the operating system. If anything in Windows NT changed, there was almost always a need to reboot it
to have the changes take effect - it really was that fragile - any unanticipated changes would result in it
rebooting itself anyway! I recall specifically that even changing the volume on a connected modem would require
a restart to take effect. Sheer insanity.
In any event, I bring this up now as a hopefully comedic reminder to ourselves to be sure to spend a good
amount of time anticipating and handling errors. Accessing things like configuration files over the internet is likely to fail considerably more often than accessing the same file over a LAN connection to a local server,
and the users of our application will surely benefit if we at least deal with the most obvious errors that are
likely to occur - like missing configuration data or inaccessible remote connections. We have, after all, come full circle, where browsers are a lot like the modern equivalent of a TN3270 terminal and our web servers (or
the cloud generally) are a lot like a mainframe sitting off in the distance somewhere (and in some cases, it
might actually be a mainframe, who knows!).
Over to You!
That's quite a lot of material for one post! Hopefully, there was something useful for everyone. Feedback time!
What was the most useful bit, if any? What was the least useful bit? Did any of this bring to mind a topic
that we've yet to cover? Was there anything here that needs to be covered in more detail? There are not many
things I look forward to more than feedback, so comments and questions are most appreciated!
Related Posts:
Basics Part 1: Consoles, Calls, Classes, CSS, and... CAPS-LOCK?
Basics Part 2: Files, Fonts, Flex, and FNC
Basics Part 3: Attributes, Animation, Async, and Await
Basics Part 4: Images, Icons, iFrames, and Initialization
Basics Part 5: d, div, debugger, Debug, and Deployment
Basics Part 6: Links, Lists, Layouts, and Let
Follow Andrew on 𝕏 at @WebCoreAndMore or join our 𝕏 Web Core and More Community.
Andrew Simard

This blog post has received 6 comments.
 2. Tuesday, April 11, 2023 at 9:18:51 PM
You are most welcome!
2. Tuesday, April 11, 2023 at 9:18:51 PM
You are most welcome!
Andrew Simard
3. Wednesday, April 12, 2023 at 12:34:45 AM
Incredibly well written and explained in pictures and text, Andrew. I''m always eagerly awaiting the next articles, because you write in such a relaxed and informative way and can captivate one in front of the screen. Keep up the good work, you are so inspirational. You are a great asset to TMS and to Delphi enthusiasts.
Thomas Speck
4. Wednesday, April 12, 2023 at 2:22:17 PM
Thanks for the kind words! Much appreciated!!
Andrew Simard
5. Saturday, May 13, 2023 at 2:15:18 AM
I''m always glad when I make the time to read another of your blogs, Andrew. Each one lights another corner for me. Thanks.
Peterson Terry
6. Saturday, May 13, 2023 at 3:47:58 AM
Thanks!
Andrew Simard
All Blog Posts | Next Post | Previous Post
DERNEGI CANSUYU