Blog
All Blog Posts | Next Post | Previous Post

 Extend TMS WEB Core with JS Libraries with Andrew:
Basics Part 3 - Attributes, Animation, Async, and Await
Wednesday, March 8, 2023

As we continue exploring TMS WEB Core in this Basics series, we'll try to cover topics that involve each of these three technologies, seeing how they relate to one another, and to the Delphi (or Visual Studio Code or Lazarus) code that we might be working on. This time out we're going to focus on attributes (HTML), animation (CSS), and async/await (JavaScript).
Contents
- HTML 101.
- HTML Attributes.
- ID Attribute.
- Style Attribute.
- Class Attribute.
- Rendering.
- Making Changes.
- Animation.
- Async and Await.
- Sleep.
- Next Time.
HTML 101.
One way to think of HTML is as a generic text document containing a collection of elements that directly or indirectly describe what appears on a web page within a browser. Each element is defined by a tag - a term of some kind wrapped in a greater-than and a less-than sign. In fact, there are a handful of elements that are exactly just that. If we want to insert a horizontal line on a page, we can simply insert <hr> wherever we want one to appear (horizontal rule). If we want to add a line break, we can do that with a <br> element. Nothing more is required in either case.
Generally speaking, when referring to the HTML element in its
entirety, the term element is used. When referring to the type of element or the
actual names of the text values, the term tag is used. But often these are used
interchangeably, as there isn't really anything ambiguous when switching between the two.
Most elements have an opening and closing tag, where the impact of that element is applied to whatever is
enclosed between them. If we wanted a bit of text to be bold, for example, we could wrap it with an
element that indicates where the bold starts and ends. The HTML might look like this: <strong>
this is bold </strong>. There's not really any limit to how much content can appear between an opening and closing tag. In fact, a typical HTML page is entirely enclosed within <html>
and </html> tags.
Elements are nested within one another. It might be helpful to think of this nesting as being a tree structure, which is how it is represented internally when the page is being parsed. If one element is inserted into another, it becomes a child of that parent. A parent element might have any number of child elements, and each child element will have exactly one parent. When a parent element has several child elements, the order is often important, but not always.
If a child is added that normally requires an opening and closing tag, but one of the tags is missing, the results are often both unpredictable and undesirable. A missing opening tag likely means that anything inside the tag will be displayed without the benefit of whatever the tag was for, with the closing tag being ignored. If the closing tag is missing, it may be that any other siblings that follow (children of the same parent) will be included in the tag - not so good.
An important consideration here is that a browser will always try to render a page with whatever HTML it is given. It parses the text and builds a document tree - often referred to as the Document Object Model or DOM. And it doesn't much care if there are any mistakes - it creates a DOM with whatever it is given, for better or for worse. This can sometimes be a bit of a problem because if there is something wrong, it won't be reported (at this stage) by the browser itself. Naturally, many pages can display errors on them that relate to the contents of the page, but this is actually HTML that is included in the document - it isn't a message that is displayed by the browser itself.
And one final point that sometimes trips people up. An HTML document is just a collection of these elements. Any formatting comes about as a result of how the elements are defined, not how they appear in the document.
Whitespace (more than one consecutive space, tabs, carriage returns, line feeds, and so on) that appear between
elements, or even within an element's definition, is ignored. If a block of text needs a line break, one must
be explicitly inserted, most of the time. There are exceptions (check out the <pre>
tag for an example) but most of the time this is the case. Some websites minimize their HTML pages, meaning
that (among other things) all extraneous whitespace is removed. In some cases, the entire page is contained on
a single (very long) line.
HTML Attributes.
While there are a handful of HTML elements that can be used with just a single tag or an opening and closing
tag combination, many elements have additional properties that can be used to modify their behaviour. These
additional properties are called attributes, and they appear as extra terms within
the opening tag declaration. While there is no tag that explicitly requires attributes, a great many tags will
be more useful if attributes are supplied. Attributes may also have values assigned to them, but whether one is
required will depend on the attribute. For example, the <hr> tag
(horizontal rule) can be used as-is. If we had a block of HTML that included it, it might look like this.

top line of text<hr>bottom line of text
One of the attributes we can use with the <hr> tag is the hidden
attribute. As you might have guessed, this controls whether the tag is visible or not. If we add that
attribute to the tag, the page is rendered as if the tag was never added at all. The hidden
attribute is one of a handful of global attributes that can be added to any HTML tag.

top line of text<hr hidden>bottom line of text
Another one is the title attribute. This is most often used to display a bit of
extra information about an element, which is shown when the mouse hovers over the element, as a tooltip.

top line of text<hr title=divider>bottom line of text
Note that tags are not case-sensitive, nor are attributes. Attribute values are, however. By convention, tags
and attributes are usually lowercase. While we don't always need to enclose attribute values in quotes, it is
likely best to get in the habit of doing so. And while we can use single quotes, the convention generally is to use
double quotes. When looking at the HTML rendered by the browser using the developer tools, we're looking
essentially at what has been parsed from an HTML document and stored in the DOM. When it is displayed back to
us, it uses these conventions. So even if we entered a tag that looked like <HR TITLE=divider> the browser developer tools will still present us with its own interpretation of <hr title="divider">.
ID Attribute.
The next attribute we're interested in is the id attribute. This is used to assign a unique single identifying value to an element, which can make it much easier to reference that element later. Generally, this is only assigned to elements that need to be referenced later - most elements won't have an id attribute assigned. This is another global attribute, so in theory, any element could indeed have an id. The value assigned to an id, as with other attribute values, is case-sensitive but in most cases, it will be lowercase. In addition, id values should not start with a number and should not contain any whitespace characters (in particular, no spaces).
As we mentioned earlier, the browser isn't going to throw up an error if we don't follow the rules - it might just do unexpected things. Or even worse, it will work just fine. Why is that worse? Because it will work just fine on the browser we're testing with, in development, only to break on the browser that a key customer is using when we're giving them a demo. We've got plenty of other rules to break without needlessly tripping over this one.
Perhaps the most important thing to keep in mind with respect to id attributes is that they really should be unique across the entire HTML page. When all we have is a single static page, this isn't usually too much of a challenge. Often, TMS WEB Core itself will populate the id attribute with a unique value for certain elements. However, two problems are worth noting.
First, the id values that TMS WEB Core generates on its own are not necessarily going to be the same between one run of the application and the next. If we need to reference an element by its id at any point, it is best to assign our own value explicitly.
Second, it may very well be that the HTML content of the page is not at all static. If our project loads forms or creates elements dynamically at runtime, or uses pop-up elements, we can very easily end up in a situation where the id values are no longer unique across the page, breaking various things in the process.
In regular Delphi VCL applications,
by default, there is a convention of assigning component names sequentially (Button1, Button2, Button3, etc.) on
each form. If you have two forms loaded, there's no ambiguity because we can reference Form1.Button1 separately from Form2.Button1 and there's also no ambiguity (in the code at least) if we just reference Button1 - the
compiler will figure out what we mean in short order. In an HTML page, these all get mashed together, so we
need to be mindful of these name collisions. Generally, we won't get an error about it, just unexpected behaviour.
Just for fun, if we wanted to see if a page had any duplicate id values, we could copy & paste the
following JavaScript into the browser console (sourced from stackexchange).
Online validation services also provide this kind of check, but having one we can run ourselves directly is
helpful because we'll want to run this when an application is having problems in a certain place while the app is running, showing a custom form, for example. This is not something
that is as easy to pass over to an online validation service.
(function findDuplicateIds() {
    var ids = {};
    var all = document.all || document.getElementsByTagName("*");
    for (var i = 0, l = all.length; i < l; i++) {
        var id = all[i].id;
        if (id) {
            if (ids[id]) {
                console.log("Duplicate id: #" + id);
            } else {
                ids[id] = 1;
            }
        }
    }
})();
There are many situations where we might need to reference an HTML element using its id
attribute. Maybe we want to change the value of another attribute in the same element. Or we want to reference
something in one of its child elements. Depending on what we're doing, this may involve prefixing the id
value with a hash symbol (#). For example, if we want to apply a CSS rule to an element with an id
value of "fancybutton", we'd use #fancybutton as the CSS selector. JavaScript
uses something called query selectors in the same way.
One final note on the importance of the id attribute. This is what TMS WEB Core
uses to bind a Delphi component on a form to the corresponding element in an HTML template. Subsequent changes
to the Delphi component (changing the caption of a TWebLabel component, for
example) with a given ElementID property flow through to the corresponding HTML
element on the page that has a matching id attribute. Any Delphi component
without a corresponding HTML element will be rendered without the benefit of the HTML template. Likewise, any
HTML template element that doesn't match up to a Delphi component will also be rendered without the benefit of a
Delphi component. There may often be plenty of both without matching elements.
Style Attribute.
Likely the second most powerful HTML attribute, style, is used to apply rules that describe to the web browser how an element is to be rendered. These rules, collectively, have a name - CSS. When an HTML element has a style attribute assigned, the values are referred to as "inline CSS rules" or "inline CSS styles" and generally take precedence over every other CSS rule that may be computed for that element. Unlike CSS, there is no selector involved when using the style attribute in an HTML element, as the rules are applied to the element directly - the selector is effectively pointing at the element.
The format for the value assigned to a style attribute is a little
different than other HTML attributes in that it is just a collection of CSS rules that need to follow CSS
conventions. Rules are assigned as key:value pairs, and multiple rules are separated with semicolons. For
example, we could assign an assortment of CSS rules to a style attribute as
follows.
<label style="display:block; background-color: maroon; color: white; border-radius:15px; font-weight: 900; font-size:20px; width: 400px; height:30px; text-align:center">Now this is a label!</label>
There isn't any limit to the length of the value assigned to the style attribute - it can even span multiple lines if necessary. The main thing is that it needs to be surrounded by quotation marks, which can be tricky sometimes as some CSS rules have options that also require quotation marks. Here's what our example above looks like when rendered by the browser.

HTML style Attribute.
Virtually all of the formatting on an HTML page is ultimately handled by the careful application
of numerous CSS rules. While rules can frequently appear in the style attribute
of an HTML element as we've shown above, It would be incredibly tedious to have to define all of the CSS rules
for every element in this way. The "cascading" term in "Cascading Stylesheets" (aka, CSS) reflects how a set of
rules applied to a parent element (identified using a CSS selector) is applied to all of its descendants (child
elements, child elements of child elements, and so on).
CSS rules are most often loaded from external CSS files
or from a <style> element added to the <head>
element at the top of an HTML page. HTML style attributes may be most helpful
when applying very specific adjustments to the overall CSS rules that are applied to the page. This hierarchy,
where some rules get applied at a higher priority than others, is referred to as specificity, and understanding
how the rules are applied, and in what order, is critically important when it comes to making the most of CSS. Fortunately, HTML style attributes tend to have the highest specificity, making it
a little less daunting to implement changes to individual elements when exceptions are needed.
Class Attribute.
The HTML class attribute can be thought of as a collection of zero or more arbitrary names that are assigned to an HTML element. The value assigned to the class attribute follows rules similar to what we described for id values. Case-sensitive, shouldn't start with a number, and shouldn't have spaces. However, there can be many class values (many classes) for any given element. They are assigned using a space-delimited and quoted string.
As
with other attribute values, convention suggests using double quotes and lowercase values for classes, but single quotes can
be used. They will appear as double quotes when looking at the element using the browser developer tools. I tend
to use uppercase class names for my own classes in my projects just to help make it obvious that it is my class and not a
Bootstrap or template class of some kind, but that's just a habit and not necessarily one to be encouraged.
Classes are easily the most powerful attribute in the HTML toolbox. They can be thought of as the connective tissue between JavasScript and CSS. Yet, curiously, they do absolutely nothing on their own. If we have a simple static HTML document, without any CSS or JavaScript, we can add classes all over the place, and it will have absolutely no impact whatsoever. What breathes life into them are the underlying layers of JavaScript and CSS. In more dynamic applications, like those developed with TMS WEB Core, classes will be used extensively, and for all kinds of crazy things.
Classes are in fact so important that some of the biggest and most commonly used JavaScript libraries are
designed entirely around the class system. Bootstrap
(one of the very first JavaScript libraries that we covered, here,
and also used in almost every one of our projects!) is primarily a set of classes that are assigned to HTML
elements to bring about a certain appearance or behaviour. Changing the set of classes dynamically can impact
both as well. Tailwind CSS is
another JavaScript library that works in a similar way, coming soon to a blog post near you.
Rendering.
When a browser renders an HTML document as an actual web page, all of the CSS rules are combined and merged with all of the document elements (collectively, the DOM) so that the browser knows exactly what CSS rules are to be applied to each element. The browser developer tools allow you to pick any HTML element and see the CSS rules that are being applied, in real-time, and in great detail.
If the CSS rules that apply to an element are somehow changed, then the browser will redraw that element, or even the entire page, to reflect the new set of rules. This is sometimes called "repaint" or "reflow". The CSS being applied to an element might change for any number of reasons.
- A change in the style attribute of an HTML element.
- A change in the style attribute of a parent or sibling of an HTML element.
- A change in a CSS rule that is applied to an HTML element, perhaps due to a transition or animation rule.
- The HTML element is moved to another part of the DOM (moved to a different parent).
- A change in another attribute of an HTML element, like hidden.
- The size of the container holding the HTML element has changed.
- The size of the browser window has changed.
- The orientation of the browser window has changed (device rotation).
- The classes of an HTML element, sibling, or parent have changed.
JavaScript comes into play here as well, as a JavaScript function might be triggered by an event (like a button
click) that then results in a class being added to another element. Or maybe the button was a
"close" button, resulting in a pop-up form being closed and removed entirely from the DOM. This is really the
essence of the JavaScript/HTML/CSS triangle - it all revolves around adding, removing, or altering HTML elements
and their individual attributes and contents, including, most importantly, the many style
and class attributes.
Making Changes.
When working on a TMS WEB Core project, a lot of this work is done for us. For example, let's drop a TWebEdit
component on an empty form in a new project, using the TMS WEB Bootstrap Application template. Running the
project, the TWebEdit component will appear on an otherwise blank page. Using the browser developer tools, we
can see that a standard HTML element has been added with an <input> tag, but
with several other attributes set as well.
<input type="TEXT" id="TForm1_Edit1" zindex="0" class="form-control" tabindex="1" role="textbox" style="box-sizing: border-box; text-transform: initial; top: 232px; left: 280px; width: 121px; position: absolute;">
Many of the most common values can be set directly in the Delphi Object Inspector, and much of the time that's the preferred way to make changes to our components. For example:
- id is set automatically, but we can change this using the ElementID property. Remember to keep it unique.
- class is set automatically, but we can change this using the ElementClassName
property.
- tabindex is set to a default value and can be changed with the TabOrder and TabStop properties, where tabindex = TabOrder - 1. If TabStop is false, tabindex is set to -1.
- style is a combination of several properties.
- top, left, width, and height correspond to the same Top, Left, Width, and Height properties.
- position corresponds to ElementPosition
If we update any of these values within our application, the change will generally be visible immediately. For
example, changing the Height property at any time will update the height property in the style attribute. This is how changes are made most of the time.
Even with more complex components where there are parent and child elements created from one component, often
the most commonly used attributes for the parent and child component are accessible from the Object Inspector
properties. There are times, though, when changing attributes or properties in this way isn't possible.
- Elements that don't have a corresponding Delphi component.
- Elements that don't have a needed attribute exposed in the Delphi component.
- Descendants of elements without a needed attribute or element reference.
- When you want to change a class or style attribute without replacing it.
JavaScript has a handful of functions for making changes, both to attributes generally and to the class
and style attributes specifically. Many of these functions have been added to
TMS WEB Core, making them available as Delphi functions. Let's assign the Name property of TWebEdit1
to editName and set its ElementID property to be
the same. Note that in JavaScript, a global variable is automatically created for every unique id
found on the page. Another reason to choose your id values carefully.
procedure TForm1.WebButton1Click(Sender: TObject);
begin
  // Using the component normally
  editName.Text := '';
  editName.TextHint := 'Enter name';
  editName.ElementClassName := 'rounded border border-dark';

  // Get or set any attribute.
  editName.ElementHandle.setAttribute('spellcheck','true');
  console.log(editName.ElementHandle.getAttribute('spellcheck'));

  // Attributes without values can be set as well
  editName.ElementHandle.setAttribute('hidden','');
  editName.ElementHandle.removeAttribute('hidden');

  // Managing Classes
  editName.ElementHandle.className := 'rounded border border-dark';
  editName.ElementHandle.classList.Add('rounded');
  editName.ElementHandle.classList.Remove('border');
  editName.ElementHandle.ClassList.Replace('border-dark','border-secondary');

  // Managing Styles
  editName.ElementHandle.style.setProperty('border-width','2px');
  editName.ElementHandle.style.setProperty('filter','drop-shadow(0px 0px 2px blue)');
  editName.ElementHandle.style.setProperty('min-height','25px');
  editName.ElementHandle.style.removeProperty('width');

  // JavaScript equivalents - can also just run these from the console
  asm
    // Using the component normally
    editName.Text = '';
    editName.setAttribute('placeholder','Enter name');
    editName.className = 'rounded border border-dark';

    // Get or set any attribute.
    editName.setAttribute('spellcheck','true');
    console.log(editName.getAttribute('spellcheck'));

    // Attributes without values can be set as well
    editName.setAttribute('hidden','');
    editName.removeAttribute('hidden');

    // Managing Classes
    editName.className = 'rounded border border-dark';
    editName.classList.add('rounded');
    editName.classList.remove('border');
    editName.classList.replace('border-dark','border-secondary');

    // Managing Styles
    editName.style.setProperty('border-width','2px');
    editName.style.setProperty('filter','drop-shadow(0px 0px 2px blue)');
    editName.style.setProperty('min-height','25px');
    editName.style.removeProperty('width');
  end;

end;
The main differences between the Delphi variants and the JavaScript variants are that the assignment operator is
different ( = instead of := ), no need for ElementHandle, and of course JavaScript
is case-sensitive. There are many more JavaScript functions that can be used directly from Delphi when dealing with child elements, like firstElementChild,
lastElementChild, and so on.
Also, if we're primarily making changes to CSS, there's a recently added TWebCSSClass
component that we can use. This allows us to set all kinds of CSS properties using the Delphi Object
Inspector. This component is then tied to the components we want to change via the ElementClassName
property of our component and the CSSClassName of the TWebCSSClass
component.
Animation.
Now that we know how to make changes to all kinds of properties of our HTML elements, let's take a look at animation. Specifically, CSS animation. Briefly, a CSS rule consists of a selector, a property, and a value. Selectors are used to determine which HTML elements the rule will be applied to. Properties define what the rule is defining - things like top, opacity, border, min-width, filter, transform, and so on. Values refer to what can be assigned to properties, where each property has a set of values that it can use.
As with HTML generally, there are no errors generated if CSS rules are not properly defined, or if a property is assigned a nonsensical value. The browser will make the most of whatever it is given. If there's a structural error, like a missing semicolon or a missing closing brace, then it is likely that the rest of the CSS file will simply not be processed.
CSS Animation is, generally, a mechanism where a property (or a set of properties) is assigned values that are
automatically changed in a timed sequence. If we were to change the top property
of an element manually, increasing it slightly several times over the period of one second, for example,
the element might appear to be moving down the page. We can add rules to have this happen automatically
without having to write any Delphi or JavaScript code, but rather by writing CSS rules that are then applied entirely independently.
Let's start with an example - the transition property. This property is used to alter
the value of a selected single-value property over a period of time. The property can also include several such
single-value properties, and is a short-hand property, combining transition-property,
transition-duration, transition-timing-function, and transition-delay properties.
The value of transition describes the name of the property and the transition time. Let's say we have four
buttons that we want to fade in and move into position. We can define a class for the buttons, which will be
applied initially, by adding our own custom CSS stylesheet to a project, if one isn't already available.
.buttons {
  transition: top 1s, left 1s, opacity 1s
}
To prepare our animation, we can set the initial values for top, left, and opacity in WebFormCreate, or we can just position the buttons on the form. The CSS rules will also be applied to the buttons initially, so we could set opacity: 0; there as well. If we wanted to write our own code, it might look like this.
procedure TForm1.WebFormCreate(Sender: TObject);
begin
  button_top.Top := 300;
  button_top.Left := 400;
  button_top.ElementHandle.style.setProperty('opacity','0');

  button_left.Top := 400;
  button_left.Left := 200;
  button_left.ElementHandle.style.setProperty('opacity','0');

  button_right.Top := 440;
  button_right.Left := 500;
  button_right.ElementHandle.style.setProperty('opacity','0');

  button_bottom.Top := 500;
  button_bottom.Left := 300;
  button_bottom.ElementHandle.style.setProperty('opacity','0');
end;
To get the animation effect, all we have to do is change the properties by any of the means we covered in the last section. Let's kick off this animation with a button click.
procedure TForm1.WebButton1Click(Sender: TObject);
begin
  button_top.Top := 400;
  button_top.Left := 402;
  button_top.ElementHandle.style.setProperty('opacity','1');

  button_left.Top := 400;
  button_left.Left := 300;
  button_left.ElementHandle.style.setProperty('opacity','1');

  button_right.Top := 440;
  button_right.Left := 402;
  button_right.ElementHandle.style.setProperty('opacity','1');

  button_bottom.Top := 440;
  button_bottom.Left := 300;
  button_bottom.ElementHandle.style.setProperty('opacity','1');end;
Any property that as a transition rule will then interpolate the range of values over the time period specified. Note that our code here doesn't indicate anything animation-related is going on - no timers or anything. This is all handled entirely through CSS and the browser. As we've set the transition rule to include top, left, and opacity, we'll see the buttons "transition" to these new values over time - smoothly. Here's what this example looks like.

Animating Buttons with Transitions.
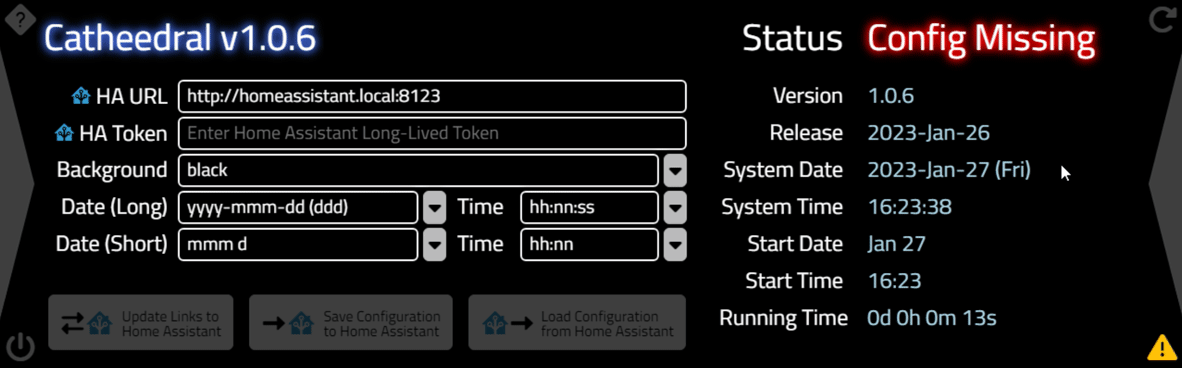
This is very similar to how the corner buttons in the Catheedral application (part of the Home Assistant not-so-mini-series) are first brought into the interface. That application also uses a few transitions for animating the drop-down elements in its configuration UI, and for switching between pages. You can read all about these animations in Part 3. Here's an example.
Transitions for drop-down elements.
So transitions work pretty well and are not too difficult to set up. And there are plenty of additional options. We could introduce a delay before the start of the transition. Or the timing function can be changed. If you wanted the opacity to change more quickly initially, but then not fully until the very last moment, a cubic-bezier function could be used. Check out the Ceaser CSS Easing Animation Tool for a bit of help coming up with just the right curve.
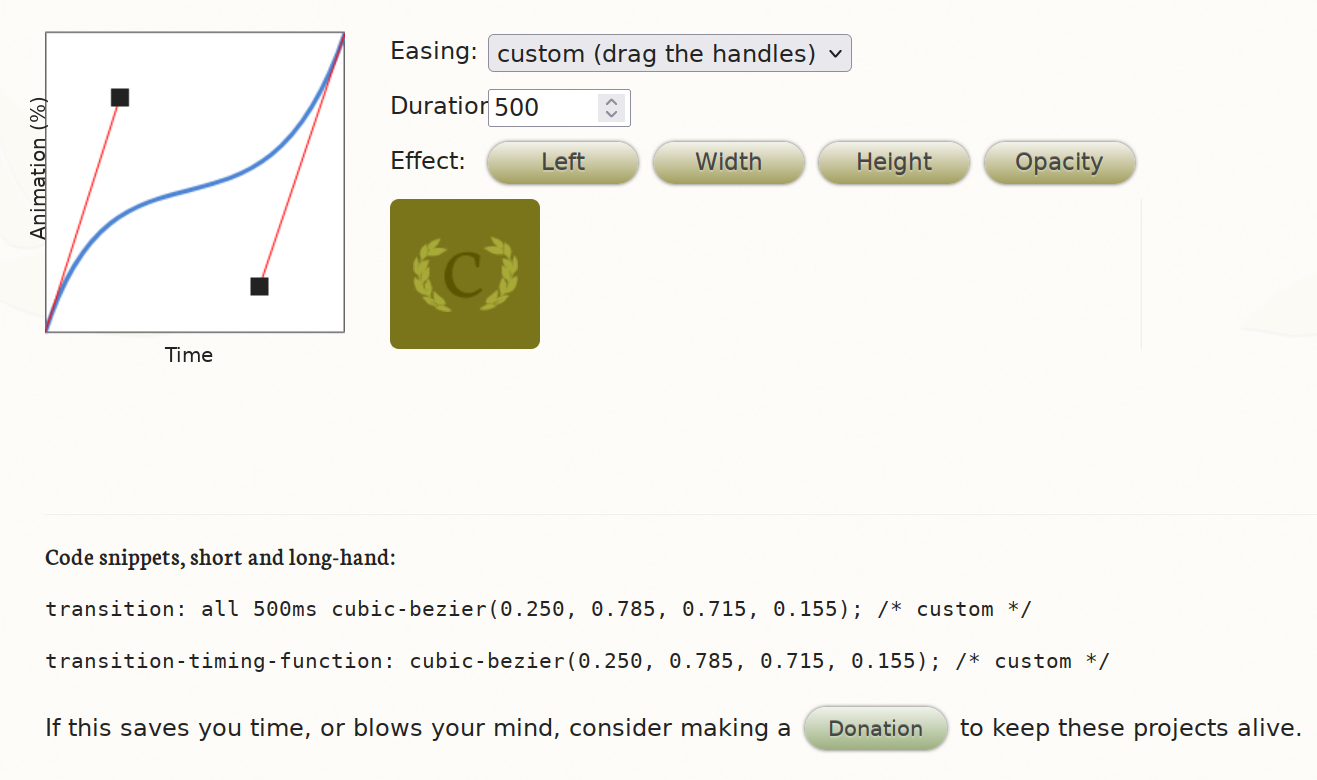
Ceaser CSS Easing Animation Tool Example.
The generated cubic-bezier snippet can then be copied over to our CSS easily enough.
.buttons {
  transition: top 1s, left 1s, opacity 1s cubic-bezier(0.195,0.755,0.825,0.175);
}
It might be a subtle change, but the main takeaway here is that we can adjust things however we like, with an amazing degree of precision.

Opacity Transition with Bezier Curve.
Transitions are great when you want to animate some kind of interaction with an element, like fading in or fading out an element as we've done above, or when an element changes from one state to another. And we don't have to really write any JavaScript code or worry about timer events - just a CSS rule. But what if we want the animation to cycle continuously, or to move through a non-linear series of steps from one value to another? We can still do it without writing any JavaScript code, using a more complex set of CSS animation rules.
The setup here is similar, just defining CSS rules. Let's say we want to implement something like a Cylon eye,
from the original Battlestar Galactica. We'll start with a big rectangle with a red circle in the middle. We
can even add a CSS filter to make it a little more fun. We'll need a few TWebHTMLDiv
components. One for the "eye socket", one for the "eyeball" and one for the extra "eye glare". To make it a
little simpler, we'll also have an "eye combo" element that contains the "eyeball" and "eye glare", which is in
turn contained within the "eye socket". We then just have to animate the "eye combo" element rather than two
separate elements. We can define almost everything via CSS.
#eyeSocket {
  border: 5px solid gray;
  outline: silver solid 25px !important;
  background: black;
  border-radius: 25px;
  width: 1000px !important;
  height: 100px !important;
  overflow: hidden;
}
#eyeBall {
  position: absolute;
  border-radius: 50%;
  background: pink;
  background: radial-gradient(circle, pink 0%, maroon 50%, black 100%);
  filter: drop-shadow(0px 0px 5px maroon);
  top: 5px;
  left: 0px;
  z-index: 1;
}
#eyeGlare {
  position: absolute;
  border-radius: 50%;
  background: maroon;
  background: radial-gradient(circle, #A00000 0%, #400000 50%, #100000 100%);
  filter: drop-shadow(0px 0px 20px maroon);
  top: 5px;
  left: 0px;
  transform: scale(10,1.5);
}
#eyeCombo {
  position: absolute;
  top: 0px;
  width: 100px;
  height: 100px;
  left: 460px;
}
This gets us to the following. And again, we're doing all of this entirely via CSS - no JavaScript coding to be found. Note that we likely could have more carefully crafted our radial gradients to remove the need for the filters, lowering the overhead of this animation, but this works pretty well as-is.

Static CSS Cylon Eye.
To get it moving, we'll need to add a CSS animation rule. This, like the transition
rule, is a short-hand rule that includes animation-name, animation-duration,
animation-timing-function, animation-delay, animation-iteration-count,
animation-direction, animation-fill-mode, and animation-play-state. No shortage of options here. Like transitions, animations are something that can be very precisely controlled.
The basic idea is that we can set "key frames" that define what CSS style rules to apply at each point in our
animation. The browser will then interpolate the styles selected between each keyframe during the animation
sequence. Quite a large number of CSS properties can be interpolated in this way. For our purposes, all we'll
really need to do is move the "eye combo" left and right. Just for fun, we'll also adjust the opacity
slightly. We define keyframes by giving them a name and then listing what styles we want to
have at what stage.
@keyframes eyemotion {
  0% { left: -10px; opacity:0.7; }
  50% { opacity: 1.0; }
  100% { left: 930px; opacity: 0.7; }
}
Then, we just reference this animation when setting the rule for a particular HTML element. The order of
declaration isn't important - the @keyframes declaration can appear before or after it is used. Here, we're
specifying:
- Use the "eyemotion" @keyframes.
- Animate over a period of 2s.
- Use the ease-in-out timing function.
- Animate continuously (don't stop).
- Alternate running forward/backward.
There are many other options that could be included, but for our animation, that's all we need.
#eyeCombo {
  animation: eyemotion 2s ease-in-out infinite alternate;
}
We don't even need to do anything to start this animation - it starts as soon as the page is loaded.

Animated CSS Cylon Eye.
That works pretty well and is a lot of fun, but let's try another example with perhaps something more practical.
Let's say we have a set of buttons and we want to rearrange them. We won't deal with the rearranging bit here,
but let's say we want to have them go into "jiggle mode" like in iOS, when rearranging home screen icons. In
this case, we have a situation where the buttons are not moving, and then an animation starts and runs until we
decide to stop it. So a bit more involved than our last example in that respect. The actual jiggling is a bit
tricky as well. While we take a different approach here, the information in this
post was very helpful.
The really basic idea behind getting the jiggle effect is to slightly rotate the element around an offset from its center position and then rotate it back. If that offset is randomized, as well as the duration of the animation cycle, we end up with our jiggle effect. How quickly each button jiggles, along with how much, and how variable the effect is across a collection of buttons, can then all be adjusted by putting bounds on these two random values.
We can do the setup for this by assigning all of the animation properties that we need in
advance (say, in WebFormCreate) and then just enabling or disabling the animation
when needed.
We'll start with a 4x4 array of buttons where the ElementClassName includes jigglable. Using JavaScript, we can get an array containing all of these buttons using document.querySelectorAll('.jigglable'). Then we can use a forEach loop to iterate over this array and set various style
properties. Here's the initialization.
procedure TForm1.WebFormCreate(Sender: TObject);
begin
  // Setup Jiggly Buttons
  asm
    var jigglies = document.querySelectorAll('.jigglable');
    jigglies.forEach(jiggle => {
      jiggle.style.setProperty('transform-origin',parseInt(Math.random()*100)+'% '+parseInt(Math.random()*100)+'%');
      jiggle.style.setProperty('animation-duration',0.15+Math.random()*0.15+'s');
      jiggle.style.setProperty('animation-iteration-count','infinite');
      jiggle.style.setProperty('animation-direction','alternate');
      jiggle.style.setProperty('animation-timing-function','ease-in-out');
    })
  end;
end;
For the CSS @keyframes, all we're doing is adding a rotation back and forth.
@keyframes jiggling {
  0% { transform: rotate(0eg); }
  25% { transform: rotate(4eg); }
  50% { transform: rotate(0eg); }
  100% { transform: rotate(-4deg); }
}
Then, to enable the animation, we'll set the animation-name property to jiggling. To stop the animation, we'll remove the animation-name property.
procedure TForm1.btnJiggleOffClick(Sender: TObject);
begin
  // Turn Off Jiggly Buttons
  asm
    var jigglies = document.querySelectorAll('.jigglable');
    jigglies.forEach(jiggle => {
      jiggle.style.removeProperty('animation-name');
    });
  end;
end;

procedure TForm1.btnJiggleOnClick(Sender: TObject);
begin
  // Turn On Jiggly Buttons
  asm
    var jigglies = document.querySelectorAll('.jigglable');
    jigglies.forEach(jiggle => {
      jiggle.style.setProperty('animation-name','jiggling');
    });
  end;
end;
And with that, we can turn our jiggle mode on and off. Pretty jiggly, don't you think?
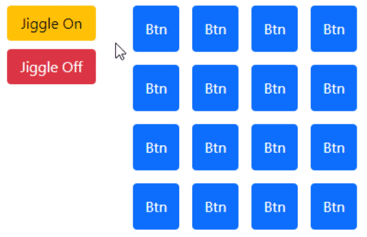
Jiggle Mode.
There are plenty of other things that we can do with animation, and plenty of other properties that can be
animated, including element colors and sizes. And again, as with our previous animation and transition
examples, the coding required here is not really related to the animation itself - just selecting what is to be
animated, for the most part. The browser does most of the hard work of timing everything, rendering animation
frames as best it can without us having to think about it. And this is just CSS animation. There are other ways
to get animated content into a project, including the use of animated GIFs and animated SVG files. Neither of
these require much in the way of coding either, at least as far as timing is concerned.
Async and Await.
Our final topic today, however, is entirely concerned with timing. This can be a challenging topic, so let's start with a bit of background information.
First, JavaScript, as it is currently implemented in all modern browsers, is a single-threaded affair. The browser itself is multi-threaded, but each "tab" in the browser is only able to use one thread for its JavaScript execution. Sometimes web applications make requests, like when downloading images or accessing other remote content. These requests are then handled by the browser outside of the JavaScript environment, using many threads executing separately. There are some browsers being developed with a multi-threaded rendering engine, such as the Flow Browser, but there isn't a desktop version of that yet and even there, JavaScript itself isn't multi-threaded.
Next, JavaScript has two primary timer mechanisms. First, setTimeout() is used when a single event is to be fired after a set delay. Second, setInterval() is used when an event is to be fired continuously after repeating a set delay. TMS WEB Core provides a TWebTimer component, which is a wrapper for setInternval(). This means that if you don't disable the timer, it will fire again after the interval number of milliseconds has elapsed. Working on Delphi VCL projects over decades, I very rarely had any use for timer functions. However, in TMS WEB Core projects, the use of timers is very common. This is partly due to the asynchronous nature of everything.
In traditional application programming, calling a method (a function or procedure of some kind) is generally a
synchronous operation. The code that makes the call generally stops and waits for the method to complete, and
then carries on. Everything flows in a sequential or synchronous fashion, each bit of code executing in exactly
the order that it is called. This is typically the case in a Delphi VCL application as well, so long as it
doesn't use any threads. The main thread of the application does all the work, and if a CPU-heavy task comes
along, or a task that does some kind of external I/O like a query, the application may become unresponsive
until the task is completed. The main thread is effectively blocked for the duration of that task.
In multi-threaded applications, methods can be executed entirely separately, perhaps even on separate CPUs. These methods can start and finish independently from the main thread, and any delays due to CPU-heavy tasks or external I/O do not impact the main thread.
TMS XData projects are great examples of multi-threaded applications. Generally, each time an endpoint is accessed, a new thread is created to service that request. When dealing with multi-threaded applications, any communication between threads or between threads and the main application thread generally has to be coordinated using thread-safe components and other synchronization mechanisms. If you have a method that needs to display the output of several threads, it might have to wait some amount of time (maybe just a few milliseconds, maybe much longer) for the threads to complete and return their values. It is very possible that the threads will complete in a different order than the order they were initially invoked.
JavaScript, being single-threaded, uses a collection of queues internally to enable the ability to have asynchronous methods. At a high level, whenever an asynchronous method is called, it is added to a queue to be executed when the main thread is no longer busy. When it completes, the results are returned via another queue, waiting for the main thread to pick them up.
One way this is implemented, from a coding perspective, is through the use of callback functions. An asynchronous function is called, and a method to execute when it completes is passed as an extra parameter. This is how setTimeout() and setInterval() work. A function is passed to them that is executed when the interval is reached.
TMS WEB Core has a number of important methods that are asynchronous. For example, when creating a new form at
runtime, we use the CreateNew method which is asynchronous. We can pass it a callback function which is
invoked once the form has been loaded.
procedure TForm1.WebButton1Click(Sender: TObject);
var
  FancyForm: TFancyForm;

  procedure AfterCreate(AForm: TObject);
  begin
    console.log('Now THAT is a FancyForm');
  end;

begin
  FancyForm := TFancyForm.CreateNew(@AfterCreate);
end;
While this works fine, callbacks are not all that fun to work with, as our code gets split up into numerous methods all over the place. Callback methods that themselves call asynchronous methods just make matters exponentially worse. To address this, JavaScript (and by extension, TMS WEB Core) provides the async attribute and the await() function.
In JavaScript, the async attribute is added before a function declaration, altering the function to make it return a Promise reference instead of its usual value. In TMS WEB Core, we can do the same thing by adding [async] before the method declaration in the interface part of our code. Other asynchronous methods that we might call, such as TForm.CreateNew, have this set as well. When we call them from our code, the method immediately returns a reference to a Promise object, and our code continues along, unaware perhaps that the method we've just called has likely not yet been completed. But it can check the Promise to see if it has. That's not generally done, however.
Instead, we have the await() function, which takes a Promise as a parameter. In
JavaScript, if we had an asynchronous method called BigTask() that returned an integer, we could use this as
follows.
var IntegerResult = await BigTask()
In TMS WEB Core, it is a regular function, which would look something like this.
IntegerResult := await( BigTask() );
Either way, the execution of the code in our method is suspended until BigTask() completes and returns its Promise. Other code, triggered by user input or timer events can still run, making for a much better user experience. For our new form example, we could instead write the code like this.
procedure TForm1.WebButton1Click(Sender: TObject);
var
  FancyForm: TFancyForm;
begin
  FancyForm := TFancyForm.Create(Self);
  await(TFancyForm, FancyForm.Load());
  console.log('Now THAT is a FancyForm');
end;
That simplifies things dramatically, and the code is now executed in the order that it is written, which improves readability considerably. The only remaining trick is that if our code uses await(), then we must add the [async] attribute to our method declaration. At first, this might seem a little backward - shouldn't what we're waiting for be marked with [async]? Well, yes, it certainly should and likely already is. However, in order to have our method wait for an asynchronous function to complete, it also needs to be asynchronous itself, hence the need to add the [async] attribute. But don't worry, if you forget, a very specific compiler error will be generated telling you to do exactly that.

Compiler Error Generated When [async] is Missing.
Sleep.
Related to this async/await business is often the desire to have a sleep function as we have in Delphi. In
JavaScript, there is no sleep function, and thus no sleep function in TMS WEB Core. But with our new knowledge
about async/await, is there any way we can get a sleep function? Well, sure there is.
procedure TForm1.btnSleepClick(Sender: TObject);
begin
  btnSleep.Caption := 'Sleeping...';
  asm
    async function sleep(msecs) {
      return new Promise((resolve) =>setTimeout(resolve, msecs));
    }
    await sleep(5000);
  end;
  btnSleep.Caption := 'Go To Sleep';
end;
Here, we're just using setTimeout() to implement the delay length, and async/await to stop our code from executing in the interim. Note that because we have a Delphi function with an await in it, we need to add [async] to our method declaration (the btnSleepClick() method). As the await is coded directly in JavaScript, the Delphi compiler doesn't pick up on this error as it did previously. In this case, if we forget, we'll get a console error message instead, indicating the same thing.

Console Error Generated When [async] Is Missing.
The addition of async/await to TMS WEB Core just a few versions ago makes using asynchronous functions a joy to
use, especially compared to the alternative. Code can once again be written sequentially. And, so long as we
have a good understanding of what is happening elsewhere in our application, this can help us develop considerably
more robust applications.
One final note about setTimeout() and setInterval (and by extension TWebTimer). When the browser detects that the current tab has lost focus (the tab with our TMS WEB Core application running in it, for example), it suspends all the running timers. When the tab gets the focus again, the timers are unsuspended, picking up where they left off. All in an effort to save battery life, for the most part. Not hard to imagine scenarios where this is undesirable. There are various workarounds. One is to effectively replace the JavaScript setInterval() and setTimeout() functions internally with something else. HackTimer is one such solution I've used for this without issues. This came up, for example, when wanting to have an automatic logout function for an app - we don't really want to wait until the app gains focus again to log out.
Next Time.
That's it for this Basics post. What do you think we should cover next? Pick a letter!
Related Posts:
Basics Part 1: Consoles, Calls, Classes, CSS, and... CAPS-LOCK?
Basics Part 2: Files, Fonts, Flex, and FNC
Basics Part 3: Attributes, Animation, Async, and Await
Basics Part 4: Images, Icons, iFrames, and Initialization
Basics Part 5: d, div, debugger, Debug, and Deployment
Basics Part 6: Links, Lists, Layouts, and Let
Follow Andrew on 𝕏 at @WebCoreAndMore or join our 𝕏 Web Core and More Community.
Andrew Simard

This blog post has received 8 comments.
 2. Wednesday, March 8, 2023 at 12:07:39 PM
Thanks very much! I am happy to hear that you find them helpful. Was there any part of this blog that you found particularly useful?
2. Wednesday, March 8, 2023 at 12:07:39 PM
Thanks very much! I am happy to hear that you find them helpful. Was there any part of this blog that you found particularly useful?
Andrew Simard
3. Thursday, March 9, 2023 at 8:06:55 PM
I agree! I need to go back and ready a few more articles to catch up and fill in where I may not understand.Personally, I found your async/await section very informative. I knew when async/await support was added to TMS Web Core that it''d be very useful for me - your explanation really helped.
Martin Jeffrey
4. Thursday, March 9, 2023 at 8:39:39 PM
Glad it helped. Async/Await is great, but not really all that intuitive at first.
Andrew Simard
5. Friday, March 10, 2023 at 9:03:38 AM
Hi,procedure a();
var progressElem: TJSElement;
begin
progressElem:=document.getElementsByClassName(''progress-bar'');
is it possible set style property for progressElem e.g. width --> 20px
end;
Czech Tomasz
6. Friday, March 10, 2023 at 10:45:58 AM
Yes. I''ve added your question to the TMS Support Center with an example of how to do this.https://support.tmssoftware.com/t/blog-question-follow-up-setting-style-properties/20440
Andrew Simard
7. Friday, March 10, 2023 at 12:53:28 PM
Thank you Andrew, I really appreciate what you do, your blogs explain how to use TMSWebCore properly. From time to time I come to the conclusion that if I had known this earlier, I would have programmed the application completely differently :)
Czech Tomasz
8. Friday, March 10, 2023 at 5:11:48 PM
You are most welcome. Please keep in mind, though, that there are many, many ways to use TMS WEB Core. I find myself moving towards including a lot more JavaScript than is strictly necessary, for example, as I find it is often easier than discovering, testing, and using the equivalent Delphi code. However, one of the best things about TMS WEB Core, in my opinion, is the ability to seamlessly float back and forth between JavaScript and Delphi. So while I take great care in publishing code that works, at least in the examples I am using, there may well be better or certainly different approaches that one could take in nearly every example!
Andrew Simard
All Blog Posts | Next Post | Previous Post
I respect for your time and effort.
Thank you very much.
DERNEGI CANSUYU