Blog
All Blog Posts | Next Post | Previous Post

 Extend TMS WEB Core with JS Libraries with Andrew:
Basics Part 2 - Files, Fonts, Flex, and FNC
Monday, December 26, 2022

First, we'll have a look at many of the files that play a role in the final project deployment. Then we'll have a look at a few of the ways fonts can be included in a project. This is followed by an introduction to CSS flex for handling component layout on the page. And finally, we take a look at how to best take advantage of what FNC has to offer.
Motivation.
When starting to work with a new tool, like TMS WEB Core, for example, there is usually a bit of a learning curve. How smooth or how painful that is depends on many factors. Often, documentation and other supporting materials make certain assumptions about their audience in order to help things along. But invariably, some things get overlooked and someone could be left puzzled about an issue that might be completely obvious to someone else.Web technologies, in particular, are prone to this kind of problem because they have evolved piecemeal over such a long period of time. Various online communities might promote a particular approach to solving a given problem at one point in time, only to be upended by something new and shiny that makes their approach completely obsolete seemingly overnight.
This is particularly the case for various web programming frameworks, for example. Someone entering the fray for the first time might get the impression that jQuery is the greatest thing ever, only to learn a short while later that using jQuery is very much on the decline, as JavaScript itself has evolved and now incorporates many of its key features natively.
To make this seemingly chaotic situation worse, there is also a versioning problem. There might be a huge collection of code samples for a particular JavaScript library. This could be an invaluable resource for untold legions of developers for many years. Only to be made worthless by the next major release of that very same JavaScript library. This is readily apparent with D3 Charts, for example. All the more tragic because there were so many great tutorials that no longer work properly in the current version without numerous and non-obvious changes. And D3 really is a tool that needs a huge collection of code samples due to the many ways it can be used, given its low-level nature.
Back to TMS WEB Core, the versioning problem isn't nearly as acute (fingers crossed!) but there is still a lot of assumed knowledge out of the gate. And a TMS WEB Core project only makes up a portion of the overall experience, with browsers and other web technologies like JavaScript, HTML, and CSS contributing a lot more potential variability (and viability) of any given project. Especially compared to how something like Windows might have contributed to a traditional Delphi application.
Having a solid grasp of the fundamentals of these other technologies is therefore assumed, but not required, in order for a TMS WEB Core project to be successfully deployed. But that extra bit of knowledge can smooth out the learning curve dramatically. And that's what we're hoping to achieve with these "Basics" posts.
At the end of the day, all of this means that there are often many ways to accomplish any given task. If one approach doesn't seem to be working out, there are likely several other options for any given problem. This applies generally to JavaScript and the web environment.
TMS WEB Core expands this flexibility considerably by allowing you to also work with the usual Delphi tools that you may already be familiar with, in addition to any combination of approaches. For example, you can easily move between Delphi and JavaScript using asm... ...end blocks as we've seen in the last post. This frees us up to apply whatever tools and techniques can best solve whatever challenge we're up against.
More Background.
In a traditional Delphi VCL application, the end result of the programming effort is typically a single EXE file. While there are variations on this, the general idea is that you can take that EXE file and run it on another Windows-based system and your application will, most of the time, "work" as designed.Of course, we're all likely familiar enough with this to know that it is not entirely true. There are many other supporting elements that can be a factor, including DLLs, fonts, permissions, Windows version, 32-bit vs. 64-bit, and so on.
To help with that, often these kinds of applications are distributed with an "installer" application that helps ensure any prerequisites are in place, and that the EXE file is put somewhere sensible, along with any icons or other supporting files. To the average user of such an application, they're typically aware of an "installation step" after which they know that they just need to click on an icon to run the application. Nothing special here.
Moving to the web, all of this changes. The end result of the programming effort is typically a folder containing many files. This folder needs to be handed over to a web server of some kind. And it is most often up to the developer to do the final "install" - more accurately called a deployment in this case.
The developer typically needs to be the one worried about prerequisites and dependencies. To the average user of such an application, they're just expecting to enter a URL into a browser (or click a link on a web page somewhere, or perhaps a browser bookmark). Everything else should just "work".
The aforementioned fonts, DLLs, permissions, and versions are (hopefully) not an issue any longer - from the perspective of the user, at least. Complicating things further for the developer, the browser used to access the application may be running on the tiniest screen on a mobile phone, or on the most powerful desktop with several connected displays. It may be a modern desktop browser like a current release of Chrome or Firefox. Or it may be an aging and unsupported Android browser of questionable lineage.
Ideally, the developer would very much prefer to just create a single application that can gracefully accommodate these variations. Not always realistic, but this is increasingly the standard and most desirable approach.
Note: TMS WEB Core can be used with the Miletus Framework or the Electron Framework to create applications that do in fact result in an EXE (or platform equivalent) file. They encapsulate everything needed to run a web application into a native executable for a specific platform (Windows, macOS, Linux, or Raspberry Pi for example). This application then launches a custom browser window to host the application, where the usual browser controls are normally not visible, giving the appearance of a native application. These applications can be deployed like traditional Delphi VCL applications.
Files.
For a TMS WEB Core application, getting started with a new project is much the same as getting started on a new Delphi VCL application. Load up Delphi. Create a new project using one of the TMS WEB Core templates. Drop some components on the form. And click the Run button.Let's give it a try. Using the TMS WEB Bootstrap Application template, create a new project, add a TWebButton to the form, save the project, and then run it. Delphi will prompt you for a location to save the files and what names to use, as is normally the case, and if all goes according to plan, your preferred web browser will launch, with the button appearing on an otherwise blank page.
We don't care about that at the moment. What we're interested in right now is understanding what files were created in the build/compilation process, and
what kinds of things we need to know about them. You can browse around using Windows Explorer to look at the
files. For our purposes, we just want a list, so "tree /f /a" from the Windows command line while in the new
project folder gets us what we're after.
C:.
|   bootstrap.bundle.min.js
|   bootstrap.min.css
|   Project1.dpr
|   Project1.dproj
|   Project1.dproj.local
|   Project1.html
|   Unit1.dfm
|   Unit1.html
|   Unit1.pas
|
+---TMSWeb
|   \---Debug
|           bootstrap.bundle.min.js
|           bootstrap.min.css
|           Project1.html
|           Project1.js
|           Project1.js.map
|           Unit1.html
|
\---Win32
    \---Debug
            Project1.exe
            TMSWebRunner.ini
So many files! But let's have a look at what we've got going on. Starting with the top of the tree.
- bootstrap.bundle.min.js and bootstrap.min.css are the actual Bootstrap files that provide all
the CSS classes and other JavaScript functions that comprise all that is Bootstrap. These files are
referenced explicitly within Project1.html below. They were added to the project as part of the TMS
WEB Bootstrap Application template. Picking another TMS WEB template would not include Bootstrap in this
fashion.
- Project1.dpr is the top level of the project's Delphi/Pascal source code - the one that contains the
original "program" declaration, much the same as a Delphi VCL application. Normally this is something that
doesn't need a lot of attention until perhaps when you start creating multiple forms and care a little more
about the order they are loaded. You can see the contents of this file in the Delphi IDE via the Project
| View Source menu option. Here's what is created by default - it just loads up and runs Form1.
program Project1;

uses
  Vcl.Forms,
  WEBLib.Forms,
  Unit1 in 'Unit1.pas' {Form1: TWebForm} {*.html};

{$R *.res}

begin
  Application.Initialize;
  Application.MainFormOnTaskbar := True;
  Application.CreateForm(TForm1, Form1);
  Application.Run;
end.
- Project1.dproj and Project1.dproj.local contain Delphi options for this project. You can see
these in the Project | Options menu in the Delphi IDE. Ideally, you'll never have to edit
these directly.
- Project1.html contains the main HTML page for your project. This is typically the very first thing
that is loaded when launching a TMS WEB Core application. You can edit this directly in the Delphi IDE by
double-clicking on it in the Project Manager. By default, it shows the Design view, which is blank. We're
after the Code view normally. And while this is an HTML file, the main reason for editing this file is to
make adjustments to the top <head> section - usually adding in or removing JavaScript libraries, fonts,
CSS files, and that sort of thing. Here's what it looks like by default. Note that it includes a link to the
JavaScript that is generated by TMS WEB Core, shown here as $(ProjectName).js which defaults to Project1.js
(more on that below). Also, links to the two Bootstrap files above are included here.
<!DOCTYPE html>
<html lang="en">
  <head>
    <meta http-equiv="Content-Type" content="text/html; charset=utf-8"/>
    <meta content="width=device-width, initial-scale=1" name="viewport"/>
    <noscript>Your browser does not support JavaScript!</noscript>
    <link href="data:;base64,=" rel="icon"/>
    <title>TMS Web Project</title>
    <script src="bootstrap.bundle.min.js" type="text/javascript"></script>
    <link crossorigin="anonymous" href="bootstrap.min.css" rel="stylesheet"/>
    <script src="$(ProjectName).js" type="text/javascript"></script>
    <style>
    </style>
  </head>
  <body>
  </body>
  <script type="text/javascript">rtl.run();</script>
</html>
- Unit1.dfm contains the contents of the form just as it does in a Delphi VCL project. And as is the case
there, you normally don't need to edit this file directly. You edit it by making changes to the form using the
Delphi IDE - adding components, changing properties, and so on. With just one button added, this is all
that is in this file. Depending on your application, this can grow considerably. When a TMS WEB Core project
is compiled, this file is processed and included in the JavaScript file (Project1.js for example).
object Form1: TForm1
  Width = 640
  Height = 480
  CSSLibrary = cssBootstrap
  ElementFont = efCSS
  Font.Charset = DEFAULT_CHARSET
  Font.Color = clWindowText
  Font.Height = -15
  Font.Name = 'Tahoma'
  Font.Style = []
  ParentFont = False
  object WebButton1: TWebButton
    Left = 248
    Top = 200
    Width = 96
    Height = 25
    Caption = 'WebButton1'
    ElementClassName = 'btn btn-light'
    ElementFont = efCSS
    HeightStyle = ssAuto
    HeightPercent = 100.000000000000000000
    WidthPercent = 100.000000000000000000
  end
end
- Unit1.html contains the HTML template for the form. You could, for example, load up an HTML template
from somewhere that already had a particular layout with controls, images, a theme, and so on. This could then be
linked directly to the Form (via Unit1.dfm) using HTML "id" properties to link a component on the Form
to an element in the HTML template. If you're not using templates, this will typically not be something you'll have to
edit. Here's what it contains by default.
<html>
  <head>
    <meta http-equiv="Content-type" content="text/html; charset=utf-8" />
    <title>TMS Web Project</title>
    <style>
    </style>
  </head>
  <body>
  </body>
</html>
- Unit1.pas is probably the file we're most familiar with and will spend the most time working with in
terms of actual coding. This is of course the Delphi/Pascal source code for the form. Here's what it looks
like - pretty basic as we've not added any code yet.
unit Unit1;

interface

uses
  System.SysUtils, System.Classes, JS, Web, WEBLib.Graphics, WEBLib.Controls,
  WEBLib.Forms, WEBLib.Dialogs, Vcl.Controls, Vcl.StdCtrls, WEBLib.StdCtrls;

type
  TForm1 = class(TWebForm)
    WebButton1: TWebButton;
  private
    { Private declarations }
  public
    { Public declarations }
  end;

var
  Form1: TForm1;

implementation

{$R *.dfm}

end.
- Project1.js contains the JavaScript code for the project. This is created by passing the
Delphi/Pascal code through the pas2js compiler, converting Pascal into JavaScript (aka transpilation). This
means that this is really the most important file - it contains all of your code! Note that there isn't a
separate Unit1.js file - by default, all of the JavaScript code generated for the project is combined into a
single JavaScript file, typical for JavaScript projects generally. Note that there's not normally a reason to
edit this file. But as JavaScript is not a "compiled" language, there are plenty of instances where it might
be useful to look at its contents from within the browser's developer tools. There are compiler options that
allow you to generate separate JavaScript files, which will in turn create many different links in the
Project1.html file to load them all up.
- Project1.js.map is also not something we'll ever be editing normally. This is generated for use by
JavaScript debuggers. Note that the size of these two files easily dwarfs everything else. More than 4.5 MB
combined.
The final folder in our set is the Win32 folder. When developing TMS WEB Core applications, the "platform" for the project is normally set to Win32. This doesn't matter all that much, as the resulting set of JS/HTML/CSS is what makes up the actual web application, and it doesn't really have anything to do with Win32 v.s Win64 or anything else. The files that are contained in this Win32 folder are not something we'll need to edit or use, and primarily are there to help with launching the application in the developer environment.
File Deployment.
The Debug folder (or the corresponding Release folder) contains everything that is needed to run the web application. It is the contents of this folder that need to be deployed (copied) to the web server that you're using to publish the project.
When running the project from the Delphi IDE, TMS WEB Core uses its own TMS Web Server to serve up the contents of this folder on a particular local port (which defaults to http://localhost:8000/Project1/Project1.html).
Note that if you change the Build Configuration in the Delphi IDE Project manager, switching from Debug to
Release, compiling the project will generate a new set of files as well as a Release folder to hold them. The
main immediate difference is that the Project1.js file is now only about 300k and there is no Project1.js.map
file generated. Running the project, it won't look any different - and one would hope that would always be the
case!
Here are a few thoughts behind the actual deployment of the project. There are potentially many more variables in play, such as the choice of web server, where it is located, how it is accessed, and so on. Far too many variables to make an actual generic step-by-step deployment recipe. But the general ideas are likely to be the same.
- Naturally, you need a web server of some kind. Popular choices are Apache, NGINX, or IIS but there are many other solid alternatives.
- The web server must have a network connection accessible to your users. If this is an internal
intranet-style application, perhaps it doesn't need to be visible to the public internet, but often it does.
- If it is public-facing (or even if it isn't, honestly) the web server should be configured with an SSL certificate. There are free certificates available (one example is to use LetsEncrypt) and increasingly this is becoming required and not optional.
- Unless you have a dedicated server for your project, you'll need to set up some kind of "virtual server" within a web server for a given project.
- The contents of the TMSWeb Debug (or Release) folder need to be copied over to wherever this "virtual server" is expecting to find its HTML documents (for example, wherever Apache's "DocumentRoot" directive is pointing).
- The web server needs to know how to load the first page. Sometimes this can be done by renaming Project1.html to index.html. Or creating a symbolic link to it. Or adding an entry in the web server configuration. Lots of options.
- The contents of the folder need to have appropriate permissions set that allow the web server to share the
files.
- Be sure to copy the entire folder - including any subfolders that could be part of the project. This might include things like "fonts", "css", or "images" folders that are often part of a project.
- Test the project once it has been deployed. Some things are easily overlooked when moving between a
development and production installation (or potentially other intermediate "test" staging servers).
- If possible, try and automate moving the project from the Delphi folder to any subsequently deployed folder.
This might happen often, so making it quick and painless (and consistently repeatable) is a good idea.
Our example doesn't (yet!) have any CSS files in it, but it does have HTML and JavaScript files. All three
file types are essentially text files that get combined and interpreted by the web browser to make your project
come alive. The main Project1.html can be thought of a bit like the "conductor" - it contains links to the
other files that are needed, and it is the first file that the browser loads. The browser looks through this
file and then issues requests to load whatever other files it needs. The web server is essentially just serving
up each of these files in turn, when requested. The browser console may indicate if there were issues with
loading any of these files.
This deployment (copying the files from the development machine to the web server) may also be an opportune time to introduce other things into the mix. This is moving a bit beyond the "basics", however. CSS, HTML, and JavaScript files, being text files, are all candidates for optimization.
The general term for this is "minimization" and by convention files that have been put through this process have ".min" included in their filename. We saw this already with the Bootstrap files, for example. But deploying your project is also a good time to do this as well. Though not strictly necessary.
The "Release" version of projects already does a great deal of optimization to the JavaScript file, which is by far the most important. But if you've got large CSS files or a ton of extra content in your HTML files, minimization can help shrink those down as well.
The main
goal is to reduce the size of these files so that they can be downloaded as quickly as possible by the browser.
Or, if you have a lot of users, to reduce the amount of overall traffic being handled by the web server. If
your web server is running on Linux, tools like minify
can be used to help with this kind of thing.
Current Bootstrap.
As we opted to create a new TMS WEB Core project using the Bootstrap Application template, a set of Bootstrap
files were automatically included in the project, and links to them were added to the Project1.html file. While
this certainly makes things easy, Bootstrap is one of those projects that is continuing to evolve, and as
such you might find it helpful to use the latest version of Bootstrap in your project. The links for that are
included directly on the Bootstrap
website. As of this writing, this means that we can use these two lines to replace those in the
Project1.html file already.
    <script src="https://cdn.jsdelivr.net/npm/bootstrap@5.2.3/dist/js/bootstrap.bundle.min.js" integrity="sha384-kenU1KFdBIe4zVF0s0G1M5b4hcpxyD9F7jL+jjXkk+Q2h455rYXK/7HAuoJl+0I4" crossorigin="anonymous"></script>
    <link href="https://cdn.jsdelivr.net/npm/bootstrap@5.2.3/dist/css/bootstrap.min.css" rel="stylesheet" integrity="sha384-rbsA2VBKQhggwzxH7pPCaAqO46MgnOM80zW1RWuH61DGLwZJEdK2Kadq2F9CUG65" crossorigin="anonymous">
We can then remove those two Bootstrap files from the main project directory, the Debug (or Release) folder, as
well as from the Project Manager tab, and our update is complete, with two fewer files to include in our
deployment process and a more current version of Bootstrap to work with.
Introduction to Fonts.
When creating any kind of application, web-based or otherwise, there's often a desire to use one or more specific fonts. Sometimes this is needed to tie in an application to the overall theme of an organization's marketing materials. Sometimes there is a need for a font that works better for a given type of content (monospaced fonts for presenting code, for example). Sometimes it's just nice to look at a different font from time to time.
Whatever the reason, using different fonts is likely to be something that comes to mind as soon
as you see your web application in a browser. Not because the default font is in any way unpleasant. Just
that, well, it's the default font. We can do better.
This is one of those topics where there are many different ways to approach the problem. Implementation-wise, it is also one of those situations where there are perhaps a few too many variables that come into play. The end goal for the purposes of our discussion here is (generally) to have the browser display an element (a button, a block of text, etc.) using a font that we've chosen, as specified via any combination of HTML and CSS.
Simple enough, right? Almost like we shouldn't have to cover it at all. But, well, things are not so simple. Let's try and cover some basic principles of how it works from the point of view of the web browser.
When a web browser loads a page, it also loads up any linked CSS files and uses those in combination with the HTML content to display the page. We'll ignore for the moment how JavaScript can be used to manipulate the content of the page, and just accept that the combination of HTML and CSS will be used to render a page.
If
there is an element that displays text, the browser will check the element, the CSS, and whatever other rules are in play, in order to determine what font to use. While there are many CSS attributes that can impact how a font is displayed, the
most common attributes are likely to be the following, at least initially.
- font-family: The name of the font. If a list is provided, the browser will use the first font it has
access to. Generic names like "serif" or "sans-serif" should be included at the end of the list if you're
using an uncommon font that might not be available to the browser for some reason. And
by 'access', this could be a font installed in the local operating system, or one loaded up dynamically
via supplied HTML or CSS links. And keep in mind that "available" has time-sensitive implications. For
example, we can load in fonts dynamically, but this can sometimes take a while. Having a fallback in place
while waiting for the selected fonts to load is generally a good practice.
- font-size: The size of the font along with the units, if necessary. Browsers usually have a default
font size, typically the equivalent of 16px or 1em. This value can be specified in many ways, using units like
"px", "em", or "rem", but also with keywords like "small", "medium", and "large", or with relative keywords
like "smaller" and "larger", as compared to the font used for the parent element.
- font-weight: Indicates how "bold" the font is. This can be a numeric value or a keyword, like 400
("normal"), or 700 ("bold").
- font-style: Indicates whether the font is displayed as "normal" or with an "italic" or "oblique"
face, optionally including degrees of slant, in the case of oblique. What's the difference between italic and
oblique? Italic is defined by the creator of the font explicitly, whereas oblique is a slant calculated by
the browser for a given angle. Some fonts have oblique faces defined explicitly as well. They are somewhat
interchangeable in the sense that if you ask for one and the font doesn't have it, the browser will use the
other, and as a last resort will calculate an oblique face when needed.
There are many ways these kinds of values might end up in the final HTML or CSS that gets rendered on the page. Here are just a few.
- Directly embedding the values in an HTML element. For example:
<div style="font-family:Tahoma; font-size: 12px; font-weight:700">Some text</div>
- CSS rules contained in a separate file but applied to the HTML. For example:
HTML:CSS:<div id="fancy">Fancy text</div>
#fancy { font-family: Helvetica; font-size: 2em; font-style: oblique 9deg; } - HTML that includes tags that indicate different font changes. For example:
<span>This might display <strong>bold text</strong> while this might display <em>italic text</em>.</span>
While all of these font attributes fall under the usual CSS rules about, well, the cascading nature of style
sheets, naturally, font-family deserves a little more attention. This is because browsers go out of their way
to try and make sure that text is rendered, even if a specified font is not available. And, entirely
predictably, different browsers display different fonts by default in this kind of situation. And if you've
loaded up any kind of JavaScript helper library, like, say, Bootstrap, you'll find that the defaults might be
different again.
Back in our TMS WEB Core example, we can see this play out with the font used for our button. In the Object
Inspector, the font can be specified using the usual Object Inspector properties. Here's what was created by
default.
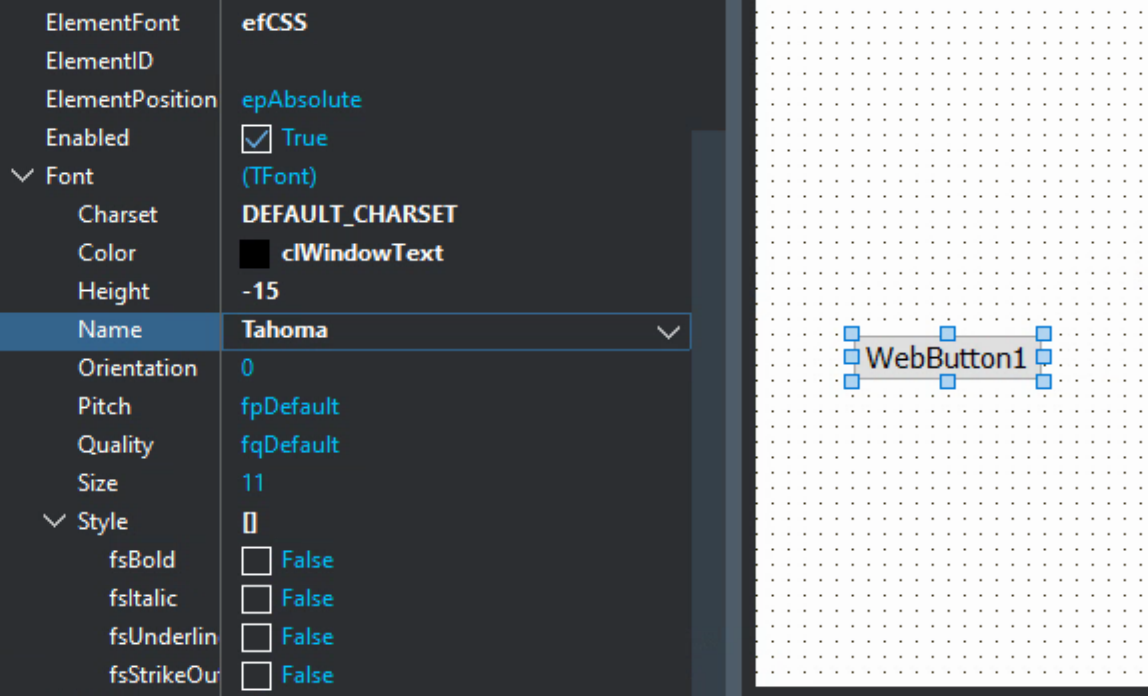
Default Button Font.
The key properties here are "ElementFont" and the "Name" sub-property of "Font". "ElementFont" has options for
"efCSS" and "efProperty", corresponding to whether the font will be handled by CSS or by the property value set here.
This means that if "efProperty" is selected, the button will be shown with the Tahoma font, or whatever font has been selected using the Object Inspector. This is implemented in HTML by adding a "style" property to the button with the font-family specified.
If "ElementFont" is instead set to "efCSS" then the font value here isn't explicitly applied. Rather, the font used is inherited from the parent component. Which, in this case, is the form. Which likely defaults to Tahoma anyway. But if you've got Bootstrap loaded, it might default to the "system" font. Or Arial. Or something else, based on whatever CSS rules are in effect when the browser gets around to drawing the button.
And, importantly, if you create your web application using, say, Tahoma, but then use a browser on another computer to view the page, where Tahoma is not installed, it will display it using the default browser font.
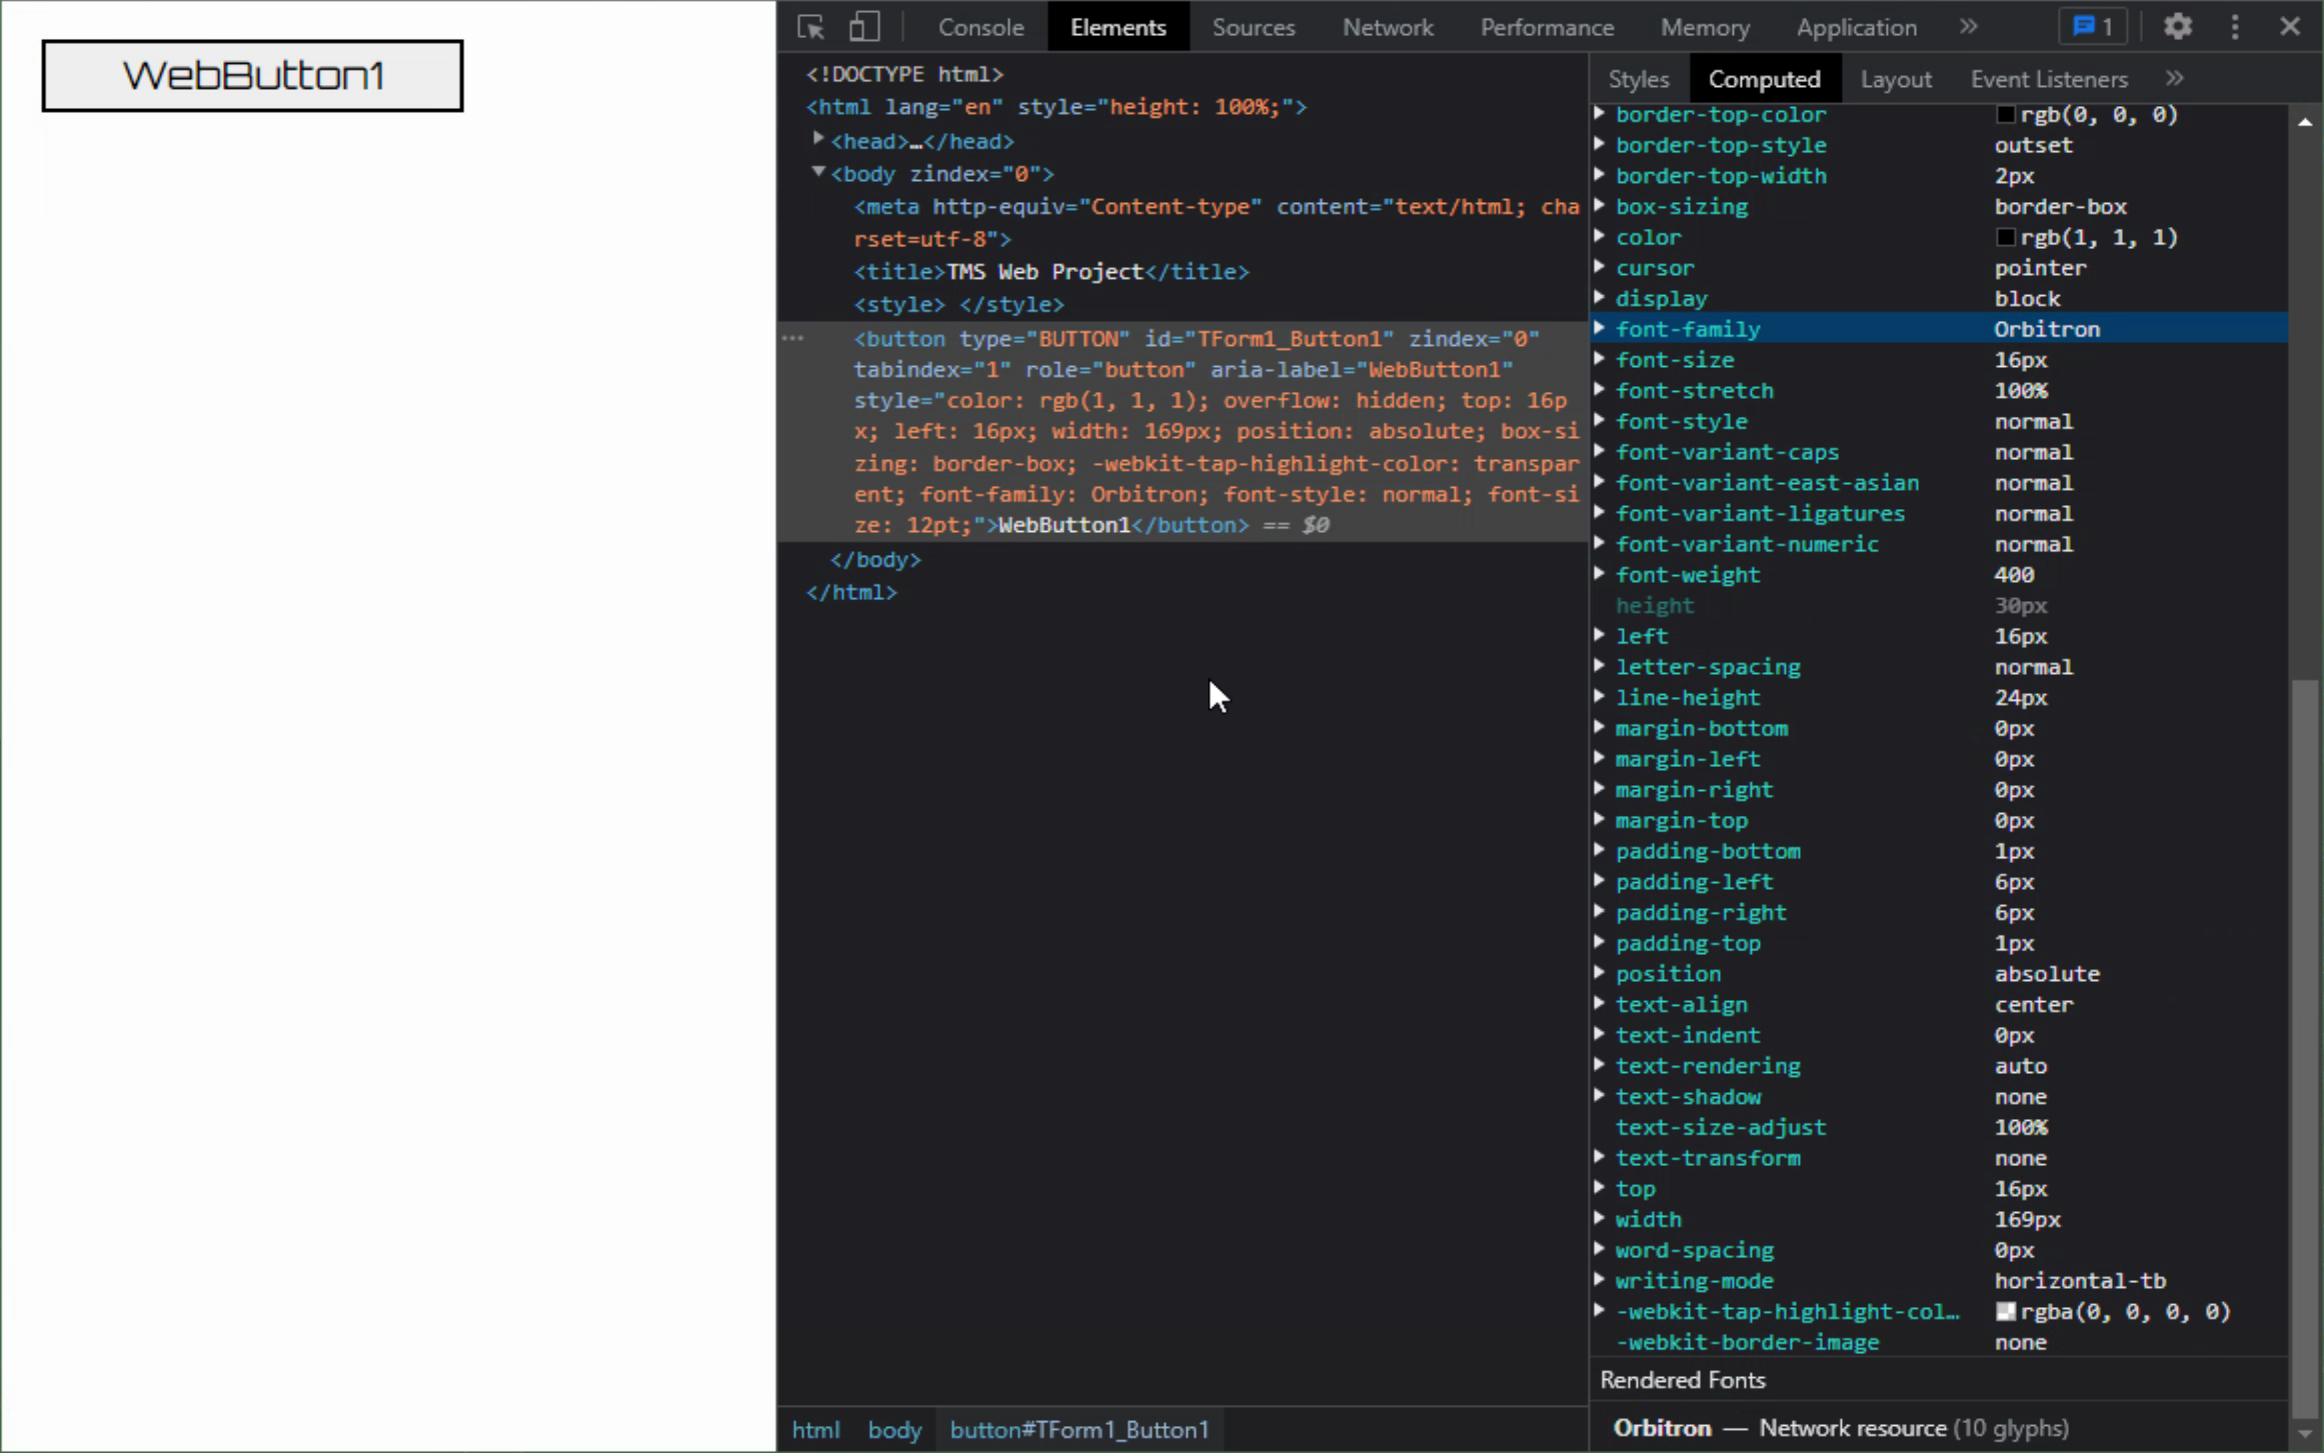
Confusing? Certainly can be. One way to help bring clarity to the situation is to check what font the browser has decided to use. In the browser developer tools, there is a "Computed" section, where it shows the final CSS attributes that ended up being used to render the page.
For example, if we set "ElementFont" to "efProperty" and select some random font, say "Impact", we should see something like this, where the "Computed" value for "font-family" is indeed "Impact". Note also in the bottom-right corner, there is a reference to what fonts have been rendered on the page. In this case, it is showing "Impact" as well. All good. It also indicates (at the very bottom) that this is a "local font" meaning that it is being supplied from the browser's underlying operating system.
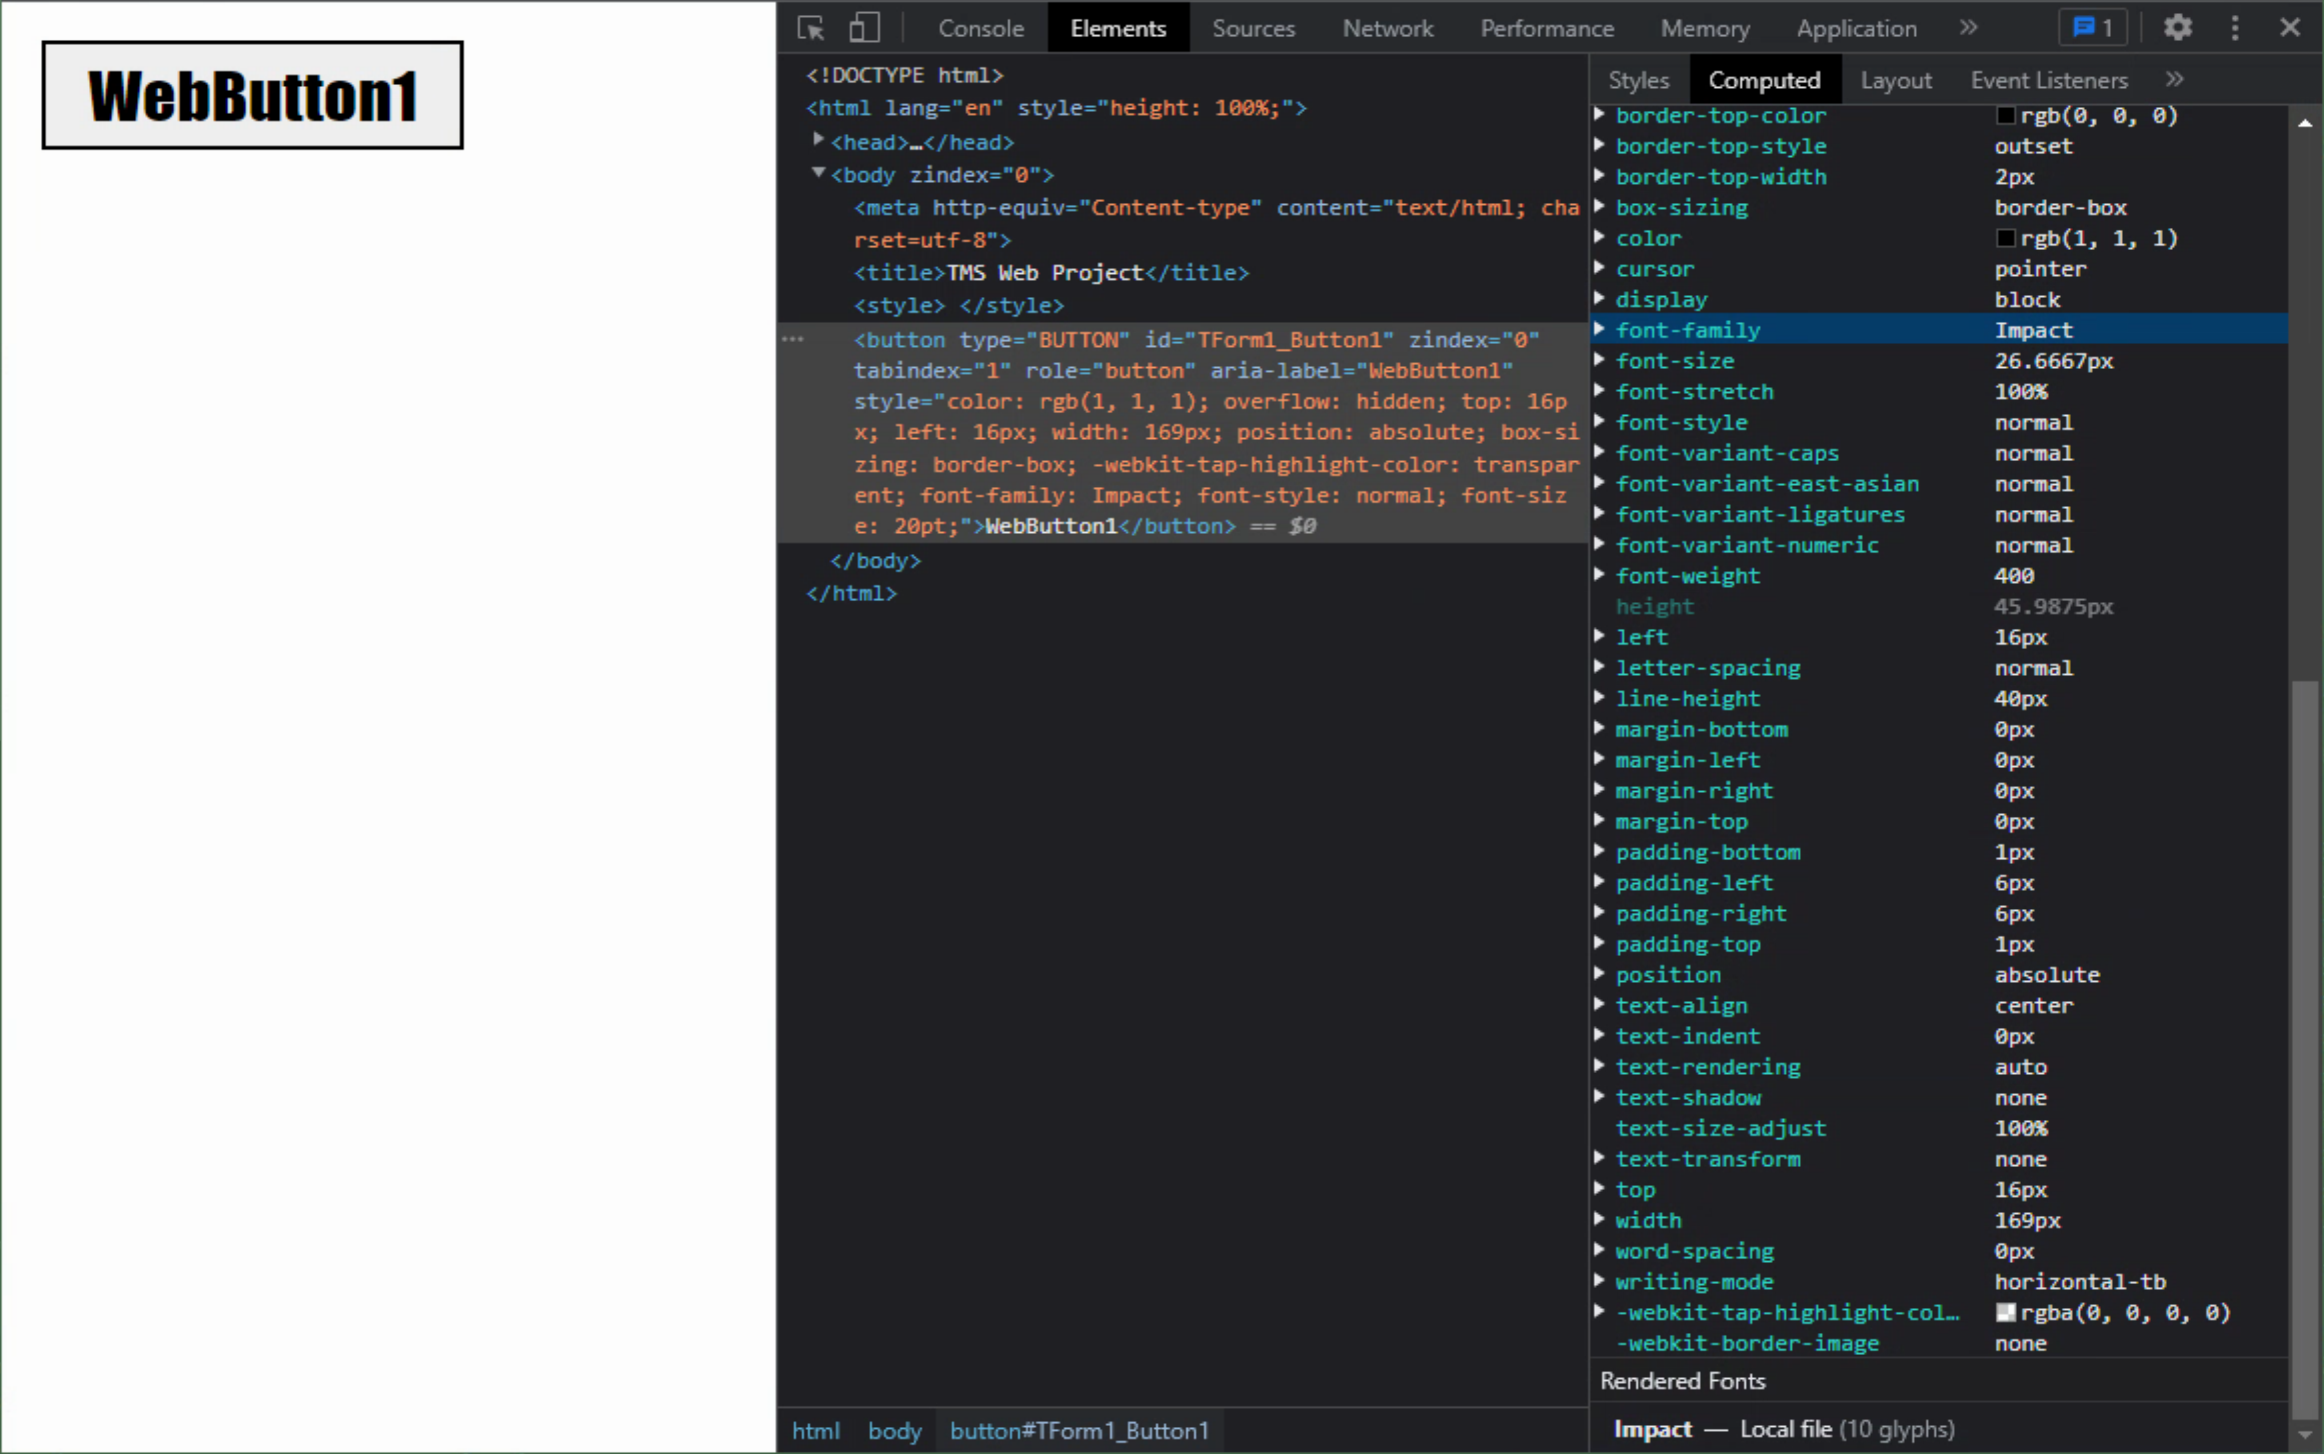
Showing the "Computed" value for "font-family" as "Impact".
However, what happens if you view the page in a web browser where the "Impact" font is not available? Well, it
just displays whatever default web browser (or operating system) font is available. Here's the same page viewed
in the same browser (Chrome) but on a different computer (Linux instead of Windows - no "Impact" installed
here).
"Computed" value for "font-family" when font not installed.
Here, the font-family shown in the "Computed" section still shows "Impact". But at the bottom-right, you can
see that the only font being rendered is "PT Sans". And, clearly, the font shown is not the same as we had
previously. So this is not ideal! Why is this happening? Well, this web browser just doesn't know
what "Impact" is, plain and simple.
With Windows applications, it is common to distribute fonts with the application. But when visiting web pages, it isn't really a thing that we have to install fonts ourselves in order to see the page rendered correctly. At least not in the last 20 years or so.
To be fair, if you're
distributing a web application using fonts that are common enough, or are happy with just the default fonts,
this may not matter much. Or if you know that everyone using your app will have the font installed, then it
also might not matter much. For example, this might very well be the case if you're distributing an embedded web application where you have control over the
entire browser and operating system environment, like in a kiosk-style deployment. Or when deploying Miletus or
Electron apps where you can also supply an installer. But this is likely to be the exception.
Web Fonts.
The solution to this problem is to not have the web browser rely on having locally installed fonts at all. Instead, we can tell the web browser what font we want to use, as well as where it can find the font. Fonts can be included in the application directly by adding the necessary files to the project, which are then deployed with the rest of the project. Usually, they are dropped into a "fonts" folder, just to be neat and tidy, but not strictly required.
Fonts can also be hosted elsewhere, with a URL indicating the remote location. Some
organizations, like Google, for example, host thousands of fonts that you can use and link to freely. Others
offer fonts already set up for use with a web page, ready to be downloaded and added to your project. Or you can
use one of many font converters to transform, for example, a TTF font (a common Windows font format) into a WOFF
font (a common web font format). Let's look at a couple of examples.
Google Fonts.
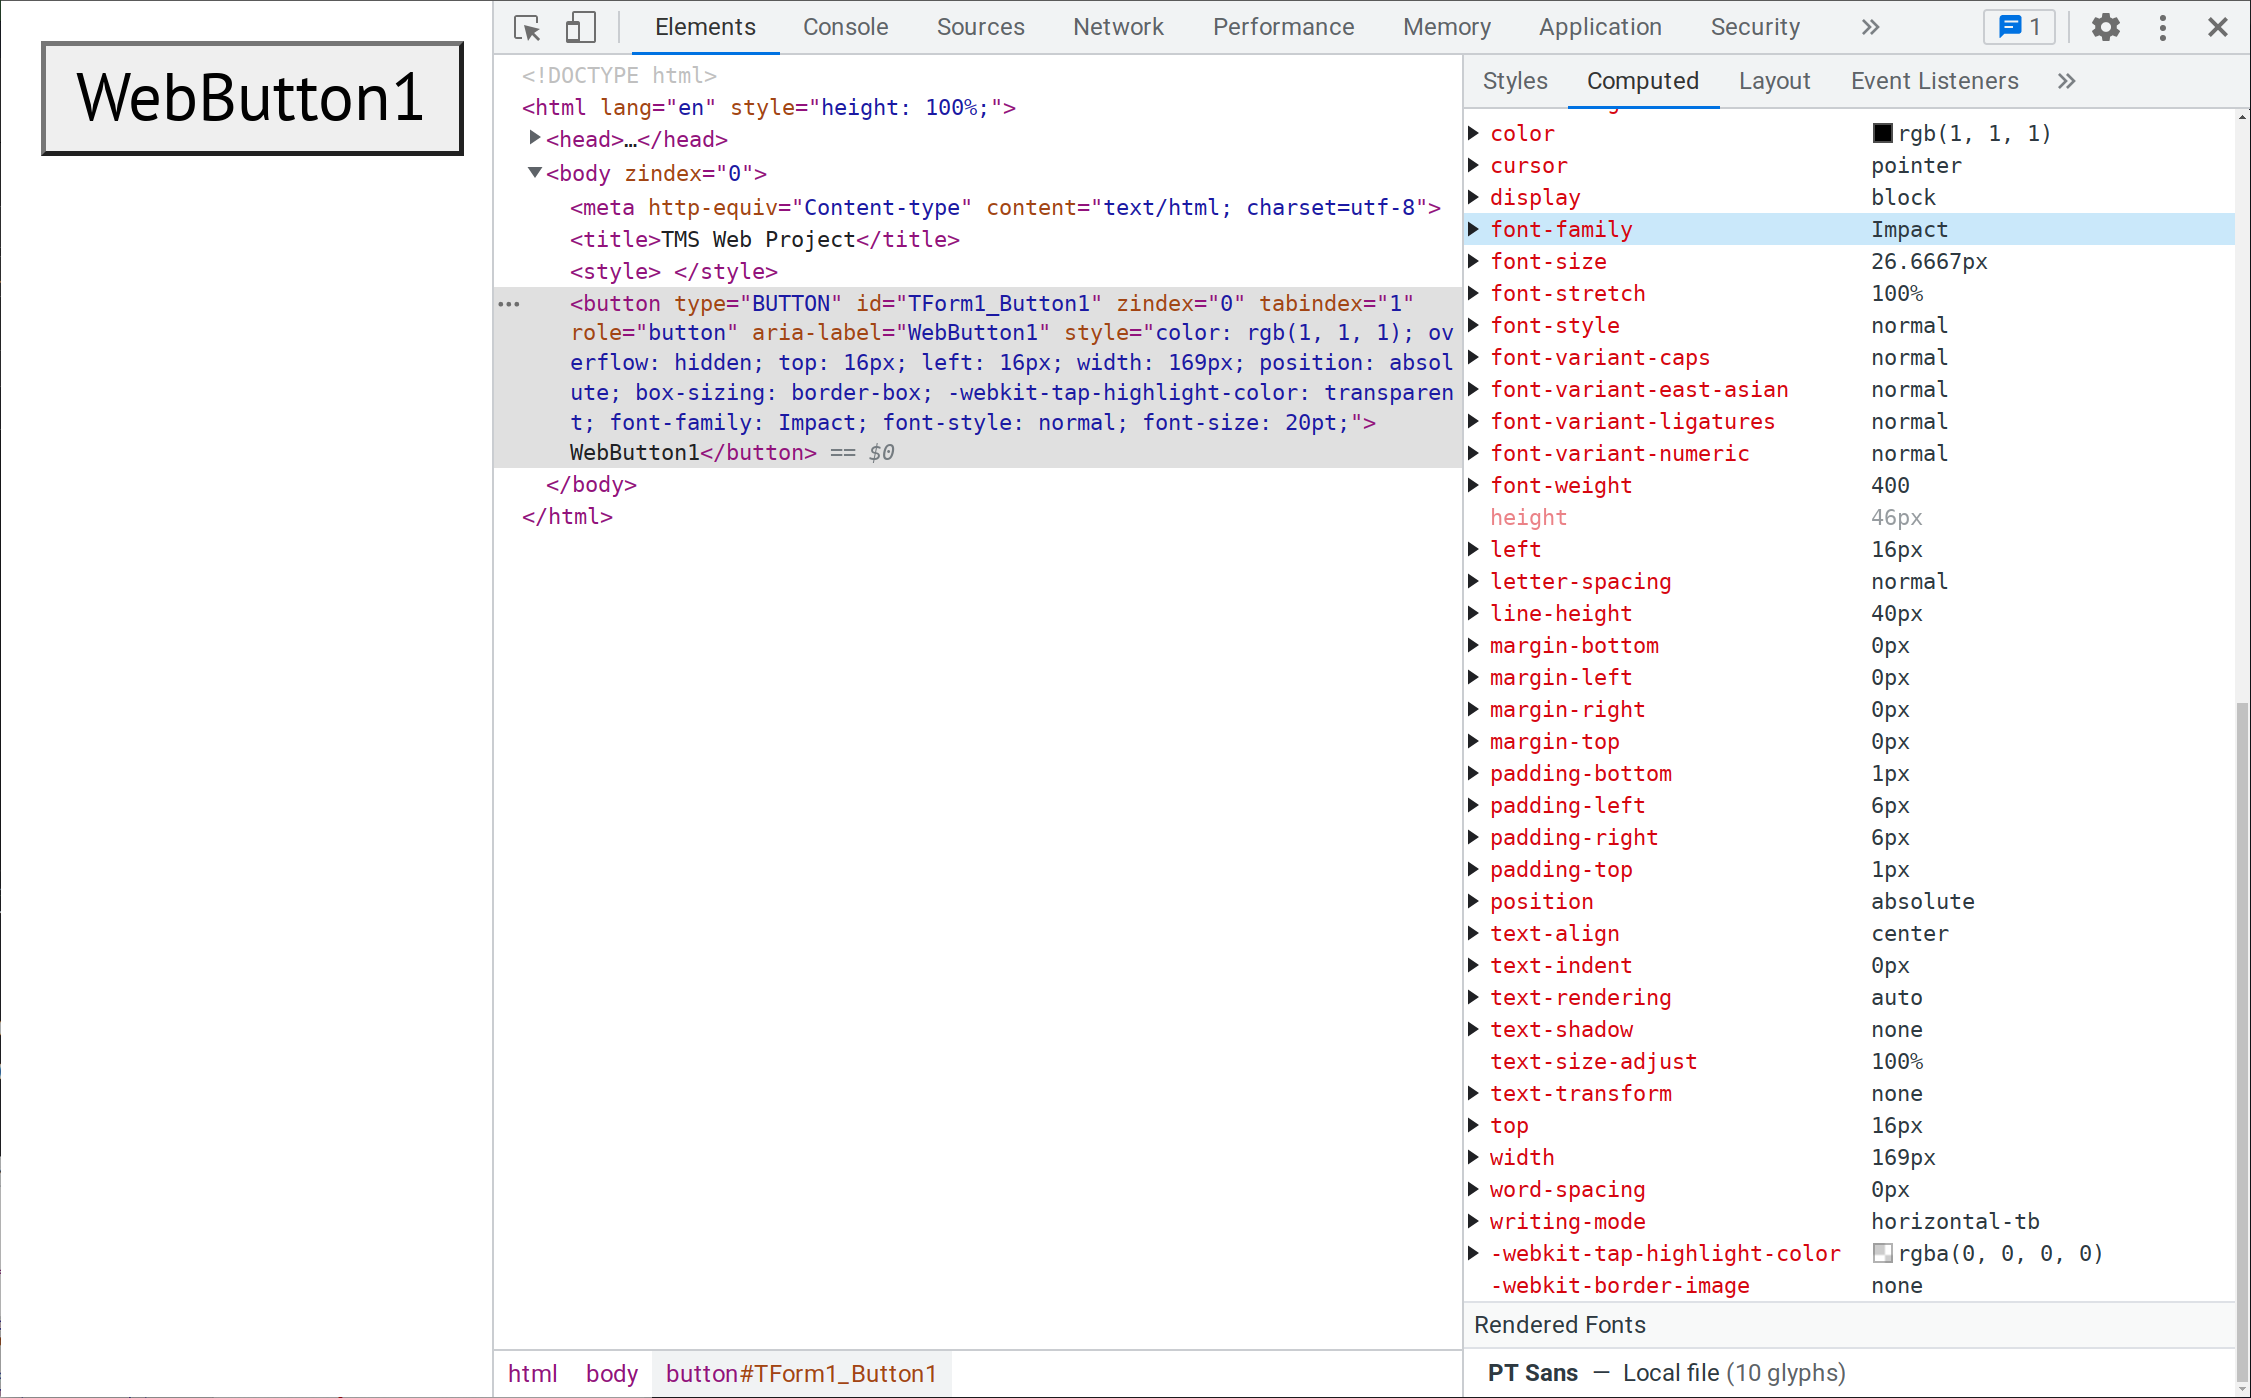
This might be the easiest way to get started. Visit https://fonts.google.com
and find a font you like. After selecting a font, it will ask you to select from the available styles.
"Regular 400" is a typical default, implying a normal weight (recall that 400 = normal, 700 = bold, etc). Once
you've made your selection, you'll see the code you'll need to embed in your project.
Google Font: Orbitron.
To add "Orbitron" to our project, we start by just copying and pasting the first block of code into the
<head> section of our Project1.html file. Our updated Project1.html file now looks like this. Line
breaks were added to make it a little easier to read.
<!DOCTYPE html>
<html lang="en">
  <head>
    <meta http-equiv="Content-Type" content="text/html; charset=utf-8"/>
    <meta content="width=device-width, initial-scale=1" name="viewport"/>
    <noscript>Your browser does not support JavaScript!</noscript>
    <link href="data:;base64,=" rel="icon"/>
    <title>TMS Web Project</title>
    <script src="bootstrap.bundle.min.js" type="text/javascript"></script>
    <link crossorigin="anonymous" href="bootstrap.min.css" rel="stylesheet"/>
    <script src="$(ProjectName).js" type="text/javascript"></script>

    <link rel="preconnect" href="https://fonts.googleapis.com">
    <link rel="preconnect" href="https://fonts.gstatic.com" crossorigin>
    <link href="https://fonts.googleapis.com/css2?family=Orbitron&display=swap" rel="stylesheet">

    <style>
    </style>
  </head>
  <body>
  </body>
  <script type="text/javascript">rtl.run();</script>
</html>
Now, when the web browser loads this HTML page, it knows that it needs to load the "Orbitron" font and it has
all the information it needs to go and get it from Google's servers. And while it won't appear in the list of
fonts in the Object Inspector, you can still enter "Orbitron" there and it will work as expected, being sure to
also set "ElementFont" to "efProperty".
Orbitron Font Loaded.
Now at the bottom-right, "Orbitron" is listed, but that it is a "Network resource" meaning it was
downloaded rather than loaded from the web browser's local filesystem. Alternatively, you can set the
"font-family" CSS attribute wherever you want this font to be used. For example, if "ElementFont" is set to
CSS, the "Orbitron" font set in the Object Inspector will be ignored. But as the Caption property accepts HTML
directly, you can set its value to the following, as per the Google sample code.
<span style="font-family:Orbitron, sans-serif;">WebButton1</span>
This will get the same result. This can also be set in a CSS style sheet file, or anywhere else CSS might be
applied, along with any of the other font attributes.
FontSquirrel.
Another great source of fonts for your TMS WEB Core projects is FontSquirrel (https://www.fontsquirrel.com). There are many fonts to be found here, with perhaps better tools for searching and finding fonts than what Google offers. Many of these fonts have licensing requirements, typically allowing you to use the font anywhere but with a copyright notice included somewhere in your project. Some are more restrictive, some less, so be sure to check out the license information for the particular font you might be interested in.
There is also a tool on this website for converting TTF fonts (or other formats) into web fonts. Many fonts are "web-ready" in that there is a package already available that can be downloaded and added to your project. Let's take a look at the "Abel" font for example.
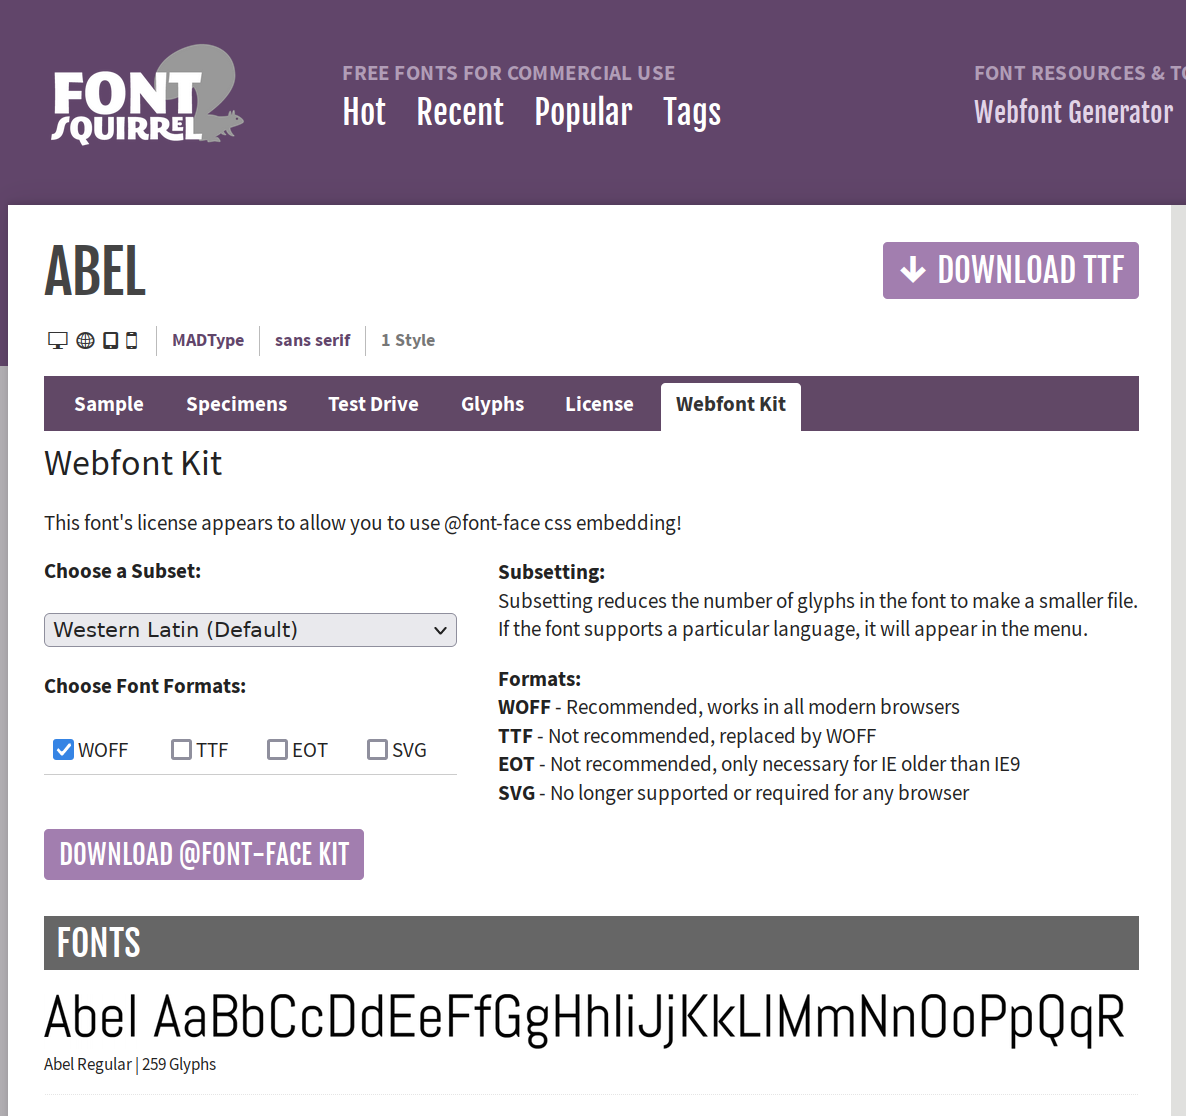
FontSquirrel - Abel Font.
Here on the last tab, we can see that a "Wefont Kit" is available. This kit can be downloaded and added to,
say, a "fonts" folder within our project. The kit contains the following files.
\---abel-fontfacekit
    |   How_to_use_webfonts.html
    |   SIL Open Font License.txt
    |
    \---web fonts
        \---abel_regular_macroman
            |   abel-regular-demo.html
            |   abel-regular-webfont.woff
            |   stylesheet.css
            |
            \---specimen_files
                    grid_12-825-55-15.css
                    specimen_stylesheet.css
What we're primarily after is the .woff file, which is what we'll add to the fonts folder. Check out the license for details about where and when that needs to be available. The kit also contains examples of style sheets and other items to help with getting started.
With the Google Fonts example, we added a link to the
Project1.html file. In this case, we're going to use a CSS file to do something similar. Let's create a
fonts.css file and put it in the "fonts" folder alongside our new font. In it, we'll add the following. This
declares the font and tells the web browser where to find it. Normally it would probably be better to put this
in a "css" folder, but not a big deal here.
@font-face {
    font-family: 'abelregular';
    src: url('abel-regular-webfont.woff') format('woff');
}
Our TMS WEB Core project won't know to load this file until we tell it to. All it takes is a quick trip
into Project1.html to add the following line, right below where our "Orbitron" font was loaded. It can also be
added to the Delphi IDE's Project Manager to make editing it easier if you're planning on adding more fonts.
<link href="fonts/fonts.css" rel="stylesheet"/>
Finally, we need to make sure that a copy of the "fonts" folder that we just made exists in the "Debug" or
"Release" folder so that these files get included in any subsequent deployment. Once that is all done, we can
specify "abelregular" as a font in all the same ways that we were using "Orbitron" or "Tahoma" previously.
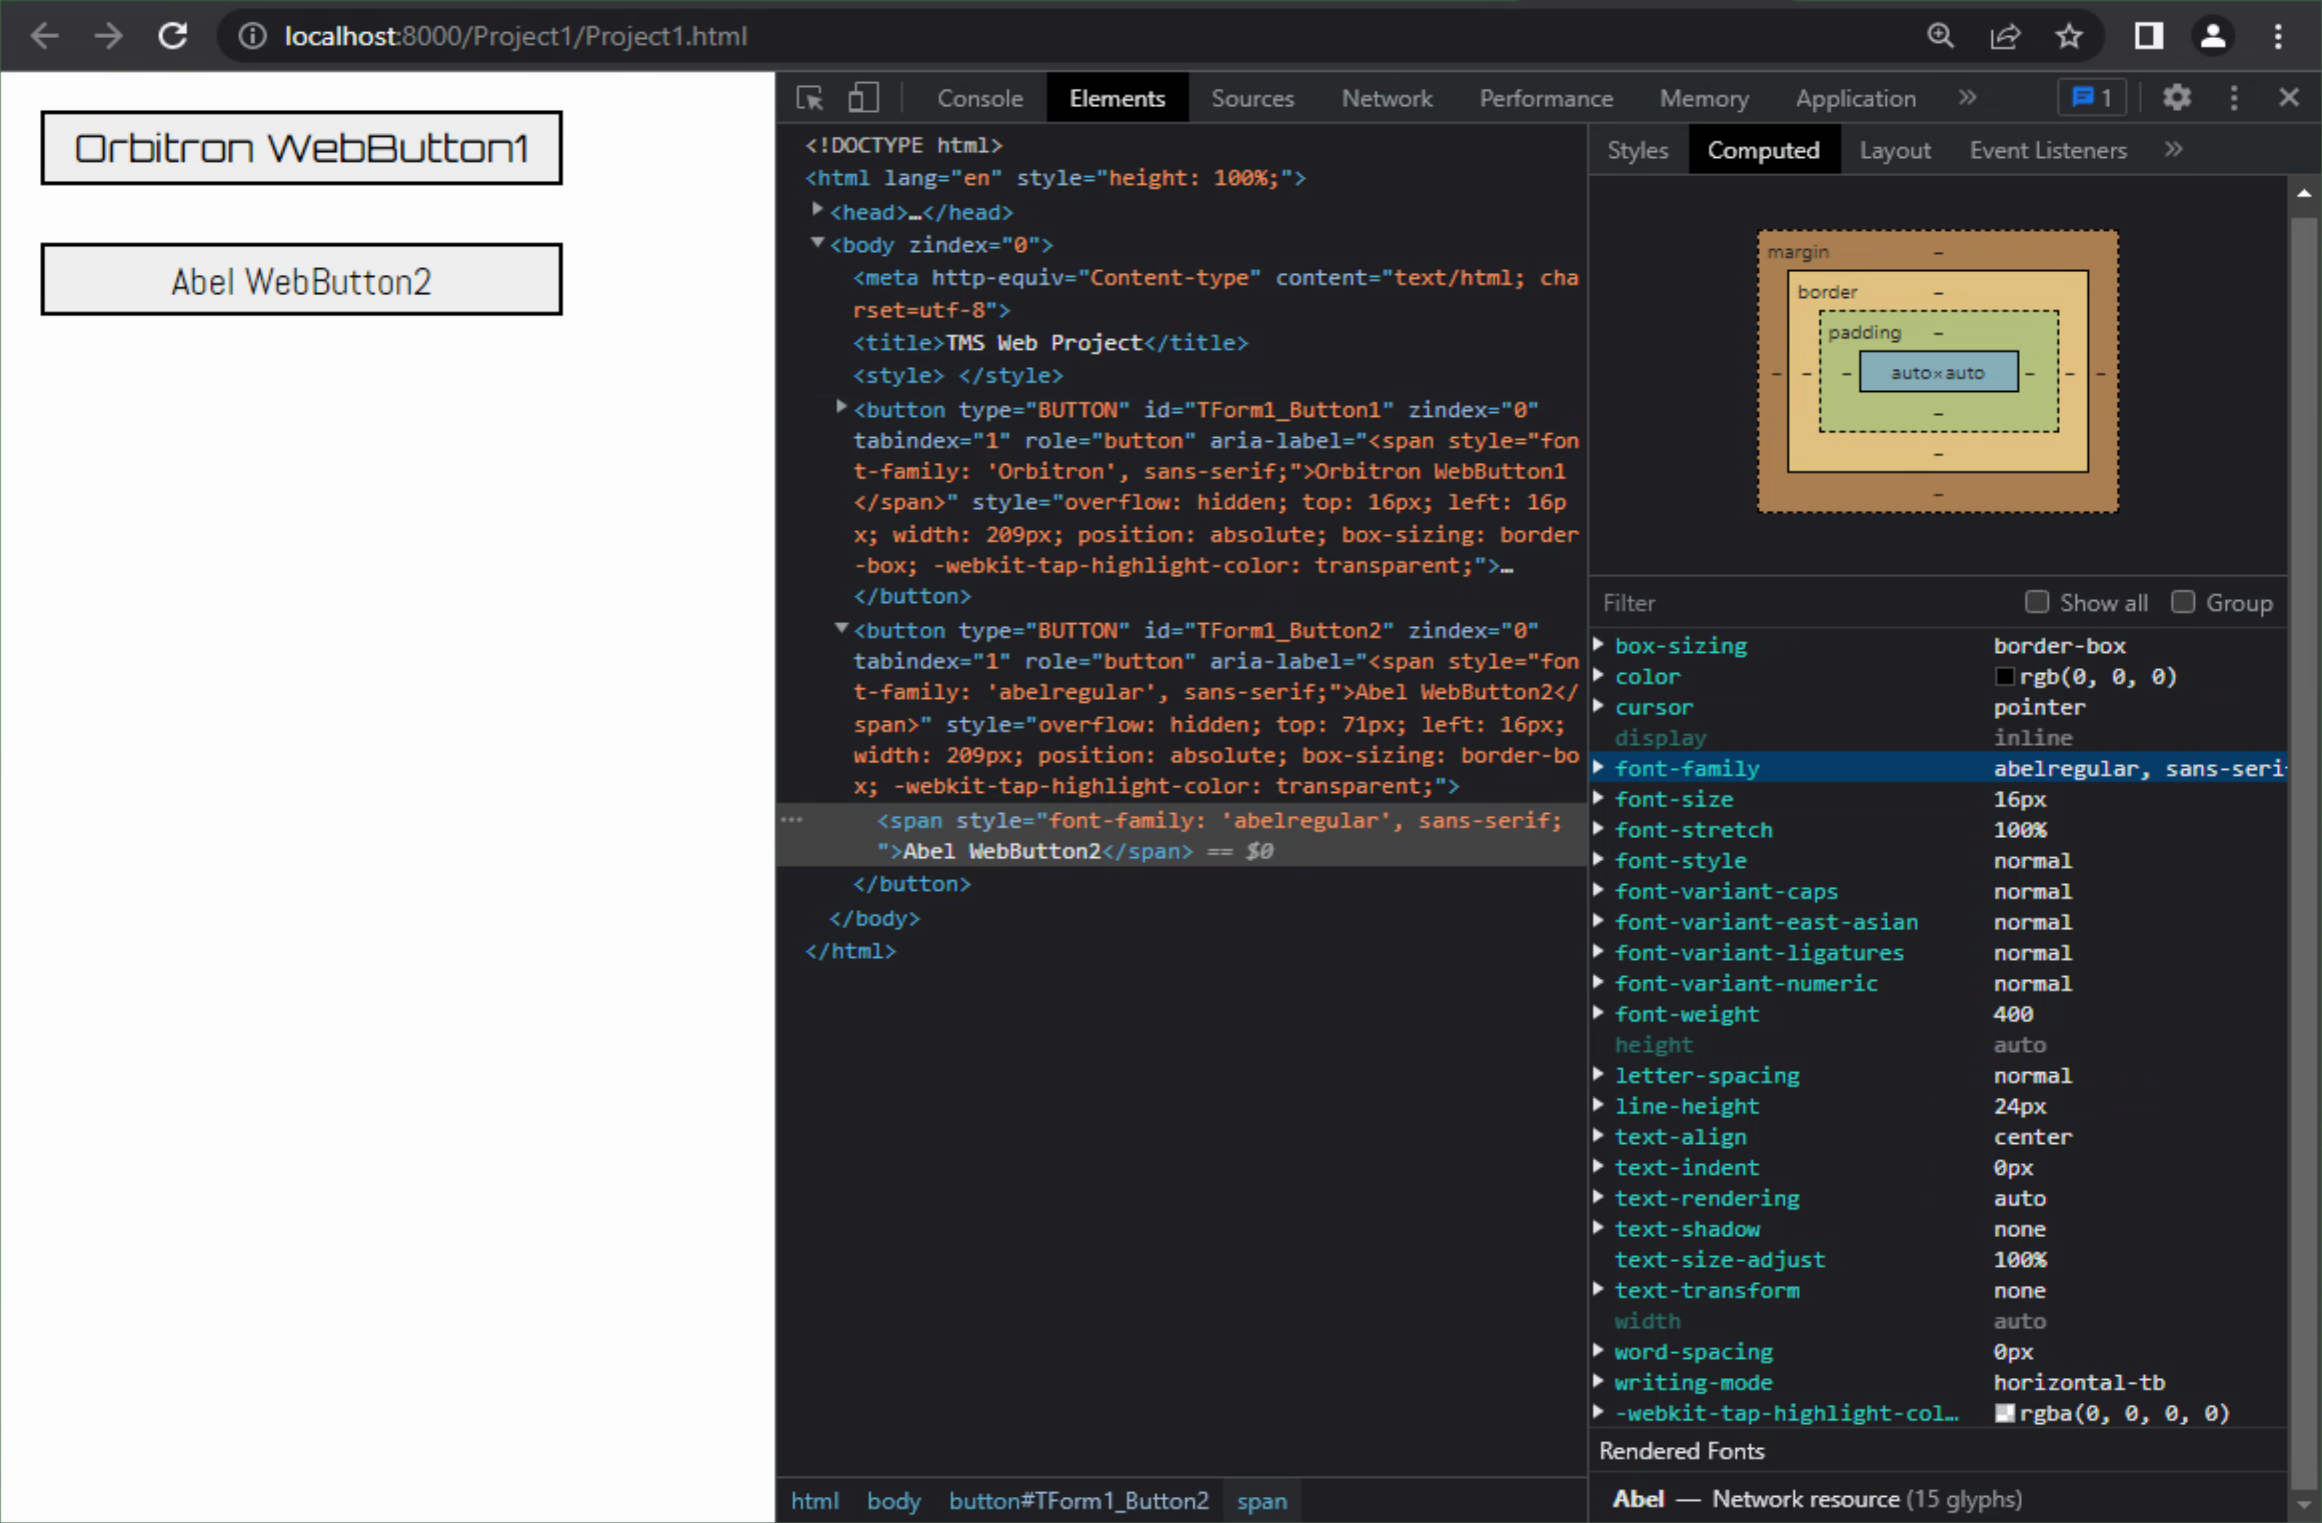
Abel Font Loaded.
Note that the bottom-right corner still reports "Network resource" even though this font is included directly
in your project. This is because, from the point of view of the web browser, it is still downloading the font. It just happens to be that the web browser is downloading the font from your web server (the same place it is
downloading the rest of your web application) rather than from some external website.
CSS Flex.
Now that we can set whatever fonts we like, another topic that is likely to come up is all about positioning elements on the page. Here, too, there are altogether too many ways to go about this. The approach you might take depends on several factors. Familiarity with CSS is a big one. Whether there is any reason to keep using the Delphi "align" mechanisms (cross-platform projects may make this a better approach). And the complexity of what you're trying to do.
Complicating things further, we're generally accustomed to using a Delphi "form" that has somewhat fixed dimensions - they can be resized, but not infinitely, for example. Translating a Delphi form into a web page also introduces issues related to how elements move around when the size of the page changes - the "responsive" aspect of it all.
And while we might get away with not having
to address some of this in a traditional Delphi VCL app, using form constraints, for example, web applications
are not nearly as forgiving and we're very likely to encounter users with a much broader range of page sizes
(and ratios and orientations and DPI and....) than we might normally anticipate in a Windows environment.
Once upon a time, one way to build more complex page layouts was to use tables. This allowed for a bit of structure, and some degree of containment - components didn't generally move beyond the table cell that they were in, for example. This made it easy to have a header, a footer, and something in between. Maybe even left and right columns on the page. That sort of thing. Not elegant but workable, particularly if you are designing web pages like someone might design a newspaper layout.
A more modern way of doing layout, however, is
to make use of a relatively new set of tools within CSS known as "flex" or "flexbox". In this paradigm,
containers are defined, along with how the contents within the container, well, "flex" to produce the desired
layout. Tricky to describe. Easier to show. We'll be using Bootstrap classes here, but plain
old CSS would work just as well.
We'll start with the basic Delphi form. Let's say that we want to have a large rounded rectangle fill the
page, and automatically resize to fit the page whenever it changes. First, we'll use our form as the default
container that we'll need to host the rectangle. In the Form1's ElementClassName, we can add the following Bootstrap classes:
vw-100 vh-100 d-flex p-2 bg-black
- vw-100: Set the form width to be the same as the viewport - the page width (equivalent CSS would be width: 100vw).
- vh-100: Set the form height to be the same as the viewport - the page height (height: 100vh;).
- d-flex: Sets the "display: flex;" CSS attribute - this is what tells CSS that this is a flex situation
(display: flex;).
- p-2: Add 0.5rem of padding to this container (padding: 0.5rem;).
- bg-black: Set the background color of the form to black (background-color: #000000;).
Note carefully that the CSS "display" attribute gets used for lots of things. For example, to make something invisible, you can assign a Bootstrap class of "d-none" (shorthand for display: none;). But in some cases, this might conflict with the use of the "visible" property of a component as specified in the Delphi IDE's Object Inspector.
We'll also have to tell TMS WEB Core that we want to be in control of the layout, which we can do by setting the "ElementPosition" property to "epIgnore".
Next, once Form1 is set up as a flex container in this fashion, any child components can make use of CSS's "flex"
mechanisms. To get our rounded rectangle to fill the page, we can drop a TWeb HTMLDiv component ont the form
and then set its ElementClassName property to something like this:
flex-fill bg-dark border border-secondary border-3 rounded
- flex-fill: Stretch the <div> to fill the entire parent container.
- bg-dark: Set the background color to a little lighter than black.
- border: Indicate that we want a border for this element.
- border-secondary: Bootstrap's "secondary" color is used for the border.
- border-3: Increase the width of the border.
- rounded: Add a bit of rounding to the border.
We'll also have to set the "ElementPosition" property to "epIgnore" again, and also set both the "WidthStyle" and "HeightStyle" properties in the Object Inspector to "ssAuto".
We can now position this TWebHTMLDiv on the form however we like, and have CSS take over when it is displayed on the page. The buttons from the previous section have been left in place, and while it appears that they are inside the TWebHTMLDiv component, their "ElementPosition" properties were left unchanged (defaulting to "epAbsoulte") so they stayed right where they were. We'll get to those in just a moment.
This gets us the following page, where the outer rectangle
automatically fits the page as the browser window is resized.
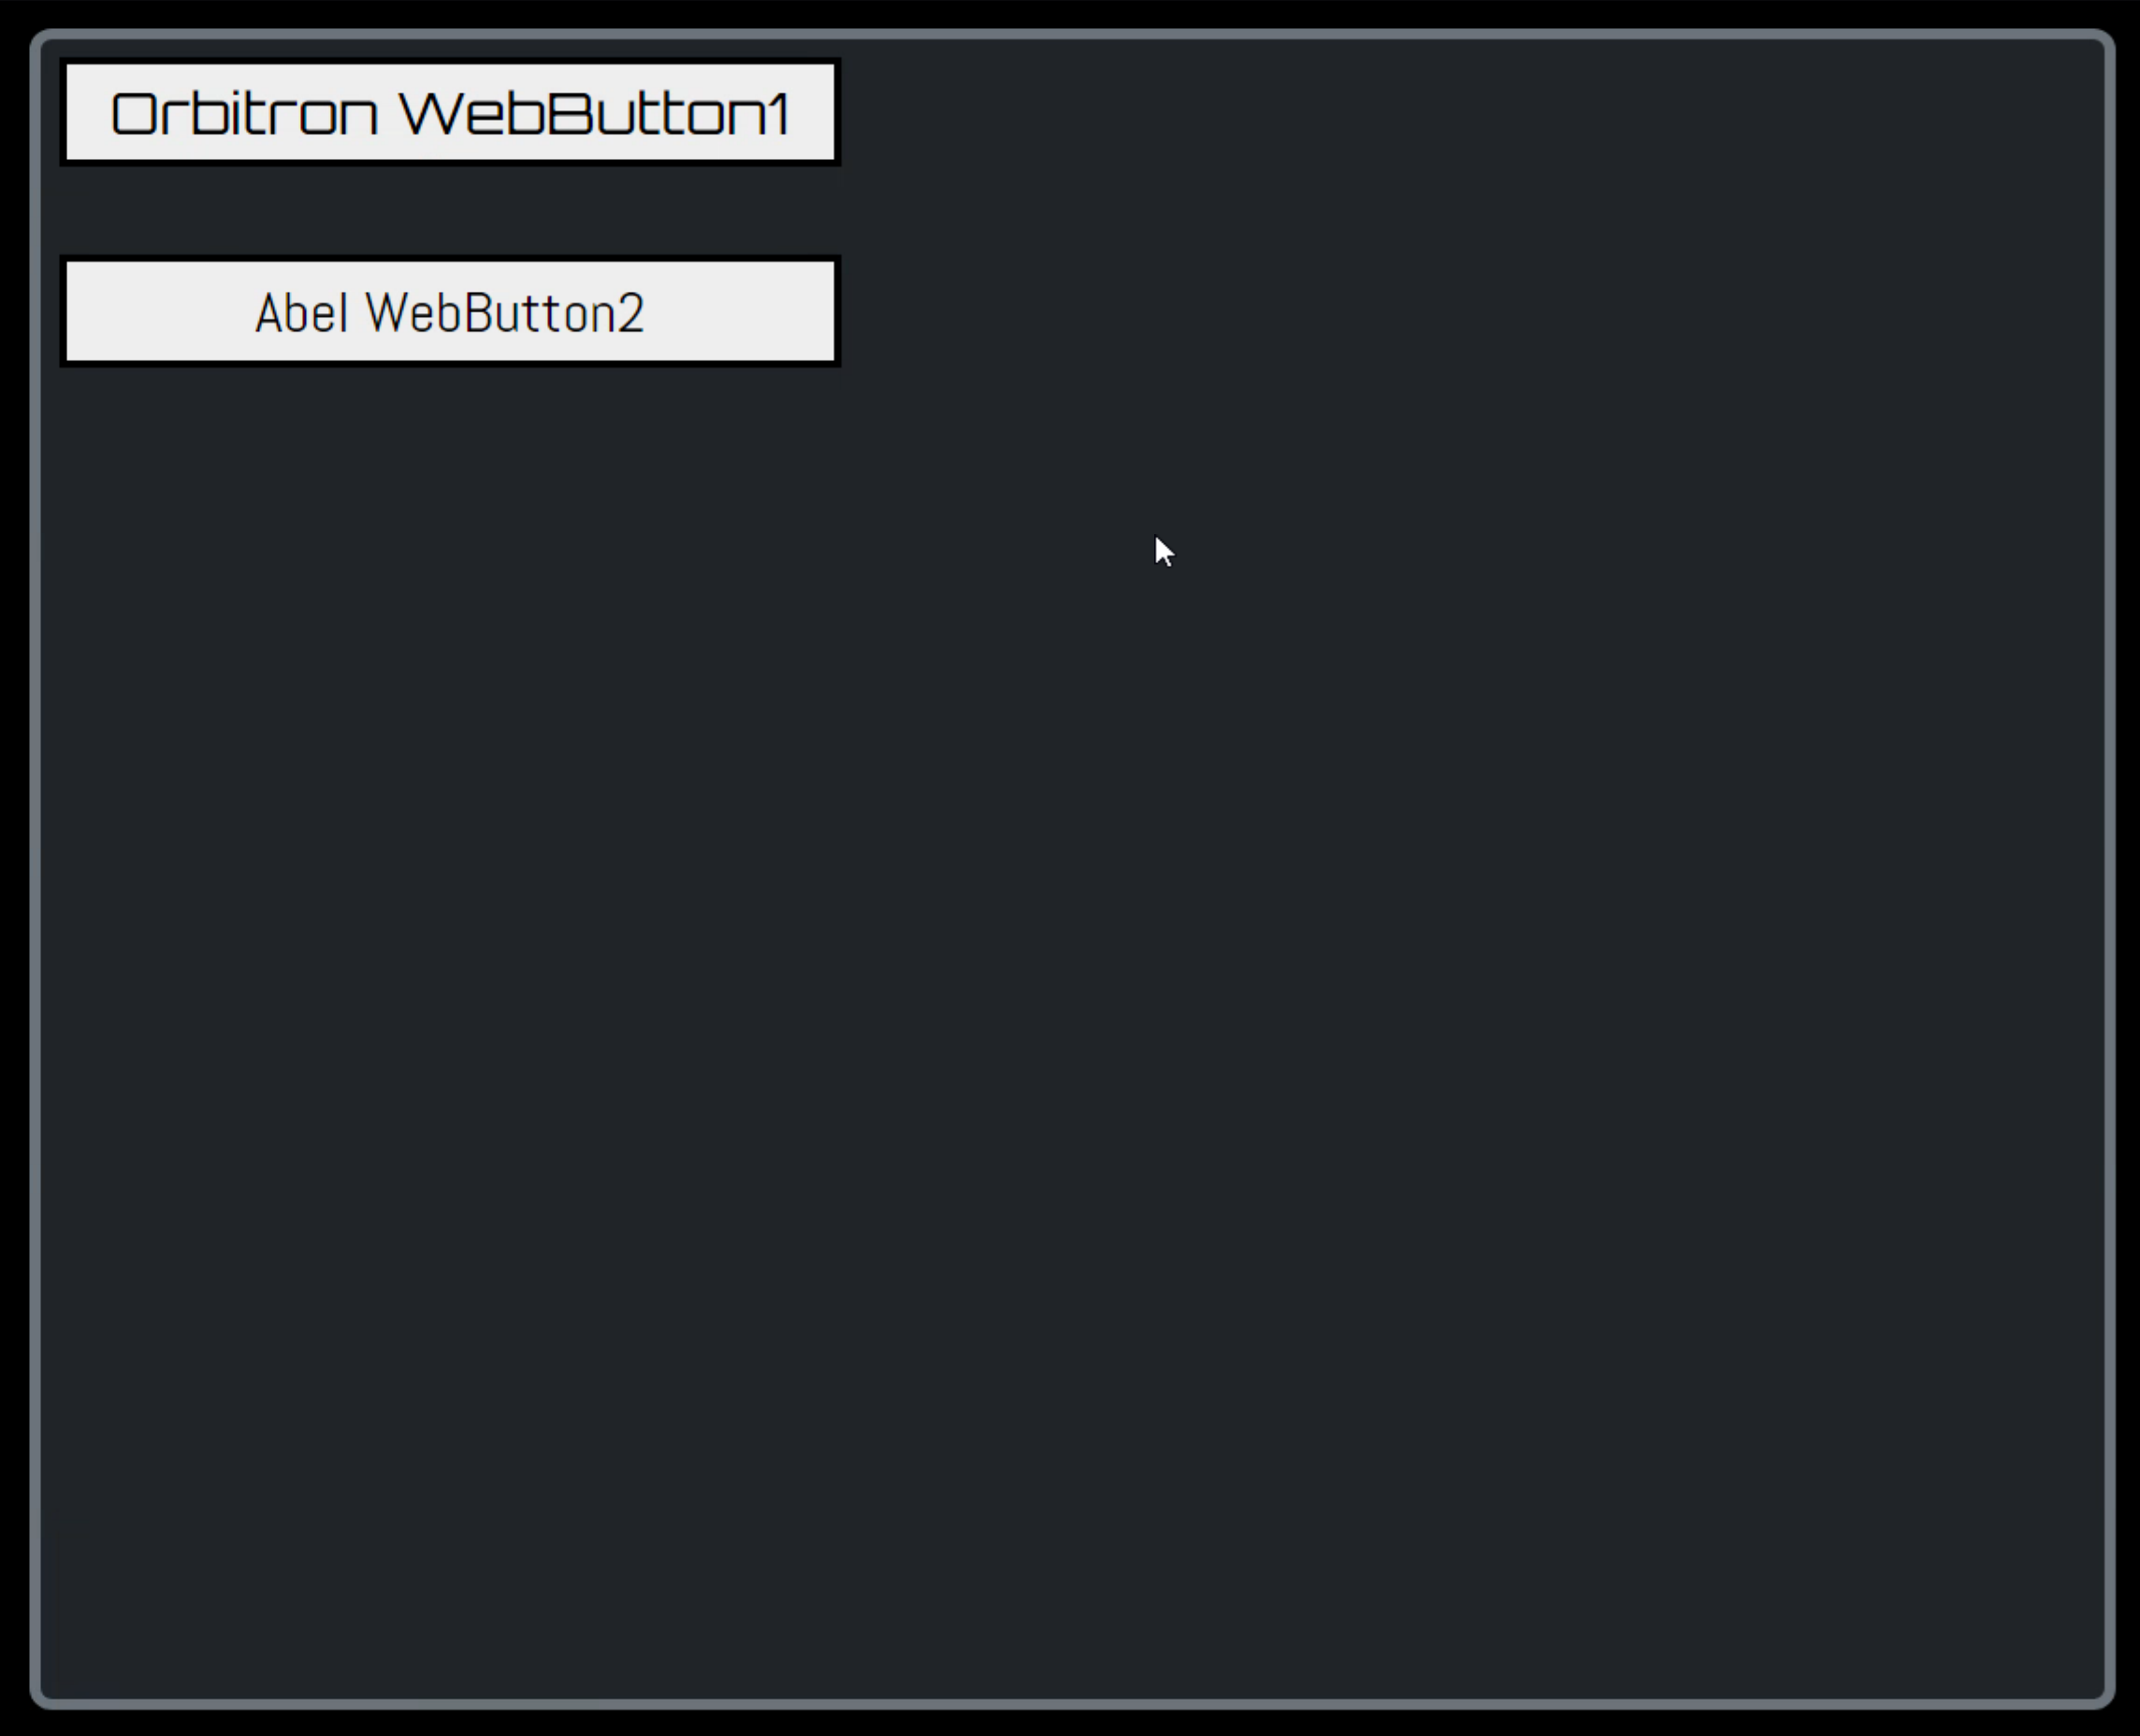
CSS Flex in Action.
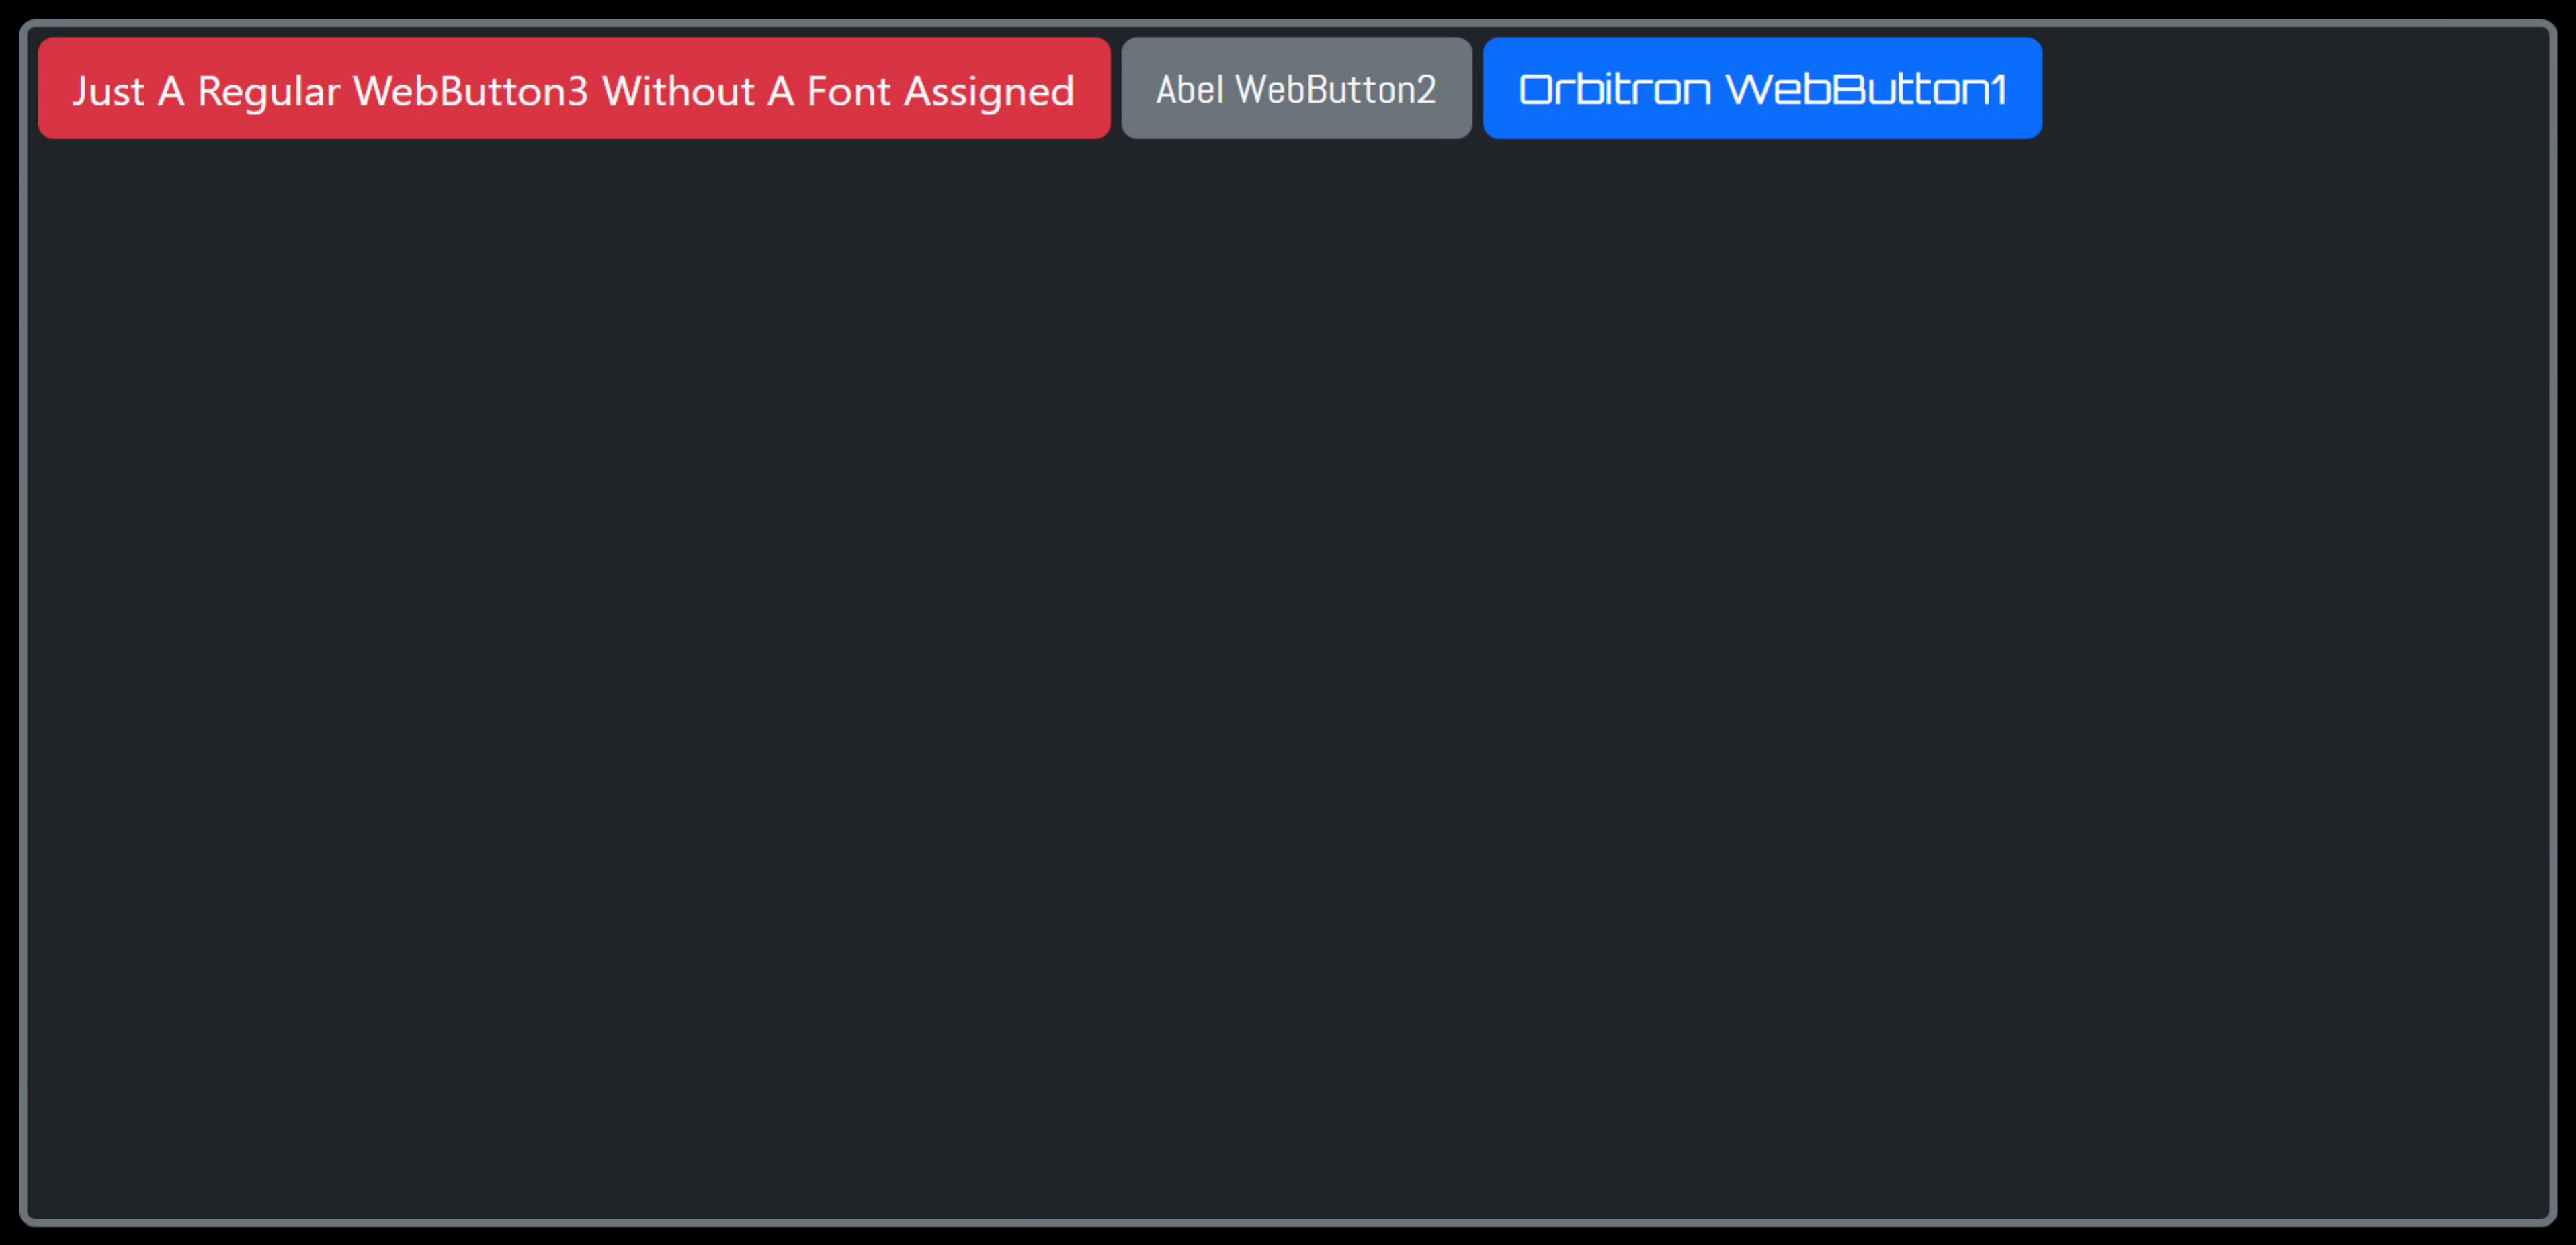
Let's now tackle those buttons, and, for good measure, add a third button to the mix. Let's say we want them
to appear aligned at the top of the page. One approach is to create a new TWebHTMLDiv component inside of our existing TWebHTMLDiv component, and then cut & paste our existing buttons into this inner TWebHTMLDiv component. And then add a third
button with a longer caption. In the Delphi IDE, these can be aligned any which way. Here's what it might look
like.
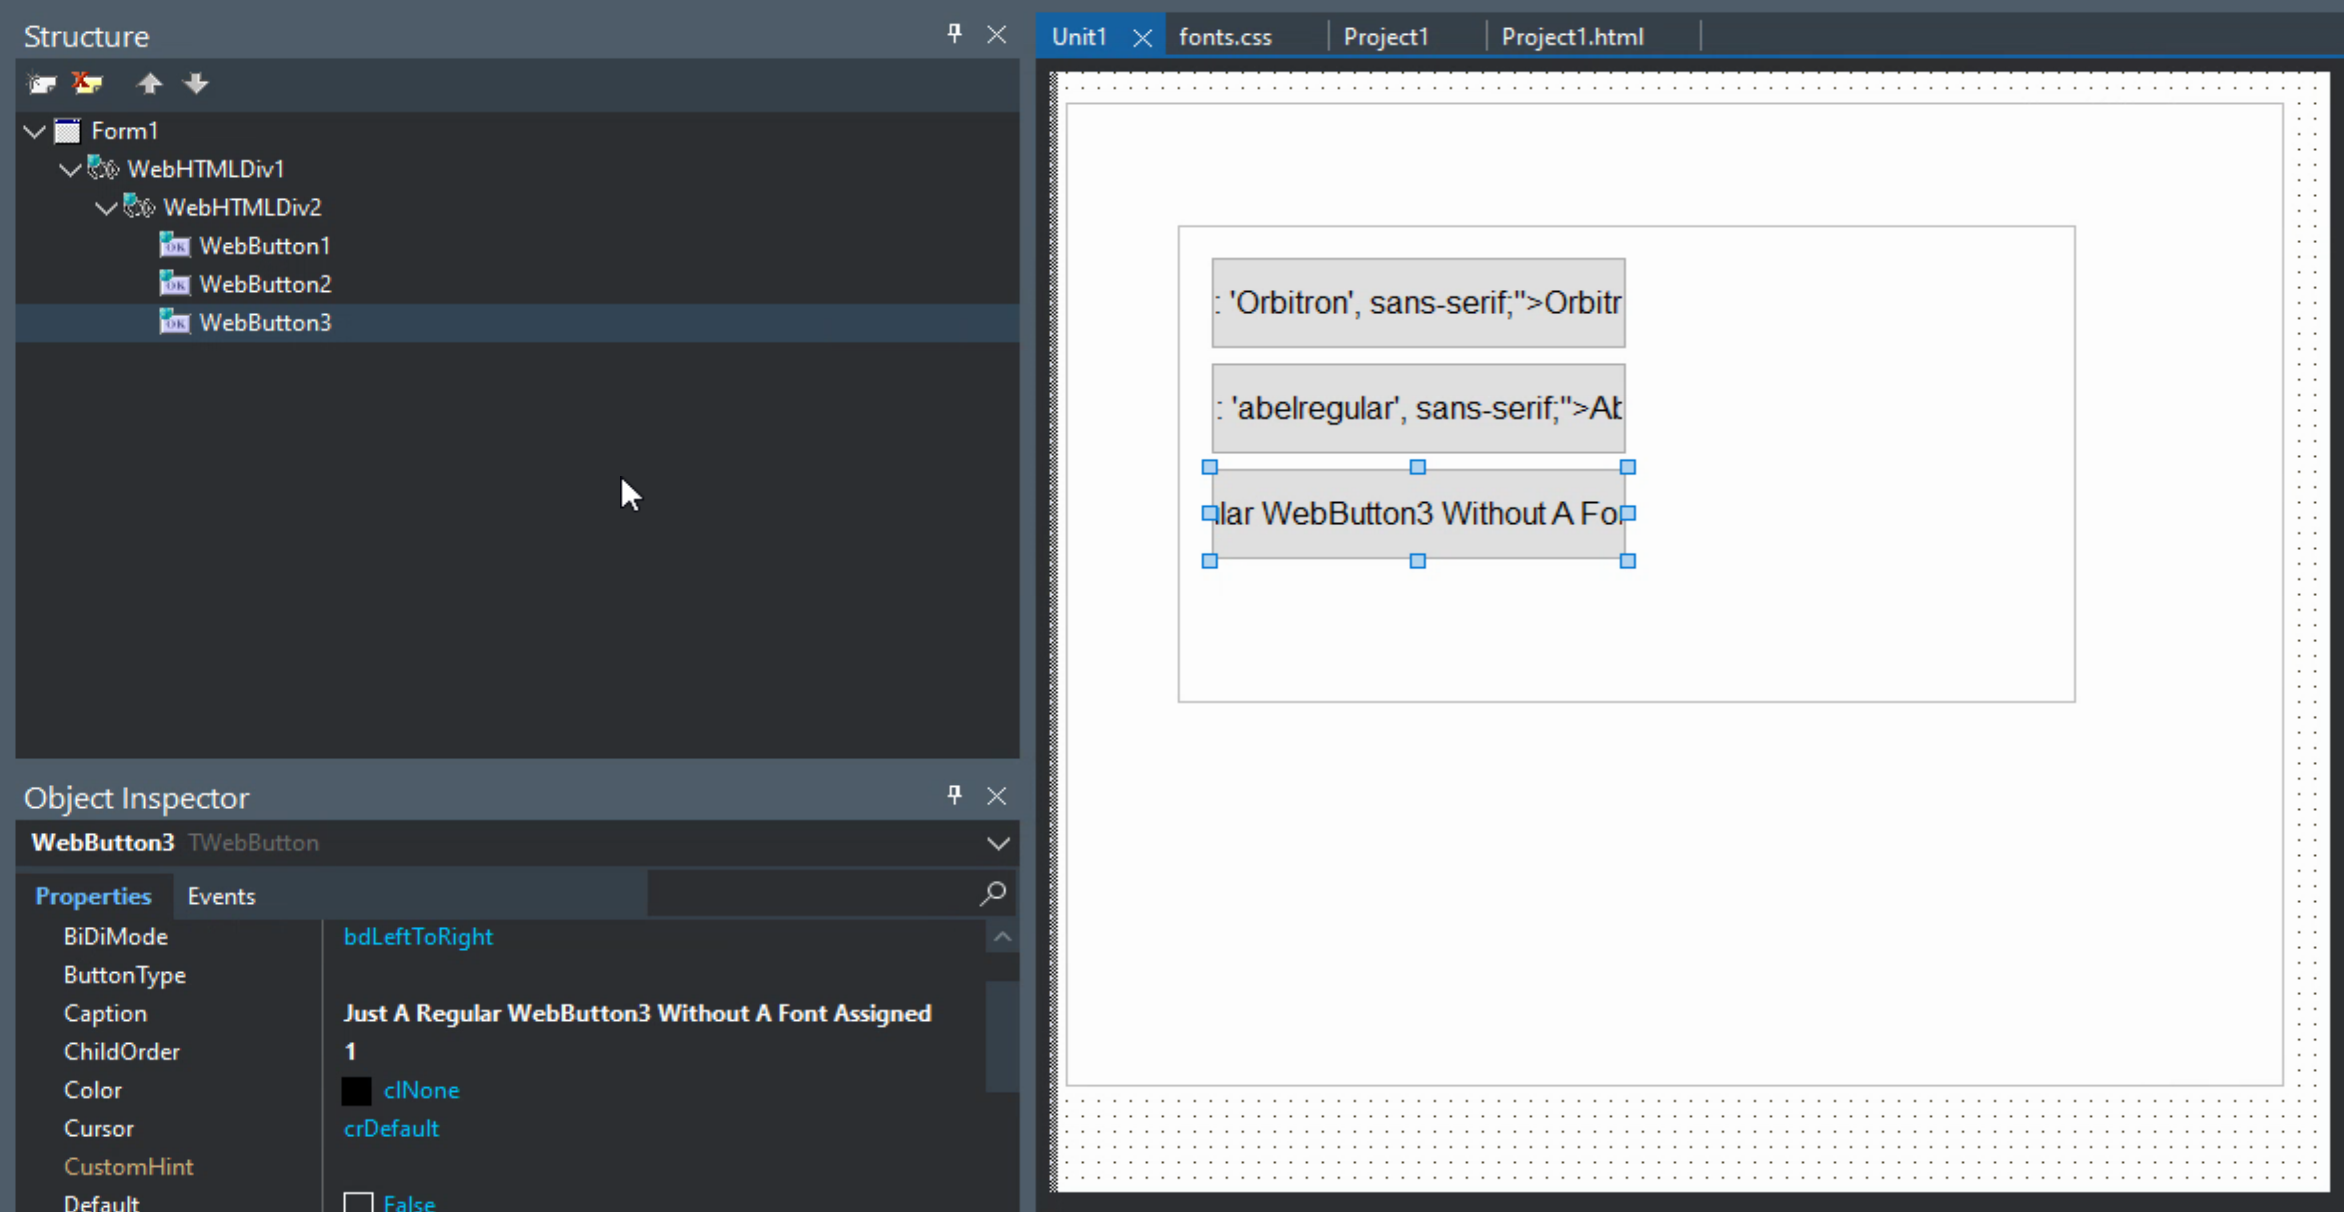
CSS Layout in the Delphi IDE.
Basically, we're not using the Delphi IDE much for the layout here, other than defining the parent/child relationships between the components. The "display" attribute of CSS is not something that cascades down from parent to child, so if we want to use flex with this new arrangement, we'll need to add "d-flex" to both of the TWebHTMLDiv component's ElementClassName properties.
And although we've not done anything with the button layout,
copying and pasting them into our updated TWebHTMLDiv component changed their "ElementPosition", "WidthStyle" and
"HeightStyle" positions to be the same as their new parent. Running our project now gets us the following.
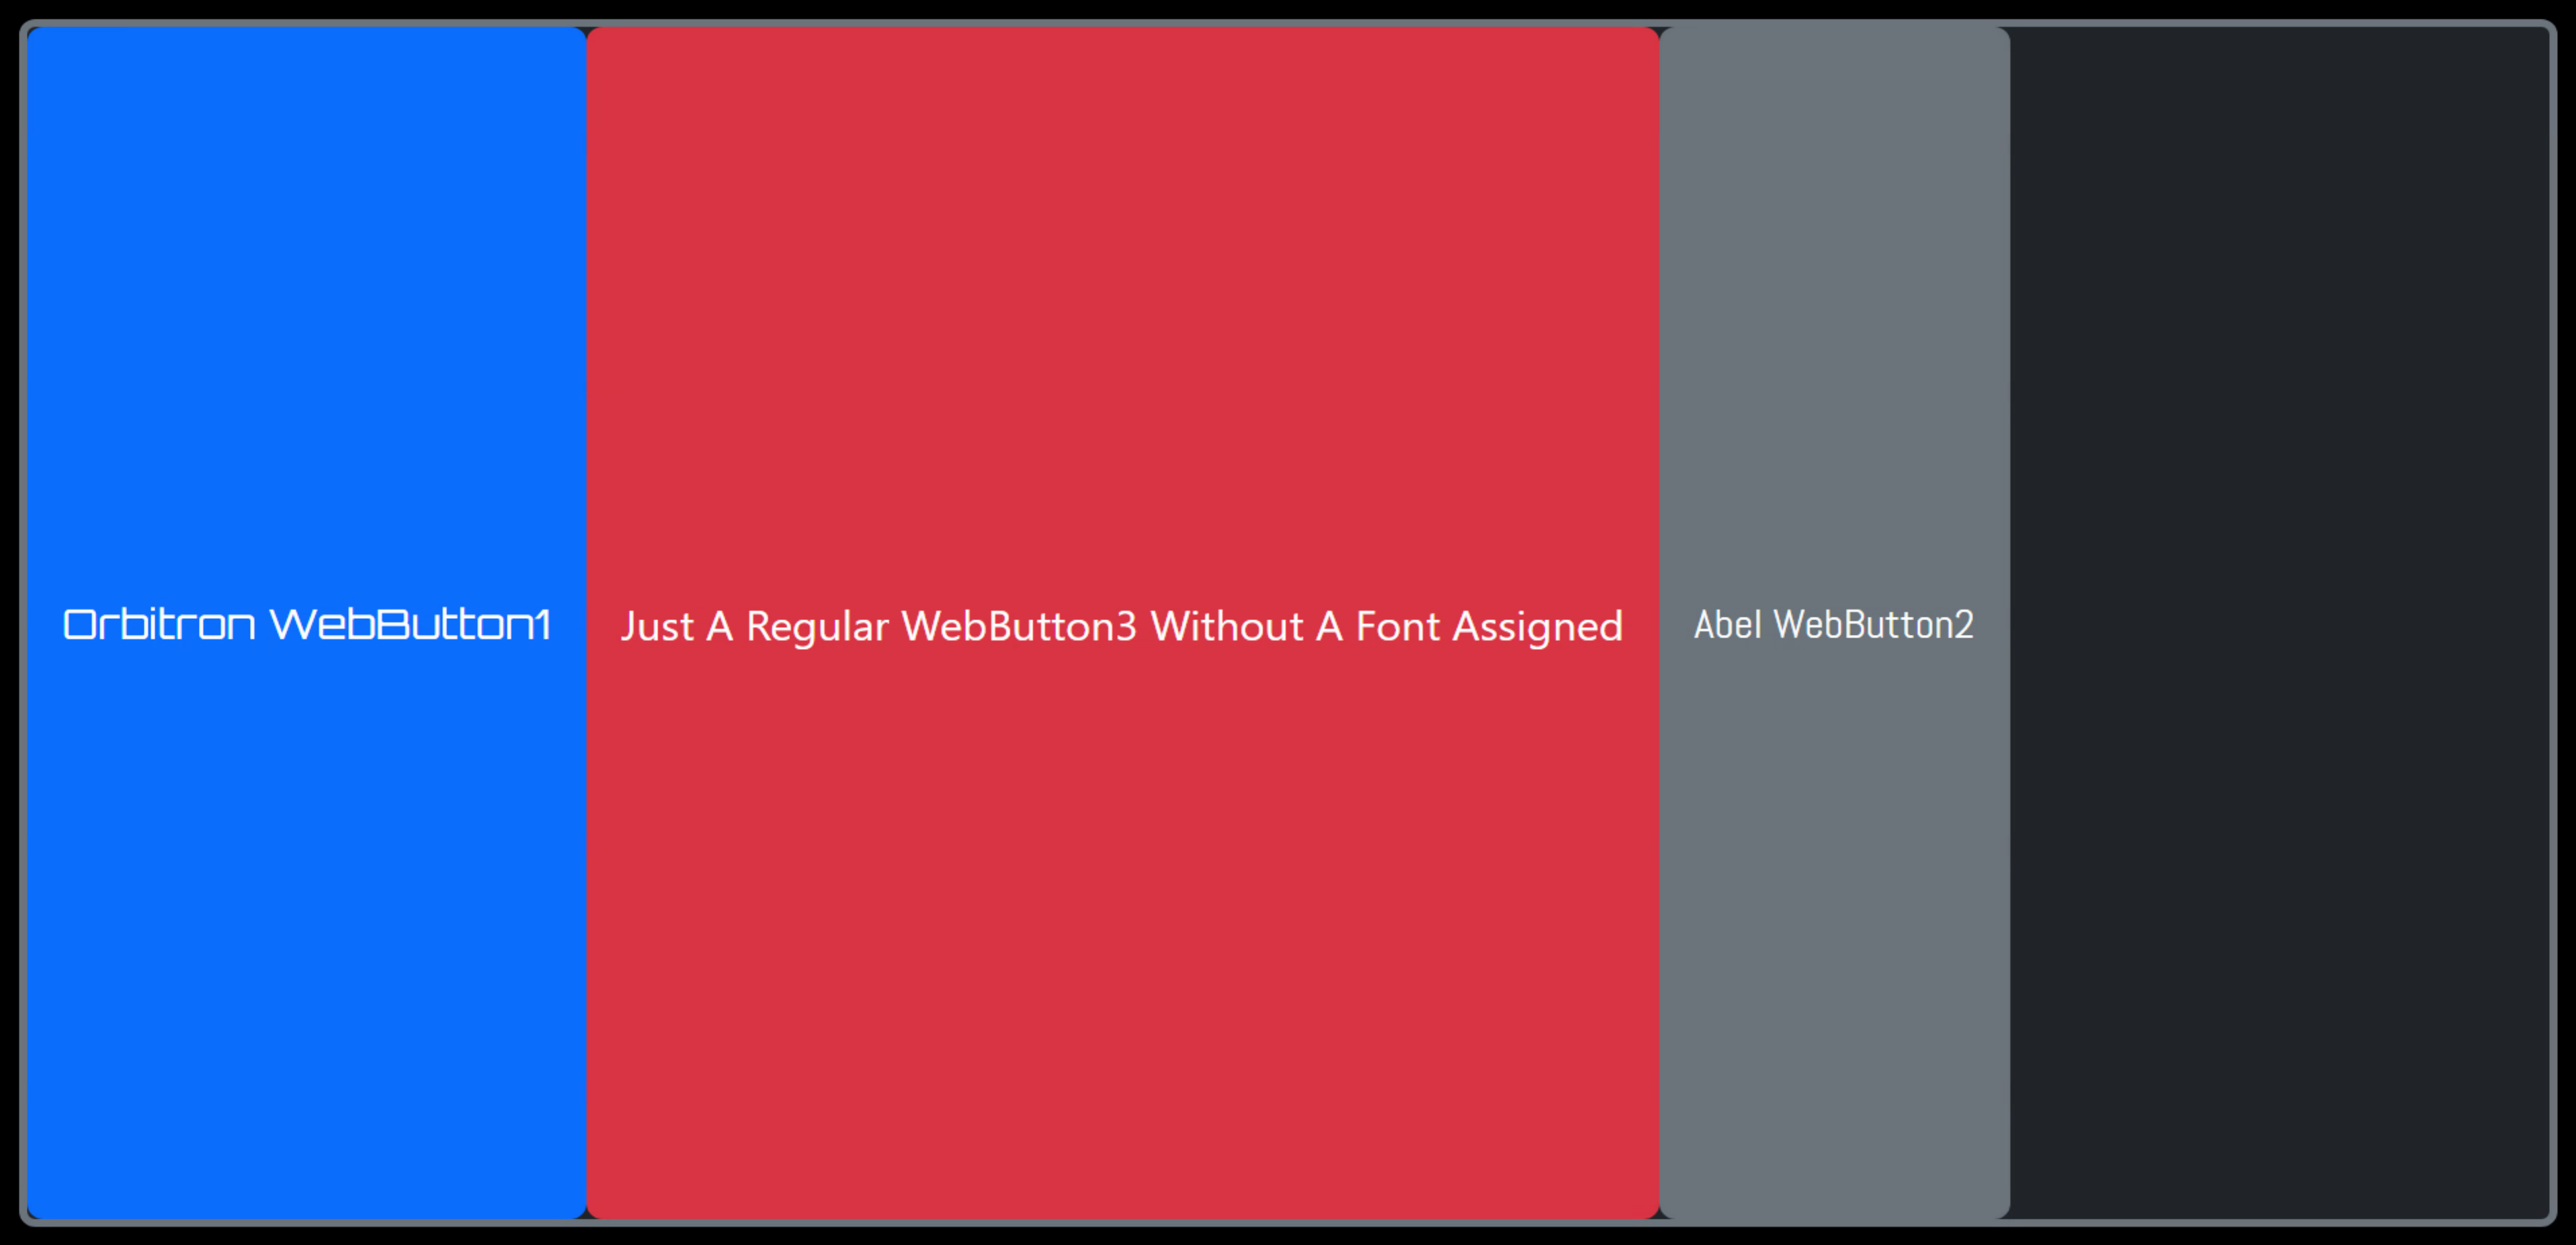
Default Buttons Arrangement.
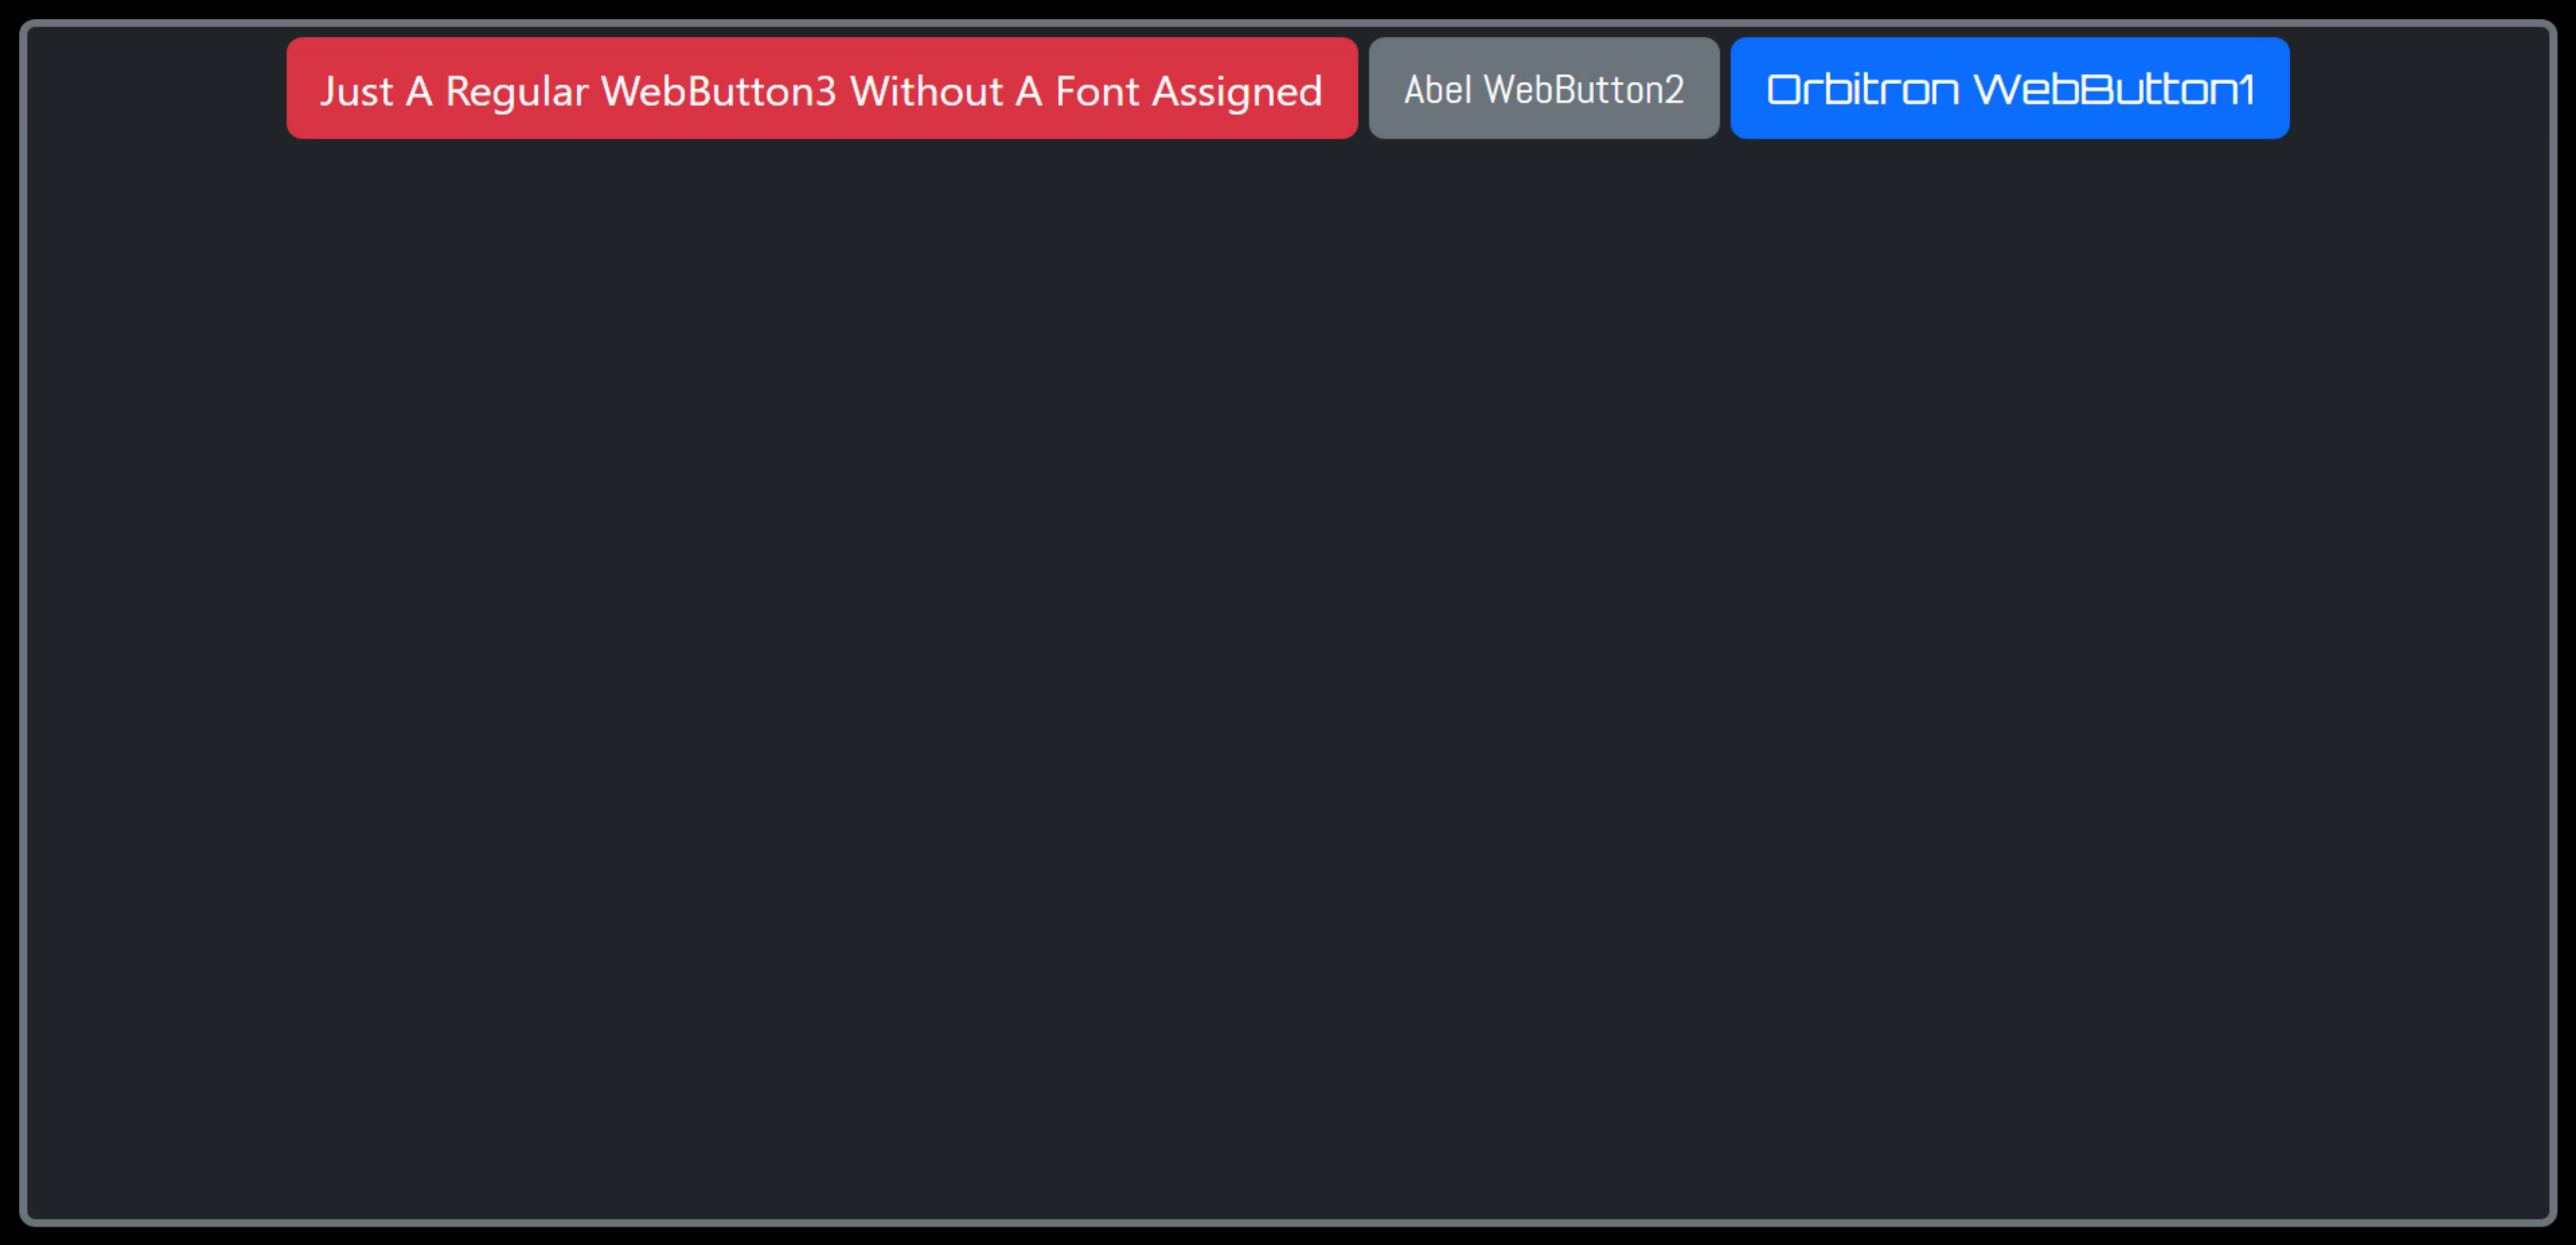
Note the order of the buttons in this arrangement. There are a few ways to manage this order. First, the order in which buttons are created plays a role, all else being equal.
Second, the "ChildOrder" property in the IDE
can be used to reorder the actual HTML that is generated. In this case, because the third button was just a
copy/paste version of the second button, it ended up with a "ChildOrder" property set to the same value. Updating the "ChildOrder" values for the buttons, we can then get the 1, 2, 3 order we might expect.
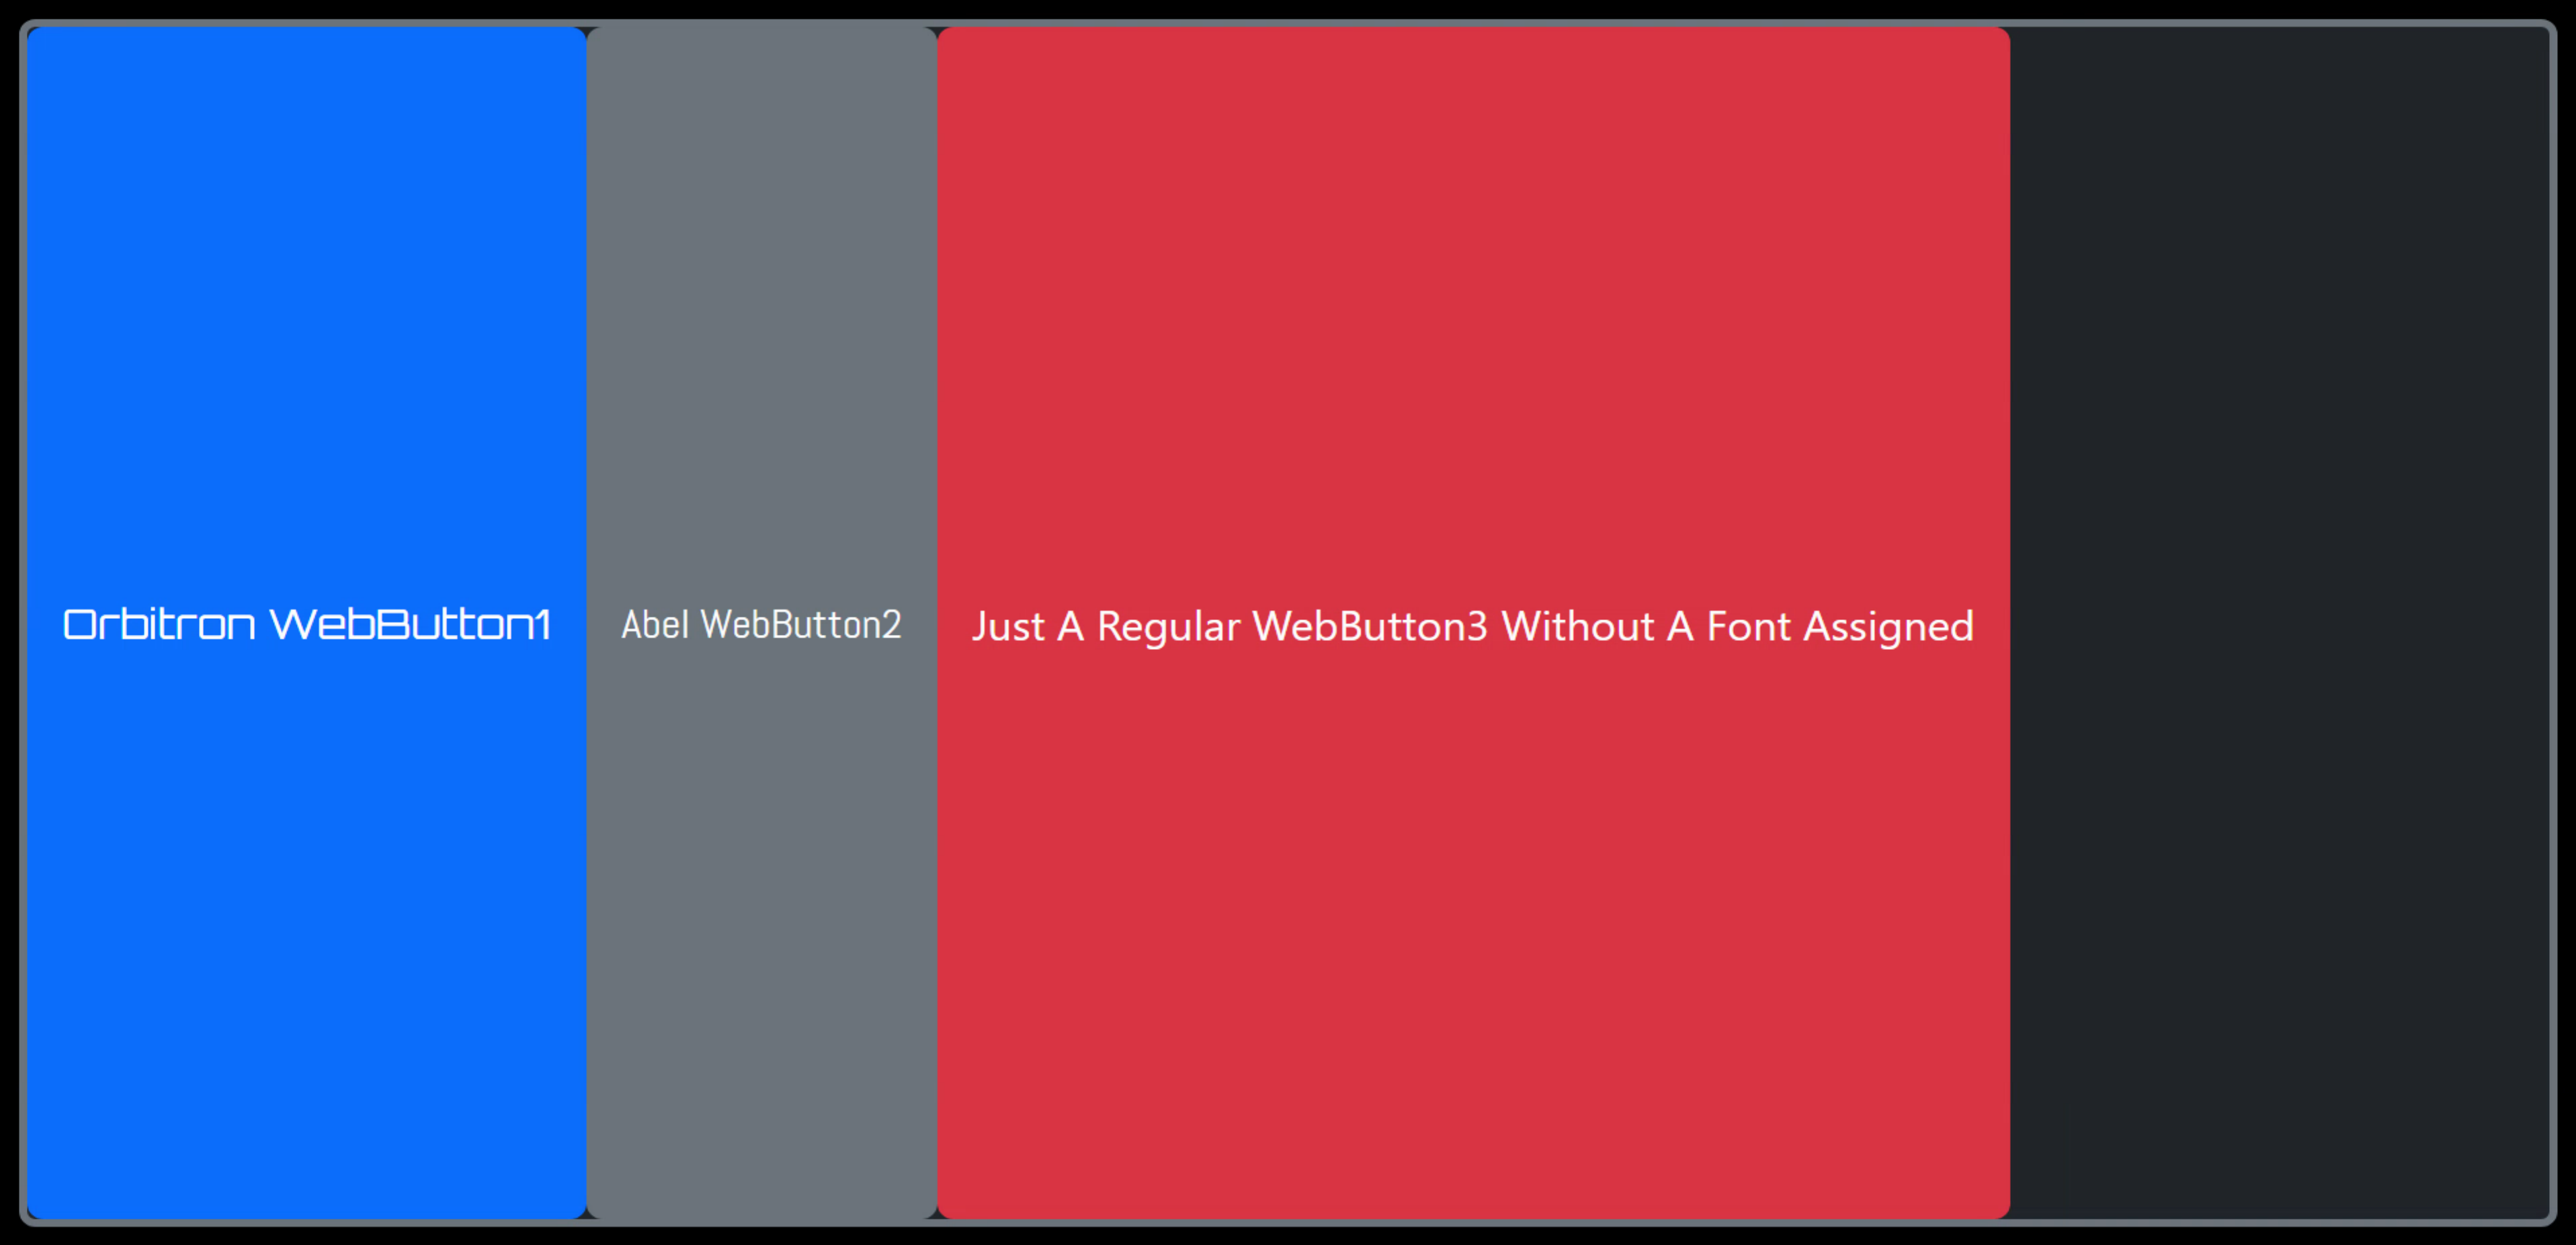
Using ChildOrder to Order Buttons.
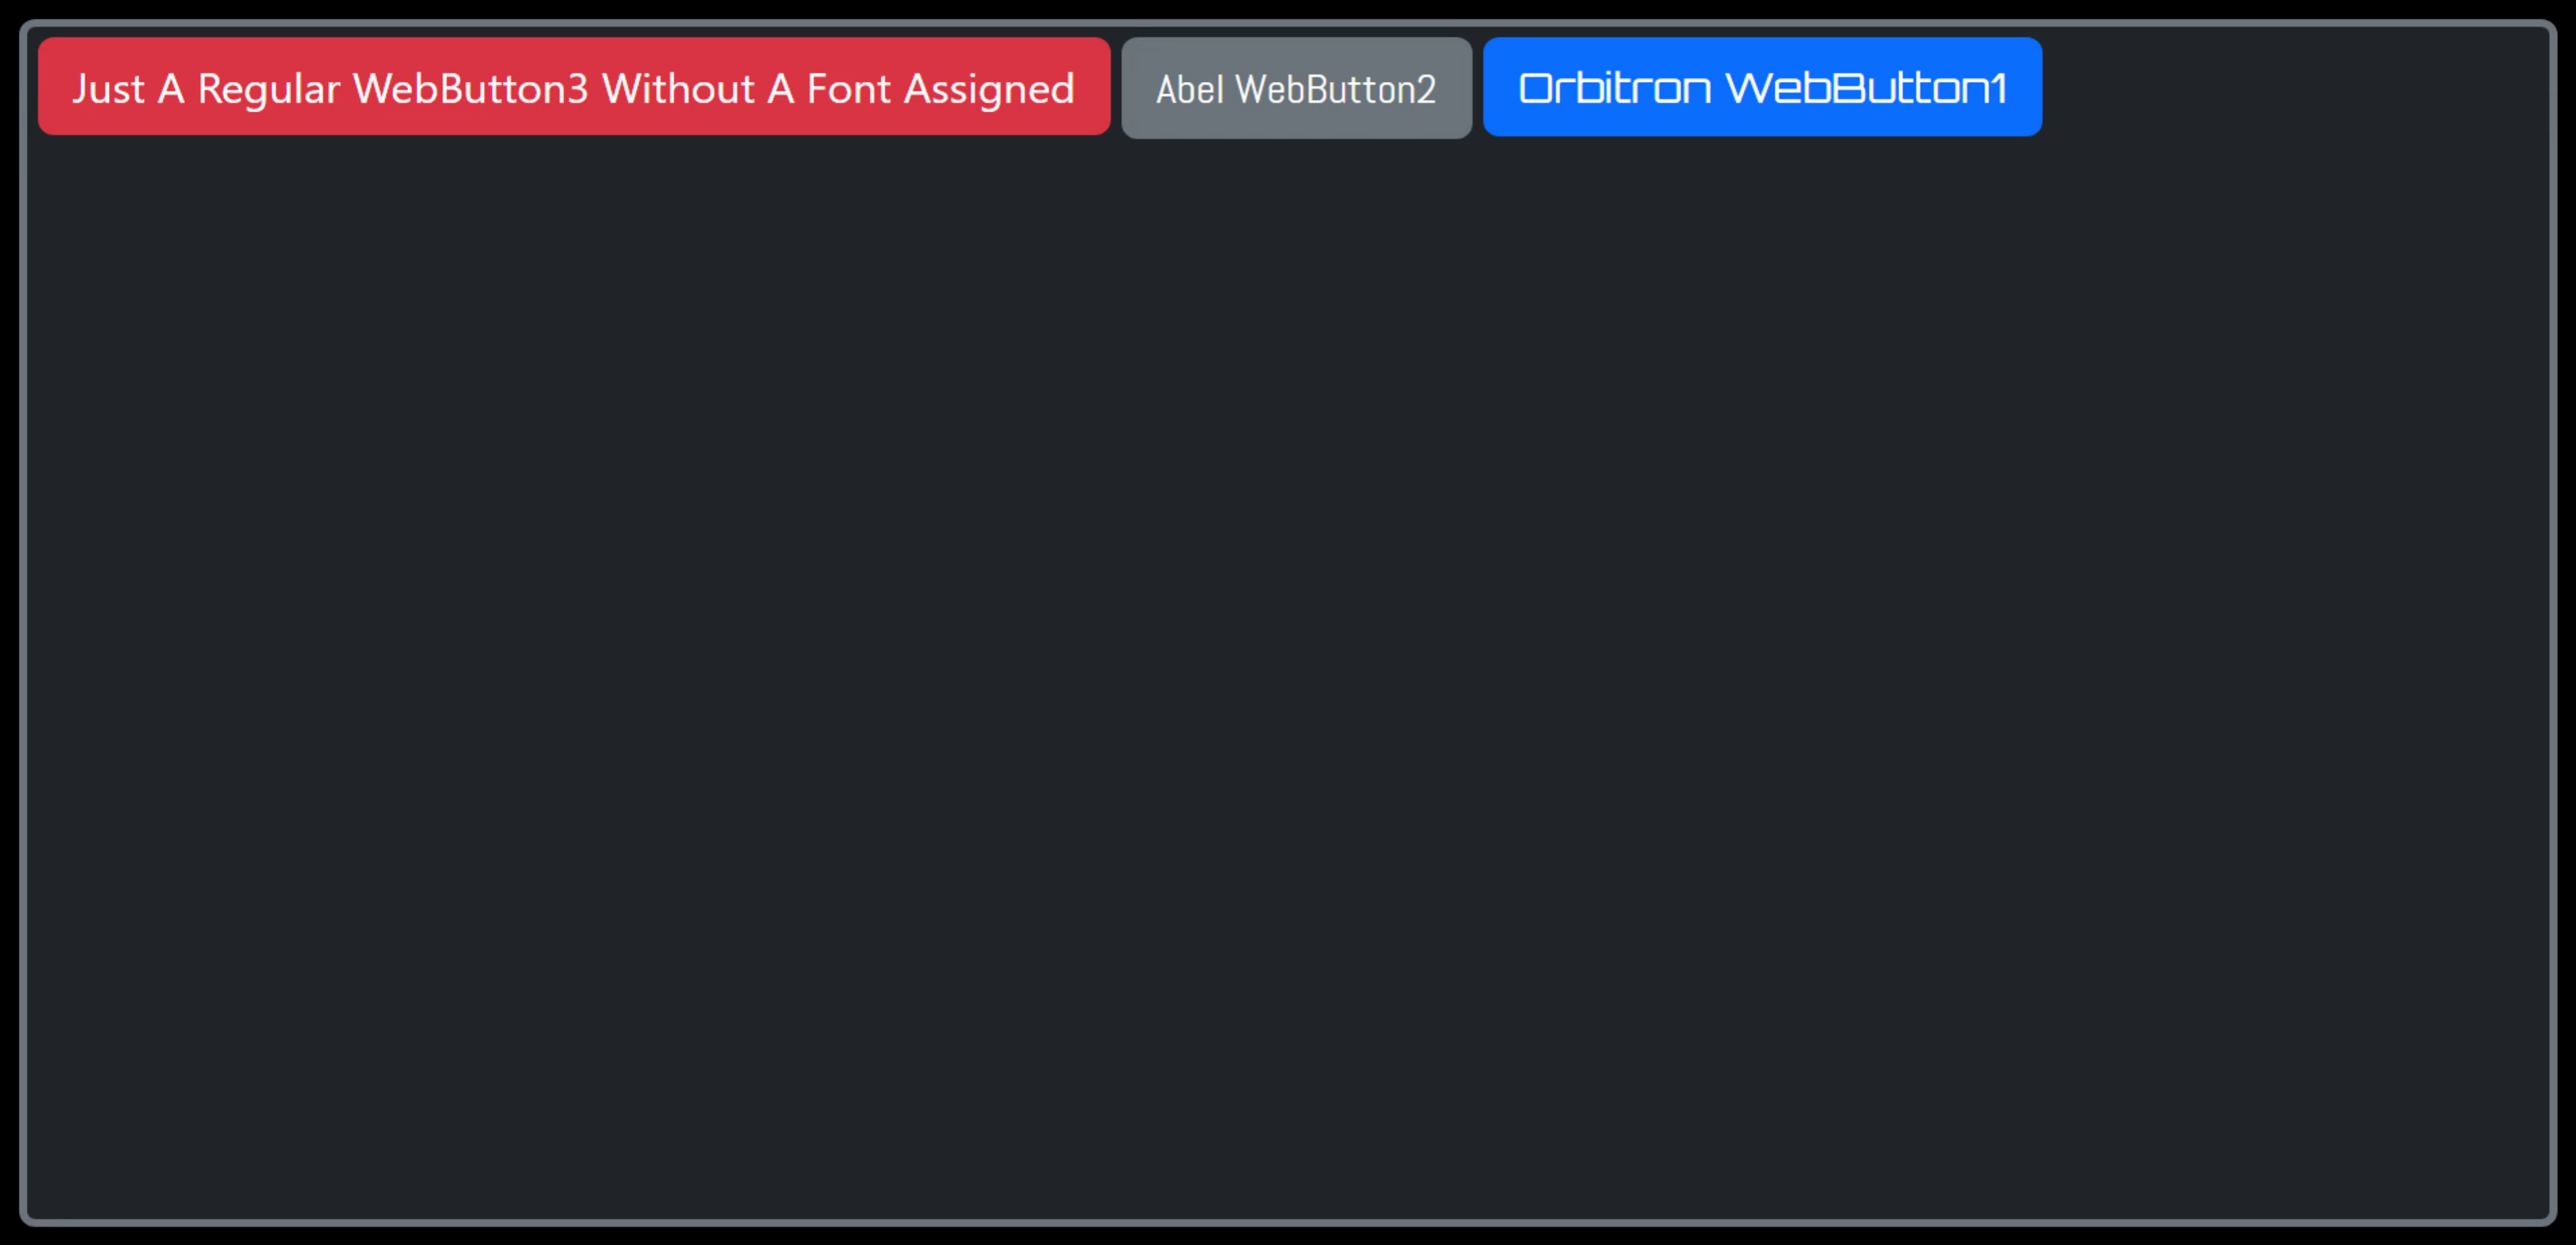
Another alternative is to use the "order" CSS property to explicitly change the order. In Bootstrap, this
means using the "order-x" class. Note that Bootstrap only defines order-0 through order-5, so if you need more,
you can define them in your own CSS file.
If we wanted to reverse the order here, for example, we would assign
order-0 to TWebButton3, order-1 to TWebButton2. and order-2 to TWebButton3. We can do this by adding the
"order-x" class to the ElementClassName property of each button. This gets us the reversed order, overriding
the default order as well as the "ChildOrder" properties.

Using CSS "order" Attribute.
Lots of options for setting the order, then. As a side note, if you venture into Bootstrap button groups, the
ordering there is tricky as the first and last buttons get a different style (rounded left vs. rounded right vs.
not rounded corners). Curiously, neither the ChildOrder nor the CSS order property seems to do the trick.
Instead, the order in the Delphi IDE seems to be what gets used. To change that, you can copy and paste the
buttons again to change the order.
Alright, now what about the height? While there are instances where it might be desirable for the button height to fill its container, often this is not the case. Let's say we want the buttons to have a regular height. Let's also add a bit of padding between the buttons and the outer rectangle, as well as between each other.
One of the initially confusing parts of CSS flex is that you can control the layout of the contents of a
container by adding classes (or CSS attributes) to the container itself. In this example, we can add a few more
classes to the WebHTMLDiv2 component.
align-items-start gap-1 p-1
- align-items-start: Moves all the elements to the top of the container. Could also use align-items-center or align-items-end.
- gap-1: Specifies the spacing between elements (buttons in our current situation). This is super-handy if you've ever tried doing this without CSS flex.
- p-1: Adds a bit of padding around the entire container so the buttons don't touch the edges
This gets us closer to something reasonable.
Button Layout with Gap and Padding.
The addition of "align-items-start" is what kicked in the "auto height" mechanism of CSS flex. This brings up an important point - CSS flex can be a bit particular about how it works, with seemingly small changes resulting in drastic alterations in how things are ultimately laid out on the page. So if you're experimenting with this for the first time, a little patience might be in order.
It is also sometimes convenient to test things out in the browser, adding classes or CSS properties to the WebHTMLDiv2 in this case, in order to see what works, and then copying the necessary classes to the Object Inspector ElementClassName property.
Once you've got a bit of
a footing, sometimes you end up with the problem of adding altogether too many classes to the ElementClassName
properties of all of your components, often without them all being strictly necessary. Something I'm guilty of
all the time! Fortunately, we can add as many classes as we like.
If you look closely at the above example, you'll notice that the buttons have different widths, naturally because of the different lengths of text, but also very slightly different heights because of the fonts being used. In this case, the height of WebHTMLDiv2 isn't set - it fills the page.
The buttons themselves get their
height set to match their contents by virtue of the "align-items-start" which also forces them to the top of
their WebHTMLDiv container. Instead, we can apply "align-self-start" to WebHTMLDiv2, which sets its height to
match its content - the buttons - and then causes its contents to do the same. Tricky business. But it gets us
buttons with the same height.
Fixing Button Heights.
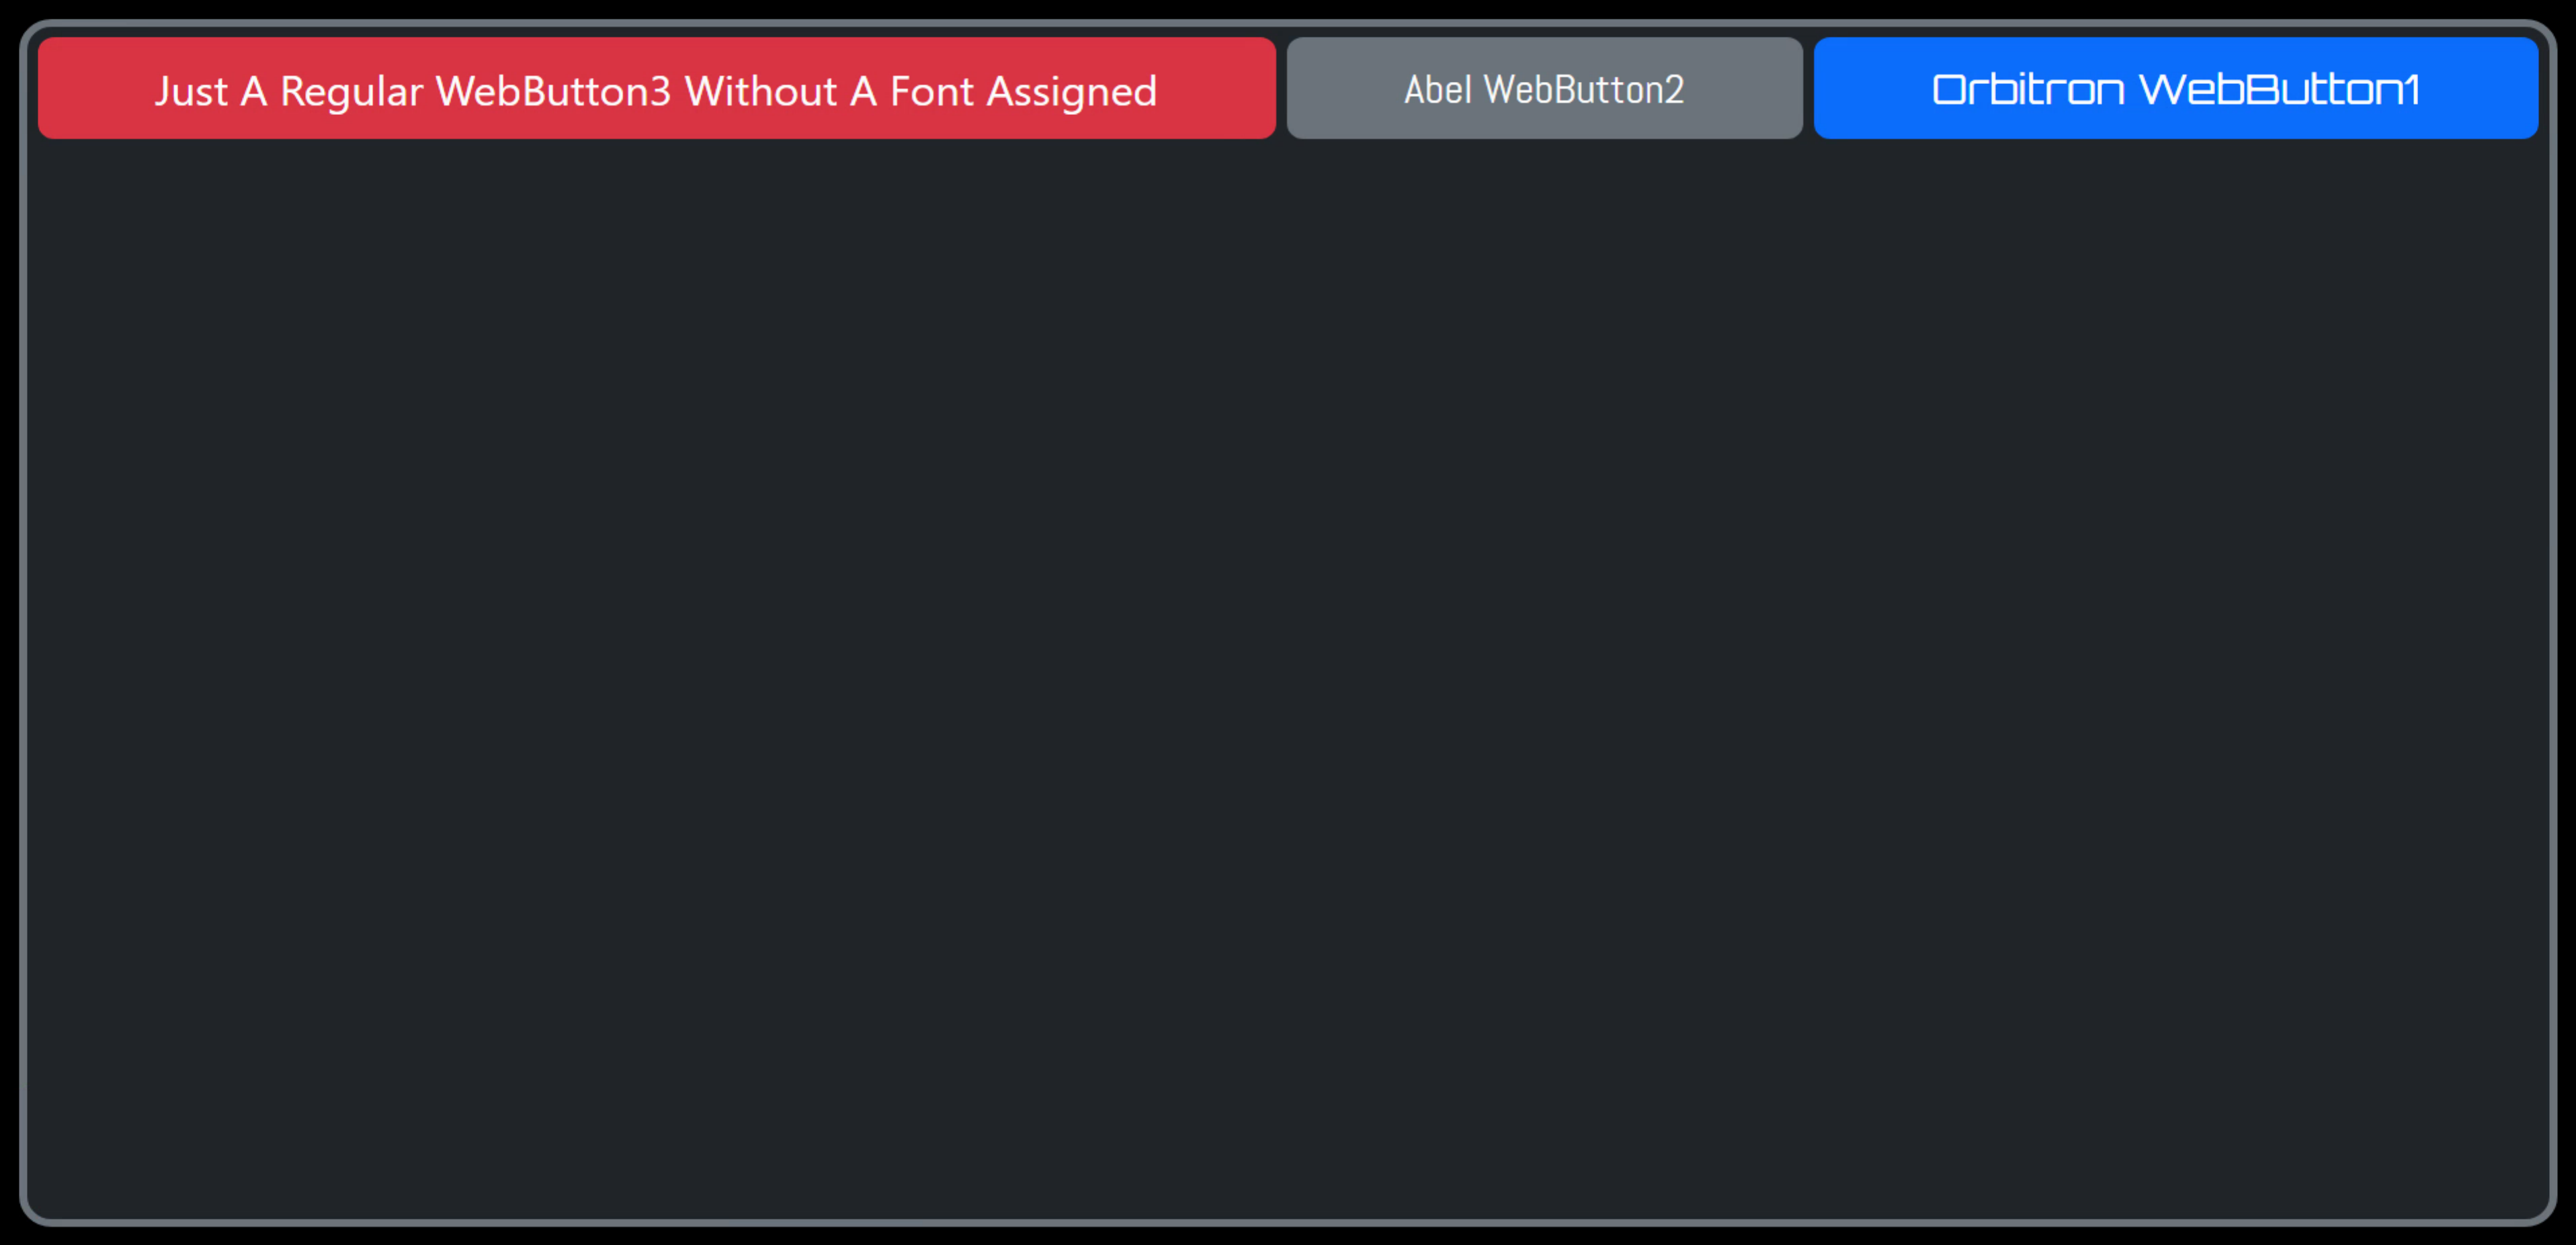
What about centering the buttons? Yep, there's a class (or a CSS flex property) for that as well. In this
case, we can just add 'w-100 justify-content-center' to WebHTMLDiv2 and the buttons will be centered. The
"w-100" tells WebHTMLDiv2 that it should stretch to fill the width of WebHTMLDiv1.
Centered Buttons.
Many more variations are possible, just by making some adjustments to the classes in WebHTMLDiv2.

CSS Flex: justify-content-end and align-self-center.
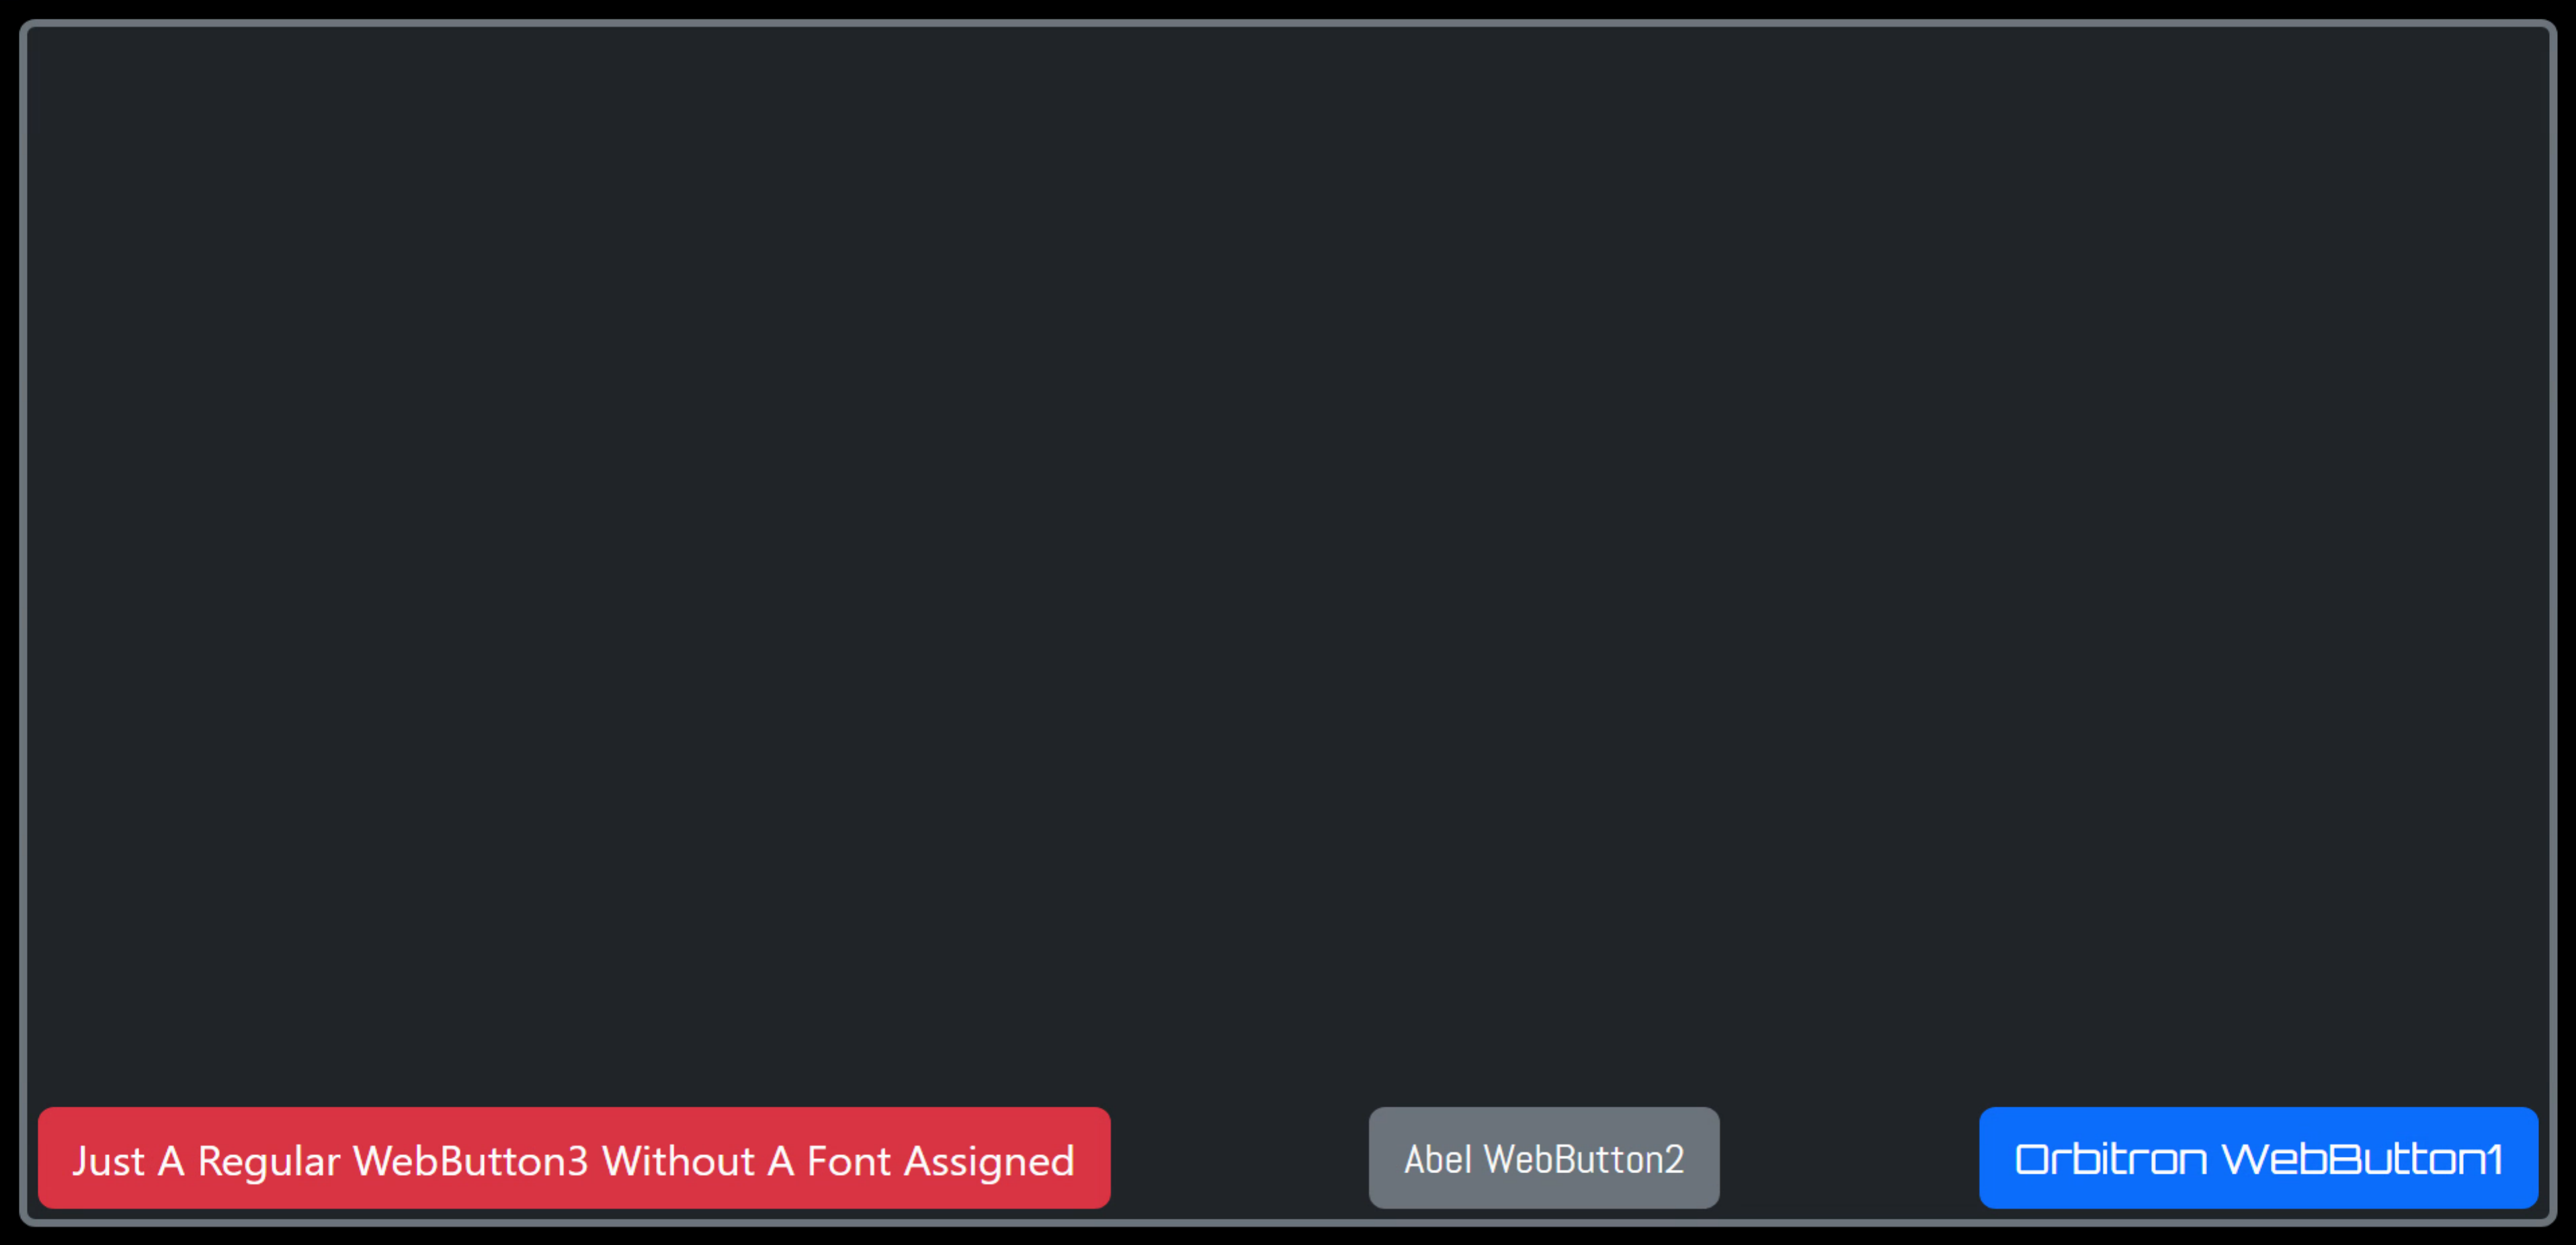
CSS Flex: justify-content-between and align-self-end.
If you'd like the buttons to fill up the space between them as well as the full width of the space available,
you can add 'flex-fill' to one or more of the buttons. If you want them all to divide the space evenly, add
this class to all of the buttons. Often this isn't the case though, particularly if you have one button in a set
that just has an icon - leave 'flex-fill' off that button to have it stay the same size. In our example here,
let's let them share the space equally.
And for those with a keen eye with respect to rounded corners, you might notice that the rounding of the outermost rectangle doesn't really match the buttons. To address that, we'll need to adjust the border-radius to something like 12px. This can be accomplished by adding a custom CSS class in a new CSS file.
Or we can try out the new TWebCSSClass component that
was recently added to TMS Web Core. Drop one on the form. Change the "BorderRadius" property to 12. Change
the "CSSClassName" property to "Rounded12". And add "Rounded12" to the "ElementClassName" property of
WebHTMLDiv1. We end up with the following.
CSS Flex: Add flex-fill To Buttons To Use Available Space.
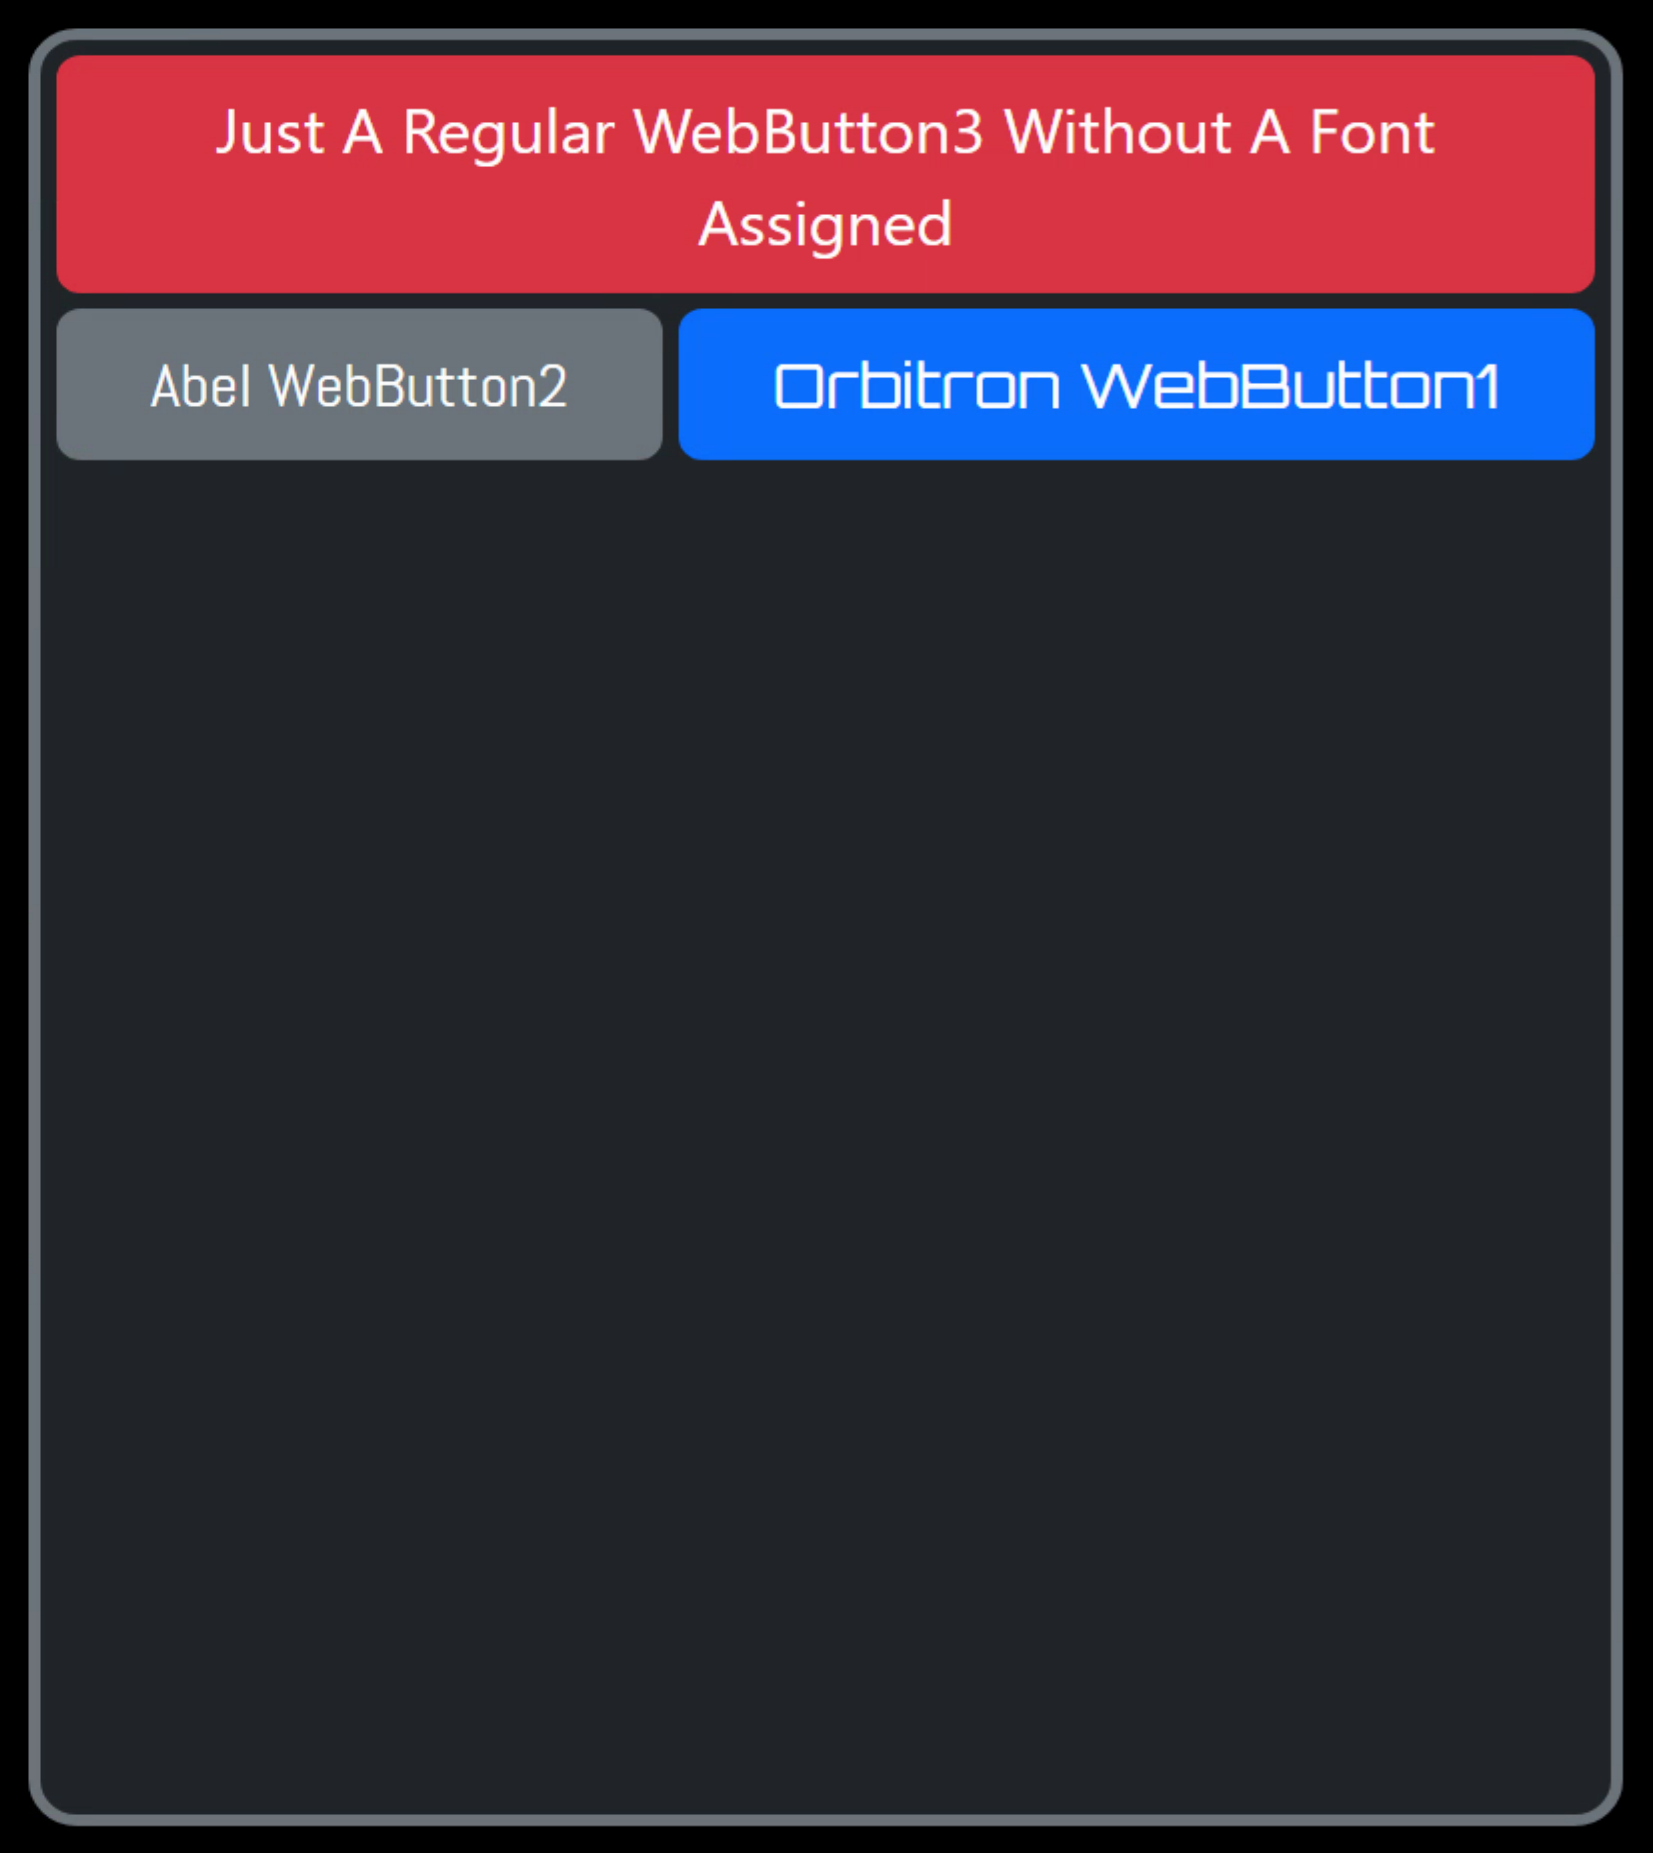
As a little bonus for all this, if we resize the page (form), the buttons will wrap their text and adjust their
height to compensate.

Automatic Button Resizing.
By default, the buttons won't wrap to the next line, but adding the class 'flex-wrap' does the trick. And
because flex-fill is still being applied, we get this result.
CSS Flex: Add flex-wrap to wrap elements.
Taking this all the way gets us a column of buttons. Note that this is where the CSS flex "gap" attribute comes in handy - we don't have to do anything about the spacing as the gap value is applied in
all the places we'd like it to be applied already.
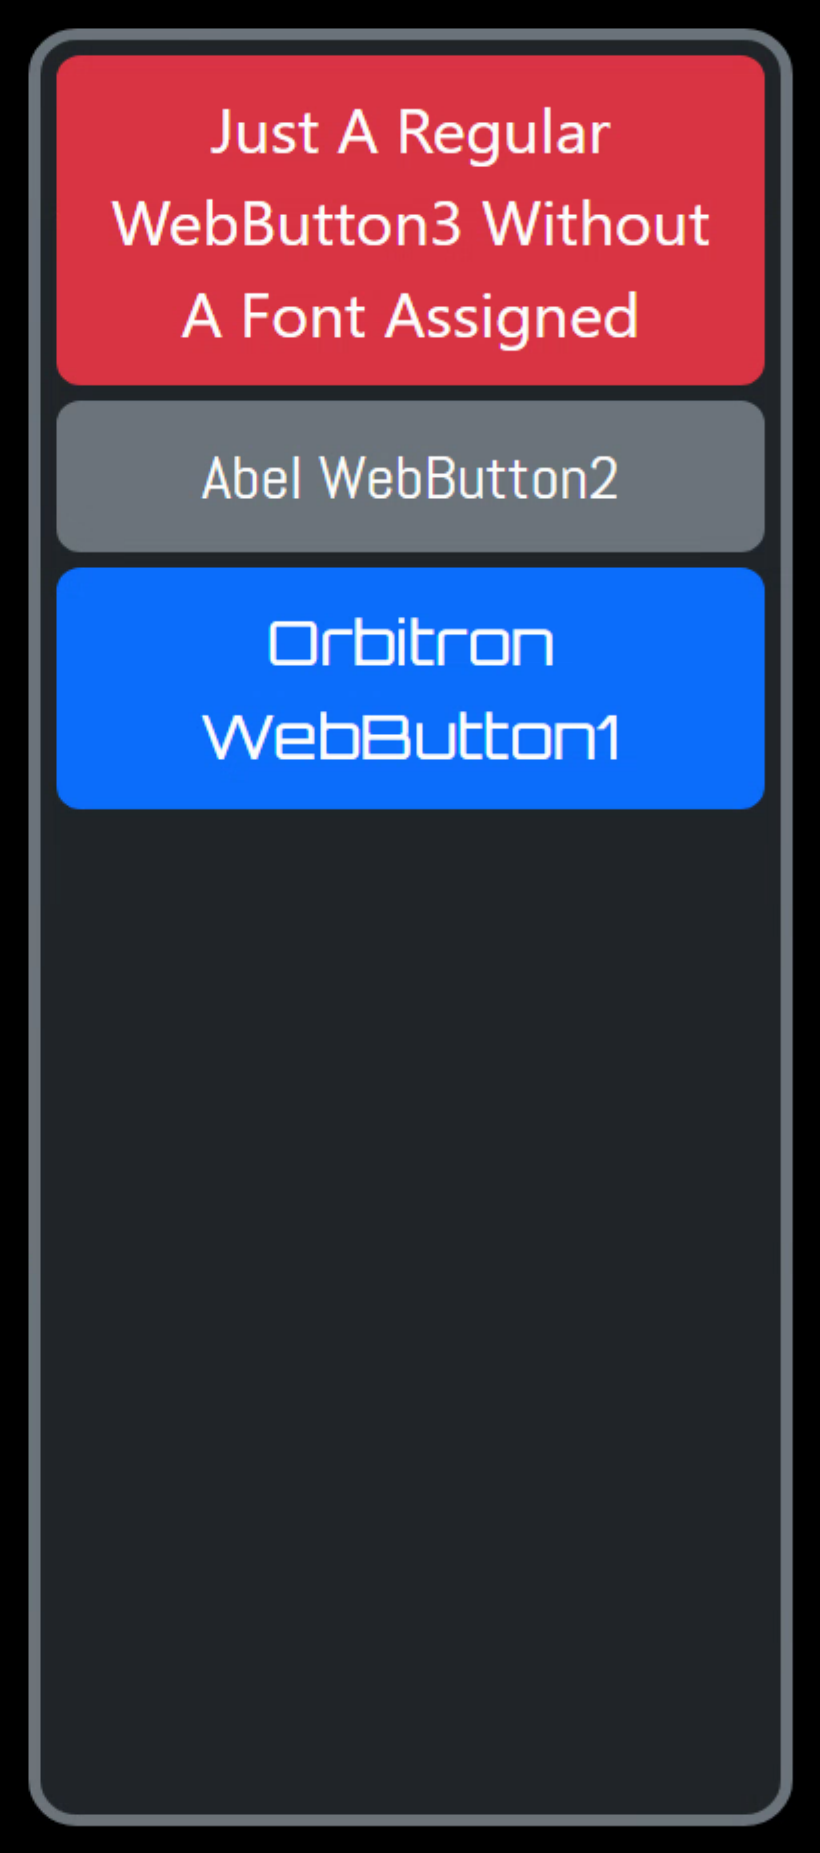
CSS Flex: gap
There is a lot more to explore with CSS flex, but hopefully this gives you a bit of a taste and a few
hints on where to get started. After using it for a bit, it becomes pretty clear that there is the flexibility
to do nearly any kind of layout by combining these techniques with various levels of nested <div>
elements, much like we might nest TPanels in order to keep things organized in a traditional VCL app. But this
is much, much more powerful.
FNC Components.
Our final topic for today is FNC components. If you're a TMS Software customer (as you hopefully are if you're using TMS WEB Core, naturally) then you may already be familiar with their cross-platform FNC components. They are all designed to be used in VCL apps, FireMonkey apps, and, naturally in Web apps by way of TMS WEB Core.
One of the key benefits is that you can design an application that is cross-platform, using the same components, and thus sharing the same overall UI for users of your application, making it a more seamless transition for them when moving between application platforms. Pretty fantastic all on its own, really.
When it comes to TMS WEB Core, using FNC components couldn't be easier. Just drop a component on the form and
it is ready to go, just as would be the case in a Delphi VCL app. But there are a few things to mention for
anyone just starting out with TMS WEB Core when it comes to FNC components.
First, be sure to install the latest version of TMS WEB Core and the latest version of all of your FNC components. Issues can arise when these are not all in sync with one another, and they can be difficult to troubleshoot, even when there are very minor version differences.
The TMS Support Center is of course a great
resource if you run into trouble, but the very first thing to do before reporting an issue is to make sure that
everything is up to date. In particular, for TMS WEB Core itself, it can be helpful to first uninstall it using
the Windows "Add/Remove Application" feature before installing the latest version of TMS WEB Core. FNC
components can naturally be installed using the TMS Subscription Manager, which will help with automatically
uninstalling and installing FNC components properly.
Second, after using TMS WEB Core for a while, mainly as we've been doing in this blog post, you might be tempted to reach for one of those "ElementClassName" fields or one of its close relatives, only to find out - gasp! - that none of these are properties of FNC components! This is most likely due to the fact that such properties have no value outside of TMS WEB Core.
One way to get around that is to first add a TWebHTMLDiv component to
your form and then add your FNC component to that. You can then use the ElementClassName and other properties
of the TWebHTMLDiv component to fit it into your overall design. The FNC component can then be set to "align:
client" or something along those lines to fill up the TWebHTMDiv component and allow you to go on your merry way. This is
particularly helpful when using things like CSS flex, where you really want to set properties using the ElementClassName mechanism.
Finally, because FNC components are cross-platform, their presentation on a web page is usually created using a <canvas> element, similar to how components are drawn in a VCL app. This is fantastic for cross-platform consistency (yay!) but not so fantastic when you want to use CSS to override something (boo!).
Generally, the
way to theme an FNC component is to adjust the properties of the component itself. Most of the time, there are
plenty of options here that make it easy to adjust to whatever you need. In more advanced situations (or when
you have many FNC components to adjust) there is also the option to have them pick up information from CSS via
their "AdaptToStyle" property. This allows you to set CSS properties that the component will then use when
creating the <canvas> element. This goes a long way toward making FNC components fit in seamlessly with
whatever layout or theme choices you might be working with.
Wrap-Up
This is only our second "basics" post and things are already moving along pretty well. But there are still many more letters in the alphabet yet to cover! Next time we'll cover a few basic concepts starting with the letter "A". If you've been using TMS WEB Core for any time at all, can you guess what some of them might be?
Related Posts:
Basics Part 1: Consoles, Calls, Classes, CSS, and... CAPS-LOCK?
Basics Part 2: Files, Fonts, Flex, and FNC
Basics Part 3: Attributes, Animation, Async, and Await
Basics Part 4: Images, Icons, iFrames, and Initialization
Basics Part 5: d, div, debugger, Debug, and Deployment
Basics Part 6: Links, Lists, Layouts, and Let
Follow Andrew on 𝕏 at @WebCoreAndMore or join our 𝕏 Web Core and More Community.
Andrew Simard

This blog post has received 4 comments.
 2. Tuesday, December 27, 2022 at 9:32:08 PM
Very kind of you to say. Thanks!
2. Tuesday, December 27, 2022 at 9:32:08 PM
Very kind of you to say. Thanks!
Andrew Simard
3. Friday, December 30, 2022 at 6:08:09 AM
"...Often, documentation and other supporting materials make certain assumptions about their audience in order to help things along. But invariably, some things get overlooked and someone could be left puzzled about an issue that might be completely obvious to someone else...."This is so absolutely true, thank you for having this approach. Your blog posts are simply the best.
Ole Ekerhovd
4. Friday, December 30, 2022 at 11:42:06 PM
Thank you very much, and you are very welcome! I get caught in that trap all the time - frequently encountering vast gaps in my knowledge that I did not know that I did not know! And often the most trivial things.
Andrew Simard
All Blog Posts | Next Post | Previous Post
Well done, Andrew!! Look forward to many more.
Hazell Richard