Blog
All Blog Posts | Next Post | Previous Post

 Add AI superpower to your Delphi & C++Builder apps - Part 5: create your MCP client
Tuesday, May 27, 2025

Image generated by OpenArt
This is part 5 in our article series about adding AI superpower to your Delphi & C++Builder apps. In the first 4 installments, we covered:
In this article, we continue our journey along the path of the Model Context Protocol (MCP). This time, our focus is on MCP clients — what they are, how they work, how you can use them and how to create your own. If you haven’t already, we recommend reading our previous article to get a basic understanding of MCP.
What is an MCP Client and Host?
Strictly speaking, an MCP client is a protocol client implementation that maintains a one-to-one connection with an MCP server, regardless of the underlying protocol or connection type used. The sole purpose of the MCP client is to communicate with the server. It provides an interface for sending and receiving data over an active connection.
While that might sound like limited functionality, it’s a critical building block for creating something more powerful and versatile: MCP host applications!
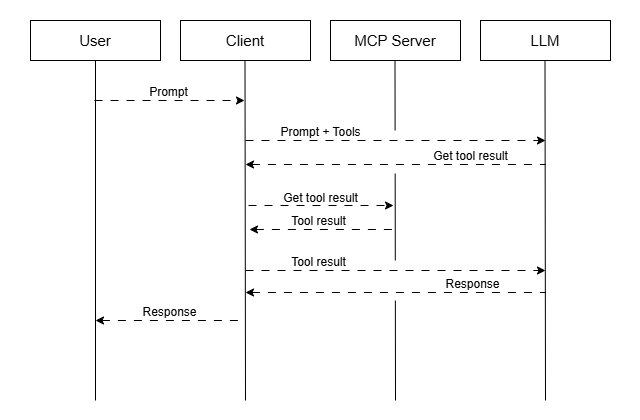
An MCP host is where the real magic happens — it uses MCP clients internally to connect to MCP servers and acts as the glue between the MCP servers and the large language model (LLM). When a prompt is sent to the LLM, the host sends along any available tools for function calling. If the LLM decides it needs to use one of those tools, it includes that in its response. The MCP host then forwards the function parameters to the appropriate MCP server and waits for the result. Once received, the host delivers the response back to the LLM, allowing it to proceed with generating the final answer or to call another tool if needed.
Note: We often refer to MCP host applications as MCP client applications, as this aligns better with Delphi development terminology.
Which MCP Client to Use? How to Set It Up?
There are several ready-to-use MCP client applications available today that can get you up and running quickly. Some popular options include:
- Claude Desktop
- Visual Studio Code
- Cursor.ai
Each of these applications come with a configuration file (usually in JSON format) where you can define connections to one or more MCP servers. Configuration typically involves specifying the server's command, arguments, and possibly authentication tokens or endpoint details.
Here's a general overview of what an MCP host configuration might look like:
These hosts are excellent for prototyping or integrating LLM functionality into your daily workflows.
But what if you want to embed this power directly into your own Delphi application?
Introducing TTMSMCPClient
We created TTMSMCPClient to make building MCP client applications accessible to Delphi developers.
Looking at the component name, you might wonder: Do I have to handle all communication with the LLM myself? What does TTMSMCPClient do for me?
TTMSMCPClient is not just a barebones MCP client implementation. It allows you to add multiple MCP server connections using the Servers property, each handled by its own internal MCP client. You can configure these servers at design-time or programmatically:
We went a step further and built in communication with LLMs via our TTMSMCPCloudAI component, automating the full exchange between MCP servers and the LLM. To send a prompt, you only need a single line of code:
Capturing the response is just as simple:
Flexibility and Control
While TTMSMCPClient shares many responsibilities typically handled by an MCP host, it's important to clarify that it is not a host itself. It's a building block that developers can use to create such applications. Therefore we designed it to be as flexible as possible:
ToolCallModeproperty lets you enable or disable tool call confirmation (great for automated or background clients)- Works in both GUI and console applications
- Full control via events — detect what’s happening and act accordingly
- Easily switch to another supported LLM

Use Cases
Using TTMSMCPClient in Delphi applications can open up new possibilities:
- Integrate your own or third-party MCP servers directly into Delphi applications
- Handle LLM responses natively without relying on external tools
- Build full-featured AI-powered applications with customized UI and interaction logic
Conclusion
Applications that use MCP clients can leverage the power of existing or custom MCP servers to unlock the full capabilities of LLMs — now directly within Delphi or C++Builder environments!
In the next article in this series, we’ll dive deeper into using RAG.
If you have an active TMS ALL-ACCESS license, you have access to TMS AI Studio that uses the TTMSMCPCloudAI component but also has everything on board to let you build MCP servers and clients.
Bruno Fierens
Related Blog Posts
-
Add AI superpower to your Delphi & C++Builder apps - Part 1: intro
-
Add AI superpower to your Delphi & C++Builder apps - Part 2: function calling
-
Add AI superpower to your Delphi & C++Builder apps - Part 3: multimodal LLM use
-
Add AI superpower to your Delphi & C++Builder apps - Part 4: create MCP servers
-
Add AI superpower to your Delphi & C++Builder apps - Part 5: create your MCP client
-
Add AI superpower to your Delphi & C++Builder apps - Part 6: RAG
-
Introducing TMS AI Studio: Your Complete AI Development Toolkit for Delphi
-
Automatic invoice data extraction in Delphi apps via AI
-
AI based scheduling in classic Delphi desktop apps
-
Voice-Controlled Maps in Delphi with TMS AI Studio + OpenAI TTS/STT
-
Creating an n8n Workflow to use a Logging MCP Server
-
Supercharging Delphi Apps with TMS AI Studio v1.2 Toolsets: Fine-Grained AI Function Control
-
AI-powered HTML Reports with Embedded Browser Visualization
-
Additional audio transcribing support in TMS AI Studio v1.2.3.0 and more ...
-
Introducing Attributes Support for MCP Servers in Delphi
-
Using AI Services securely in TMS AI Studio
-
Automate StellarDS database operations with AI via MCP
-
TMS AI Studio v1.4 is bringing HTTP.sys to MCP
-
Windows Service Deployment Guide for the HTTP.SYS-Ready MCP Server Built with TMS AI Studio
-
Extending AI Image Capabilities in TMS AI Studio v1.5.0.0
-
Try the Free TMS AI Studio RAG App
-
Connect to llama.cpp servers from Delphi with TMS AI Studio v1.6

This blog post has received 1 comment.
All Blog Posts | Next Post | Previous Post
We also have a fleet of available trucks, where each truck has a current location (address).
I’m wondering if it’s possible to use AI to suggest which truck to assign to each parcel.
One additional complication is that ferry schedules must also be considered, to ensure the truck can fit into the right ferry time slots.
Roland Bengtsson