Frequently Asked Component Specific Questions
Options |
|
Display all FAQ items |
Displaying items 61 to 75 of 888, page 5 of 60
<< previous next >>

 TMS VCL WebGMaps
Make sure *.google.com is added to your trusted domains
When you have configured your Internet Explorer in such way that the domains *.google.com do not belong to the trusted domains, TWebGMaps will not work. (TWebGMaps internally uses the IE ActiveX WebBrowser). So, in case nothing shows up in WebGMaps upon start, make sure to add *.google.com to your trusted domains via the Internet Explorer config.
TMS IntraWeb WebGMapsTTIWWebGMaps authentication
It is recommended to use an API Key to authenticate your application with the Google Maps JavaScript API service. Retrieving an API Key is free and can be obtained at the Google Developers Console. Instructions can be found on this page: https://developers.google.com/maps/documentation/javascript/get-api-key
Make sure to enable the following APIs in Google’s Console:
- Google Maps JavaScript API
- Google Maps Directions API
- Google Maps Geocoding API
- Google Maps Geolocation API
The API Key should be assigned to the APIKey property, one time before the map is loaded, in the Form’s OnCreate event of an application.
Example:
procedure TIWForm1.IWAppFormCreate(Sender: TObject);
begin
  TIWWebGMaps1.APIKey := ''myAPIKey'';
end;
TMS FMX WebGMapsTTMSFMXWebGMaps authentication
It is recommended to use an API Key to authenticate your application with the Google Maps JavaScript API service. Retrieving an API Key is free and can be obtained at the Google Developers Console. Instructions can be found on this page: https://developers.google.com/maps/documentation/javascript/get-api-key
Make sure to enable the following APIs in Google’s Console:
- Google Maps JavaScript API
- Google Maps Directions API
- Google Maps Geocoding API
- Google Maps Geolocation API
- Google Maps Elevation API
The API Key should be assigned to the APIKey property, one time before the map is loaded, in the Form’s OnCreate event of an application.
Example:
procedure TForm1.FormCreate(Sender: TObject);
begin
  TMSFMXWebGMaps1.APIKey := ''myAPIKey'';
end;
When using the TTMSFMXWebGMapsGeocoding and/or TTMSFMXWebGMapsReverseGeocoding controls the API Key should be assigned the respective APIKey properties as well.
Example:
procedure TForm1.FormCreate(Sender: TObject);
begin
  TMSFMXWebGMapsGeocoding1.APIKey := ''myAPIKey'';
  TMSFMXWebGMapsReverseGeocoding1.APIKey := ''myAPIKey'';
end;
TMS VCL WebGMapsTWebGMaps authentication
It is recommended to use an API Key to authenticate your application with the Google Maps JavaScript API service. Retrieving an API Key is free and can be obtained at the Google Developers Console. Instructions can be found on this page: https://developers.google.com/maps/documentation/javascript/get-api-key
Make sure to enable the following APIs in Google’s Console:
- Google Maps JavaScript API
- Google Maps Directions API
- Google Maps Geocoding API
- Google Maps Geolocation API
- Google Maps Elevation API
The API Key should be assigned to the APIKey property, one time before the map is loaded, in the Form’s OnCreate event of an application.
Example:
procedure TForm1.FormCreate(Sender: TObject);
begin
  WebGMaps1.APIKey := 'myAPIKey';
end;
When using the TWebGMapsGeocoding and/or TWebGMapsReverseGeocoding controls the API Key should be assigned the respective APIKey properties as well.
Example:
procedure TForm1.FormCreate(Sender: TObject);
begin
  WebGMapsGeocoding1.APIKey := 'myAPIKey';
  WebGMapsReverseGeocoding1.APIKey := 'myAPIKey';
end;
TAdvResponsiveListCreating your own responsive list item class
Descend from TAdvResponsiveList and override the function GetItemClass:
  TAdvResponsiveListEx = class(TAdvResponsiveList)
  protected
    function GetItemClass: TCollectionItemClass; override;
end;TResponsiveListItemEx = class(TResponsiveListItem) // add any property / functionality / extension you want to the TResponsiveListItem end;
function TAdvResponsiveListEx.GetItemClass: TCollectionItemClass;
begin
  Result := TResponsiveListItemEx;
end;
How to use TVrBanner
TVrBanner can auto-scroll a bitmap at runtime. Load the bitmap you want to scroll via VrBranner.Bitmap and set the direction VrBanner.Direction. The speed of scrolling is determined by VrBanner.TimeInterval
TMS MQTTSending and receiving images with TMS MQTT
The following code shows you how to send a selected image to a specific topic on the broker:
procedure TMQTTExampleForm.SetProfilePictureButtonClick(Sender: TObject);
var
  fs: TFileStream;
  payload: TBytes;
begin
  SelectProfileImageDialog.Filter := ''JPG images|*.jpg'';
  if (SelectProfileImageDialog.Execute) then
  begin
    fs := TFileStream.Create(SelectProfileImageDialog.FileName, fmOpenRead);
    try
      SetLength(payload, fs.Size);
      fs.Read(payload[0], fs.Size);
      MQTTClient.Publish(''myapp/profile/image'', payload);
    finally
      fs.Free;
    end;
  end;
end;
procedure TMQTTExampleForm.PublishReceived(ASender: TObject; APacketID: Word; ATopic: string; APayload: TBytes);
var
  fs: TBytesStream;
begin
  if (ATopic = ''myapp/profile/image'') then
  begin
    fs := TBytesStream.Create(APayload);
    try
      fs.SaveToFile(''c:\temp\mqtt\profile-image.jpg'');
    finally
      fs.Free;
    end;
  end;
end;
TMS FNC UI PackProgrammatically changing the scroll position in the TTMSFNCPlanner
You can programmatically change the vertical scroll position with:
TMSFNCPlanner1.VerticalScrollBar.Position := scrollpos
TMSFNCPlanner1.HorizontalScrollBar.Position := scrollpos;
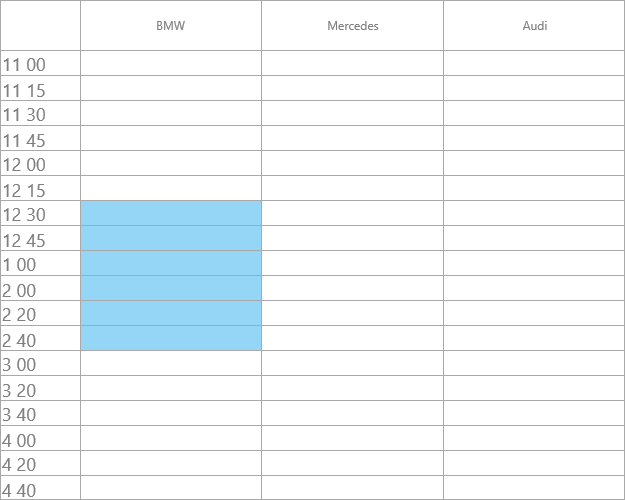
TMS FNC UI PackHow to configure TTMSFNCPlanner with a custom time line
There are 2 ways you can achieve this. You can add a disabled range of dates that cannot be selected, but they will be visible. You can achieve this by implementing the OnIsDateTimeDisabled event.
The second way is to use the pmCustom planner mode that can be used in combination with CustomDateTimes list as demonstrated in the following sample.
TMSFNCPlanner1.BeginUpdate;

TMSFNCPlanner1.Mode := pmCustom;
for I := 0 to 8 do
  TMSFNCPlanner1.CustomDateTimes.Add(IncMinute(EncodeDateTime(2017, 2, 22, 11, 0, 0, 0), 15 * I));

for I := 0 to 9 do
  TMSFNCPlanner1.CustomDateTimes.Add(IncMinute(EncodeDateTime(2017, 2, 22, 14, 0, 0, 0), 20 * I));

TMSFNCPlanner1.TimeLine.DisplayUnitFormat := ''h mm AMPM'';

TMSFNCPlanner1.TimeLineAppearance.LeftSize := 80;

TMSFNCPlanner1.EndUpdate;
 TMS FMX WebGMaps
Automatically zoom the map to display all markers.
Example:
WebGMaps1.MapZoomTo(WebGMaps1.Markers.Bounds);
TMS VCL WebGMapsAutomatically zoom the map to display all markers
Example:
WebGMaps1.MapZoomTo(WebGMaps1.Markers.Bounds);
TMS FMX Cloud PackHow to set the language for a synthesized text with TMSFMXCloudBingSpeech
Use the VoiceFont parameter of the Synthesize call to change the language of the resulting audio. Besides English there are several other languages available, including German, French and Spanish. You can also choose to use a Female or Male voice.
Example:
MSBingSpeech1.Synthesize(Text, Stream, bvGermanDEFemale);
TMS VCL Cloud PackHow to set the language for a synthesized text with TAdvMSBingSpeech
Use the VoiceFont parameter of the Synthesize call to change the language of the resulting audio. Besides English there are several other languages available, including German, French and Spanish. You can also choose to use a Female or Male voice.
Example:
MSBingSpeech1.Synthesize(Text, Stream, bvGermanDEFemale);
Persist COM port settings of TMS Async in an INI file
Setup the location for the INI file:
VaComm.SettingsStore.Key := ''.\mycomsettings.ini'';
VaComm.SettingsStore.Sections := ''COMPARAMS'';
VaComm.SettingsStore.Location := slINIFile;
Do actual save & load of the settings with:
VaComm.SaveSettings;
VaComm.LoadSettings;
TAdvOfficePagerDraw attention to a tab in TAdvOfficePager to make it blink
To do this, make sure the tab is visible when it is not selected by setting AdvOfficePager1.ShowNonSelectedTabs = true and then set custom tab appearance colors for normal & selected state of the tab with:
   // make sure the default style color is used
  AdvOfficePager12.UseTabAppearance := false;
   // initialization of colors
  AdvOfficePager12.TabAppearance.Color := clRed;
  AdvOfficePager12.TabAppearance.ColorTo := clRed;
  AdvOfficePager12.TabAppearance.ColorMirror := clRed;
  AdvOfficePager12.TabAppearance.ColorMirrorTo := clRed;

  AdvOfficePager12.TabAppearance.ColorSelected := clRed;
  AdvOfficePager12.TabAppearance.ColorSelectedTo := clRed;
  AdvOfficePager12.TabAppearance.ColorMirrorSelected := clRed;
  AdvOfficePager12.TabAppearance.ColorMirrorSelectedTo := clRed;
To draw attention to the tab, now let the tab switch between the default style color and the custom color via a timer:
procedure TForm1.Timer1Timer(Sender: TObject);
begin
  if DoAttention then
    AdvOfficePager12.UseTabAppearance := not AdvOfficePager12.UseTabAppearance
 else
     AdvOfficePager12.UseTabAppearance := false;
end;