Frequently Asked Component Specific Questions
Options |
|
Display all FAQ items |
Displaying items 181 to 195 of 888, page 13 of 60
<< previous next >>

 TPlanner
SelectPosRestricted property
When you want to control that when a user starts a selection within a position (resource) in the Planner, the select-drag will be restricted to the position where the select-drag started, a new property is available:
Planner.SelectPosRestricted: boolean;
Set this to true and even when columns or rows for resources are small and sometimes difficult to keep the mouse in the same resource during long select-drag operations, the selection will remain within the originally selected resource.
TAdvStringGridDealing with floating point number precision in TAdvStringGrid
When wanting to keep floating point numbers with high precision in the grid but display with less precision, the OnGetFloatFormat event can be used. In this code snippet, the grid cell value is set with a floating point number with 8 digits but is displayed with only 3 digits precision. Internally, we can keep calculating with values with 8 digits.
Sample:
// Set float value with full precision
begin
  advstringgrid1.FloatFormat := ''%g'';
  advstringgrid1.Floats[1,1] := 1.23456789;
  advstringgrid1.Floats[1,2] := 9.87654321;
end;

// ensure floating point number is only displayed with 3 digits
procedure TForm4.AdvStringGrid1GetFloatFormat(Sender: TObject; ACol,
  ARow: Integer; var IsFloat: Boolean; var FloatFormat: string);
begin
  FloatFormat := ''%.3f'';
end;

// do calculation at full precision
begin
  advstringgrid1.Floats[1,3] := advstringgrid1.Floats[1,1] + advstringgrid1.Floats[1,2];
end;
1.235
9.877
but the displayed result is
11.111
as the sum calculated is based on full precision.
TMS VCL Cloud PackPutting data in the cloud with myCloudData.net and component TAdvmyCloudData
If we’d want to persist application settings information in the cloud on http://myCloudData.net, this is very simple to do in Delphi.
After connecting with TAdvmyCloudData, we can test for the presence of the table that holds the data to persist, create table & metadata when it doesn’t exist and persist the data.
Code:
var
  table: TmyCloudDataTable;
  entity: TmyCloudDataEntity;
  doins: boolean;

begin
  table := AdvMyCloudData1.TableByName(''APPDATA'');

  // create table with metadata on the fly if it doesn’t exist for the myCloudData.net account
  if not Assigned(table) then
  begin
    table := AdvMyCloudData1.CreateTable(''APPDATA'');
    table.MetaData.Add(''WINWIDTH'', ftInteger);
    table.MetaData.Add(‘WINHEIGHT’,ftInteger);
    table.MetaData.Add(''WINLEFT'', ftInteger);
    table.MetaData.Add(''WINTOP'', ftInteger);
    table.MetaData.Add(''USERNAME'', ftString,50);
  end;

  // check for existing entity holding the data
  table.Query;
  doins := table.Entities.Count = 0;
  if doins then
    entity := table.Entities.Add
  else
    entity := table.Entities[0];

  // setting data to persist in the entity
  entity.Value[‘WINWIDTH’] := form.Width;
  entity.Value[‘WINHEIGHT’] := form.Height;
  entity.Value[‘WINLEFT’] := form.Left;
  entity.Value[‘WINTOP’] := form.Top;
  entity.Value[‘USERNAME’] := GetWindowsUser();
  // inserting or updating entity
  if doins then
    entity.Insert
  else
    entity.Update;
end;
TMS FMX UI PackTTMSFMXGrid: changing fixed cell font color
To change the text color of fixed cells in the grid, following code can be used:
procedure TForm1.TMSFMXGrid1GetCellLayout(Sender: TObject; ACol,
  ARow: Integer; ALayout: TTMSFMXGridCellLayout; ACellState: TCellState);
begin
   if (ARow = 0) then
      ALayout.FontFill.Color := claOrange;
end;
After installing a new version of the TMS Async and running my application, I get an error similar to : [Dcc32 Fatal Error] VaClasses.pas (25): F2613 Unit 'Graphics' not found.
Make sure that in your project, unit scope names are set to:
Winapi;System.Win;Data.Win;Datasnap.Win;Web.Win;Soap.Win;Xml.Win;Bde;System;Xml;Data;Datasnap;Web;Soap;Vcl;Vcl.Imaging;Vcl.Touch;Vcl.Samples;Vcl.Shell
TMS VCL ChartExporting to PDF
To print the chart to a PDF, you can use following code:
  with printer do
  begin
    BeginDoc;
    AdvChartView2.PrintAllPanes(Printer.Canvas,Rect(0, 0, printer.PageWidth, printer.PageHeight));
    EndDoc;
end;TAdvStringGridRemove the context menu at right mouse click
When the inplace editor is active in the TAdvStringGrid, a menu appears when you right click the mouse. This is the default Windows context menu for an edit control. You also see this when dropping a standard VCL TEdit on the form. If you want to remove this, drop a new (empty) TPopupMenu on the form and use the event handler:
procedure TForm4.AdvStringGrid1GetEditorProp(Sender: TObject; ACol,
  ARow: Integer; AEditLink: TEditLink);
begin
  advstringgrid1.NormalEdit.PopupMenu := PopupMenu1;
end;
 TAdvStringGrid
Raw sort compare with virtual grid
TAdvStringGridHow to customize colors in the dropdown color cube
You can customize the colors of each cell in the color cube selection of TAdvColorPickerDropDown by implementing the OnDropDown event and in this event handler write the code:
procedure TForm4.AdvColorPickerDropDown1DropDown(Sender: TObject;
  var acceptdrop: Boolean);
begin
  AdvColorPickerDropDown1.CubePanel.CubeCellColor[0] := clred;
  AdvColorPickerDropDown1.CubePanel.CubeCellColor[1] := clgreen;
  AdvColorPickerDropDown1.CubePanel.CubeCellColor[2] := clblue;
  AdvColorPickerDropDown1.CubePanel.CubeCellColor[3] := clblack;
end;
 TPlanner
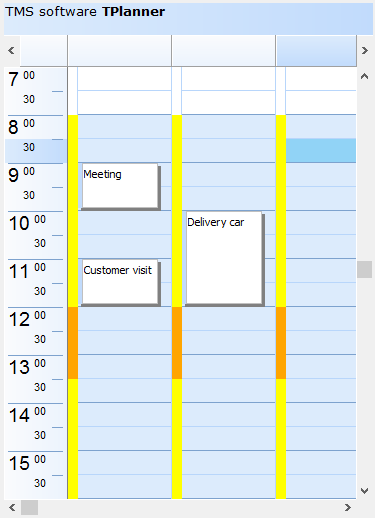
Position gap area colors
With the new OnPositionGapProp() event in T(DB)Planner, it is now possible to color code particular things in the position gap area. The position gap is enabled with setting Planner.PositionGap to a value different from zero. When this is enabled, the event OnPositionGapProp is triggered and via ABrush & APen properties, the position gap area color can be dynamically changed.
Sample code:
var
    workhourstart: TDateTime;
    workhourend: TDateTime;
    lunchhourstart: TDateTime;
    lunchhourend: TDateTime;

procedure TForm4.FormCreate(Sender: TObject);
begin
  Planner1.PositionGap := 10;

  workhourstart := EncodeTime(8,0,0,0);
  workhourend := EncodeTime(17,0,0,0);
  lunchhourstart := EncodeTime(12,0,0,0);
  lunchhourend := EncodeTime(13,0,0,0);
end;

procedure TForm4.Planner1PositionGapProp(Sender: TObject; Position,
  Index: Integer; ABrush: TBrush; APen: TPen);
var
  dt: TDateTime;
begin
  dt := Frac(Planner1.CellToTime(Position, Index));

  if (dt >= workhourstart) and (dt <= workhourend) then
  begin
    ABrush.Color := clYellow;
    APen.Color := clYellow;
  end;


  if (dt >= lunchhourstart) and (dt <= lunchhourend) then
  begin
    ABrush.Color := clWebOrange;
    APen.Color := clWebOrange;
  end;

end;
 TDBPlanner
Position gap area colors
With the new OnPositionGapProp() event in T(DB)Planner, it is now possible to color code particular things in the position gap area. The position gap is enabled with setting Planner.PositionGap to a value different from zero. When this is enabled, the event OnPositionGapProp is triggered and via ABrush & APen properties, the position gap area color can be dynamically changed.
Sample code:
var
    workhourstart: TDateTime;
    workhourend: TDateTime;
    lunchhourstart: TDateTime;
    lunchhourend: TDateTime;

procedure TForm4.FormCreate(Sender: TObject);
begin
  Planner1.PositionGap := 10;

  workhourstart := EncodeTime(8,0,0,0);
  workhourend := EncodeTime(17,0,0,0);
  lunchhourstart := EncodeTime(12,0,0,0);
  lunchhourend := EncodeTime(13,0,0,0);
end;

procedure TForm4.Planner1PositionGapProp(Sender: TObject; Position,
  Index: Integer; ABrush: TBrush; APen: TPen);
var
  dt: TDateTime;
begin
  dt := Frac(Planner1.CellToTime(Position, Index));

  if (dt >= workhourstart) and (dt <= workhourend) then
  begin
    ABrush.Color := clYellow;
    APen.Color := clYellow;
  end;


  if (dt >= lunchhourstart) and (dt <= lunchhourend) then
  begin
    ABrush.Color := clWebOrange;
    APen.Color := clWebOrange;
  end;

end;
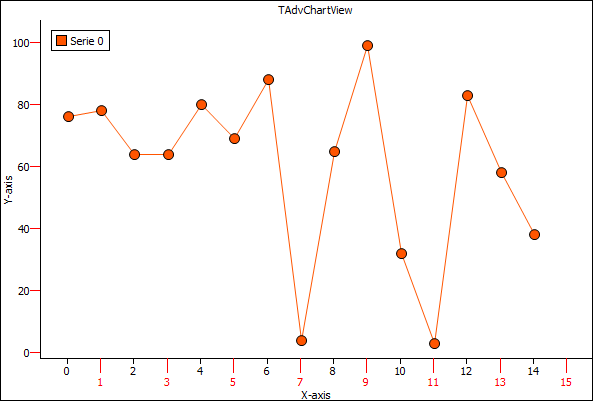
TMS VCL ChartCustom x-axis value drawing
The distance between X-Axis values is determined by the X-Scale, which is calculated based on the RangeFrom and RangeTo properties on pane level. Additionally, the X-Axis can display major units and minor units with their own font size. Below is a sample that demonstrates this:
procedure TForm127.DrawXAxisValue(Sender: TObject; Serie: TChartSerie; Canvas: TCanvas; ARect: TRect; ValueIndex, XMarker: integer; Top: Boolean; var defaultdraw: Boolean);
var
  s: string;
  tw: Integer;
begin
  if Odd(ValueIndex) then
  begin
    DefaultDraw := False;
    s := IntToStr(ValueIndex);
    tw := Canvas.TextWidth(s);
    Canvas.Pen.Color := clRed;
    Canvas.MoveTo(XMarker, ARect.Top);
    Canvas.LineTo(XMarker, ARect.Top + 15);
    Canvas.Font.Color := clRed;
    Canvas.TextOut(XMarker - tw div 2, ARect.Top + 17, s);
  end;
end;

procedure TForm127.FormCreate(Sender: TObject);
var
  I: Integer;
begin
  AdvGDIPChartView1.BeginUpdate;
  AdvGDIPChartView1.InitSample;
  AdvGDIPChartView1.Panes[0].Range.RangeTo := 15;
  AdvGDIPChartView1.Panes[0].XAxis.AutoSize := True;
  AdvGDIPChartView1.Panes[0].Series[2].Free;
  AdvGDIPChartView1.Panes[0].Series[1].Free;
  AdvGDIPChartView1.Panes[0].Series[0].ClearPoints;
  AdvGDIPChartView1.Panes[0].Series[0].AutoRange := arEnabled;
  AdvGDIPChartView1.Panes[0].Series[0].XAxis.AutoUnits := False;
  AdvGDIPChartView1.Panes[0].Series[0].XAxis.MajorUnit := 2;
  AdvGDIPChartView1.Panes[0].Series[0].XAxis.MinorUnit := 1;
  AdvGDIPChartView1.Panes[0].Series[0].OnXAxisDrawValue := DrawXAxisValue;

  for I := 0 to 14 do
    AdvGDIPChartView1.Panes[0].Series[0].AddSinglePoint(Random(100));

  AdvGDIPChartView1.EndUpdate;
end;
 TAdvRichEditor
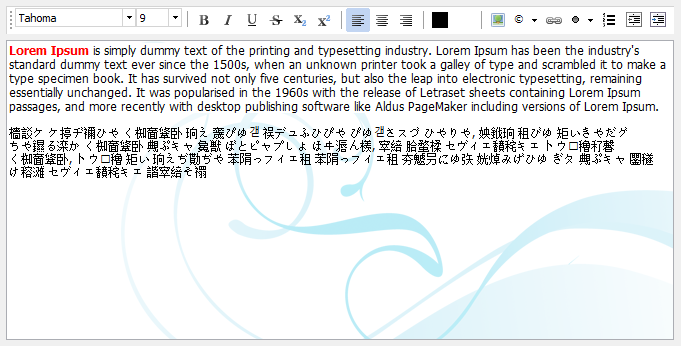
How to use a watermark
It is easy to use a watermark for TAdvRichEditor. To do this, simply implement the OnDrawBackground event and in this event, you can use the canvas to draw whatever watermark you may want for the TAdvRichEditor.
Example:
var
    png: TPNGImage;

procedure TForm4.FormCreate(Sender: TObject);
begin
  png := TPNGImage.Create;
  png.LoadFromFile(''e:\tms\temp\watermark-news.png'');
end;

procedure TForm4.FormClose(Sender: TObject; var Action: TCloseAction);
begin
  png.Free;
end;

procedure TForm4.AdvRichEditor1DrawBackground(Sender: TObject; ACanvas: TCanvas;
  ARect: TRect);
begin
  ACanvas.Draw(0,0,png);
end;
 TAdvOfficeTabSet
How to set the first left displayed tab
When there are a lot of tabs in TAdvOfficeTabSet, it is now possible to programmatically set the first left displayed tab so the user immediately sees the tab you want to focus instead of requiring a lengthy scroll operation. This is done via the new AdvOfficeTabSet.ScrollPosition property.
Example:
var
  i: integer;
begin
  AdvOfficeTabSet1.AdvOfficeTabs.Clear;
  // enable fast inserting of many tabs
  AdvOfficeTabSet1.BeginUpdate;

  for i := 0 to 50 do
  begin
    AdvOfficeTabSet1.AdvOfficeTabs.Add.Caption := ''Tab ''+ inttostr(i + 1);
  end;

  AdvOfficeTabSet1.EndUpdate;
  // first tab will be tab 25
  AdvOfficeTabSet1.ScrollPosition := 25;
end;
 TMS VCL Cloud Pack
Simplified code to have our cloud components connect to a cloud service
We have simplified the code that needs to be written to have our cloud components connect to a cloud service. Before it was needed to load persisted tokens, test the tokens, refresh tokens when needed or start a new authentication / authorization process. From now on, this is all simplified. When the cloud component application key & secret are set and the location where to persist tokens is specified, the code can be reduced to a call to Connect and handling the OnConnected event from where you can start calling the cloud service methods:
procedure TForm1.Button1Click(Sender: TObject);
begin
  AdvOneDrive1.Connect;
end;

procedure TForm1.AdvOneDrive1Connected(Sender: TObject);
begin
  Init;
end;