Blog
All Blog Posts | Next Post | Previous Post

 Upgrading of the Delphi 6 Personal Finance software to Delphi 12 with the help of the TMS products
Thursday, February 1, 2024
Softacom is a certified consulting partner of TMS Software and an official consulting and training partner of Embarcadero. They are experts in migration and modernization software built using legacy languages and platforms or obsolete technologies, using modern programming languages, frameworks and databases.
Software version written in Delphi 6.
We have an application that deals with personal finance. In this app, we can record our expenses and can view statistics related to them. The application was developed using the Paradox database management system (DBMS) and standard Delphi components. No third-party libraries were used.
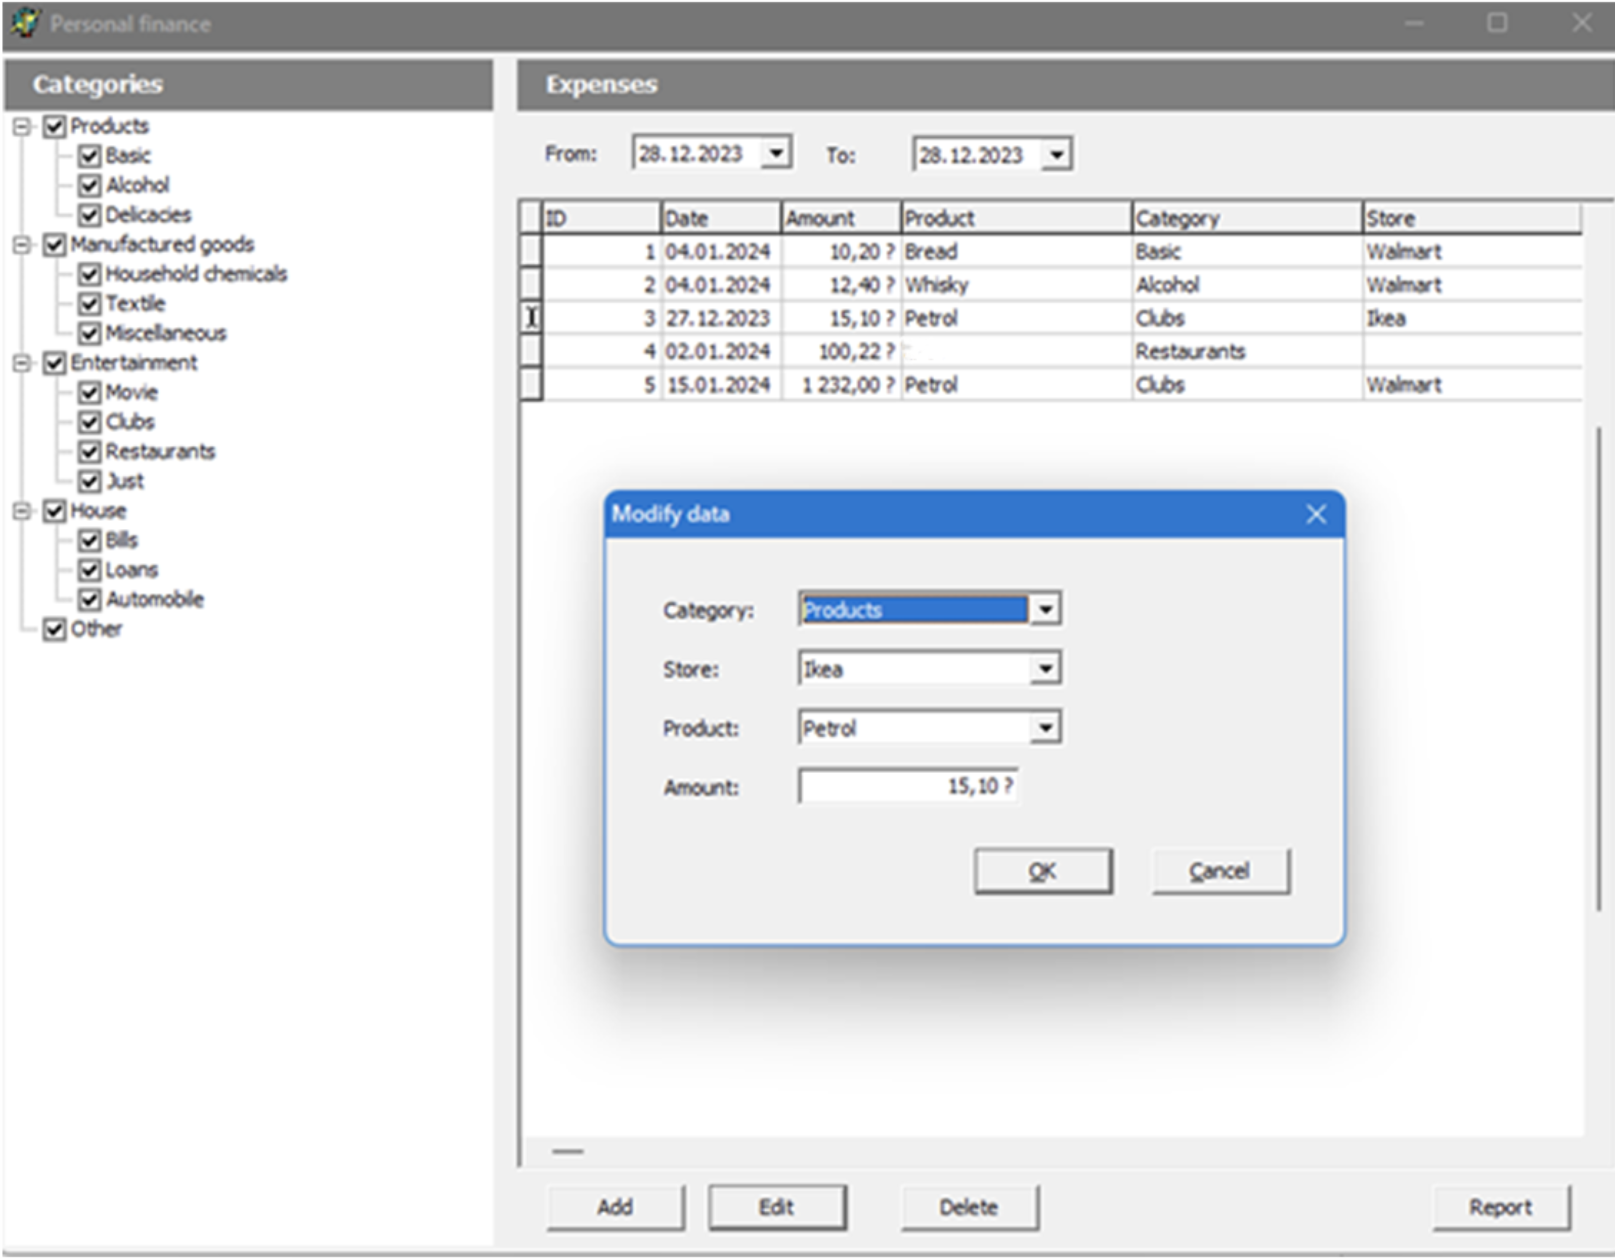
Interface of the Private Finance program, its version in Delphi 6
Let's analyze the program structure.
So, all the tables that the program works with are stored in the Data Module. First of all, the application checks whether its tables exist, and if necessary, creates them and fills them in with some initial data.
When the main form (MainForm) is being created, we should build a category tree with checkboxes and display data using the TDBGrid component. This data can be edited and supplemented. The Report button generates a report using QuickReport tools.
The editing form uses DB Lookup Comboboxes.
Do you remember the times when Delphi 6 was released? But the program is still in demand and it works perfectly. So, why should we spend time, invest money, and, in general, change anything?
- A user will get unicode capability.
- No matter how good our program is, we still have to change something, add something, and enhance something in it. And, of course, you want to do this in comfortable conditions. It's even weird to compare the modern Delphi IDE with Delphi 6. Tips, language tools, design tools - all this has achieved unbelievable heights over the last 25 years.
- A user will have the possibility to work in an up-to-date Delphi IDE, producing modern Windows executables, including a 64-bit version.
- A user can take advantage of modern UI paradigms such as ribbon (we have chosen a Ribbon bar and you can opt even for more appealing options).
- Now, you can’t say "I use BDE with Paradox" as it is not relevant anymore. So what does it mean? What do you have now? Azure, REST, fast-performance database access to modern database servers. And you do not even need to delve into this as you have TMS Aurelius!
The use of TMS Data Modeler
The first thing that should be done to update the project is the data structure revision. Unfortunately, our database for the app was created with Paradox and TMS Data Modeler doesn’t support this format. If your database is built on any of the SQL Server platforms (MS, Oracle, etc), the whole process will be less challenging for you.
And we will need to create our database schema from scratch.
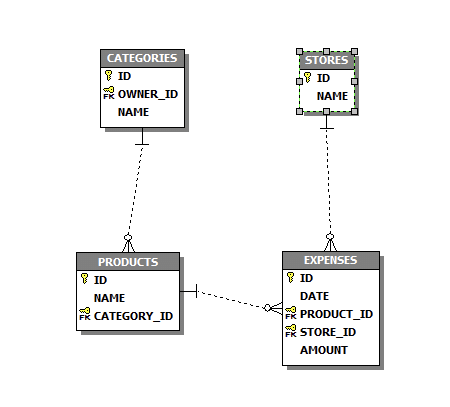
Data model schema
Now let's create a module for TMS Aurelius, Export -> TMS Aurelius.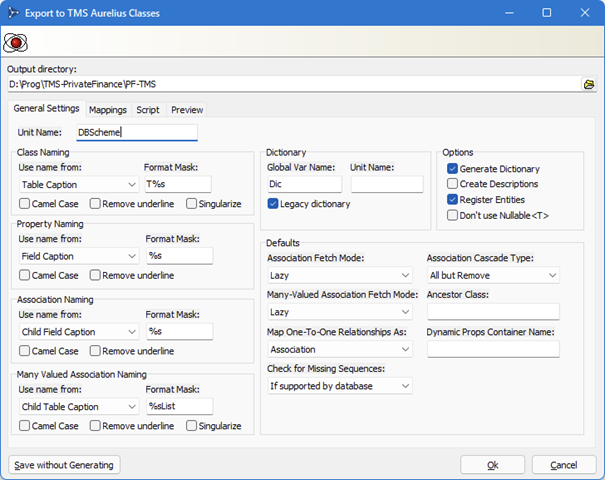
Screen for the data model export from TMS Data Modeler to TMS Aurelius.
You will get a code that will look something like this:
[Entity]
  [Table('CATEGORIES')]
  [Id('FId', TIdGenerator.IdentityOrSequence)]
  TCategory = class
  private
    [Column('ID', [TColumnProp.Required, TColumnProp.NoInsert, TColumnProp.NoUpdate])]
    FId: Integer;

    [Column('NAME', [TColumnProp.Required], 50)]
    FName: string;

    [Association([TAssociationProp.Lazy, TAssociationProp.Required], CascadeTypeAll - [TCascadeType.Remove])]
    [JoinColumn('OWNER_ID', [], 'ID')]
    FOwnerId: Proxy<TCategory>;
    function GetOwnerId: TCategory;
    procedure SetOwnerId(const Value: TCategory);
  public
    property Id: Integer read FId write FId;
    property Name: string read FName write FName;
    property OwnerId: TCategory read GetOwnerId write SetOwnerId;
  end;
It means that each table will be represented by a separate class. And the most wonderful thing is that we don't have to think about how this data will be saved, read, and interact. Aurelius will take all the information from the database schema and will take care of its support.
In our example, we are using SQLite. But the transition to multi-user platforms can be ensured just by means of replacing the name of the module responsible for database connection. Thus, with a wave of a hand, you will get an application that works with MS SQL, Oracle, Interbase, or something else. Don't hesitate - give it a try!
New application
Now we can begin our new project on the latest version of Delphi (our example will work starting from Delphi 11).
As every theater begins with a hanger, the project starts with the Data Module (but we already have a module with a data schema).
We can transfer the module from the Delphi 6 version, but of course, we need to get rid of all DB components in it. However, the database initialization procedures in it are good, so we'll keep them for now.
Let's refactor DataModuleCreate.
If in the Delphi 6 version, we had to search for the Documents folder via WinAPI, now it's just a simple call:
FDBPath := IncludeTrailingPathDelimiter(TPath.Combine(TPath.GetDocumentsPath, 'PersonalFinance'));
Well, the database initialization has become simple and straightforward:
   var bInit := not TFile.Exists(FDBPath);
  FConnection := TSQLiteNativeConnectionAdapter.Create(FDBPath);
  TDatabaseManager.Update(FConnection);
  FManager := TObjectManager.Create(FConnection);
  if bInit then
  begin
    FillCategories;
    FillStores;
    FillProducts;
    FillExpenses;
  end;
If the database file doesn’t exist yet, we will need to fill in the new database with data. Otherwise, we will need just to open the database. It is very convenient that Aurelius will create the database for us based on the description in DBScheme. And if we change something there, it will update the database.
Data creation procedures have also become simpler. Instead of direct interaction with tables, we will communicate with objects:
procedure TDM.FillStores;
const
  cStores: array[0..1] of string = ('Walmart', 'Ikea');
begin
  for var i := Low(cStores) to High(cStores) do
  begin
    var Store := TStore.Create;
    try
      Store.Name := cStores[i];
      FManager.Save(Store);
    except
      if not FManager.IsAttached(Store) then
        Store.Free;
      raise;
    end;
  end;
end;
It is convenient to have objects for working with data. But do we really need to abandon Delphi tools for working with DB Components? Let's place the TAureliusDataset component on our form, which will provide us with standardized TDataSet access to our data objects, including Lookup fields. But all this will be available in an object-oriented manner. For example, to see the name of the expense category (which is stored in the product, which, in turn, is stored in the expense record), we will simply specify the field name as ProductId.CategoryId.Name.
And with this set, it completely copies our old table display:
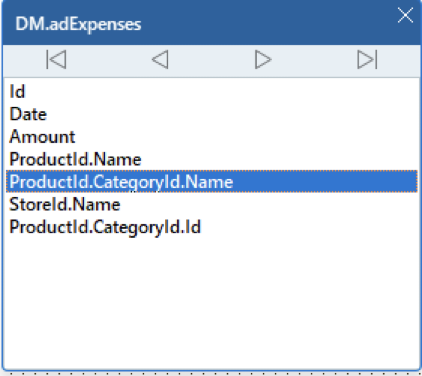
Fields of the adExpenses dataset
Now let's move on to the main form. Ribbon. File -> New -> TMS Ribbon Form
And let’s add the necessary buttons there, place TMS FNC TreeView & TMS FNC Grid
Unfortunately, we won't be able to transfer the old form to FMX by replacing control types and some fields. There are too many differences. Even the Caption property of TLabel is now called Text. Sizes are gathered under the Size property, and positions under the Position property. But challenges only make a warrior stronger, especially since the new controls from TMS provide us with many more options for customizing the appearance and displaying data in comparison to standard VCL controls.
Actually, we will simply copy the tree content from the old application, by replacing work with tables with objects and using TDictionary to store information about nodes.
We will also store the state of the selected categories in the Data Module, by replacing TBucketList with TDictionary.
In essence, the main form is ready and functional. And the process of its creation didn’t require a lot of effort, mainly because we decided to use TMS controls.
The work with our editing form is even simpler. Here, we will use the relatively new functionality of Delphi – Live Bindings. It means we'll simply use arrows to indicate where our control (ComboBox) should get data from and where to save it. We'll trick the system, and add TAureliusDataset and TComboBox to work with the data.
Right-click -> Bind Visuality and let’s build a scheme roughly like this:
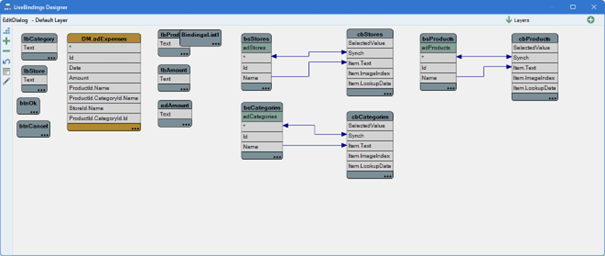
LiveBindings model for the EditDlg module
Pay attention to how we link the table to TComboBox. We do not choose the Id field to ensure the link with Item.LookupData but connect Synch with *. This means that when selecting an item in the ComboBox, our dataset will automatically be set to the chosen record. We need this to show only products from a specific category in the Product field:
procedure TEditDialog.cbCategoriesChange(Sender: TObject);
begin
  LinkProducts.Active := False;
  try
    adProducts.Close;
    adProducts.SetSourceCriteria(Dm.Manager.Find(TProduct)
      .Where(
        Linq['CategoryId'] = adCategories.Current<TCategory>.Id
      )
    );
    adProducts.Open;
  finally
    LinkProducts.Active := True;
  end;
end;
adCategories is synchronized with the category selection control, and we will choose only suitable products for the adProducts dataset.
And now let's add reports.
We will use the built-in capabilities of the TMS FNC Grid.
We need to initiate a call:
Grid.SaveToHTML(FileName);
Now let’s export our table to PDF as well.
We should place the TTMSFNCGridPDFIO component on the form. Let’s make sure that, being clever, it has already found our Grid and is linked to it. Then it’s time for a new call:
PDFIO.Save(FileName);
Now we can export it to Excel and to the printer.
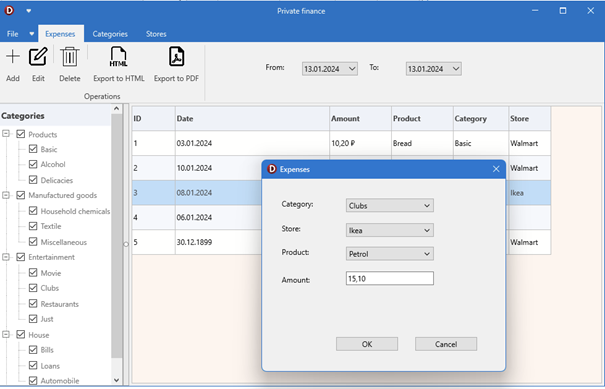
Interface of the Private Finance program, its version in Delphi 12 (TMS FNC Controls)
Ribbon is a very convenient way to present toolbars when you need to put a large number of control elements there. On the Categories & Stores pages, we have placed control buttons that correspond to the respective dictionaries. Perhaps for such a small application, the use of the Ribbon bar may seem excessive. However, we believe that this application is just a beginning of a large and successful journey for the personal finance management product. It's all in your hands.
Conclusion
The migration of the functionality from the old, good, nostalgic app, which was possibly written even in the last century, to new technologies has been completed.
What do we have as a result?
- You can work in an up-to-date Delphi IDE, producing modern Windows executables, including a 64-bit version.
- You can leverage unicode capability.
- You got cross-platform capability.
- You can take advantage of modern UI paradigms such as ribbon.
- You can benefit from robust, fast-performance database access to modern database servers.
Did you know that simply by changing the platform in the Project Manager:
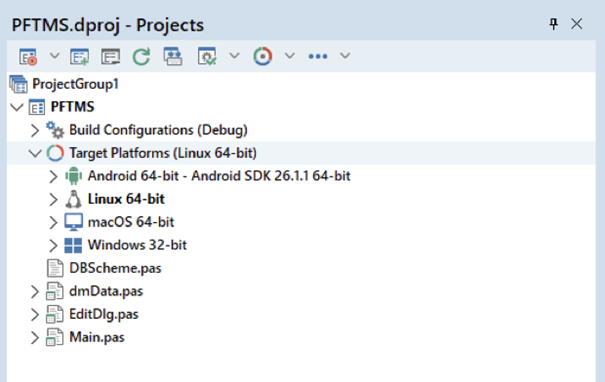
Delphi 12 Project Manager with the list of Target Platforms
You can add to your list of friends users of Mac, Linux, and even those people who prefer the small screens of their smartphones to a high-quality monitor?
However, to offer an app that will be comfortable for the users from the latter category, we need to do a little bit more work and make the category tree collapsible. Do you want us to write about this (and other nuances of transferring a desktop application to mobile platforms) in a new article? We look forward to your feedback.
Aaron Decramer

This blog post has received 1 comment.
All Blog Posts | Next Post | Previous Post
Hindermann Thorsten