Blog
All Blog Posts | Next Post | Previous Post

 Extend TMS WEB Core with JS Libraries with Andrew:
HTMX
Tuesday, September 12, 2023

Over time, nearly every popular software framework will eventually spawn interlopers encroaching on its domain. Sometimes they are trying to get a bit of attention by providing an alternative solution, often inserting themselves
between the developer and the original framework, while still requiring that the original framework be kept in
place. A front, in effect, to an existing framework. This is likely to happen most often when the framework in
question is difficult or complex. Tools like Bootstrap
and Tailwind
are examples of this, trying to replace a good deal of the complexity of CSS by using an impressive array of
HTML classes. TMS
WEB Core is also a variation of this, in that we're using Delphi as a front for HTML, CSS, and JavaScript.
Often, while these tools offer a degree of efficiency, particularly for the new developer, they tend to work best when there is also a solid understanding of the underlying framework. Sometimes, in fact, the underlying framework evolves to make the interloper less and less useful. This is perhaps the case with jQuery, where Vanilla JavaScript now has enough features that the benefits of using jQuery are no longer quite so obvious.
Today, we're going to take a look at HTMX.
This is a relatively new tool, and its main claim to fame involves using HTML attributes to implement all
kinds of things. Where Tailwind is effectively a front for CSS, HTMX can be thought of as a front for
JavaScript. And while, like Tailwind, it doesn't replace the underlying framework, it makes it a good deal easier to use.
Motivation.
While working with TMS WEB Core, we've seen countless examples where we can use JavaScript directly in our projects. First by adding JavaScript libraries to our Project.html file and then, when needed, using asm...end blocks to add JavaScript code to interact with them. We don't need to have a great understanding of JavaScript, though it can certainly be helpful.
Often, though, the JavaScript that we might write is very simple in nature,
or perhaps if not simple, it is the kind of thing that is commonly used by many other developers. This is where
HTMX comes in, offering an alternative way to implement an array of features that normally require JavaScript,
mostly just by adding attributes to HTML elements.
One of the key areas that HTMX is focused on relates to accessing remote data. In HTML, normally, there are
only a handful of tags that have the capability of remotely accessing data. The anchor <a> tag, for
example, can fetch another page from the server. The image <img> tag can be supplied with a src attribute
that will retrieve an image from a remote source, much like the video <video> and audio <audio>
tags. HTMX offers an alternative approach, where this kind of remote capability (invoking GET or POST, for
example) can be added to almost any HTML tag.
Getting Started.
As with many of our other JavaScript library examples, we'll need to add the HTMX JavaScript library. As
usual, this is available via a CDN and can be added to our Project.html file directly or via the Manage
JavaScript Libraries feature of the Delphi IDE.
    <!-- HTMX via jsDelivr CDN -->
    <script src=" https://cdn.jsdelivr.net/npm/htmx.org@1.9.5/dist/htmx.min.js "></script>
There is no CSS file in this case, as HTMX is strictly focused on JavaScript. Bootstrap or Tailwind would still be useful for all the things that they are normally useful for. The sample project for this blog post was created using the TMS WEB Core Bootstrap Application template, and uses a handful of Bootstrap classes, as we shall soon see.
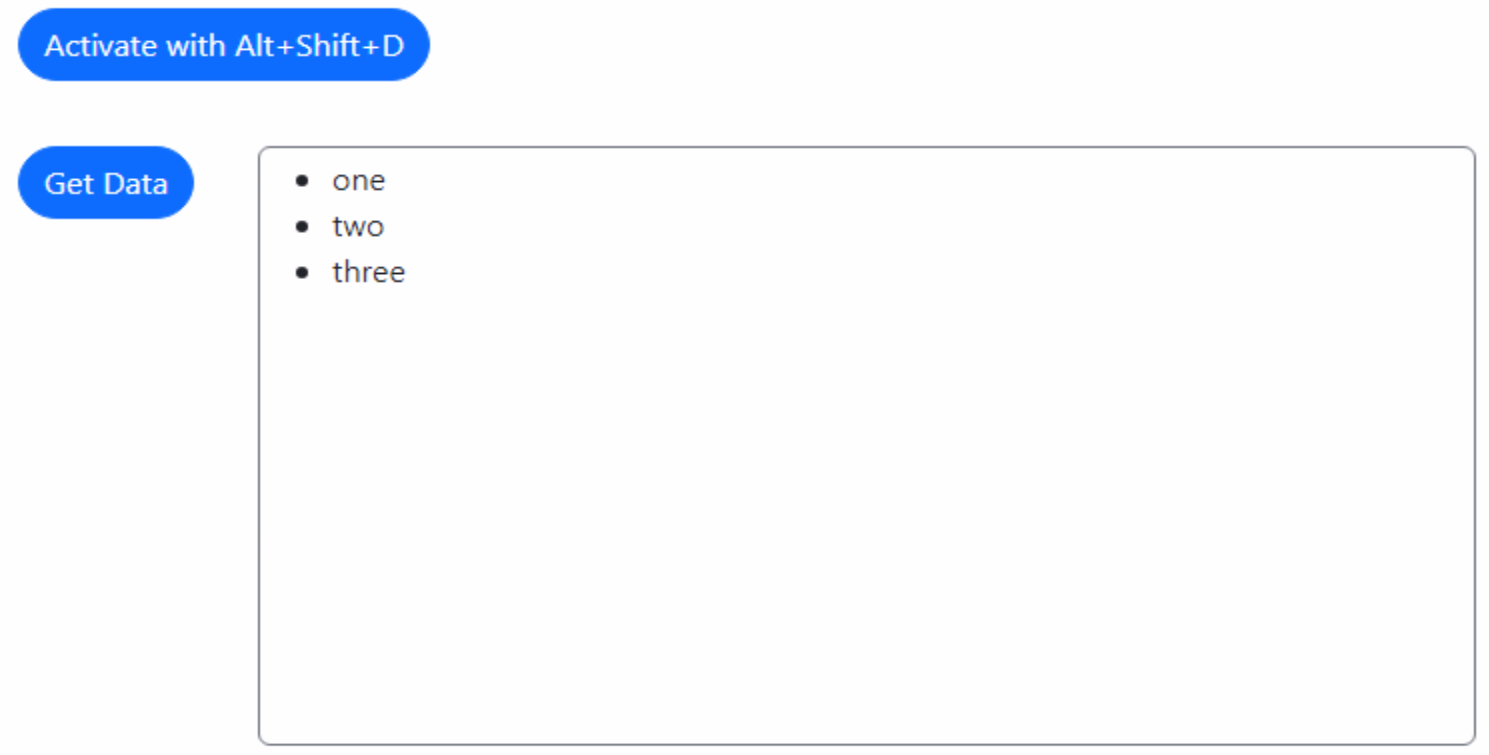
To test out HTMX, we can try something simple. One of the examples from the HTMX website involves creating keyboard shortcuts. In order to use HTMX, we'll need to add attributes to the HTML elements (tags). There are several ways we can do this in TMS WEB Core. One way to
set an HTML attribute programmatically is to use the setAttribute() method, which we can use with any of the web components, like TWebButton.
WebButton1.ElementHandle.setAttribute('attribute-name','attribute-value');Another way is to create a TWebHTMLDiv component, and then edit the HTML property to add another HTML element inside of it, and then assign whatever attributes are needed. Note that this will also create an extra <div> wrapper around whatever is contained within the HTML property. For our example, let's create a button that we can either click on or use a keyboard shortcut to activate. If we use the keyboard shortcut, the button will change from blue to red (Bootstrap's default btn-danger color). If we click on the button, it will change to yellow (Bootstrap's btn-warning color).
<button
  id="WebButton"
  class="btn btn-primary rounded-pill"
  hx-trigger="click, keyup[altKey&&shiftKey&&key=='D'] from:body"
  hx-on:click="WebButton.classList.replace('btn-primary','btn-warning');WebButton.classList.replace('btn-danger','btn-warning');"
  hx-on:keyup="WebButton.classList.replace('btn-primary','btn-danger');WebButton.classList.replace('btn-warning','btn-danger');"
>
Activate with Alt+Shift+D
</button>
We're still writing JavaScript in this example, making use of the JavaScript classList.replace() method to change the button color. But we don't have to write any JavaScript code using an asm...end block, nor do we have any Delphi code executing here - it is all handled by the HTML block above, contained entirely within the HTML property of the TWebHTMLDiv component.
One final note before moving on. As with many JavaScript libraries, there can be issues with the timing of when the library is loaded, and whether the DOM elements that the JavaScript library uses are available yet. This is especially true with TMS WEB Core, where elements may be created dynamically well after the page has finished loading.
Some
JavaScript libraries are equipped with sophisticated "Observer" support that will actively keep track of changes
to the elements on the page (the DOM) and take action whenever something of interest appears (or disappears). Other JavaScript libraries
just need a swift kick in the rear to get them to take notice. HTMX (currently) falls in the latter category, though that may very well change with subsequent releases.
To ensure that
the attributes assigned to the HTML elements we're dealing with are actually wired up and active, we can add the
following method call. Here, we're doing it in WebFormCreate, but we might call it again if we displayed a
different form or a popup that had HTMX-equipped HTML element attributes.
procedure TForm1.WebFormCreate(Sender: TObject);
begin
  asm htmx.process(document.body); end;
end;
For many projects, this may not be required at all, particularly if the HTMX attributes are added to an HTML template for example - they'll be available when the project loads, so this will be redundant. Fortunately, when it runs, it only updates those elements that it doesn't already know about, so no harm in running it again or even periodically.
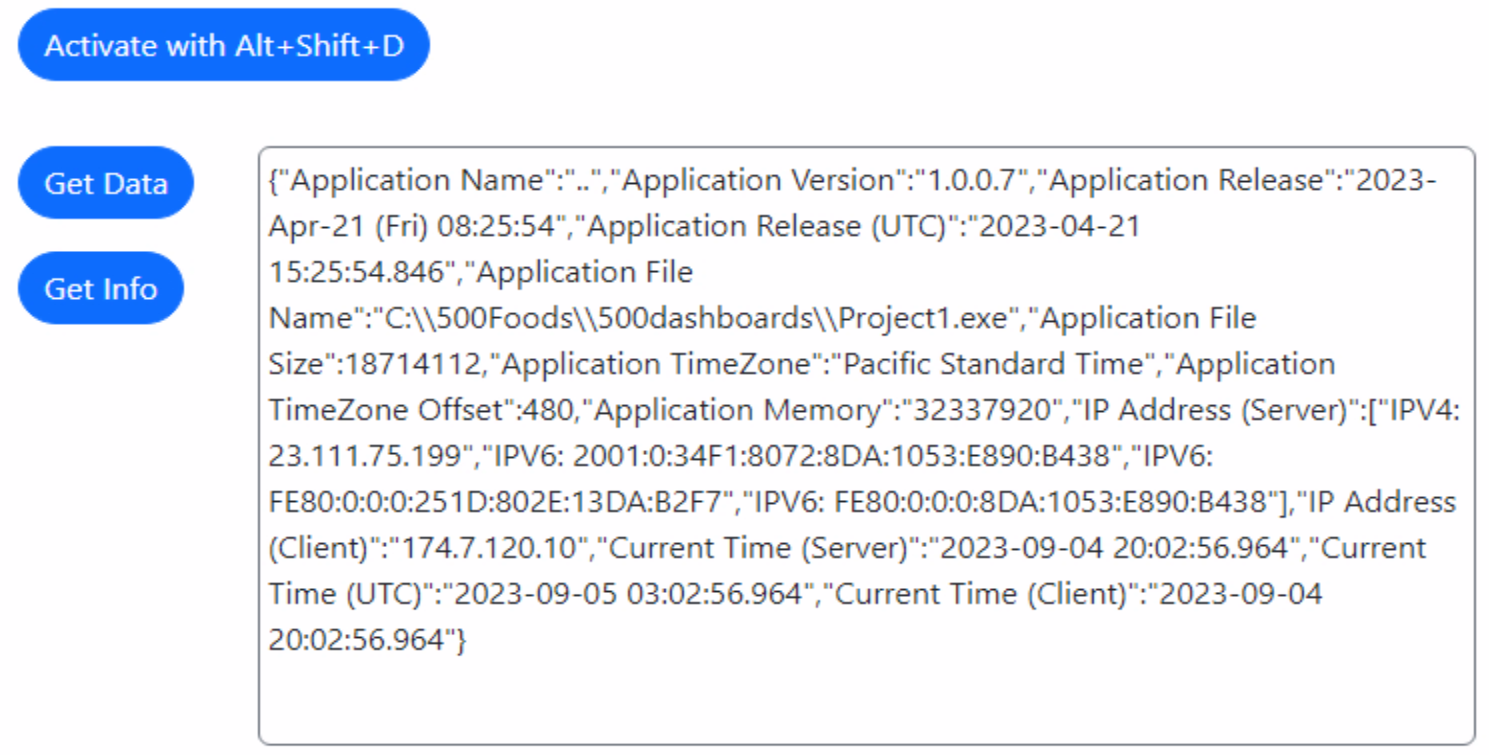
Remote Data.
The main appeal to HTMX is that it greatly simplifies accessing other data, typically via GET or POST. Whatever data is retrieved can then be added to the current page directly. We can do this already with TMS WEB Core in several different ways, such as using a TWebHTTPRequest component. Or we can use JavaScript's fetch() method as well, within an asm...end block. Lots of options.
Using HTMX, we can do something similar by supplying more
attributes. Let's create another button, and this time when the button is clicked, we'll replace the contents
of a separate TWebHTMLDiv component with something from a remote location. In this case, we'll just add an HTML snippet to
an extra file, "data.html", that we'll add to our project. When the button is clicked, that file is
retrieved and its contents are inserted into the second element, replacing whatever contents were there
previously.
<button
  id="WebButtonGetData"
  class="btn btn-primary rounded-pill"
  hx-get="data.html"
  hx-target="#DisplayData"
>
Get Data
</button>
The contents of data.html in this case should be an HTML snippet. Here we've just added a simple unordered list as an example.
Simple GET Result.
If we wanted to retrieve something a little more complex, we could instead make a call to a
TMS XData endpoint. In our Template Demo, for example, we've got an endpoint that is used to return information
about the XData server itself. In this case, it is just JSON being returned. We could create a component that
formatted JSON a little better, but for now, we can just see that the request is working as expected. Here's our
updated button, with just a different URL provided. Recall that we could set this attribute programmatically
just as easily as adding it to a TWebHTMLDiv component's HTML property.
<button
  id="WebButtonGetInfo"
  class="btn btn-primary rounded-pill"
  hx-get="https://carnival.500foods.com:12345/tms/xdata/SystemService/Info?TZ=America%2FVancouver"
  hx-target="#DisplayData"
>
Get Info
</button>
Now, instead of getting our unordered list, we get the JSON from the remote XData server, which again replaces the contents of the #DisplayData component.
Accessing Data from an XData REST API Endpoint.
An XData endpoint could return an HTML snippet just as easily as it could return a block of JSON, so plenty of
options here depending on what is needed.
HTMX also offers up all kinds of options for updating the current page with whatever is returned. An "hx-swap-oob" attribute, for example, refers to its "out of band" mechanism. This is an attribute that can be added to the top-level elements of the HTML snippet being returned (assuming we're returning an HTML snippet). It directs the contents of each element in the snippet to other elements on the page.
The idea here is that you can retrieve an HTML snippet with one GET request, and update multiple
elements independently, anywhere on your page, from that HTML snippet, rather than just one element. All with just a bit of HTML. For example, maybe you want to retrieve account information. The returned HTML could then update an account photo in one snippet of HTML, the account name in another, and so on, and then apply these to different elements on the original page, all with one request.
Uploader Example.
We recently took a look at several ways of interacting with a PHP uploader script that accepts images. One of the examples provided on the HTMX website involves uploading a file and showing a progress bar. To implement our interaction using HTMX, we can use the "form" approach, populating an HTML form with the FileName, FileData, and Key values that our uploader.php script is expecting.
To make it a bit fancier, we can implement a progress bar using a bit of JavaScript and some HTMX
helper functions. As we've done previously, this can all just be added to the HTML property of a TWebHTMLDiv
component. No extra code or settings are required anywhere else.
<form
  id="ImageUploadForm"
  class="text-center"
  hx-encoding='multipart/form-data'
  hx-post='https://www.example.com/uploader.php'
  hx-target="#Results"
>
  <input class="rounded p-1 m-1 w-100" type='text' name='Key' value="It's an older code, sir, but it checks out."><br>
  <input class="rounded p-1 m-1 w-100" type='text' name='FileName' value="newimagename.jpg"><br>
  <input class="btn btn-primary rounded p-1 m-1 w-100"  type='file' name='FileData' accept='image/*'><br>

  <button class="btn btn-primary m-1">Upload Image</button><br>

  <div class="rounded m-1 w-100 bg-light border border-secondary overflow-hidden" style="height:38px;">
    <div id="ProgressBar" class="h-100 bg-primary" style="width:0%;"></div>
  </div><br>

  <div id="Results" class='w-100 p-1 m-1 h-auto rounded border border-secondary'>Upload when ready</div>

</form>

<script>
  htmx.on('#ImageUploadForm', 'htmx:xhr:progress', function(evt) {
    htmx.find('#ProgressBar').style.setProperty('width', evt.detail.loaded/evt.detail.total * 100+'%')
    htmx.find('#Results').innerHTML= 'Upload in progress: '+(evt.detail.loaded/evt.detail.total * 100).toFixed(1)+'%';
  });
</script>
The JavaScript in this case is just embedded directly within the TWebHTMLDiv component, rather than adding an asm...end block to a Delphi method somewhere. All it is doing is handling progress events generated by the upload process, updating the progress bar (which is just a pair of <div> elements), and the output at the bottom. When the upload completes, the data coming back from our upload script is added to the output at the bottom as well, replacing whatever was there previously. Here's what it looks like.
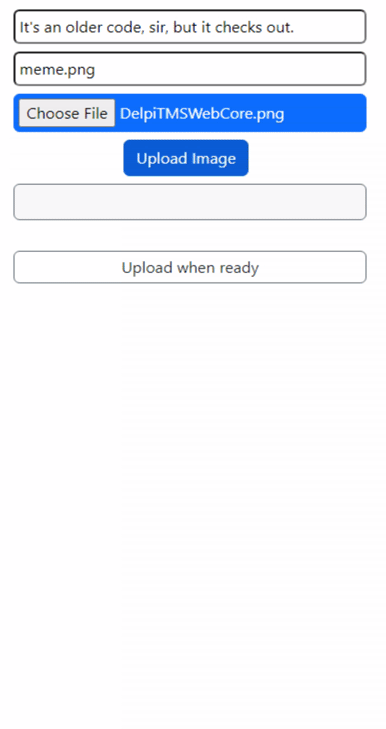
HTMX Uploader Example.
While we're again dipping our toe into the world of JavaScript, these are mostly one-liners that should not be
too difficult to follow or to use in your own projects. What we've avoided is anything related to the
considerably less friendly mechanisms used to handle the actual upload and processing of the returned data -
HTMX deals with this all on its own. We just give it the URL we want to connect with, and the element ID where
we want the output to go, and HTMX takes care of the rest.
To HTMX or not to HTMX?
The big question then is whether this might be something you would use in your own projects? If you need to add a quick one-off feature, like our PHP uploader example, this might be a good fit. Particularly if you're comfortable with HTML and CSS but not so much JavaScript. Or maybe you want to quickly add key bindings, or link to some other kind of dynamic content. HTMX makes light work of exactly these kinds of things.
TMS WEB
Core projects, generally, also make it easy to do these kinds of things without the addition of
another JavaScript library, and we've seen examples of most of these things previously. But it is always good to have
choices, particularly if they can save us a bit of time here and there. And there is a lot more to HTMX than
what we've covered here. As always, comments and questions are most welcome.
Follow Andrew on 𝕏 at @WebCoreAndMore or join our 𝕏 Web Core and More Community.
Andrew Simard

This blog post has received 4 comments.
 2. Wednesday, September 13, 2023 at 11:49:04 PM
You are most welcome. Working in the web environment generally means that there are a lot more projects to explore and a constantly evolving set of tools that fall in and out of fashion far more quickly than in VCL land. And a surprising number of both supporters and detractors of every single one of them!
2. Wednesday, September 13, 2023 at 11:49:04 PM
You are most welcome. Working in the web environment generally means that there are a lot more projects to explore and a constantly evolving set of tools that fall in and out of fashion far more quickly than in VCL land. And a surprising number of both supporters and detractors of every single one of them!
Andrew Simard
3. Wednesday, October 25, 2023 at 7:11:12 PM
Thanks .. usefull as your all blogs. Ramazan geven
DERNEGI CANSUYU
4. Wednesday, October 25, 2023 at 7:20:48 PM
Thank you and you are most welcome!
Andrew Simard
All Blog Posts | Next Post | Previous Post
Peterson Terry