Blog
All Blog Posts | Next Post | Previous Post

 TMS WEB Core and More with Andrew:
PHP Scripts and Uploading Files
Tuesday, July 25, 2023

As developers, but potentially new-to-web developers, we're all very well aware that there are many kinds of web servers, web services, APIs, and web programming languages, and dozens of ways to accomplish any given task. TMS WEB Core is fantastic for designing web apps that are 100% HTML/JS/CSS when deployed. TMS XData is equally fantastic at providing a REST-compliant API. Combined, it doesn't take much effort at all to move data back and forth between web client apps and server-side databases or services.
But the world is
a much bigger place than just TMS WEB Core and TMS XData - we don't always have the luxury of using just these
tools. Occasionally, we might want to talk to another service. One common scenario involves uploading images
or other data to a remote web server, where the only available interface is a PHP
script. In today's post, we're going to craft our own PHP script to facilitate exactly this - uploading images
to a web server. We'll go into detail about how it all works, and then look at how we might interact with it in
a handful of different ways.
About PHP.
PHP has been around for a good long time. About as long as Delphi, as it turns out - 1995 was a busy year! As a
result, there is a lot of PHP code running around in the world. As a scripting language, it is an easy language to start
using. But as a programming language generally, it has many of its own nuances that make moving between PHP and
other languages just about as annoying as moving between, say, Delphi and JavaScript. But that's not a
complaint, really, just the reality of having different languages for different things. The main
use for PHP these days is for running scripts on web servers. Some very large and well-respected projects are based
entirely on PHP, including the likes of WordPress
and Drupal.
Running PHP code isn't particularly difficult. Most Linux systems likely come ready to go with PHP already installed. If not, it is trivial to install using the package manager of your choice. And Windows isn't left out in the cold either - downloads are readily available for whatever platform you happen to be using. The "context" of where PHP code is executed is perhaps a little more important, however. For example, you can run PHP code directly from the command line of your choice, where code is executed without necessarily requiring any kind of web server or network connection. Much like a local scripting language like bash or PowerShell or something along those lines.
The more interesting context is when it is running as part of a website. Just like an HTML or CSS file, a PHP script can be uploaded to a web server, ready to run whatever code can be found within. Rather than just being returned as a file, like HTML or CSS, the PHP code is executed by a process running on the web server, and the output of the script execution is what is returned.
There are numerous safeguards in place (or obstacles, depending on where you're coming from) to make this work properly. Typically, this involves configuring Apache or the web server of your choice to allow for PHP scripts to be run, along with configuring options related to how much memory each PHP process has access to, the account used to run the PHP code, how threading is handled, among many, many other considerations.
Normally, once PHP is configured (often by default with Apache), there
isn't much need to do any configuring. But it doesn't take much to run afoul of the default rules, particularly
if you're doing anything that is resource-intensive. Something to keep in mind. Very capable, but not always
very friendly as there are many obscure options available to control how PHP behaves. We'll encounter a couple of these later on pertaining to the default limits on file uploads.
The language itself isn't particularly troublesome. Here are a few notes that will help make it a little
easier to understand the code we'll be looking at, coming from the perspective of a Delphi developer.
- PHP files are just text files - scripts - like any other text file. They start with "<?php" and end with "?>"
- Like Delphi, lines are terminated with a semicolon. Unlike Delphi, variable names are case-sensitive,
starting with $. Yet somehow function names are not case-sensitive. Weird!
- Various operators commonly used include Assignment (=), Equality (==), Inequality (<>), And (&&), Or (||),
and String Concatenation (.). String concatenation in particular makes PHP code a little curious to look at.
- Code blocks use curly braces, typically in all the same places where Delphi uses begin/end;
- Both "print" and "echo" can generate output that is ultimately destined either for the command-line or a web page.
- When outputting text to the command-line, use the constant "PHP_EOL" to get line breaks. HTML will ignore these, as HTML likes to do, but it helps a great deal when initially testing things, as we'll soon see.
- There is a rich library of functions available by default, covering everything we're going to need, including Base64-encoding and
Hash functions, various array functions, and so on.
Overall, PHP isn't so terrible to work with as a language. But like JavaScript and other scripting languages
that have been around for a long time, many coding shortcuts have been developed that can sometimes make it
difficult to decipher what is going on, particularly if this isn't a language that you've used previously.
Passing Data.
Naturally, when dealing with a server-side script written in PHP, we're going to want to pass it data of some kind, or we're hoping it will pass us data of some kind - perhaps even just a web page. The primary way we communicate with a web server is of course through a URL, and PHP is no exception here. When we access a website normally, visiting a generic static HTML page perhaps, we're essentially asking our browser (or our web app) to issue a "GET" request to the web server, which responds ultimately with the HTML page that it has been configured to return, based on the URL we provided.
In the case of a PHP script, the web server runs the PHP script itself and then returns the output of that script as the web page that you see in the browser. In more complex websites, accessing a URL might run one PHP script which internally might call many other PHP scripts to generate the page that you ultimately see.
When such a script is called, any additional information in the URL will be passed to the script as
parameters. For example, let's say we have a URL like the following.
https://www.example.com/awesomescript.php?Value1=Frog&Value2=Camel
The PHP script, called "awesomescript.php", will then get invoked, and the parameters "Value1" and "Value2" will
be passed to it. This is not unique to PHP of course - this is just how URL parameters have been conventionally
passed. Internally, PHP stores these parameters in an array that is called $_GET. To access a parameter, you
could use something like $_GET['Value2'] and you'd end up with the value "Camel".
Another bit that PHP provides
automatically is the $_SERVER array when running in a web server environment. For example, $_SERVER['REMOTE_ADDR'] will get
you the IP address that was used to invoke the script. Running the same script via the command-line, the
$_SERVER array is not populated. There are other arrays that may be populated automatically as well, depending on the context within which the PHP script is being invoked.
URL parameters work pretty well, but there are a few limitations. For example, a URL can be a bit unwieldy if
you want to pass a lot of parameters or if you want to pass an actual file of some kind. There are limits to
how long a URL can be (think KBs and not MBs), browser-dependent of course. And anything that goes into a URL
has to be URL-encoded. This means that any spaces are replaced with %20, and other special characters are
similarly replaced to create a valid URL. While there are functions to help with this kind of thing, it can be a bit troublesome to figure out where and when they need to be used.
To get around these limitations, browsers, and web apps can instead send "POST" commands to a web server instead of (or in addition to) "GET" commands. In this mode, a block of data is sent to the server in a similar way, but it isn't passed as part of the URL. There are fewer limitations here, with the ability to send very large files (potentially hundreds of MBs), but we still have to worry about data encoding. Binary files (like images) in particular have to be encoded somehow, but we'll get to that in just a moment.
The basic idea is that you can post a block of data
and then PHP will receive it into another array, $_POST. In fact, if you format the POST data with the same
conventions for URL parameters, the $_POST array can be used in the same way to get at the values. Just that there's not really a limit on how large the values can be. The POST data might contain a string that starts with "Key1=somekey&Key2=otherkey&File=abcde..." where the entire string could be dozens of MBs long. Doesn't really matter most of the time - the data just flows as you would expect.
One final array may also be available - the $_FILES array. This array is populated with one or more files if certain conditions are met. We'll refer to this general mechanism as "form data" as it is often handled using straight-up HTML all by itself, using <form> elements. HTML (via the browser or curl) can provide all that is needed to create the POST data that encodes files in a way that PHP can process into this array. We'll be looking at this in more detail later in this post.
So a bit of a warning. Our blog posts often contain a fair bit of shifting between Delphi and JavaScript code. We'll be doing a fair amount of that as well, but we'll also be throwing PHP into the mix, and a bit of HTML where it is actually doing stuff all on its own. Normally we just treat HTML as a collection of elements and attributes used to direct how the browser renders our page. But with the use of a form, HTML can perform complete tasks like uploading a file to a remote server, without having to use any JavaScript at all. All that to say this might be a little more involved than normal!
Back to our PHP script, then, we know that we'll have access to potentially as many as four arrays - $_SERVER, $_GET, $_POST, and $_FILES. In order to properly handle an upload to our server via this script, we'll need to use these arrays to determine if all the data we need is available. Also, any public-facing web server that allows users to upload files should have some kind of security in place to block unauthorized access or excessive use. For our script, we're after the following bits of information.
- A request from an authorized IP address.
- An authorization key (like a password or a passphrase).
- The name of the file that we are uploading.
- The file itself, encoded or otherwise.
If we receive a request with all of these elements, we'll write the image to a folder on the server and then
display it back using a link to the image. If we don't receive all these elements, or there's anything amiss
with any of them (like an unauthorized IP or an unrecognized key) then we'll instead present a generic HTML form
where the user can correct or supply this information.
Uploader.php
So let's create our script. We're going to call it "uploader.php" and it is just going to sit in the root directory of a PHP-enabled (and SSL-secured) web server somewhere. We're using "www.example.com" here, but any web server will do, as long as it has PHP enabled. The script is designed to handle a number of conditions. Certainly, these aren't all applicable to everyone, so feel free to take this script and alter it however you like. Here are some of the design ideas that have gone into it.
- The script will only allow uploads from specific IP addresses.
- The IP addresses are hard-coded into the script but as SHA-256 hashes.
- The script will only allow uploads when a valid Key is provided.
- The Keys are listed in the script, but also as SHA-256 hashes.
- The IP and Key values are shown as comments here for illustrative purposes but should be removed.
- An online site like SHA256
Online can be used to generate SHA256 hash strings.
- The script is ultimately expecting parameter values for Key, FileName, and FileData.
- All three values can be passed as URL parameters (FileData = explicitly Base64-encoded).
- All three values can be passed as part of the POST data (FileData = explicitly Base64-encoded).
- FileName and FileData values can be passed as part of a "form data" mechanism.
- All three values can also be supplied via a webpage which in turn uses the same HTML "form data" mechanism.
- The script can be run from the command-line directly, or from the command-line via curl.
PHP already includes functions for generating SHA-256 hashes as well as for converting Base64 strings to binary
files. And as PHP is running server-side, it doesn't have any qualms about file access and those kinds of
things - it isn't running in a JavaScript sandbox. However, the web server itself may curtail some of what it
can do, providing a sandbox of sorts all its own. For our purposes, we're assuming that the script will be
writing its files into subfolders of the folder that the script itself is running in, that these folders already
exist, and that the appropriate permissions for these folders are already in place. Here is the script we're going to be working
with.
<?php


// Uncomment these to see contents of arrays at script startup
//
//  print '<h5>$_SERVER</h4><pre style="font-size:8px;">';
//  var_dump($_SERVER);
//  print '</pre>';
//
//  print '<h5>$_GET</h4><pre style="font-size:8px;">';
//  var_dump($_GET);
//  print '</pre>';
//
//  print '<h5>$_POST</h4><pre style="font-size:8px;">';
//  var_dump($_POST);
//  print '</pre>';
//
//  print '<h5>$_FILES</h4><pre style="font-size:8px;">';
//  var_dump($_FILES);
//  print '</pre>';


  // Parse command-line arguments into the $_GET array.
  // This is only useful when testing the script - can be removed for production.

  if ($argv <> NULL) {
    parse_str(implode('&', array_slice($argv, 1)), $_GET);
  }


  // Valid IP Addresses stored as SHA256 Hashes.
  // These are the only IPs we'll accept files from.  We could use the
  // actual IPs but we don't want anyone trying to spoof them, so with
  // this approach, minus the comments, their identities are well hidden.
  //
  // NOTE: REMOVE COMMENTS BELOW.

  $valid_IPs = array(
    // "IP Address: 127.0.0.1"
    '16e27be24b0e34270fda0f08b644b316e576085d40e3c356b0f8cf2198d4fb36',
    // "IP Address: 174.7.120.10"
    '4d945113eeba103b525b46adb083bc73ee26acced4df227d39a22182c66f7929',
    // 'IP Address: 67.231.28.131"
    '417cb8fd64627ec334ea28f2f8b30458ee6048b5221c38d360f8d3fda1649082'
  );


  // Keys are stored as SHA256 Hashes as well.  The idea is that each
  // key can be handed out to a different client, and can thus be revoked
  // from that client if something has warranted such an action.  The
  // key can also be associated with a destination folder, see below.
  //
  // NOTE: REMOVE COMMENTS BELOW.

  $valid_Keys = array(
    // rogue_one: "It's an older code, sir, but it checks out."
    '1ba8144e86f111a52b04c9e241355e2225cb67e38bf0b15aa3c751cb49af2739',
    // fifth_element: "Mul-ti-pass. Yes, she knows it's a multipass. Anyway, we're in love."
    '5aace8c4d4cb5c2ebd43ba68ab556c4b9bdad415b6777d033e71d216dde458e2'
  );


  // For each Key above, select a folder to store the uploaded images in.
  // These don't have to be unique, but they should exist in the same
  // folder as the script, or be adjusted accordingly, along with write
  // permissions for the web server account that is providing this script.

  $Folders = array(
    'rogue_one',
    'fifth_element'
  );


  // See if the client IP address matches one of our hashed IP values

  $match_IP = 'no';
  $actual_IP = 'No IP Available'; // this happens if running php from command-line

  if (array_key_exists('REMOTE_ADDR', $_SERVER)) {
    $actual_IP = $_SERVER['REMOTE_ADDR'];
    foreach($valid_IPs as $valid_IP) {
      if(hash('sha256','IP Address: '.$actual_IP) == $valid_IP) {
        $match_IP = 'yes';
        break;
      }
    }
  }
//  print 'Match IP: '.$match_IP.PHP_EOL;


  // See if the provided key, if any, matches one of our hashed Key values
  // The key could be provided as a URL parameter or embedded in the POST data
  // If we find a key, that we use the index to also find the folder name

  $match_Key = 'no';
  $Key = '';
  $Folder = 'destination not available';

  if (array_key_exists('Key', $_GET)) {
    $Key = $_GET['Key'];
  }
  else if (array_key_exists('Key', $_POST)) {
    $Key = $_POST['Key'];
  }

  if ($Key <> '') {
    for ($i = 0; $i < count($valid_Keys); $i++) {
      if (hash('sha256', $Key) == $valid_Keys[$i]) {
        $match_Key = 'yes';
        $Folder = $Folders[$i];
        break;
      }
    }
  }
//  print 'Match Key: '.$match_IP.PHP_EOL;


  // The new filename could be provided as a URL parameter or embedded
  // in the post data, or if it is not supplied, the original filename
  // embedded in the FILES array could be used as well. Note that if
  // we're embedding the file in the URL or POST data and not the
  // FILES data, we'll need a filename.  If it is in the FILES data,
  // the URL or POST data can be used to override it.

  $match_FileName = 'no';
  $FileName = '';

  if (array_key_exists('FileName', $_GET)) {
    $FileName = $_GET['FileName'];
    $match_FileName = 'yes';
  }
  else if (array_key_exists('FileName', $_POST)) {
    $FileName = $_POST['FileName'];
    $match_FileName = 'yes';
  }
  else if (array_key_exists('FileName', $_FILES)) {
    $FileName = $_FILES['FileName']['name'];
    $match_FileName = 'yes';
  }
//  print 'Match FileName: '.$match_FileName.PHP_EOL;


  // Remove any nefarious characters from filename

  $nefarious = array('/','\\','..',',',' ','|','`');
  $FileName = str_replace($nefarious, '', $FileName);


  // If everything is in order, then see if we've got a file.
  // File could be provied as a URL parameter (base64 encoded)
  // though undesirable. Could also be base64 encoded as a part
  // of the POST data, or not base64 encoded as part of FILE.

  $match_FileData = 'no';
  if (($match_Key == 'yes') && ($match_IP == 'yes') && ($match_FileName == 'yes')) {

    $FileData = 'no filedata specified';
    $FileSize = 'no filesize available';

    if (array_key_exists('FileData', $_GET)) {
      $FileData = $_GET['FileData'];
      $FileBin = base64_decode($FileData);
      $match_FileData = 'yes';
    }
    else if (array_key_exists('FileData', $_POST)) {
      $FileData = $_POST['FileData'];
      $FileBin = base64_decode($FileData);
      $match_FileData = 'yes';
    }
    else if (array_key_exists('FileData', $_FILES)) {
      $FileBin = file_get_contents($_FILES['FileData']['tmp_name']);
      $match_FileData = 'yes';
    }

    // print 'Match FileData: '.$match_FileData.PHP_EOL;

    if ($match_FileData == 'yes') {
      $FileSize = strval(round(strlen($FileBin) / 1024, 1)).' KB';
      $file = fopen($Folder.'/'.$FileName, 'w');
      fwrite($file, $FileBin);
      fclose($file);
    }

  }
  else {
    $FileData = 'Not Authorized';
    $FileSize = 'Not Authorized';
  }

  // Ok, we now have everything we need to proceed.  First, we'll
  // display an HTML page with a bit of header stuff sorted out.

  echo <<<HEADER
<html>
  <head>
    <title>Fancy File Uplaoder</title>
  </head>
  <body>
    <h4>Fancy File Uploader</h4>
    <p>IP Address: $actual_IP</p>
    <p>IP Authorized: $match_IP</p>
    <p>Key Authorized: $match_Key</p>

HEADER;


  // Next, if we got a file, great, let's display the details.
  // Otherwise, we display a form, populating it with what we've
  // been provided already.  The form 'action' will be to just
  // call this same script again, hopefully with more data.

  if (($match_Key == 'yes') && ($match_IP == 'yes') && ($match_FileName == 'yes') && ($match_FileData == 'yes')) {
    print '    <p>Folder: '.$Folder.'</p>'.PHP_EOL;
    print '    <p>File: '.$FileName.'</p>'.PHP_EOL;
    print '    <p>Size: '.$FileSize.'</p>'.PHP_EOL;
    print '    <p>Image:</p>'.PHP_EOL;
    print '    <p><img width="200px" src="'.$Folder.'/'.$FileName.'"></p>'.PHP_EOL;
  }
  else {
    print '    <form method="POST" action="uploader.php" enctype="multipart/form-data">'.PHP_EOL;
    print '      <p><label for="Key">Key <input type="text" name="Key" id="Key" value="'.$Key.'" style="width:500px;"></label></p>'.PHP_EOL;
    print '      <p><label for="FileName">New FileName <input type="text" name="FileName" id="FileName" value="'.$FileName.'" style="width:417px;"></label></p>'.PHP_EOL;
    print '      <p><label for="FileData">Select Image <input type="file" id="FileData" accept="image/*" name="FileData"></label></p>'.PHP_EOL;
    print '      <p><input type="submit" name="Upload" value="Upload">'.PHP_EOL;
    print '    </form>'.PHP_EOL;
  }


  // And finally, we wrap-up our HTML page.

  echo <<<FOOTER
  </body>
</html>

FOOTER;


 ?>
Lots of white-space and comments in the code to help decipher what is going on, but hopefully nothing to cause
anyone any amount of trouble. If we just wanted a basic file uploader, stripping out all the comments, bypassing the IP and key validation, and ignoring folders, we could shorten this down to a handful of lines without any trouble at all. But the exercise here is more about providing a PHP script that we can access in many different ways. Feel free to adjust it to suit your particular needs. For example, the SHA256 codes for the IP addresses and keys could be loaded by the PHP script from a separate file not accessible from the website - likely a good idea.
So what is it doing? It is essentially looking for the information that we're after - values for Key, FileName, and FileData - from one of the PHP arrays. Depending on what it finds, it either accepts the upload and stores it, or it presents a web page with a simple form where this same information can be provided, while also filling in the form with the values it already has, in the case of the Key and the FileName.
In terms of the code, there are a few odds and ends to mention.
- The output of the script should be a valid HTML page. When viewed from the command-line, this raw HTML should still be readable enough to understand what it is presenting.
- The "echo" and "print" commands are used to generate this HTML output.
- The <<< construct, known as HEREDOC, is used to output blocks of pre-formatted text that can
include variable output as well.
- An attempt is made to sanitize the provided filename, so someone can't pass in "../uploader.php" for example, and overwrite the script itself.
- Part of the rationale for providing different keys mapped to different folders is to allow users to have unfettered access to their own collection without being concerned that their files will be overwritten by someone else.
- The HTML form that is generated, when submitted, calls the very same script again (itself) with whatever parameters were
provided via the current form.
- The uploaded images are written into folders that correspond to the Key that was provided.
This script could be shortened by removing the IP address validation or the key validation, by not using a
key-determined subfolder, or perhaps by not even showing any output if the upload was successful or otherwise. Lots of options here, and it wouldn't take much effort to handle any other kinds of file uploads, including
video or audio files, or data files of any kind, really. This is intended to be as generic as possible.
Command-line Invocation.
Let's start by just running our script from the command-line by calling PHP directly and passing it the name of
this script. Here we're using bash running under Linux, but the same would work in Windows.
# php uploader.php
This gets us the following.
<html>
  <head>
    <title>Fancy File Uplaoder</title>
  </head>
  <body>
    <h4>Fancy File Uploader</h4>
    <p>IP Address: No IP Available</p>
    <p>IP Authorized: no</p>
    <p>Key Authorized: no</p>
    <form method="POST" action="uploader.php" enctype="multipart/form-data">
      <p><label for="Key">Key <input type="text" name="Key" id="Key" value="" style="width:500px;"></label></p>
      <p><label for="FileName">New FileName <input type="text" name="FileName" id="FileName" value="" style="width:417px;"></label></p>
      <p><label for="FileData">Select Image <input type="file" id="FileData" accept="image/*" name="FileData"></label></p>
      <p><input type="submit" name="Upload" value="Upload">
    </form>
  </body>
</html>
While it is straight-up HTML, it should be easy enough to see what is going on. All the PHP_EOL references in the code were put there so that this structure was clean and easily viewable, even though the line feeds are ignored entirely by a browser rendering the very same HTML as we'll soon see.
Here, we can see that, when running from the command-line in this fashion, there's no IP address available. This is because the $_SERVER array does not get populated in this context. In fact, none of our four arrays ($_SERVER, $_GET, $_POST, $_FILES) get populated by default when running the script this way. But we can see that an HTML page is produced, and we can see that it includes a form with a bunch of elements. We can also see that our key was not authorized because, well, none was provided.
To help things along a little bit, an extra bit of code was added to the top of the script to take in any
command-line parameters and populate the $_GET array with them, in order to mimic the same behavior as passing
parameters via a URL. This means that we can test out whether our Key validation is working by passing in a Key
parameter via the command-line.
# php uploader.sh Key="It's an older code, sir, but it checks out."
This is one of the Keys that has been converted into a SHA-256 hash and added to the array. When we run the
script with this parameter, we get a little bit further along.
<html>
  <head>
    <title>Fancy File Uplaoder</title>
  </head>
  <body>
    <h4>Fancy File Uploader</h4>
    <p>IP Address: No IP Available</p>
    <p>IP Authorized: no</p>
    <p>Key Authorized: yes</p>
    <form method="POST" action="uploader.php" enctype="multipart/form-data">
      <p><label for="Key">Key <input type="text" name="Key" id="Key" value="It's an older code, sir, but it checks out." style="width:500px;"></label></p>
      <p><label for="FileName">New FileName <input type="text" name="FileName" id="FileName" value="" style="width:417px;"></label></p>
      <p><label for="FileData">Select Image <input type="file" id="FileData" accept="image/*" name="FileData"></label></p>
      <p><input type="submit" name="Upload" value="Upload">
    </form>
  </body>
</html>
Here, we can see that the Key passed its authorization test. But as we didn't pass the IP check or provide a
file, we're still presented with a form to fill out. Note also that the Key we supplied is now included in the HTML of the generated
form. This means that if we were to view this form in a browser, the Key field would be populated.
Normally, we wouldn't run this script from the command-line in this fashion, as it is running on the server already. Not much point in using this particular script to copy a file from one location to another, but perhaps it could be adapted if you wanted to include a Base64 conversion step as part of the copy process. Lots of options here.
During script development and testing, though, you might want to run this from the command-line
to check for script errors. The idea is that it has to run to completion to get the HTML output we're seeing.
If there's any kind of PHP coding error, we'll see it when running the script in this environment. We might not
see such an error when running in another context, as much of the time PHP is configured not to show errors of
any kind, particularly in production environments. And with good reason - there can be all kinds of warnings
crop up that aren't really something users will get any benefit from seeing, and any PHP errors that are presented could give away clues that compromise security.
As a result, we're not really going to be able to do much more with this type of invocation without modifying the script to
deal with the lack of an IP address. Fortunately, there are other ways of testing this script that don't need such
modifications, so we'll leave the script as it is, potentially as a way to also make sure it isn't used in a
manner contrary to what we've designed it for. Anyone else trying to run the uploader.php script directly on
the server in this fashion will not be able to cause any problems as the lack of an IP address will prevent it
from making any changes of any kind.
Command-line Invocation via Curl/GET
A handy tool that has been around in some form since 1996, almost as long as PHP itself, is "curl", aka "client for URL". And it's not hard to understand why - it is a command-line tool used to retrieve a web
page. Kind of like a command-line-driven web browser of a sort. For our purposes, we can use it to test our
script in all kinds of ways.
# curl -i https://www.example.com/uploader.php
The -i parameter is used to generate the information summary at the beginning of the output that is returned.
The rest of the command is just the URL for our script. The assumption we're making is that the script is available at some
URL, properly configured with support for PHP. Here's the output.
HTTP/1.1 200 OK
Date: Wed, 19 Jul 2023 18:02:31 GMT
Server: Apache/2.4.54
Vary: Accept-Encoding
Transfer-Encoding: chunked
Content-Type: text/html; charset=UTF-8

<html>
  <head>
    <title>Fancy File Uploader</title>
  </head>
  <body>
    <h4>Fancy File Uploader</h4>
    <p>IP Address: 67.231.28.131</p>
    <p>IP Authorized: yes</p>
    <p>Key Authorized: no</p>
    <form method="POST" action="uploader.php" enctype="multipart/form-data">
      <p><label for="Key">Key <input type="text" name="Key" id="Key" value="" style="width:500px;"></label></p>
      <p><label for="FileName">New FileName <input type="text" name="FileName" id="FileName" value="" style="width:417px;"></label></p>
      <p><label for="FileData">Select Image <input type="file" id="FileData" accept="image/*" name="FileData"></label></p>
      <p><input type="submit" name="Upload" value="Upload">
    </form>
  </body>
</html>
In this context, the $_SERVER array is populated, and as we've added the above IP address as one of the authorized SHA256 hash values, our script indicates that this is in fact an authorized IP address. We didn't provide values for the Key, FileName, or FileData, so we're still presented with an HTML form.
Using curl makes it easy to test that things are working (or not) as expected. And curl commands can be added to a separate script, like a bash script, to make it easy to call the same curl command without having to fill in all the parameters each time and without having to rely on command-line history to do the same. Let's pass in a couple more parameters.
# curl -i -G https://www.example.com/uploader.php -d "Key=It%27s%20an%20older%20code%2C%20sir%2C%20but%20it%20checks%20out.&FileName=test.png"
In this example, we've added the -G parameter to indicate that we want to use GET for this request, and we've
passed in URL parameters, encoded, using the -d parameter. Encoding in this case involves replacing spaces with
%20, commas with %2C, and single apostrophes with %27. A bit tedious, but you can use a website like https://urlencoder.org
to do this for you. Or you can enter text into a browser's URL field and it will do a similar conversion for you.
If we enable the output of our $_GET and $_POST arrays at the beginning of our script, we
get the following.
HTTP/1.1 200 OK
Date: Wed, 19 Jul 2023 18:35:43 GMT
Server: Apache/2.4.54
Vary: Accept-Encoding
Transfer-Encoding: chunked
Content-Type: text/html; charset=UTF-8

<h5>$_GET</h4><pre style="font-size:8px;">array(2) {
  ["Key"]=>
  string(43) "It's an older code, sir, but it checks out."
  ["FileName"]=>
  string(8) "test.png"
}
</pre><h5>$_POST</h4><pre style="font-size:8px;">array(0) {
}
</pre><h5>$_FILES</h4><pre style="font-size:8px;">array(0) {
}
</pre><html>
  <head>
    <title>Fancy File Uploader</title>
  </head>
  <body>
    <h4>Fancy File Uploader</h4>
    <p>IP Address: 67.231.28.131</p>
    <p>IP Authorized: yes</p>
    <p>Key Authorized: yes</p>
    <form method="POST" action="uploader.php" enctype="multipart/form-data">
      <p><label for="Key">Key <input type="text" name="Key" id="Key" value="It's an older code, sir, but it checks out." style="width:500px;"></label></p>
      <p><label for="FileName">New FileName <input type="text" name="FileName" id="FileName" value="test.png" style="width:417px;"></label></p>
      <p><label for="FileData">Select Image <input type="file" id="FileData" accept="image/*" name="FileData"></label></p>
      <p><input type="submit" name="Upload" value="Upload">
    </form>
  </body>
</html>
We can see from the above that we are indeed getting our parameters passed into the $_GET array and that the
$_POST and $_FILES arrays are empty. In the HTML output, we can see that without an actual file being passed
in, we are still presented with an HTML form. In this case, both of the values we passed as parameters are included in
the form as well. And we've passed both the IP validation check and the Key validation check. All we're
missing now is a value for FileData to go with the FileName we've passed.
Passing files (images in this case) via the URL (aka via GET) is generally not all that feasible, primarily due
to the length limitations on the URL itself. It is possible though. We'll also have to encode the image in
some way so that it can be included in the URL. First, we'll start with a small image. In this case, it is an
hourglass PNG file taken from the Actorious project. It started out as a 5 KB PNG file, but after running it
through TinyPNG, we're left with a file that is just 1,531 bytes.

Sample Image.
If we want to include a binary image in a URL, we'll have to first encode it as a string and then ensure that
the string itself is URL encoded. A bit tricky. We can convert our 1,531-byte file into a Base64-encoded string using
yet another online tool, like https://www.base64encode.org,
a close cousin to the URL encoder website. Once we get the Base64-encoded string, which has now grown to 2,044 bytes,
we can pass it through the same URL encoder as we did for the other parameters, getting us our final FileData
parameter at a slightly larger 2,144 bytes.
Our image after Base-64 encoding:
iVBORw0KGgoAAAANSUhEUgAAAFwAAACKCAMAAAAQVt1YAAAA3lBMVEUYMVOirLr///+fqrigqrmtuMekrrz9/v4bNFUeN1ieqLcwR2UaMlT7/PxRZH76+/txf5X6+vuos8L8/f2ep7d/jaAzSWchOForQmGlr76qtcORnrEkPFwHIkastsQoP18dNVeHlKZEWHQ6T22msL+apbUuRGPu7/JoeI9fcIhZa4NVZ4ASLE+MmapAVHDw8fSuuciCkKRJXXhtfZJkdYzT2N7L0NiQnK17ip50gphNYHs2TGnCydKVobLz9Pbe4ebY3OJ2hZrGy9W1vcgMJkoBG0C7wszh5Onh5OiyusWyY8rgAAAE2ElEQVRo3u2Y6XKiQBCAx5nhkICIiCgawVtjNNFEozk3u8ke7/9CG9qgGIdj9M9uFV9VYinw0fQM3QwoIyMjIyMjIyMjI+OfRPbyKfFkTnWnOFHKHyhlRYE/5eMr/IfPgDJ8n6zbPO4CFbmgo/Tuxl2ZclHuTVPLpzWa44Lmhqnl7S6vnBZTy/s9hTfyMUpNMUe3x5FI6G6XmZ1ebr8KtcDeFKIQ6WfYzVkVceC1n2oUDhSH9+MCk5EibnYh93nEx821n3dS60VfcMsh/i6lFuKlIBA/rFrPRTIbNAM5LQ255Z1rAhkVH5CKGKjbyJ0xt7wvEOpPYKeNZLa80euCXJhyy21KqX/o9ShK3il97lHhlquWCIc6EcMloyEkjhKxgbi5KEHSaa2CPFX+gioju/dZgVoqv7wigJw4K8RkuNlOuyPEj9za3CK0a90UD7hZ+dtgPCvoCAqftZE6AoMm/dxqqcfI7TrJAYRGly0itNFRFGBI46Er9Ti5PKM0wa3UKuhIKrWEpkFKY3Q042asnYqv6vFytViKsVPastEJeKuYQSV1F52EZ0Xaab2KTiRvsTNDCbhPtxOeuE+PnQbu0+2zAzup9w+nltuZFwrzh4bKV2UmXzJDe2dfB34+WQ4wMHi0Ojz+Ri9spzmh82V7cYmxpG0wMcaPYw599UmkO3mpsJ+P2wU2DRMHSJqB8c9Oentb2IZOmvtt1XWwrkt4D8nAg3Xq4F9DeRH3Mv7wHesgPNDX7JTd+pqEa6HS2FXOpW5iJgb+mco+haTs7F3LC3LyPZwRTTKlsF1MkZmHHrjD9hEC1CYOxQ3iPftNcs94Ug460J0Lm4Yfgi0mJtObQfhsxqCS5K4rjHUKHOV+M6SQe/H29v6KtfBPTZXfTTfPcDOshZMwOW+8jbG0l5g5lxvkXXiGq/4KT0IdW+f2+cWeXMOlWDdh9SABBnSNtTg52J+rfHEHz+TeEktJcgOPo9x9lhuqS98/M5ZYck0zTWk3pHdRxXBC2G6x56/f7rGGGXIA7PC5VNnyokjZ8trEX23cYv2rPH/Z//775eUlZL9qRFRCJepBqwh30KFcRpeXnuyhCyOwa/iM5fYmlEbInVu4sH25gVvntir71yS/i9gI5MzCPm+SXKx8HZKD5vH8cgN6/4P1OLk6i3n+XMMiOyyHwbPcKuCut0k3cZ8hPxNIlJx27w4HFHTPgyuf59CADlhFfexEy8Wy7ecNalTYbm6n99aNH1XWOjTmXRQtVfzSciWBI6zfEK6LM3SIrYCbDRHm/vkdLOEEDNxmyKsCodHyJrSYESQ9Dsn8lme1NmjJEdDakwe9QkuQa7iFGNzDZIkOHTqRlRS6cfXAkt9eK7HyW8jdiybFBs6uifmWE51y6HPupgIYcXJ9wapahXLCS1HiQC/yfmAtJinP96wbSBDBHZuYM0jMQtIi3XjFahL1crwbJowlw7uwb2BnugmrT0y74E4K/QKBfYENxqiaBq7LzC4BCU+0lzbF1O1+mKQD9WAY0ZefSAo5JS0X+aijBZYMzZSC8qLrGMONwGSYIylQJhdBIRouYUWh67oGlfHHXGWbIZa7kpBIebWbafLUegwWXD+KFRRL3u2fJdCvNvYjalTa7fa0b6OMjIyMjIyMjIyMjIz/kb+FzXKO8auchgAAAABJRU5ErkJggg==
Our image after URL encoding:
iVBORw0KGgoAAAANSUhEUgAAAFwAAACKCAMAAAAQVt1YAAAA3lBMVEUYMVOirLr%2F%2F%2F%2BfqrigqrmtuMekrrz9%2Fv4bNFUeN1ieqLcwR2UaMlT7%2FPxRZH76%2B%2Ftxf5X6%2Bvuos8L8%2Ff2ep7d%2FjaAzSWchOForQmGlr76qtcORnrEkPFwHIkastsQoP18dNVeHlKZEWHQ6T22msL%2BapbUuRGPu7%2FJoeI9fcIhZa4NVZ4ASLE%2BMmapAVHDw8fSuuciCkKRJXXhtfZJkdYzT2N7L0NiQnK17ip50gphNYHs2TGnCydKVobLz9Pbe4ebY3OJ2hZrGy9W1vcgMJkoBG0C7wszh5Onh5OiyusWyY8rgAAAE2ElEQVRo3u2Y6XKiQBCAx5nhkICIiCgawVtjNNFEozk3u8ke7%2F9CG9qgGIdj9M9uFV9VYinw0fQM3QwoIyMjIyMjIyMjI%2BOfRPbyKfFkTnWnOFHKHyhlRYE%2F5eMr%2FIfPgDJ8n6zbPO4CFbmgo%2FTuxl2ZclHuTVPLpzWa44Lmhqnl7S6vnBZTy%2Fs9hTfyMUpNMUe3x5FI6G6XmZ1ebr8KtcDeFKIQ6WfYzVkVceC1n2oUDhSH9%2BMCk5EibnYh93nEx821n3dS60VfcMsh%2Fi6lFuKlIBA%2FrFrPRTIbNAM5LQ255Z1rAhkVH5CKGKjbyJ0xt7wvEOpPYKeNZLa80euCXJhyy21KqX%2Fo9ShK3il97lHhlquWCIc6EcMloyEkjhKxgbi5KEHSaa2CPFX%2Bgioju%2FdZgVoqv7wigJw4K8RkuNlOuyPEj9za3CK0a90UD7hZ%2BdtgPCvoCAqftZE6AoMm%2FdxqqcfI7TrJAYRGly0itNFRFGBI46Er9Ti5PKM0wa3UKuhIKrWEpkFKY3Q042asnYqv6vFytViKsVPastEJeKuYQSV1F52EZ0Xaab2KTiRvsTNDCbhPtxOeuE%2BPnQbu0%2B2zAzup9w%2BnltuZFwrzh4bKV2UmXzJDe2dfB34%2BWQ4wMHi0Ojz%2BRi9spzmh82V7cYmxpG0wMcaPYw599UmkO3mpsJ%2BP2wU2DRMHSJqB8c9Oentb2IZOmvtt1XWwrkt4D8nAg3Xq4F9DeRH3Mv7wHesgPNDX7JTd%2BpqEa6HS2FXOpW5iJgb%2Bmco%2BhaTs7F3LC3LyPZwRTTKlsF1MkZmHHrjD9hEC1CYOxQ3iPftNcs94Ug460J0Lm4Yfgi0mJtObQfhsxqCS5K4rjHUKHOV%2BM6SQe%2FH29v6KtfBPTZXfTTfPcDOshZMwOW%2B8jbG0l5g5lxvkXXiGq%2F4KT0IdW%2Bf2%2BcWeXMOlWDdh9SABBnSNtTg52J%2BrfHEHz%2BTeEktJcgOPo9x9lhuqS98%2FM5ZYck0zTWk3pHdRxXBC2G6x56%2Ff7rGGGXIA7PC5VNnyokjZ8trEX23cYv2rPH%2FZ%2F%2F775eUlZL9qRFRCJepBqwh30KFcRpeXnuyhCyOwa%2FiM5fYmlEbInVu4sH25gVvntir71yS%2Fi9gI5MzCPm%2BSXKx8HZKD5vH8cgN6%2F4P1OLk6i3n%2BXMMiOyyHwbPcKuCut0k3cZ8hPxNIlJx27w4HFHTPgyuf59CADlhFfexEy8Wy7ecNalTYbm6n99aNH1XWOjTmXRQtVfzSciWBI6zfEK6LM3SIrYCbDRHm%2FvkdLOEEDNxmyKsCodHyJrSYESQ9Dsn8lme1NmjJEdDakwe9QkuQa7iFGNzDZIkOHTqRlRS6cfXAkt9eK7HyW8jdiybFBs6uifmWE51y6HPupgIYcXJ9wapahXLCS1HiQC%2FyfmAtJinP96wbSBDBHZuYM0jMQtIi3XjFahL1crwbJowlw7uwb2BnugmrT0y74E4K%2FQKBfYENxqiaBq7LzC4BCU%2B0lzbF1O1%2BmKQD9WAY0ZefSAo5JS0X%2BaijBZYMzZSC8qLrGMONwGSYIylQJhdBIRouYUWh67oGlfHHXGWbIZa7kpBIebWbafLUegwWXD%2BKFRRL3u2fJdCvNvYjalTa7fa0b6OMjIyMjIyMjIyMjIz%2Fkb%2BFzXKO8auchgAAAABJRU5ErkJggg%3D%3D
Not very friendly, but workable. If we add that to our curl command, by adding it as the value for a FileData
parameter, our (abbreviated here) command looks a little like this.
# curl -i -G https://www.example.com/uploader.php -d "Key=It%27s%20an%20older%20code%2C%20sir%2C%20but%20it%20checks%20out.&FileName=test.png&FileData=iVBORw0KGgoAAAANSUhEUgAAAFwAAACKCAMAAAAQVt1YAAAA3lBMVEUYMVOirLr%2F..... .....%3D%3D"
But that's all we need for our upload to complete. Here's the result.
HTTP/1.1 200 OK
Date: Wed, 19 Jul 2023 19:23:06 GMT
Server: Apache/2.4.54
Vary: Accept-Encoding
Transfer-Encoding: chunked
Content-Type: text/html; charset=UTF-8

<h5>$_GET</h4><pre style="font-size:8px;">array(3) {
  ["Key"]=>
  string(43) "It's an older code, sir, but it checks out."
  ["FileName"]=>
  string(8) "test.png"
  ["FileData"]=>
  string(2044) "iVBORw0KGgoAAAANSUhEUgAAAFwAAACKCAMAAAAQVt1YAAAA3lBMVEUYMVOirLr///.... ...=="
}
</pre><h5>$_POST</h4><pre style="font-size:8px;">array(0) {
}
</pre><h5>$_FILES</h4><pre style="font-size:8px;">array(0) {
}
</pre><html>
  <head>
    <title>Fancy File Uploader</title>
  </head>
  <body>
    <h4>Fancy File Uploader</h4>
    <p>IP Address: 67.231.28.131</p>
    <p>IP Authorized: yes</p>
    <p>Key Authorized: yes</p>
    <p>Folder: rogue_one</p>
    <p>File: test.png</p>
    <p>Size: 1.5 KB</p>
    <p>Image:</p>
    <p><img width="200px" src="rogue_one/test.png"></p>
  </body>
</html>
PHP automatically performs the URL decode step when populating the values in its arrays. This leaves us with the original Base64-encoded file as the value in our $_GET array's FileData parameter. Which can then be directly decoded back into its original binary form,
resulting in the original 1,531-byte file being stored on our server. And because we supplied everything the script required, we
don't get presented with a form but rather a page that shows the image, linked directly to the server's copy of the file, using
the filename that we provided. Success!
Generating output that is structured in this way - an HTML page - makes sense when someone might access this script directly via a web browser. It wouldn't take much effort at all to pass another parameter to indicate what kind of result we'd like to see instead. One idea might be to return a JSON array with the same values (folder, size, image link, etc.) if we were calling the PHP script from an application, to make it easier to extract the results..
Note that it didn't really matter in our PHP code what kind of image was passed or how big it was. The process is the same. However, as we're using GET and URL parameters, this is a bit unwieldy, and will eventually break for larger images. How much larger will depend on many factors, but best not to tempt fate and keep URL parameters to something under 2 KB where feasible.
Another consideration with respect to URL length is that some organizations record all URLs passing through their routers and firewalls. Super-long URLs may be blocked unceremoniously, even if all the underlying technical components support them. And this could result in a lot of extra data being logged for no real benefit.
Before moving on, one more little tidbit. It is a bit of a pain to use curl with such long parameters,
particularly these files. Setting up a test script makes this a lot easier - you can just add whatever you like
in the script and not have to think about it too much. But curl itself can also accept files as parameters. So
if our hourglass image was already available as a URL-encoded Base64 image, we could just reference it in the
curl command directly. In fact, we can even pass our Key as a file if we were so inclined, so long as it, too, was
already encoded.
curl -i -G https://www.example.com/uploader.php -d "Key=$(cat secretkey.enc)&FileName=test.png&FileData=$(cat hourglass.enc)"
Taking this a step further If the file data being fed into this command as URL parameters were not already encoded, or if the image was not already encoded as a Base64 image, we could even do those
conversions on the fly by running a few bash commands together all at the same time.
curl -i -G https://www.example.com/uploader.php -d "Key=$(cat secretkey.txt | jq -Rr @uri)&FileName=test.png&FileData=$(cat hourglass.tiny.png | base64 | jq -sRr @uri)"
Here, we're making use of the Linux 'jq' command to handle the URL encoding. This is usually used for processing JSON files, but we can use it here to do some of our work for us. For the Key value, we use 'jq -Rr @uri' as it is a single line of text, and if we add the extra -s parameter that we use with the image, the end-of-line character is added, messing up our Key validation. This isn't an issue with the Base64 encoding, which seems to need this extra parameter.
Ultimately, we get what we're after. We can pass parameters and a small
image entirely using GET, and even reference the Key stored in a text file, and an image stored in its original
format. Not too bad.
Command-line Invocation via Curl/POST
Using GET works pretty well when there are only a few parameters and very little data. But what to do when that's not
the case? The next option is to issue a POST request instead of a GET request to our web server. What does
this mean? It means that when we send along our request, we can pass a block of data that is arbitrarily
large. Using GET, for example, if we tried passing our hourglass image before compressing it, when it was 5 KB
instead of 1,531 bytes, we get a web server-generated HTML page returned instead of our script output:
HTTP/1.1 414 Request-URI Too Long
Date: Wed, 19 Jul 2023 20:27:09 GMT
Server: Apache/2.4.54
Content-Length: 248
Connection: close
Content-Type: text/html; charset=iso-8859-1

<!DOCTYPE HTML PUBLIC "-//IETF//DTD HTML 2.0//EN">
<html><head>
<title>414 Request-URI Too Long</title>
</head><body>
<h1>Request-URI Too Long</h1>
<p>The requested URL's length exceeds the capacity
limit for this server.<br />
</p>
</body></html>
To issue a request using POST instead of GET, we just have to remove the -G parameter - curl will assume we're
using POST because we're passing data with the -d option. Everything else can stay the same, we can just pass much larger
files. Here's the same command we used previously, just with the original hourglass.png instead of
hourglass.tiny.png.
curl -i https://www.example.com/uploader.php -d "Key=$(cat secretkey.txt | jq -Rr @uri)&FileName=test.png&FileData=$(cat hourglass.png | base64 | jq -sRr @uri)"
With a bit of trimming for presentation, we're getting a very similar result, but all of
our parameters arrive in the $_POST array instead of the $_GET array. How we handle it in PHP doesn't really change. The
data passes through a URL decoding step as it did previously, and we get the Base64 image that we can decode
just as we did previously. And PHP itself doesn't much care how big any of these items are.
HTTP/1.1 200 OK
Date: Wed, 19 Jul 2023 20:30:14 GMT
Server: Apache/2.4.54
Vary: Accept-Encoding
Transfer-Encoding: chunked
Content-Type: text/html; charset=UTF-8

<h5>$_GET</h4><pre style="font-size:8px;">array(0) {
}
</pre><h5>$_POST</h4><pre style="font-size:8px;">array(3) {
  ["Key"]=>
  string(43) "It's an older code, sir, but it checks out."
  ["FileName"]=>
  string(8) "test.png"
  ["FileData"]=>
  string(7591) "iVBORw0KGgoAAAANSUhEUgAAAFwAAACKCAIAAACo6ro9AAAAAXNSR0IArs4c6QAAAAlwSFlzAAAL.... ....AgQStRQKCgEBAun/mfHCwW3lk0sAAAAASUVORK5CYII="
}
</pre><h5>$_FILES</h4><pre style="font-size:8px;">array(0) {
}
</pre><html>
  <head>
    <title>Fancy File Uploader</title>
  </head>
  <body>
    <h4>Fancy File Uploader</h4>
    <p>IP Address: 174.7.120.10</p>
    <p>IP Authorized: yes</p>
    <p>Key Authorized: yes</p>
    <p>Folder: rogue_one</p>
    <p>File: test.png</p>
    <p>Size: 5.5 KB</p>
    <p>Image:</p>
    <p><img width="200px" src="rogue_one/test.png"></p>
  </body>
</html>
The main difference is that there's technically no longer any limit on the size of the image. Note that
we're still using URL-encoded values when populating the request and that all of our values now show up in the $_POST
array and none of the values show up in either the $_GET or $_FILES arrays.
We're not out of the woods yet, though. The manner in which we're calling curl, via command-line options and
embedding files directly into the call, means that we're actually going to hit another limit just due to how
we're using curl. This is an operating system-enforced limit and is likely in the ballpark of 2MB or so.
Meaning that if we try to send a larger image, we'll get an error like this.
bash: /usr/bin/curl: Argument list too long
This isn't an issue with our request or our PHP script, but rather an issue with how we're using curl to compose our request. We'll see later that we can use this method (sending larger files inside POST data) without problems. But we've got a few other tricks we can use with curl before we get to that.
Command-line Invocation via Curl/FORM
We've been using curl in its simplest form - just passing parameters with the idea that it's constructing a
large string to send to the web server. This is great, but as we've just seen, curl itself is going to run
into problems if that string gets too long. Instead, we can compose our same POST request, but use a different
mechanism to add in the necessary data. Instead of passing data using the -d parameter (implying POST), we're
going to use the -F parameter. This is intended to mirror how HTML composes a request when a form is
submitted. So instead of doing a lot of encoding, we can just pass multiple files with multiple -F options.
curl -i https://www.example.com/uploader.php -F Key=@secretkey.txt -F FileName=bigtest.jpg -F FileData=@bigimage.jpg
Note that here, we've not done anything to the original files. They are encoded automatically by curl, just as
they are encoded automatically when using an HTML form. Note that this is not at all the same kind of URL encoding but rather something else entirely. We'll see later that we'll need to be mindful of this when constructing our requests. Testing with a 25 MB+ image, we get the following
result.
HTTP/1.1 100 Continue
HTTP/1.1 200 OK
Date: Wed, 19 Jul 2023 22:02:21 GMT
Server: Apache/2.4.54
Vary: Accept-Encoding
Transfer-Encoding: chunked
Content-Type: text/html; charset=UTF-8
<h5>$_GET</h4><pre style="font-size:8px;">array(0) {
}
</pre><h5>$_POST</h4><pre style="font-size:8px;">array(1) {
["FileName"]=>
string(12) "bigtest2.jpg"
}
</pre><h5>$_FILES</h4><pre style="font-size:8px;">array(2) {
["Key"]=>
array(6) {
["name"]=>
string(13) "secretkey.txt"
["full_path"]=>
string(13) "secretkey.txt"
["type"]=>
string(10) "text/plain"
["tmp_name"]=>
string(14) "/tmp/phpe9ufus"
["error"]=>
int(0)
["size"]=>
int(44)
}
["FileData"]=>
array(6) {
["name"]=>
string(21) "shutterstock_lava.jpg"
["full_path"]=>
string(21) "shutterstock_lava.jpg"
["type"]=>
string(10) "image/jpeg"
["tmp_name"]=>
string(14) "/tmp/phpqnJJX0"
["error"]=>
int(0)
["size"]=>
int(26830191)
}
}
</pre>
<html>
<head>
<title>Fancy File Uploader</title>
</head>
<body>
<h4>Fancy File Uploader</h4>
<p>IP Address: 174.7.120.10</p>
<p>IP Authorized: yes</p>
<p>Key Authorized: yes</p>
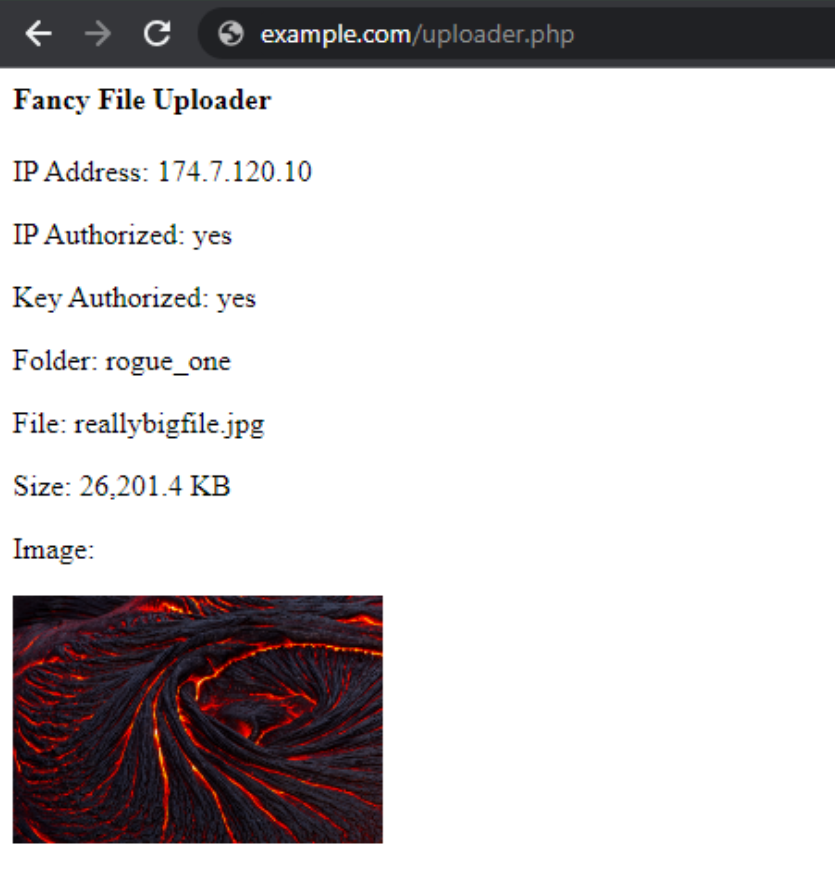
<p>Folder: rogue_one</p>
<p>File: bigtest2.jpg</p>
<p>Size: 26,201.4 KB</p>
<p>Image:</p>
<p><img width="200px" src="rogue_one/bigtest2.jpg"></p>
</body>
</html>
Here, we can see how the $_FILES array now has two entries - one for the Key file and one for the image file being
uploaded. The $_POST array contains the FileName we've chosen, though the original filename is also included in
the $_FILES array along with the rest of the FileData information which is itself an array.
We don't care about the original filenames in this case, but they're there along with an automatically generated file type, which can be handy if we don't know what kinds of files we're expecting. Our script, as written, checks all three arrays - $_GET, $_POST, and $_FILES for what we're after - the Key, the FileName, and the FileData, so it doesn't really matter where they appear, so long as they appear in one of them.
Also not-obvious-at-all-really-are-you-serious is that one of the array elements in the $_FILES array is called "tmp_name" and this is what we'll need to get at the actual underlying binary file data. We don't much care about the other elements in the $_FILES array but that's one we'll need to remember.
An aside about PHP configuration options. PHP, by default, typically limits uploads to 2MB. This can be overridden by updating the PHP.ini file of your particular server or updating the upload_max_filesize parameter in some other way. There are several options, depending on how much control over your server that you have. Using .htaccess files to update PHP configuration options may also be an option, depending on your configuration.
Note that this is imposed by the PHP engine used by your web server and
doesn't necessarily apply to anything else. Also, be mindful that there might be many instances of PHP
installed on a given system. If there's any doubt as to which PHP configuration is being applied to your script, you
can add a simple "phpinfo.php" script in the same folder, with the same permissions as your upload PHP script. It just needs to contain one command.
<?php
  phpinfo();
?>
Loading this script (eg: https://www.example.com/phpinfo.php)
will then show you all the information about your particular PHP environment when running scripts from that
location.
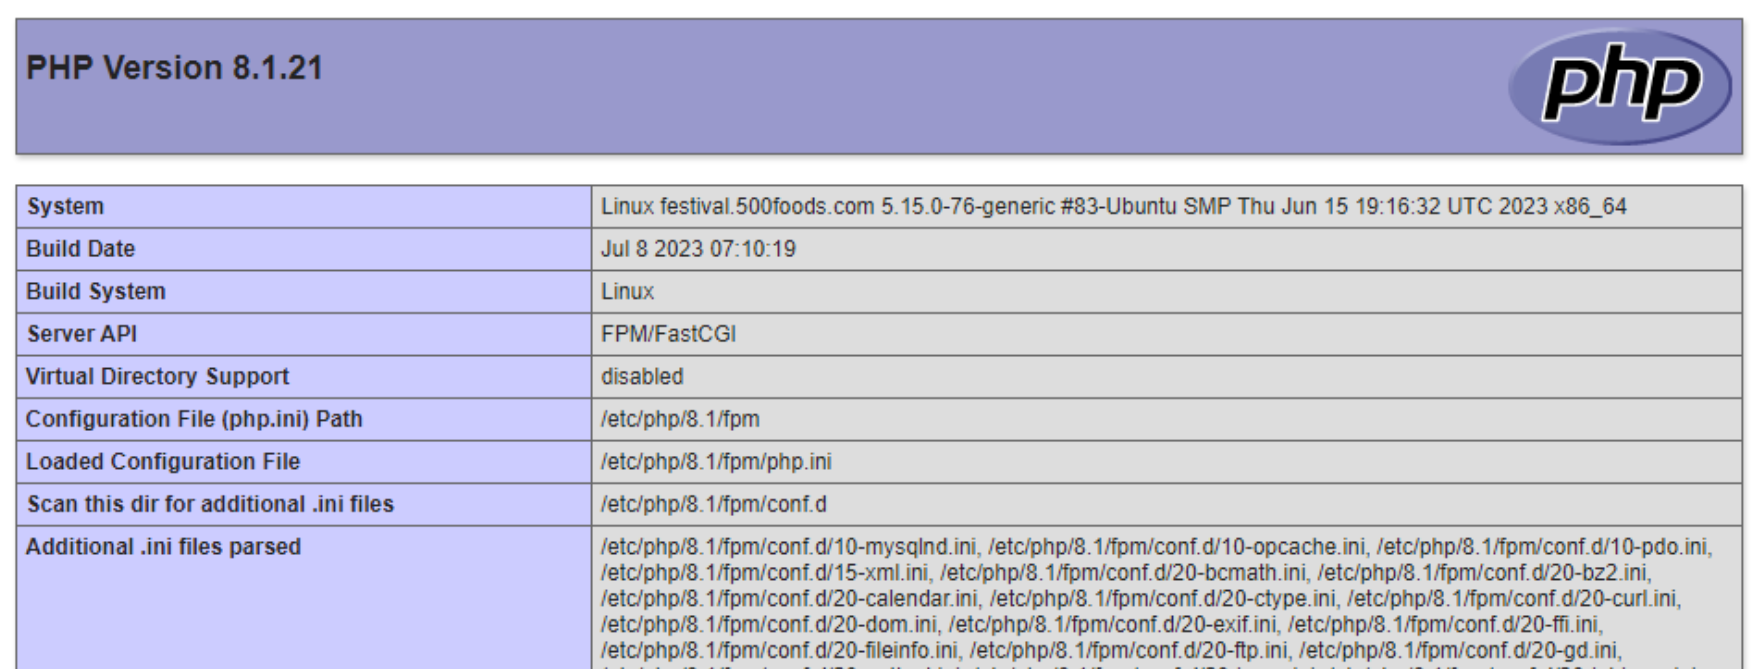
PHP Information.
There is a lot of information here (it goes on for many pages), but generally what you're after is the name of the specific php.ini file that is
being used, so you can make changes to it. Further down the list, you can see what the individual parameter values are currently set to. Like the one
we're concerned with here, upload_max_filesize. There are thousands of them though, so be sure to use the browser
search functions as finding them otherwise is no easy feat.

This Parameter Limits Uploads.
Additional considerations relate to the script's use of memory and its execution time. PHP scripts are typically limited to a certain amount of memory during their run and are likely also limited to how long they can run for. If your script is capped at 32 MB but you're accepting images up to 50 MB, then you're going to have a problem. Similarly, if you're doing a lot of server-side processing of an image, then it may run afoul of other rules as well, particularly if it takes more than a few seconds to complete.
Browser Invocation.
Alright, enough with the command-line stuff. If we just point a web browser at our script, without any
parameters, we'll get the same HTML returned (eg: https://www.example.com/uploader.php). But in this case, the same HTML is rendered by the browser instead of just output to
the command-line. If we comment out the array output at the beginning of the script, we end up with a
normal-looking web page.

Browser-rendered Script Output.
And if we give it a try, we can add our Key value, select a new filename, and load up an image. If all goes
according to plan, we'll see the image we selected.
Upload Script Working.
Note that, again, the IP address used here to access the script is included in the list of authorized IP
addresses. This time, after filling out the form and submitting it, we get the output that includes a link to
the copy of the image now stored on the server, confirming that it indeed was uploaded. Even with a 25 MB+
image, this didn't take very long at all. But the performance is of course dependent on the connection speed
between the browser and the server running the script.
So what is going on here? When we used curl to pass individual files, the encoding and upload of those
happened automatically, and the data arrived in the $_POST and $_FILES arrays with the names we assigned via
the -F parameters. In the case of the web page, the browser is doing the same thing. We can make adjustments
to this in the form that is presented by the browser - the same form we've been looking at all along.
<html>
  <head>
    <title>Fancy File Uploader</title>
  </head>
  <body>
    <h4>Fancy File Uploader</h4>
    <p>IP Address: 174.7.120.10</p>
    <p>IP Authorized: yes</p>
    <p>Key Authorized: no</p>
    <form method="POST" action="uploader.php" enctype="multipart/form-data">
      <p><label for="Key">Key <input type="text" name="Key" id="Key" value="" style="width:500px;"></label></p>
      <p><label for="FileName">New FileName <input type="text" name="FileName" id="FileName" value="" style="width:417px;"></label></p>
      <p><label for="FileData">Select Image <input type="file" id="FileData" accept="image/*" name="FileData"></label></p>
      <p><input type="submit" name="Upload" value="Upload">
    </form>
  </body>
</html>
When this HTML <form> is submitted (by clicking on the "Upload" button), the browser generates the POST
request for us. The "name" attribute from the two <input type="text"> elements is combined with their
"value" attributes to generate the array elements that land in the $_POST array in our script. The third form
element, <input type="file">, uses its "name" attribute as well for generating the element that appears in
the $_FILES array but goes a step further to populate the rest of the values, including the file itself, from
whatever file has been provided to the browser.
Crucially, the <form> element has three attributes that help make this all work.
- method="POST" tells the browser that we want to generate a POST request from this form.
- action="uploader.php" tells the browser where the script is (the URL) that we want to post data to.
- enctype="multipart/form-data" tells the browser that we're going to be generating a block of data to POST that includes multiple elements.
As perhaps an amusing side note, those who unabashedly claim that "HTML is not a language" perhaps aren't aware of just how much actual coding and functionality can be achieved with HTML alone, with no JavaScript of any kind. Here, we're passing parameters, calling scripts, and handling inputs and outputs. It sure seems like a programming language to me?!
Our script, when it finds that it doesn't have sufficient data to service the request, simply provides this
form to request the data that it requires. This form could just as easily be embedded on another page and the
script could return nothing at all. So long as the call to our script includes the Key, FileName, and FileData,
the upload will happen. Our script was designed to be flexible with where it gets its data from - either
via URL parameters or the browser-supplied <input type="file"> mechanism, or even as Base64-encoded
content, as we've seen.
For example, if we pass URL parameters in the browser, the script will populate the fields, just as we saw
previously with curl. And we can just type in our Key into the browser's URL location and the browser will do
the URL encoding for us.
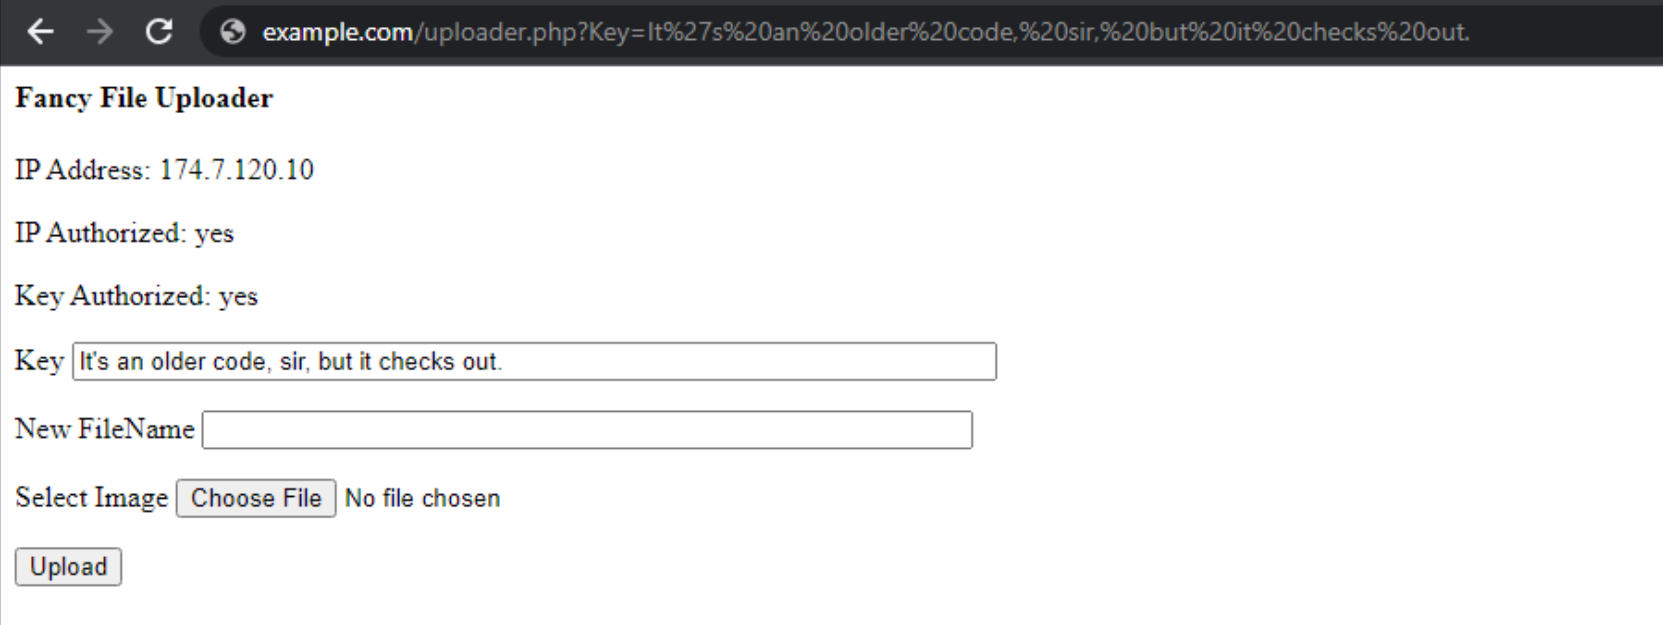
Passed Parameters Populated Preemptively.
And that about covers how our PHP script functions, both via curl and the browser. Variations of this can
be found running on web servers all over the place. Sometimes the scripts provide very little information about
what they require, using the "security by obscurity" approach to try and limit abuse. Sometimes they are
presented with a less utilitarian interface. But ultimately they're doing some variation of what we've done here.
TMS WEB Core Interaction - Form.
That's all well and good, but if we've got a TMS WEB Core project, how can we upload a file to our script? And
check whether it was successful or not? Maybe with an alternate (and more stylish) interface, integrated into the theme of our application? Well, as we've seen with curl and the browser example, we've got many options
available to us. Ultimately, though, we're going to want to generate the same POST request and pass it data in
one of the ways we've already covered.
We don't really need to use an HTML <form> directly, though we certainly could just add the above code
directly to a TWebHTMLDiv component. So let's give that a try first. We'll drop a TWebHTMLDiv component onto a Form, and add the following to its HTML property.
<form method="POST" action="https://www.example.com/uploader.php" enctype="multipart/form-data">
<p><label for="Key">Key <input type="text" name="Key" id="Key" value="" style="width:500px;"></label></p>
<p><label for="FileName">New FileName <input type="text" name="FileName" id="FileName" value="" style="width:417px;"></label></p>
<p><label for="FileData">Select Image <input type="file" id="FileData" accept="image/*" name="FileData"></label></p>
<p><input type="submit" name="Upload" value="Upload">
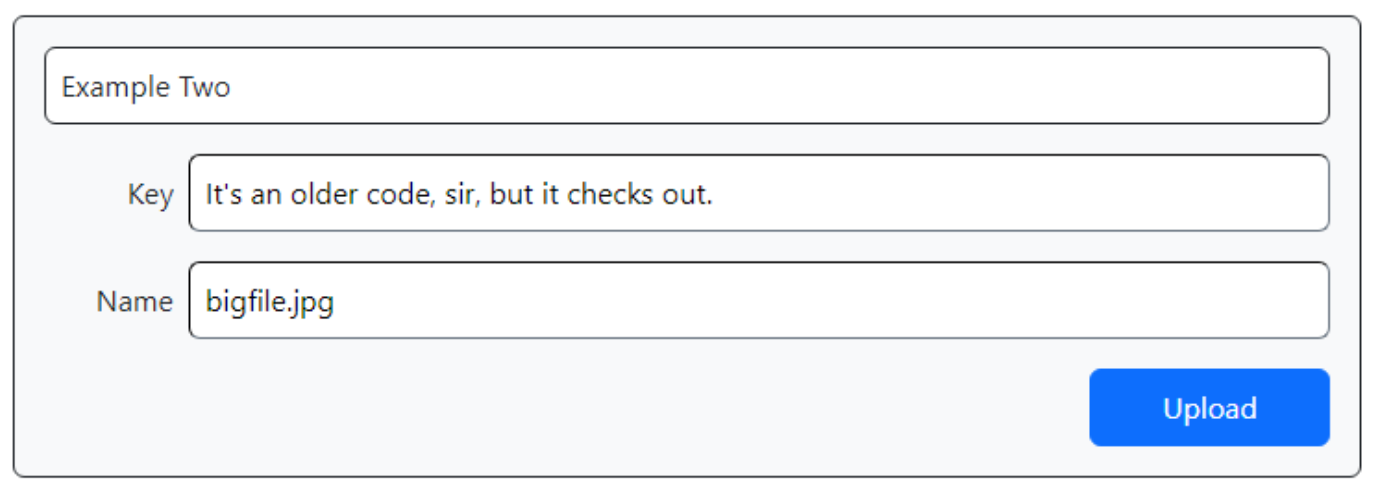
</form>If we use the TMS WEB Core Bootstrap template and add a TWebPanel component and a TWebLabel component to the form, we can already get something that looks quite a bit nicer.
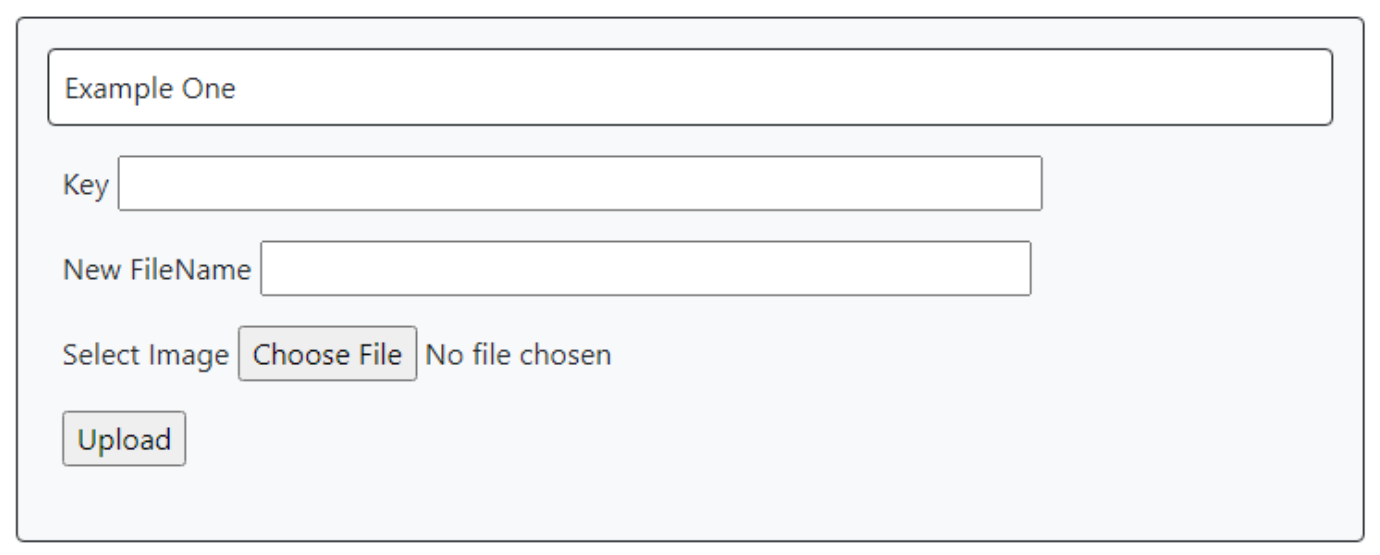
TMS WEB Core-based Form.
The only real change we made is to be sure to update the "action" attribute in the <form> element to point
to our server. When developing TMS WEB Core projects, normally there is a local TMS Web Server that hosts the
in-development app which isn't likely to be where the uploader.php script resides. But with this in place,
uploading an image works as previously.
The downside is that it redirects the page to show the output of the
script, thus leaving our application. There are ways to deal with that, related to adding more attributes (like
"target") to the HTML form that we're using. But we're not restricted to plain HTML here, so we can do
something entirely different.
TMS WEB Core Interaction - TWebHTTPRequest.
Instead of submitting a form and letting the browser have all the fun, we can do a few more things ourselves and thus gain a modicum of control over the interaction. But there are a few pieces that we have to deal with, the first of which is how to get access to a file to upload in the first place. And we have options.
Let's have a look at the TWebOpenDialog component, included with TMS WEB Core. This is a non-visual component. We can drop it on a form and configure it
to work much like our <input type="file"> mechanism in the HTML form we've been using. We can set its
"accept" property to let it know what kinds of files we want to upload. And we can add a button to our
interface to trigger the browser to open the operating system-supplied dialog to allow us to select one (or
more) files.
procedure TForm1.WebButton1Click(Sender: TObject);
begin
  WebOpenDialog1.Accept := 'image/*';
  WebOpenDialog1.Execute;
end;
Note that this same <input type="file"> mechanism automatically allows mobile users to provide a photo
from their camera(s), from their photo library, or from some other location on their device, without having to do
anything else. It can also be configured to support selecting multiple files. Our PHP script is only set up to
handle one file at a time, however, so we'll leave the TWebOpenDialog component configured the same way.
Once an image has been selected, the onChange event gets fired. From here, we can check if we've got an image, and if we
do, we can call one of several functions to access the data. For this example, let's go with the
GetFileAsBase64 option.
procedure TForm1.WebOpenDialog1Change(Sender: TObject);
begin
  if WebOpendialog1.Files.Count = 1 then
  begin
    WebOpenDialog1.Files.Items[0].GetFileAsBase64;
  end;
end;
If we know the file is a text file, or if we want to do something else with the file data, then we can choose
one of the other options. The GetFileAsArrayBuffer works pretty well for dealing with audio files, for example,
as this gives us something we can use directly in the Web Audio API. But for now, dealing with images, we've
already seen how we can use Base64-encoded files, so let's give that one a try first. When we call the
GetFileAsBase64 function, it includes a parameter that provides the file already encoded as Base64, so we don't
have to do that conversion ourselves.
All we're left with is actually sending the file. And here, too, we have lots of options. Let's go with the TWebHTTPRequest component option. In this example, we're going to be sending the Key, FileName, and FileData all as parameters that will ultimately end up in the $_POST array. This means we have to URL encode the data that we're sending. The basic steps are as follows.
- Identify the Key, FileName, and FileData values that we want to send.
- Apply URL encoding to these.
- Combine them together into the POST data that we want to send.
- Tell PHP that this is what we're sending by also sending the appropriate Content-Type that indicates this URL encoding.
- Send the data.
All sounds pretty easy, right? Not so fast!
We've made it this far without talking about CORS. This is in part because when using the command-line, curl, or straight-up HTML, CORS is not part of the picture. But alas, as
we're now using JavaScript to access a remote site, we
have to deal with CORS. Easily corrected though, as we just have to add a CORS header to the top of our PHP script. Which
we've already done, as it turns out. One of the benefits of being able to edit code while writing a blog post
at the same time. Note that the solution for CORS is actually not always to add "*" to Access-Control-Allow-Origin, as there are other implications. But in our script, we're already limiting access via IP address and Key, so this is fine.
To deal with the Content-Type issue, we can just add it to the header that is created as part
of the request that we're sending. Here's what we've got.
procedure TForm1.WebOpenDialog1GetFileAsBase64(Sender: TObject; AFileIndex: Integer; ABase64: string);
var
  KeyEnc: String;
  FileNameEnc: String;
  FileDataEnc: String;
begin
  WebButton1.Caption := 'Preparing';
  asm await sleep(100); end;

  KeyEnc := WebEdit1.Text;
  FileNameEnc := WebEdit2.Text;
  FileDataEnc := ABase64;
  asm
    KeyEnc = encodeURIComponent(KeyEnc);
    FileNameEnc = encodeURIComponent(FileNameEnc);
    FileDataEnc = encodeURIComponent(FileDataEnc);
  end;

  WebHttpRequest1.URL := 'https://www.example.com/uploader.php';
  WebHttpRequest1.Headers.Clear;
  WebHttpRequest1.Headers.AddPair('Content-Type','application/x-www-form-urlencoded');
  WebHttpRequest1.Command := httpPOST;
  WebHttpRequest1.PostData := 'Key='+KeyEnc+
                              '&FileName='+FileNameEnc+
                              '&FileData='+FileDataEnc;

  WebButton1.Caption := 'Sending';
  asm await sleep(100); end;

  await(string, WebHttpRequest1.Perform);
end;
The WebHttpRequest component will then carry out the request, sending along the file. It will return with the same HTML content that we've been getting back each time. If the upload is successful, this HTML will not contain a submission form but will contain the link to the uploaded image. We can simply test for the presence of the form in the returned text as a way of validating the operation. Plenty of other ways to do this, including checking error codes and that kind of thing. Here's what it looks like.
Upload with TWebHttpRequest.
We can make the interface a little cleaner, and remove one of the buttons. Clicking the upload button will also
select the image at the same time. Once the upload has been completed, we can display a message about whether it was
successful or not.
procedure TForm1.WebHttpRequest1Response(Sender: TObject; AResponse: string);
begin
  WebButton1.Caption := 'Upload';
  console.log(AResponse);
  if Pos('form method', AResponse) > 0
  then ShowMessage('Upload failed')
  else ShowMessage('Upload successful');
end;
We could take it further by displaying the image, as we'll have an HTML block that includes the <img>
link in it if the upload succeeds. Similarly, we could check the results to see if there was a problem with
either the IP or Key validation steps. We could also add more error-checking and return codes to the PHP
script, but for now, this works well enough.
TMS WEB Core Interaction - XHR POST.
Perhaps we'd like a little more information about the progress of the upload. There is a progress event for the TWebHttpRequest component, but this is used to track download progress and we're primarily concerned with uploads here. There are other events available, both via the TWebHttpRequest component and when accessing the same functionality using a more native JavaScript approach.
For this example,
we're going to largely be doing the same thing - sending our Key, FileName, and FileData values through a
URL-encoded mechanism, ultimately with the values all arriving in the PHP $_POST array, with FileData as a
Base64-encoded file. This time out we'll also add a progress bar.
As a side note, I struggled a bit initially in trying to figure out why Chrome/Windows was not reporting
any upload progress events at all whereas Firefox and Edge on the same system did without issue. Turns out an
uninstall/reinstall of Chrome fixed this and upload events were coming in just fine. Can't offer up any more
than that - there were no errors, and other events fired fine, just this xhr.upload progress event wasn't working,
no matter how or where it was defined. Not good.
The code for selecting an image, and for handling the input for the Key and FileName properties is the same.
For the progress indicator, we've just got a TWebHTMLDiv component layered behind a TWebLabel component, and we adjust its width
from 0% to 100% to get our progress bar effect.
Here's what the JavaScript code for roughly the same functionality looks like.
procedure TForm1.WebOpenDialog2GetFileAsBase64(Sender: TObject; AFileIndex: Integer; ABase64: string);
var
  KeyEnc: String;
  FileNameEnc: String;
  FileDataEnc: String;
  FileLength: String;
begin
  WebButton2.Caption := 'Preparing';
  asm await sleep(100); end;

  KeyEnc := WebEdit3.Text;
  FileNameEnc := WebEdit4.Text;
  FileDataEnc := ABase64;

  asm
    KeyEnc = encodeURIComponent(KeyEnc);
    FileNameEnc = encodeURIComponent(FileNameEnc);
    FileDataEnc = encodeURIComponent(FileDataEnc);
  end;

  FileLength := FloatToStrF(FileDataEnc / 1024, ffnumber,5,1)+' KB';
  WebButton2.Caption := 'Sending';

  asm await sleep(100); end;

  asm
    var xhr = new XMLHttpRequest();

    xhr.upload.onloadstart = function() {
      pas.Unit1.Form1.UpdateProgress1('Upload Started', 0);
    };

    xhr.upload.onprogress = function(event) {
      let uploadedBytes = event.loaded / event.total;
      pas.Unit1.Form1.UpdateProgress1('Uploaded',uploadedBytes);
    };

    xhr.upload.onload = function() {
      pas.Unit1.Form1.UpdateProgress1('Upload Complete', 100.0);
    };

    xhr.upload.onerror = function() {
      pas.Unit1.Form1.UpdateProgress1('Upload Error', 0.0);
      console.log('Upload Error');
      console.log(xhr.status);
    };

    xhr.onreadystatechange = function() {
      if (xhr.readyState === 4 && xhr.status === 200) {
        if (xhr.responseText.includes('form method')) {
          pas.Unit1.Form1.UpdateProgress1('Upload Unsuccessful', 0.0);
        }
        else if (xhr.responseText.includes('<img ')) {
          pas.Unit1.Form1.UpdateProgress1(FileLengh+' Upload Successful', 100.0);
        }
        console.log(xhr.responseText);
      }
    };

    xhr.open('POST', 'https://www.example.com/uploader.php', true);
    xhr.setRequestHeader('Content-Type', 'application/x-www-form-urlencoded');
    xhr.send('Key='+KeyEnc+
             '&FileName='+FileNameEnc+
             '&FileData='+FileDataEnc);

  end;
end;
To update our progress, we've got a Delphi function assigned to the task.
procedure TForm1.UpdateProgress1(ProgressText: String; ProgressValue: Double);
begin

  Console.log(ProgressValue);
  Console.log(ProgressText);

  WebLabel11.ElementHandle.style.setProperty('z-index','1');
  WebHtmlDiv5.Visible := true;
  WebHTMLDiv5.WidthPercent := ProgressValue * 100;

  if (ProgressValue <> 0) and (ProgressValue <> 100) then
  begin
    WebLabel11.HTML := '<div style="width:100%; text-align: center; filter: drop-shadow(0px 0px 1px black) drop-shadow(0px 0px 1px black); color: white;">'+
        ProgressText+' '+FloatToStrF(ProgressValue * 100, ffNumber,5,1)+' %'+
     '</div>';
  end
  else
  begin
    WebLabel11.HTML := '<div style="width:100%; text-align: center; filter:drop-shadow(0px 0px 1px black) drop-shadow(0px 0px 1px black); color: white;">'+
        ProgressText+
      '</div>';
    WebButton2.Caption := 'Upload';
  end;

end;
All that filter:drop-shadow stuff is just to make the text have a border that is visible no matter what is
behind it. Here's what our upload looks like with a progress indicator.
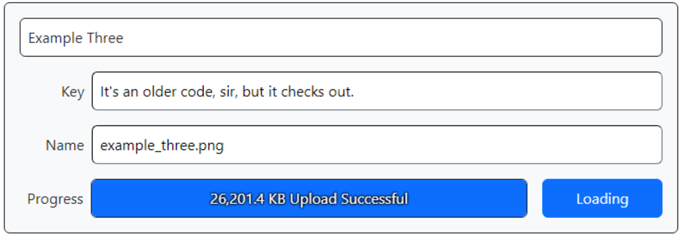
Progress Indicator Activated.
This works pretty well, and in fact a little better than curl. You may recall when we tried to stuff everything into the $_POST array by encoding the file into the POST data using curl, we ran into an operating system limit related to the length of the command we were trying to execute. No such limitations here, as there's no command-line involvement everywhere. Smooth sailing all the way.
TMS WEB Core Interaction - XHR FORM.
So while we might want to call it a day, we should keep in mind that we crafted our PHP script to work with this particular scenario - having everything passed via the POST data mechanism. There's a pretty good likelihood that this isn't the scenario many PHP upload scripts use. Why would that be? Well, because it is easier to use the Form Data approach most of the time, given that HTML itself implements the entire mechanism internally. So let's try and do the same thing again, but this time use the Form Data approach so that it will potentially be usable with PHP scripts we don't have any control over.
The structure is largely the same in terms of acquiring an image to upload, as well as the Key and FileName
parameters. We just need to somehow send along the file itself without passing it through the Base64-encoding
process. For our TWebOpenDialog component this time, we're going to use the ArrayBuffer option.
procedure TForm1.WebOpenDialog3GetFileAsArrayBuffer(Sender: TObject; AFileIndex: Integer; ABuffer: TJSArrayBufferRecord);
var
  Key: String;
  FileName: String;
  FileData: TJSHTMLFile;
begin
  WebButton3.Caption := 'Preparing';
  asm await sleep(100); end;

  Key := WebEdit5.Text;
  FileName := WebEdit6.Text;
  FileData := WebOpendialog3.Files[0].FileObject;

  WebButton3.Caption := 'Sending';
  asm await sleep(100); end;

  asm
    var xhr = new XMLHttpRequest();

    xhr.upload.onloadstart = function() {
      pas.Unit1.Form1.UpdateProgress2('Upload Started', 0);
    };

    xhr.upload.onprogress = function(event) {
      let uploadedBytes = event.loaded / event.total;
      pas.Unit1.Form1.UpdateProgress2('Uploaded',uploadedBytes);
    };

    xhr.upload.onload = function() {
      pas.Unit1.Form1.UpdateProgress2('Upload Complete', 100.0);
    };

    xhr.upload.onerror = function() {
      pas.Unit1.Form1.UpdateProgress2('Upload Error', 0.0);
      console.log('Upload Error');
      console.log(xhr.status);
    };

    xhr.onreadystatechange = function() {
      if (xhr.readyState === 4 && xhr.status === 200) {
        if (xhr.responseText.includes('form method')) {
          pas.Unit1.Form1.UpdateProgress2('Upload Unsuccessful', 0.0);
        }
        else if (xhr.responseText.includes('<img ')) {
          var x = xhr.responseText
          var FileLength = x.substr(x.indexOf('Size:')+ 6,12).trim().split('<')[0];
          pas.Unit1.Form1.UpdateProgress2(FileLength+' Upload Successful', 100.0);
        }
        console.log(xhr.responseText);
      }
    };

    var fData = new FormData();
    fData.set('Key', Key);
    fData.set('FileName', FileName);
    fData.set('FileData',FileData);

    xhr.open('POST', 'https://www.example.com/uploader.php', true);
    xhr.send(fData);

  end;
end;
The interesting bit is at the end, where we create a new set of "form data" and populate it with what we're
sending. The browser takes care of changing the Content-Type encoding to "multipart/form-data" for us. The Key and FileName
values end up in the $_POST array as expected, and the complete file, including the original filename, size, and so
on, lands in the $_FILES array, just like we want. Our progress bar works just as well using this
method.
One of the things to keep in mind with a more generic PHP upload script is that it is likely expecting to
receive data with certain labels. Instead of the name "FileData" for example, perhaps it is just "file". And
many such upload scripts don't have any kind of Key or FileName option - they just get the filename from the
$_FILES array, based on the name of the file uploaded, and security is likely handled by entirely separate
mechanisms if there are any security mechanisms at all. Hopefully from these examples, there's a clear path towards customizing this
code for any scenario you might run into.
Above and Beyond.
This post (ha!) has covered quite a lot of ground relating to how we might interact with a PHP script, specifically when it comes to uploading images. There are many ways to approach the problem and even other TMS WEB Core components that can help. TWebFileUpload, for example, combines a <form> with a UI that supports drag-and-drop, as well as similar event handling that is available with the TWebHttpRequest component, all in one package.
And there are many other things we might want to do, upon receiving a file from the user, prior to uploading it. If we were setting up a user registration system, for example, perhaps we'd want the user to upload a photo of their choosing. But we might also want to provide for a degree of customization (pan, zoom, etc) to fit the image into a given shape, like a circle perhaps. Maybe we'd also like to allow the user to select any size image they want, but when we upload it, we might want to resize it or otherwise limit the file to, say, 500 KB or something along those lines. As a general web app development tool, TMS WEB Core makes all these things possible. And we'll see an example of user photo registration in a post coming this way very soon.
Until then, please send along any ideas, comments, questions, or requests related to this post. This can be a complex topic and I'm sure there are areas that could be expanded on with additional examples. Also, the project below can be used to try some of this out. It is pointing at a live version of our original PHP script, but with the same Key and IP address restrictions in place, it won't be possible to upload a file.
Follow Andrew on 𝕏 at @WebCoreAndMore or join our 𝕏 Web Core and More Community.
Andrew Simard

This blog post has received 3 comments.
2. Wednesday, July 26, 2023 at 4:26:56 PM
Thank you very much Andrew
DERNEGI CANSUYU
3. Wednesday, July 26, 2023 at 7:02:08 PM
You are both most welcome! Be sure to post any follow-up questions that may come up.
Andrew Simard
All Blog Posts | Next Post | Previous Post
Feichtenschlager Thomas