Blog
All Blog Posts | Next Post | Previous Post

 Tracking High Altitude Balloons with Delphi and TMS Miletus
Friday, October 28, 2022
Whilst Delphi targets Windows, Mac OS, Android, iOS and Intel Linux, one gaping hole in its repertoire is the Arm-based Raspberry Pi. Taking 2020 as an example, the Pi out-sold the Apple Mac, and with over 40 million sold it’s a large target audience. So whilst I happily develop applications for all of those targets in Delphi, until recently I had to switch to Python or C or Lazarus/FPC for my Pi applications.
Enter Miletus, which is part of the TMS Web Core product. Web Core makes it easy to develop web applications which should run on pretty much any browser, and Miletus expands on that by running the web application within a binary executable that includes code to connect with the host machine more intimately. On the Pi, this includes components to control devices connected to the GPIO port, so if say you want to measure temperature and humidity using a Pi HAT then Miletus can provide the glue between your application and the hardware.
Key Components
My hobby is HAB (High Altitude Ballooning) which is flying and tracking payloads that travel through the stratosphere at 30-40km altitude – and I soon realised that Miletus had everything I needed to code an application for tracking those balloons on a Raspberry Pi. It has:
- SPI component – needed for interfacing with an radio receiver.
- UART component – needed for reading local GPS position
- Mapping – so I can show the local and balloon positions on a map
- Web and Web Socket components – needed to share telemetry and GPS location with other balloonists
- INI file component for storing user settings
Once I realised that I could do it, that quickly turned into a need to do it, so I set up a Raspberry Pi and added a radio receiver and GPS.
Development Environment
I set up the Pi to allow VNC connections so I could view and control the Pi desktop from my Windows PC, and installed Samba on the Pi so I could copy the built application from the PC to the Pi; this is needed as there’s no equivalent of the Delphi paserver program.
One thing I like to do with all my Delphi cross-platform development is to test as much as I can on the Windows PC, as the compile-run-test cycle is quicker. Obviously there are some things that cannot be tested in this way – for example SPI comms to my radio receiver module – but the majority of the code can be. Also, in Miletus there are separate components for general serial comms and for the Pi serial port, so I wrote separate code here for Windows and Pi, so that the entire application excluding the Pi-specific code could be tested as a whole.
Balloon Tracking
Before we get on to the Miletus application itself, a few notes about how high altitude balloons are tracked. The balloon carries a tracker which consists of a GPS receiver (so it knows where it is), a radio transmitter (so it can transmit that position to the ground), and a small computer running software that listens to the GPS receiver and talks to the radio. That’s a simple task and is commonly achieved with a small microcontroller such as a basic AVR (as used on Arduino boards). More complex trackers use a Raspberry Pi which makes it easy to take photographs and send the image data down with the telemetry, but that’s beyond of the scope of this article.
At the ground we need a receiver to receive that telemetry, and some means of at least displaying the balloon position as latitude, longitude and altitude. Ideally we also want to see that position on a map, so we can follow the flight path in real time and plan a route to the landing position for recovery. So now a receiver will need a suitable colour display as well as the radio receiver.
One of the great things about the hobby is the community of balloonists who are more than willing to help each other. To make it easier to track a balloon, a distribute receiver network was built so that any balloon can be tracked by multiple receivers, all sending their received telemetry to a central server. That server connects to a mapping application so that, even if only one receiver (and we commonly have 15-20 active receivers during a flight) receives a telemetry packet, then that’s enough to update the map.

So now, ideally, the receiver application can upload to the central server, and even better download telemetry from it in case the balloon is not being received locally (e.g. there’s a hill in the way).
PiPADD
I decided to call my new application PiPADD, after the “Personal Access Display Device” in Star Trek. If you’ve seen my other HAB applications then you’ll have noticed that many have an LCARS (Library Computer Access/Retrieval System) user interface, also stolen borrowed from Star Trek.
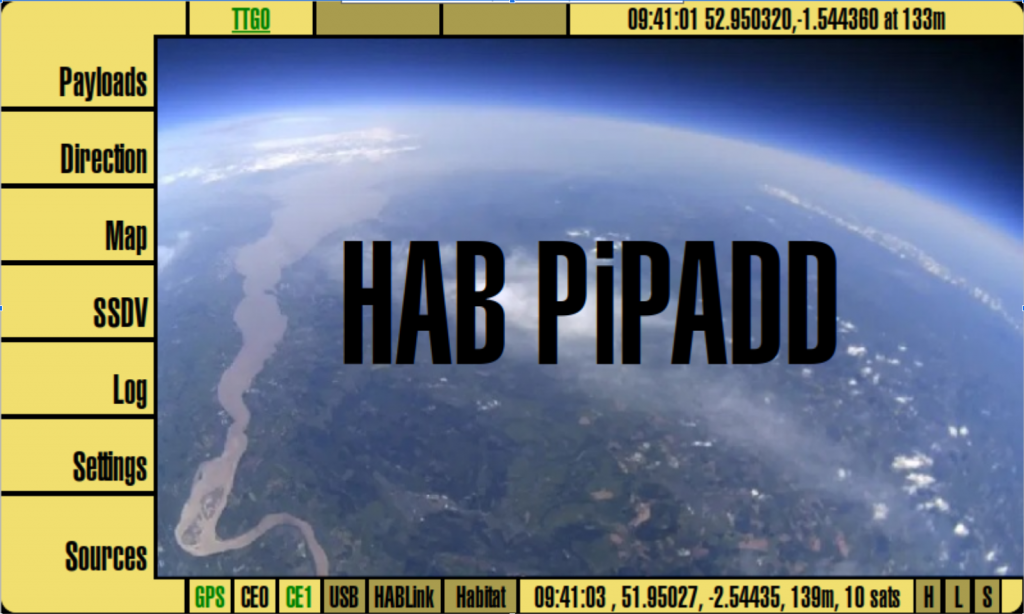
The top area shows up to 3 received payloads along with the latest telemetry from the selected payload.
The left area has buttons for the main functions.
The lower area shows the status of each telemetry source, then the current GPS time and position, and finally the status of the uploaders.
Finally, the centre of the screen shows the current selected screen (one per button on the left). On startup it shows the splash screen as you can see. – a photograph from one of my flights over the UK.
Main and Sub-Forms
The way that the UI works is that there’s a single main form that is displayed all the time, and separate forms (one per button) which are made visible as required. What I wanted was to keep the code separate – hence one form per button – but to display those forms as if they are physically part of the main form. This makes it quick and neater to change from one form to another.
On the main form, there is one TWebPanel for each of those forms:
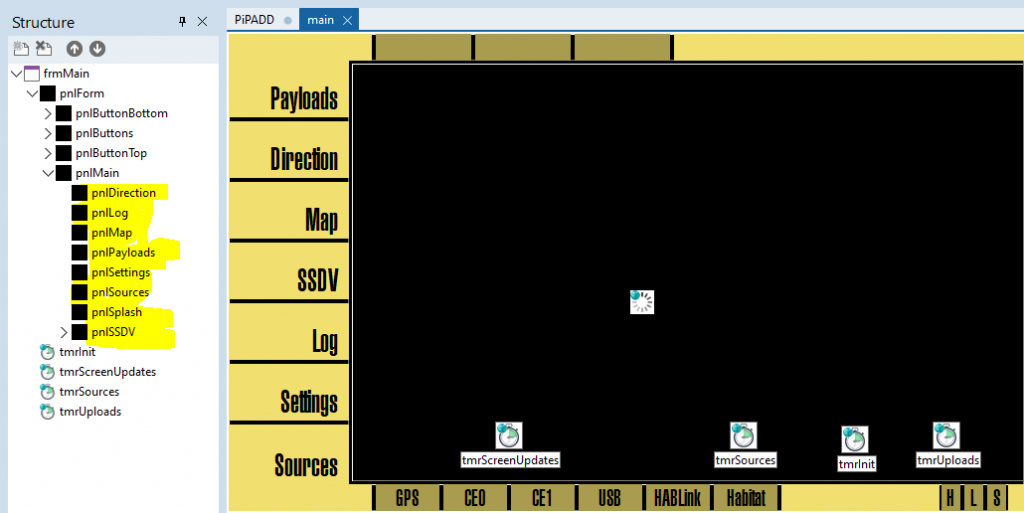
Those panels are set to Visible := False in the designer, and are made visible as required.
At startup, each of the forms is loaded in turn, with code like this:
    procedure AfterPayloadsCreate(AForm: TObject);
    begin
        frmSplash.lblStatus.Caption := 'Loading direction form ...';
        frmDirection := TfrmDirection.CreateNew(pnlDirection.ElementID,
          @AfterDirectionCreate);
    end;
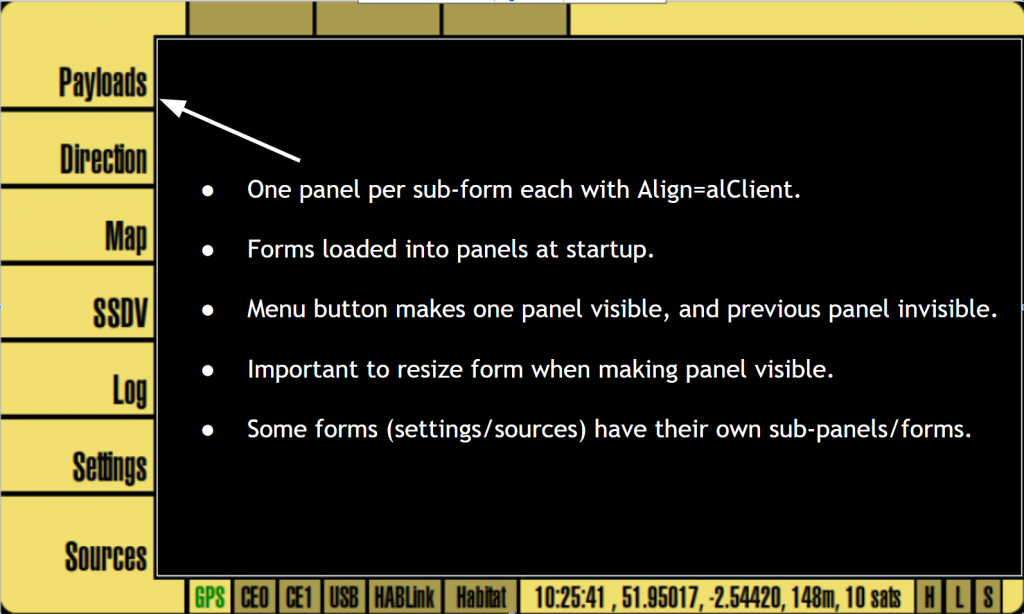
Note “pnlDirection.ElementID” which tells Web Core to load the new form with pnlDirection as its parent. That means that all we need to do to make the form visible is make that parent control (a TWebPanel) visible.
Also note “AfterDirectionCreate” which is a callback for when the form has been created. That procedure then loads the next form, and so on till all forms are loaded and the application is ready for use.
When the user clicks one of those main buttons, then essentially all that happens is that the relevant TWebPanel is made visible and the previously visible TWebPanel is made invisible. It makes for a quick changeover between forms.
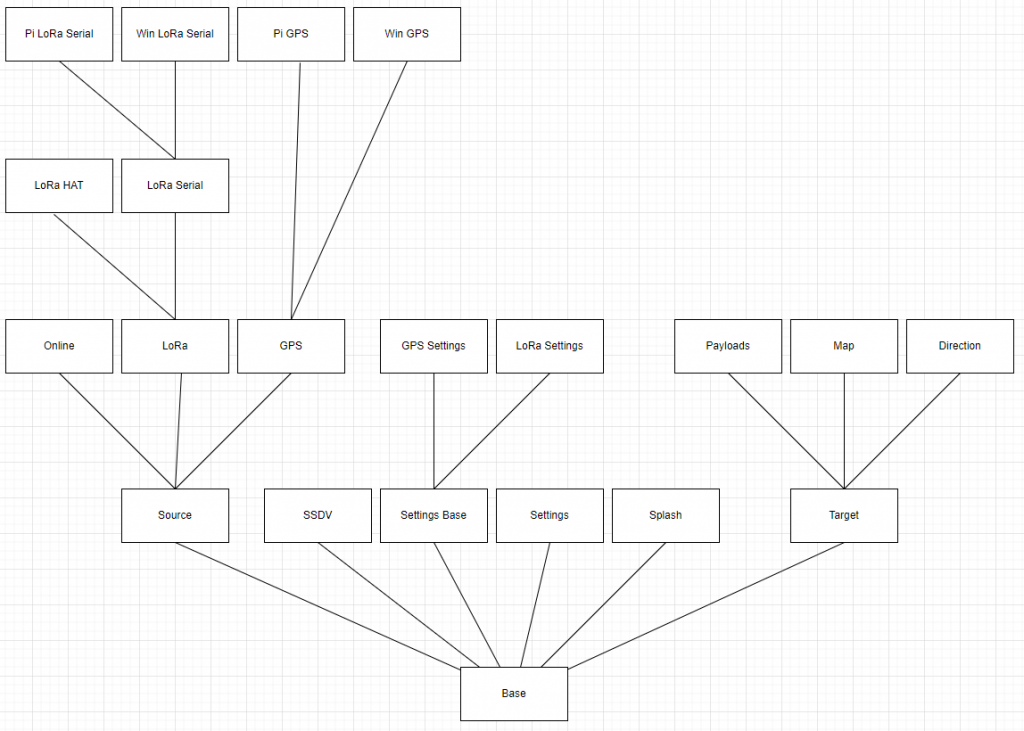
Form Inheritance
I use form inheritance quite a lot, as it saves on work and because (like most programmers I guess) I’m inherently lazy. It reduces the work designing forms and writing code, and makes for simpler code too.
For this application I created a base form for all forms aside from the main one, and then generic forms for sources (LoRa, GPS etc.), targets (directions, map etc.) and settings. Here’s the resulting inheritance tree, with some forms missing to make it clearer.
GPS – Serial
My application needs a GPS receiver so it can do things such as calculate the distance and direction to the balloon. GPS receivers for the Pi come in two flavours – HATs that connect to the GPIO pins and send data over the standard Pi serial port /dev/ttyAMA0, and USB models that create a new device typically /dev/ttyUSB0 or /dev/ttyACM0. The TMiletusRaspberryUART component now (after a bit of prompting!) supports either of these.
Usage is straightforward – set the port/device name, baud rate etc and open the device. Once opened you have to poll the device from a time (it’d be nice to have this wrapped up in an event, hint hint), then parse the GPS data which is in NMEA format and contains time, date, latitude, longitude and altitude plus lots of other information about the satellites in use. e.g.:
$GPGGA,161229.487,3723.2475,N,12158.3416,W,1,07,1.0,9.0,M,,,,0000*18
To reduce CPU usage my code switches off the NMEA sentences that it’s not interested in.
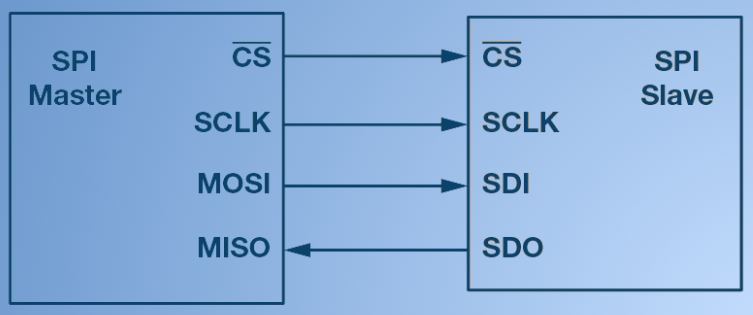
LoRa – SPI
SPI is “Serial Peripheral Interface” and is a popular serial interface on microcontrollers. SPI devices include various sensors and controllers, as well as the LoRa radio transceiver used by my application.
To use an SPI device you will need to read the manual for your specific device as they vary enormously, but in general they will present a number of registers that you can address and then write to or read from. You will then need to configure the device through config registers before sending and/or receiving data such as temperatures etc.
In the case of the LoRa devices that I use, they need to be set to the correct radio frequency etc., and then a status bit in a status register can be polled to know when a radio packet has been received. For high altitude balloons those packets will usually be telemetry containing the balloon position as an ASCII (text) string with time, latitude, longitude and altitude etc. Something like this:
$$MY_BALLOON,181,10:42:10,54.422829,-6.741293,27799.3,1:10*002A
Mapping
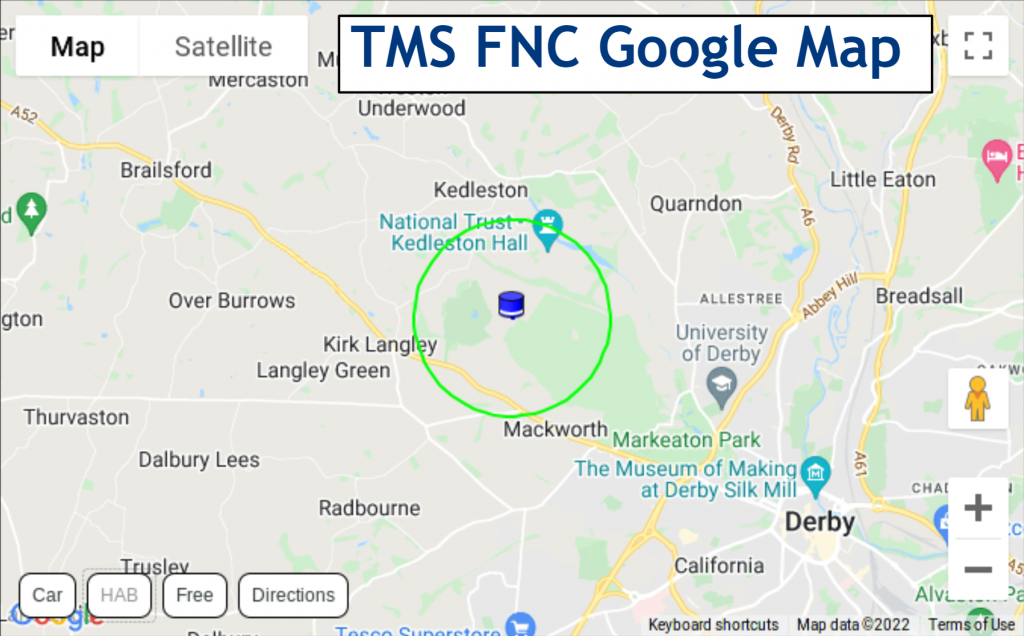
TMS Web Core includes TFNCMap – the same map that you may be familiar with from writing VCL or FMX applications. Usage is almost identical to those; the only exception being that markers need to be web-based so you no longer have the option of having them in the local file system.
TFNCMap is many features, including the ability to draw circles (useful for drawing the balloon’s radio horizon), polylines (to draw its path), and now overlaid HTML controls – see the buttons on this screenshot for an example:
LCARS and CSS
I wanted to have nice rounded corners as seen on LCARS itself. For my Android applications I have to draw circles and size/place them carefully, but in TMS Web Core it’s easier as we have access to CSS. All I needed was set add some CSS and link it to the corner component:
AddCSS('TopLeft', '.TopLeft {border-radius: 12px 0px 0px 0px}');
lblTopLeft.ElementClassName := 'TopLeft';

Speech
Star Trek ship computers all have voices, so why not add speech-to-text to my application? Then it can announce events such as “Balloon ABC has burst” when it notices the altitude rapidly falling.
TMS Web Core includes a speech component however, due to a lack of support in the Pi browser, this doesn’t work on the Pi. All is not lost though, as Miletus does include the ability to run external programs. I can imagine many tasks for which this ability is essential. So, I installed the espeak package on my Pi, and then wrote the following code to use that or the browser speech component according to the target machine:
if os.Platform = opLinux then begin
    MiletusShell.Execute('espeak -a 200 -s 150 "' + Speech + '"');
end else begin
    WebSpeechSynthesis1.Speak(Speech);
end;
Raspad 3
Initially I ran this app on a Pi 4 in a small plastic case with the official Pi touchscreen. For GPS I used a GPS HAT, and for LoRa I used a LoRa HAT, all from Uputronics.
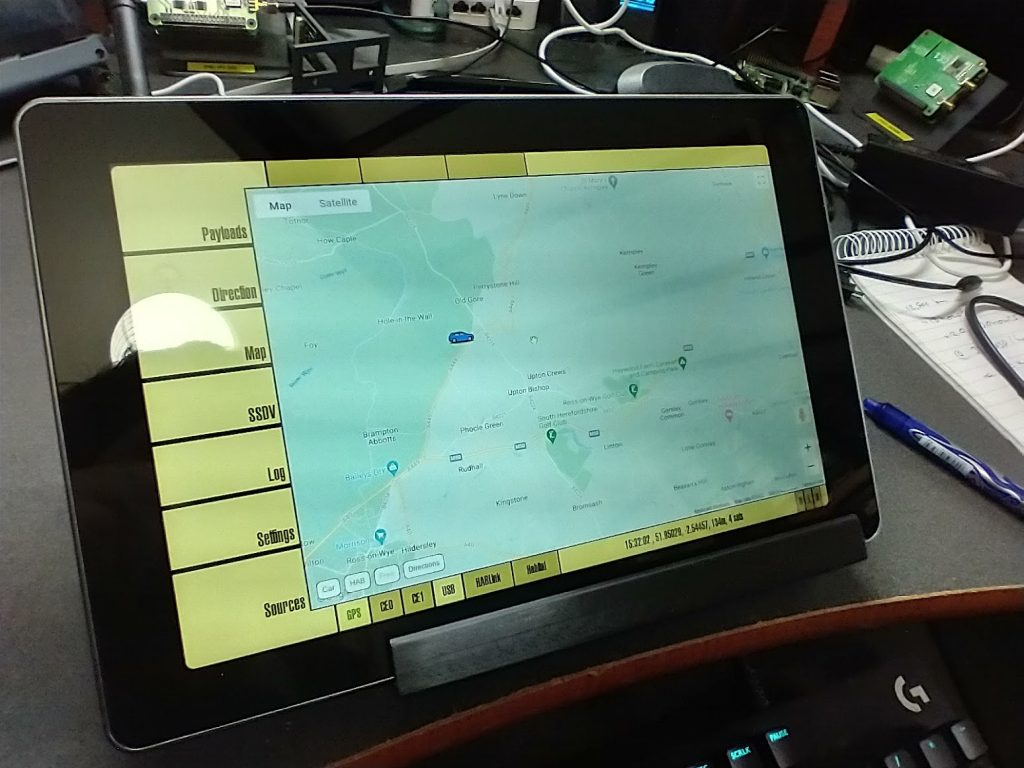
I then wondered if anyone sells a Raspberry Pi tablet where I could add these components internally. There are some tablets available, but the only one that was currently available, and which seemed to have enough internal space, was the Raspad 3. So I ordered one from Amazon and next day it arrived.
It didn’t take long to install my software (see later for instructions) and get it working. However the internal space is quite limited, and there’s only space for a single HAT. I do have a combined GPS/LoRa HAT, however it uses SPI channel 1 which is already used by the Raspad 3’s internal board (used for power, fan control, and repeating the Pi ports). I didn’t see anything in the documentation about the use of SPI, however I doubt that many people try to add a HAT especially as it blocks air from the internal fan!
Fortunately, I had other options, namely USB. All of the Pi’s 4 USB ports are free to use, so I connected a USB GPS to one and an Uputronics USB LoRa receiver to the other. This did require some software changes, firstly to allow for a choice of GPS device, and secondly to support the LoRa receiver’s serial protocol, but I had code for that already from my Android/iOS apps. It’s such a great advantage to be able to use existing Delphi code with TMS Web Core!
I tried with the GPS internally, but it did make it difficult to pick up satellites, so I opted for a stick-on external GPS which I mounted on the top of the tablet, with the LoRa UHF antenna socket on the left. I think it looks pretty good.
Hints & Tips for Miletus on Pi
Whilst TMS Web Core is pretty much “Delphi for the web”, there are some differences and it’s worth taking some time learning those differences to begin with. So here are my tips for TMS Web Core in general and Miletus on the Pi specifically.
- Learn the differences from VLC/FMX
Understand async code and the await() function
Use of HTML/CSS to enhance or design UI
Be friends with timers
Use the F12 console
- Testing on Windows is faster
- Test Pi-specific code in small test programs
- Use dummy code on Windows to replace Pi-specific
- Use “if os.Platform = opLinux …” to choose Windows/Pi code
- Set up SAMBA on Pi to transfer executable
- Read the Hints & Tips thread in the Web Core support forum
Author: Dave Akerman
Masiha Zemarai

This blog post has received 1 comment.
All Blog Posts | Next Post | Previous Post
I had not heard about Raspberry Pi tablets before, so I will have to check that out. Pretty handy. I have played with a few unusual displays. 16:9 displays are great for desktops and desktop-style apps, but fun to try other aspect ratios as well. I''ve got a 1280x400 display that makes for an interesting touch interface.
One of my next Raspberry Pi challenges is to see about wiring up a bunch of external sensors and relays. Mostly I think via serial/RS232 or some kind of HAT interface. I think it is great that Miletus supports those kinds of interfaces as it means there''s really no need to use anything other than TMS WEB Core for these kinds of projects.
Thanks for the great post!
Andrew Simard