Knowledge Base Alert April, 2015


VCL

FIREMONKEY

INTRAWEB

DEVELOPER TOOLS

TPlanner:

How to add images in a Planner header


Using mini HTML formatted text in the caption you can insert images in the header. You can do this with the <IMG> tag in the text with a reference to an image index in the imagelist assigned to Planner.PlannerImages. For info on using mini HTML formatted text, please see: http://www.tmssoftware.com/site/minihtml.asp

Example:

with Planner1.Header do
begin
Captions.Clear;
Captions.Add(''); //take first sidebar header section into account
Captions.Add('<img src="idx:0"> <b>Product</b>');
Captions.Add('<img src="idx:1"> <b>Info</b>');
Captions.Add('<img src="idx:2"> <b>New</b>');
end;


TPlanner:

How to customize the text of the sidebar


With the event Planner.OnPlannerGetSidebarLines , you can fully customize the text of the sidebar. This event is triggered when the Planner needs the text for the 3 lines that can appear in the sidebar. With this event , you can customize the text, i.e. control the format of the hour displayed there. Or for example to remove the text at specific time slots.

Example 1: hide the display for minutes:

procedure TForm4.Planner1PlannerGetSideBarLines(Sender: TObject; Index,
  Position: Integer; var HourString, MinuteString, AmPmString: string);
begin
  MinuteString := '';
end;

Example 2:

procedure TForm4.Planner1PlannerGetSideBarLines(Sender: TObject; Index,
  Position: Integer; var HourString, MinuteString, AmPmString: string);
begin
  if index mod 4 = 0 then
    HourString := inttostr(....)
  else
    HourString := '';
end;

TWebUpdate:

How to target the UserAppData directory


There are several target directory options:

{WIN} : Windows folder
{SYS} : Windows System32 folder
{PF} : Program Files folder
{TMP} : Temporary files folder
{APP} : Application folder
{DOC} : My documents folder

In case you wish to target the UserAppData directory, you can do this with a custom path converter via event OnConvertPrefix. From this event you can pass the path for a prefix you assign for this path where the path itself can be retrieved via:

uses ShlObj; 
.. 
.. 
function getUserPath:string; 
var pathString:array[0..1023] of char; 
begin 
   ShGetSpecialFolderPath(0,PChar(@pathString),CSIDL_APPDATA,false); 
   result:=pathString; 
end; 

TAdvStringGrid:

.XLS file limitation of 255 columns


It is a limitation of the .XLS file format that it can only handle 255 columns. While TAdvStringGrid can handle much more columns, export of grids with more columns than what the .XLS file format can handle will fail. If there is a need to export more than 255 columns, you can use TMS Grid Filters in combination with TMS Flexcel to export to .XLSX that doesn’t have this 255 columns limitation.


TAdvEdit:

General tips


TAdvEdit is an enhanced TEdit control that has many options to make the data entry process much more user friendly.

Allowing to enter negative & positive numbers
Set AdvSpinEdit.Signed = true and you can use the - key to toggle between negative & positive values.

Creating a TAdvEdit at runtime
To initialize focus handling properly when creating a TAdvEdit at runtime, call TAdvEdit.Init after creation.

Caret not visible in the edit control
It is a known shortcoming of the Windows operating system EDIT class (that standard VCL TEdit and also TMS TAdvEdit uses) that the caret is not displaying when the height of the control is too small in relation to the choosen font. As this is a Windows limitation, it can only be solved by either increasing the control height or decreasing the font size.

Using the decimal separator when '.' is pressed on the numerical keypad.
Set AdvEdit.ExcelStyleDecimalSeparator = true

Using a fixed suffix and/or prefix
It can be convenient that there is a fixed suffix or prefix hinting the user typically of the dimension of a value to enter. This can be the currency symbol for entering monetary values or a dimension like degrees Celcius °C. To have this dimension always displayed and as non editable part of the text, it can be set via Suffix and/or Prefix property.

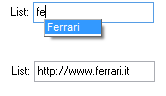
Using the built-in Lookup or autocompletion capabilities
Just like in Outlook when you start typing an email address, Outlook makes a suggestion while typing on possible matching email addresses, TAdvEdit has such capability. The settings to control this lookup or autocompletion capability can be found under TAdvEdit.Lookup. The default and most simple behavior of the lookup is to add entries in the Edit.Lookup.DisplayList stringlist.

This code snippet initializes the lookup with display text and value text. When typing 'Fe', the dropdown list will suggest 'Ferrari' and when accepting to autocomplete, the edit control text will be set to 'http://ferrari.it':

begin
  with AdvEdit1.Lookup do
  begin
    DisplayList.Clear;
    ValueList.Clear;
    DisplayList.Add('BMW');
    ValueList.Add('http://www.bmw.de');
    DisplayList.Add('Mercedes');
    ValueList.Add('http://www.mercedes.de');
    DisplayList.Add('Porsche');
    ValueList.Add('http://www.porsche.de');
    DisplayList.Add('Ferrari');
    ValueList.Add('http://www.ferrari.it');
    DisplayList.Add('Audi');
    ValueList.Add('http://www.audi.de');
  end;
  AdvEdit1.Lookup.Enabled := true;
end;


When Lookup.History is set to true, values entered in the edit control are automatically added to the DisplayList. This DisplayList can be persisted in the registry or in an INI file. To enable this capability, set AdvEdit.Persistence.Enable is true and specify the registry key or INI filename via AdvEdit.Persistence.Key and the registry value name or INI file section name with AdvEdit.Persistence.Section.

TDBAdvCardList:

Using HTML template items in TDBAdvCardList


In CardTemplate.Items[index].ItemType , you can now set the type to itHTMLText. You can use CardTemplate.Items[index].HTMLTemplate to set the template for the HTML text for the item. DB fields are invoked via <#FIELDNAME> in the template. Other than this, HTML tags can be used described at http://www.tmssoftware.com/site/minihtml.asp

Example:
When TDBAdvCardList is bound to a dataset containing cars that has the fields BRAND, TYPE, CC and PK, these can be combined into on card item in TDBAdvCardList by setting the template to:

'Car:<b><#BRAND></b><BR><#TYPE> Engine: cc:<FONT COLOR="clBlue"><#CC></FONT>/pk:<FONT COLOR="clGreen"><#PK></FONT>'

Combined with setting the CaptionField to BRAND and add an item directly connected to PRICE and COUNTRY fields, the result is:


TTMSFMXWebGMaps:

How to take a screenshot in Android


The code below takes a screenshot of an instance of TTMSFMXWebGmaps and saves it to a file:

units
AndroidApi.JNI.Embarcadero, AndroidApi.JNI.GraphicsContentViewText, AndroidApi.JNI.JavaTypes, AndroidApi.Helpers, FMX.Objects, IOUtils

code
var
  web: JWebBrowser;
  pic: JPicture;
  bmp: JBitmap;
  c: JCanvas;
  fos: JFileOutputStream;
  fn: string;
begin
  fn := TPath.GetDocumentsPath + PathDelim + ''sample.jpg'';
  web := TJWebBrowser.Wrap(TMSFMXWebGMaps1.NativeBrowser);
  pic := web.capturePicture;
  bmp := TJBitmap.JavaClass.createBitmap(pic.getWidth, pic.getHeight, TJBitmap_Config.JavaClass.ARGB_8888);
  c := TJCanvas.JavaClass.init(bmp);
  pic.draw(c);
  fos := TJFileOutputStream.JavaClass.init(StringToJString(fn));
  if Assigned(fos) then
  begin
    bmp.compress(TJBitmap_CompressFormat.JavaClass.JPEG, 100, fos);
    fos.close;
  end;
end;


TTMSFMXWebGMaps:

How to set the map to a different location


The DefaultLatitude and DefaultLongitude needs to be set at designtime, to initialize the map the first time it is loading. When the map is loading the map will load this as the center location.

Afterwards, you can use the TTMSFMXWebGMaps1.MapPanTo(Latitude, Longitude) to set the map to a different location. This function performs a pan to a location set by latitude and longitude coordinates. This is useful to set a certain position in the center of the control canvas. Make sure to call MapPanTo after the map has finished loading. The OnDownloadFinish event is triggered when the map is ready.

Example:

procedure TForm1.TMSFMXWebGMaps1DownloadFinish(Sender: TObject); 
begin
  TMSFMXWebGMaps1.MapPanTo(Latitude, Longitude); 
end;

This event works identically for TMS WebGMaps and TMS IntraWeb WebGMaps (OnAsyncDownloadFinish).

TTMSFMXGrid:

How to create a new custom grid descending from TTMSFMXGrid


When you create a new grid that descends from our TTMSFMXGrid control, make sure that in the new class, you override the protected method GetDefaultStyleLookupName to ensure your new grid control uses the base class TTMSFMXGrid default style resource.

Sample code:
  TTMSFMXGridEx = class(TTMSFMXGrid)
  private
    { Private declarations }
  protected
    { Protected declarations }
    function GetDefaultStyleLookupName: string; override;
    function GetClassStyleName: String; override;
  public
    { Public declarations }
    procedure ApplyStyle; override;
  published
    { Published declarations }
  end;

function TTMSFMXGridEx.GetClassStyleName: String;
begin
  Result := ClassParent.ClassName + 'style';
  Delete(Result, 1, 1);
end;

function TTMSFMXGridEx.GetDefaultStyleLookupName: string;
begin
  Result := GetClassStyleName;
end;

Otherwise the style resource won't be found for the new descending grid control and it will appear empty.

TIWAdvWebGrid:

Using a detailgrid in TIWAdvWebGrid


Make sure that one column has a DetailSpan value set higher than 0. This is the column from where you want to see the detail grid, typically the first column. The DetailSpan value controls in how many columns you see the detail grid. Set DetailRowShow to dsServerOneOpen. Use the ctNode ColumnType to display a node in the cell to show/hide the TTIWAdvDetailWebGrid.

Example:
  TIWAdvWebGrid1.DetailGrid := TIWAdvDetailWebGrid1;
  TIWAdvWebGrid1.DetailRowShow := dsServerOneOpen;
  TIWAdvWebGrid1.Columns[0].ColumnType := ctNode;
  TIWAdvWebGrid1.Columns[0].DetailSpan := 3;

TMS XData:

CORS and preflighted requests with TMS XData


Enabling CORS in TMS XData is very simple. Actually a single line of code:

 XDataServerModule.AccessControlAllowOrigin := '*';

And it will handle most of what’s needed, including preflighted requests. This post could end here if you are looking about how to deal with CORS in TMS XData. But let me use the opportunity to explain and illustrate how CORS works. For more information: http://www.tmssoftware.com/site/blog.asp?post=305


As always, we thank all users for the numerous inputs, feedback, comments and suggestions. This is an invaluable help to steer our developments here at TMS software. We continue to look forward to all your further communications to direct our team to provide you better tools and components for your needs.

Kind regards,
TMS software team
Email: info@tmssoftware.com
Web: http://www.tmssoftware.com
Support, FAQ & Manuals: http://www.tmssoftware.com/site/support.asp


Follow latest developments at tmssoftware.com


NOTICE: If you wish to unsubscribe from the TMS software Newsletter, please click here.