Blog
All Blog Posts | Next Post | Previous Post

 Seamlessly combining the power of TWebDataGrid with StellarDS.io backend
Thursday, October 9, 2025
Due to the popularity of football, many fans and entrepreneurs alike may want to share their excitement. Fans may want to create their own football fan site, while entrepreneurs may want to create their own football promotional sites. Regardless, many may often find the need to collect and present new and historical player info or game data to their group of followers.
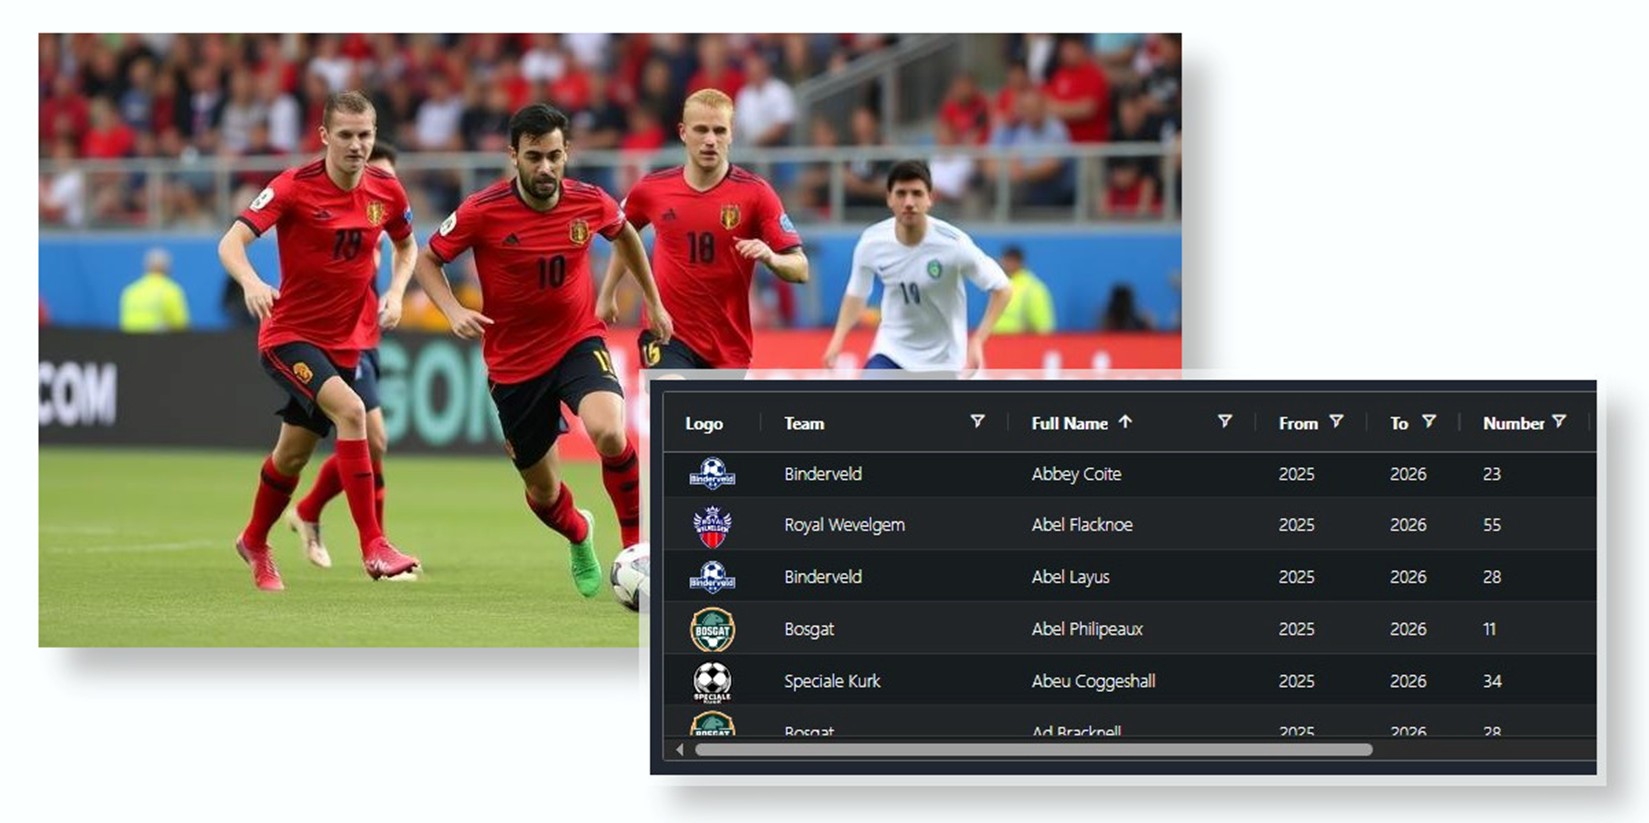
While presenting a small amount of data, a table or a list is often enough to get the point across, as the amount of data grows, there comes a point when it is no longer practical to show a (large) collection of data in a table or list format. This is where more often than not, a data grid becomes a good choice to present your football related data which allows your followers to consume large amounts of data without it being confusing or overwhelming. The use of a data grid to present such data is the topic of this blog.
A typical data grid displays data in columns and rows, and they come in many forms. Many share common features like the ability to sort columns, filter rows, etc. The TWebDataGrid which is part of the TMS WEB Core is no different and provides easy access to these common features. Rather than loading the entire collection of data before displaying the data to the user which takes time, data can be loaded as the user scrolls through the data grid allowing the web page to load very quickly.
Since data can be loaded on-demand as needed on the TWebDataGrid, a backend database is used to make data available when it is needed. StellarDS.io makes a good choice for a database as it is cloud based and only requires you to sign up for an account and create your database table in order to use it. There is no need to deploy, configure, secure or manage a server on your own, or set up any database services. This makes the process of creating a web application much simpler and cheaper compare to using other cloud based database services like Amazon RDS.
Let's Begin
In this blog, we explore how to create a functional SPA (Single Page Application) using the TMS WEB Core which can be hosted virtually anywhere that can load data from the StellarDS.io clouddatabase service. The following describes how it works:
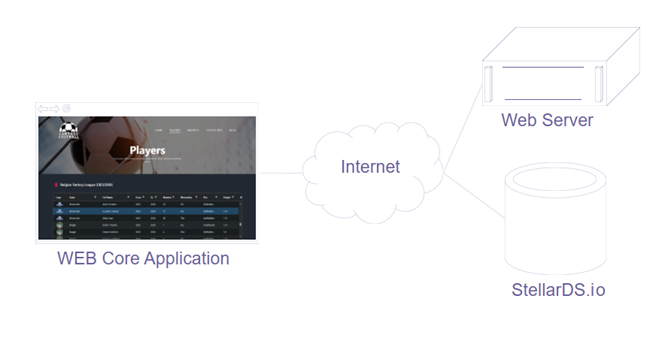
As you can tell from the diagram above, the web application consists of two main parts:
- The Single Page Application (SPA) TMS WEB Core application front-end
- The StellarDS.io database back-end.
TMS WEB Core generates the SPA as a set of HTML, CSS, JavaScript files + resources. Any web server can host this kind of files. The SPA is loaded from the web server along with its associated files like images, and runs completely on the end-user's browser. Once loaded, the SPA then makes REST API HTTPS requests to the StellarDS.io server and displays the data to the user in the form of a data grid.
You can start by collecting the data you intend to use for your web application in a form of a comma delimited text file – otherwise known as a CSV (Comma Separated Values) file. In our example, we provide an example CSV file for our list of fictious football players and clubs. For ease of loading the database, the first line of the CSV file must contain the column names. Please see the provided CSVfile for details.
In the download that goes along with this article, beside the example TMS WEB Core project provided called StellerDS_Blog, you should be able to find another TMS WEB Core project called StellarDS_Table_Creator. The StellarDS_Table_Creator project has been provided to make it easier for you to quickly create StellarDS.io data tables by using CSV files as long as the CSV file to be used has field/column names on the first line of the CSV files.
Setting up StellarDS.io
Assuming that you have your TMS WEB Core
development environment already set up, we can start by signing up for a
StellarDS.io account if you do not already have one from here
(https://stellards.io/account/sign-up).
You can leverage a free account from StellarDS.io if your web
application is not intended for commercial use (e.g. a football fan page
without any advertising revenue or other revenue streams like affiliate links).
Once you have access to your StellarDS.io account, whether it is a new account or an existing one, you will need to create a new API key in order for you to upload your data currently in a CSV formatted text file into StellarDS.io.
Configuring Roles and Permissions
Since each API key needs to be assigned to a role, you will need to properly set up the roles required prior to creating the API keys. We will need two roles:
- the first one with the authorization to manage StellarDS.io database tables
- the second one is for read-only access with no permissions to do anything other than read the stored data from the database.
To create a new role, select "Roles & permissions" and click on the "CREATE NEW ROLE" button:
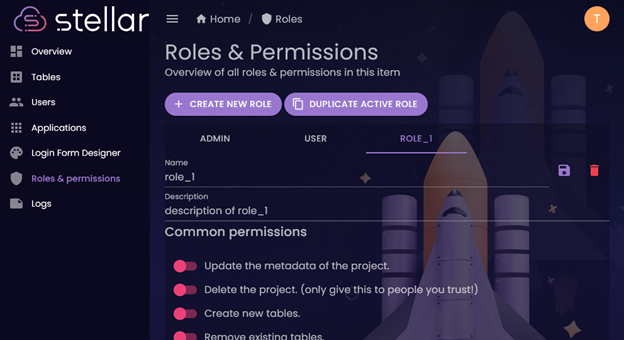
Edit the Name and Description and change it to the following:
Name: Read-only
Description: This role provides only read permissions to the data
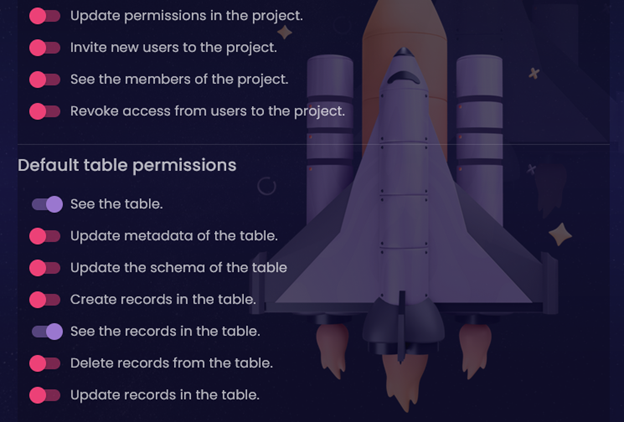
On the same screen, set only the following permissions to active (purple):
• See the table.
• See the records in the table.
It should look similar to the screenshot below:
Creating API Keys
To make use of the created roles, you can now generate two API keys. One for use with the StellarDS_Table_Creator project in order to create and populate your database table. The other is for use with the provided StellerDS_Blog application. Start by selecting "Applications" and selecting the "API KEYS" tab. You should see something similar to the following:
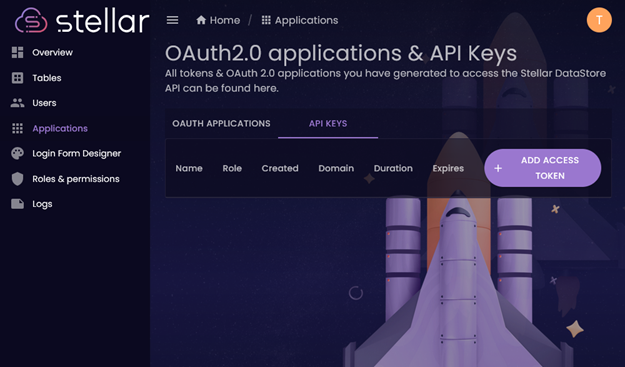
The "ADD ACCESS TOKEN" button allows you to add a new API key. Create two sets of API keys using the following parameters:
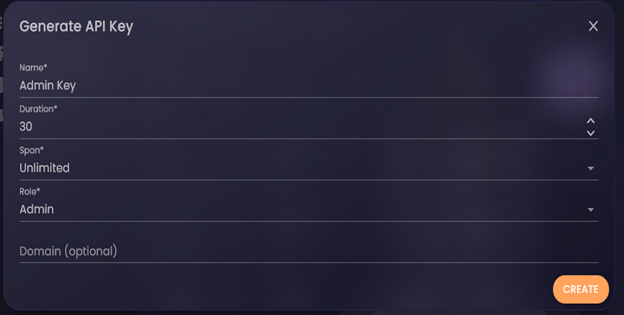
• Admin Key
◦ Name: Admin Key
◦ Duration: 30
◦ Span: Unlimited
◦ Role: Admin
• Read-only Key
◦ Name: Read-only Key
◦ Duration: 30
◦ Span: Unlimited
◦ Role: Read-only
When creating the Admin Key, you should see a dialog box appear after you click on "ADD ACCESS TOKEN". Set your parameters similar to the following screenshot:
Once you click the "CREATE" button, a new entry should appear under the "API KEYS" tab. You should see the new Admin Key appear like the following:
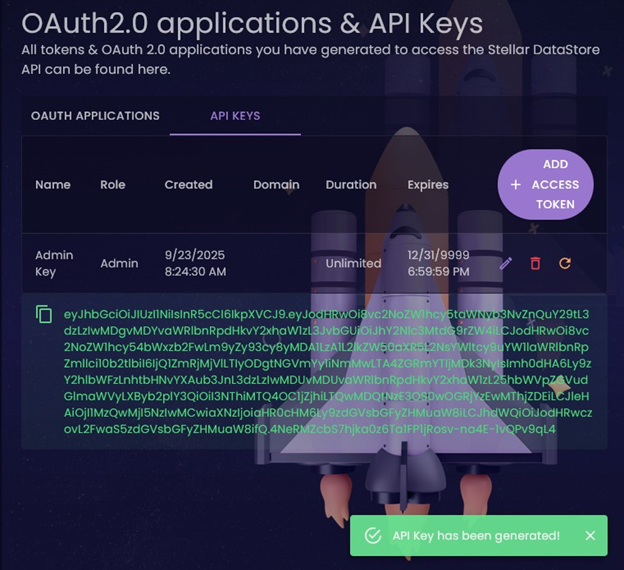
The long string of text in green (in the
screenshot above) is your newly generated API Key which is also known as an
Access Token. When following along, your
generated API Key will be different from the one shown on the screenshot
above. It will only appear ONCE, so you
MUST copy and paste it to save it somewhere safe as it will never be displayed
again for security reasons once you leave this page or create another key.
You can copy the token by clicking the copy icon:

… or click anywhere along the green
text. A notification should appear to
tell you that the API Key has been copied:
Do not share
this API Key / Access Token with anyone as this Admin Key token allows anyone
with it control over your data. We will
now refer to this API Key / Access Token as the "Admin Key" from this
point on.
You will also need a Read-only Key so your web application can query the data from StellarDS.io without having the permission to add, delete or alter your data. You can create this key by repeating the procedure starting with clicking the "ADD ACCESS TOKEN" button. Instead of selecting "Admin" for the Role, use your "Read-only" role (created earlier) instead. Click "CREATE" when ready. You should now see a new Read-only Key created in the list similar to the following:
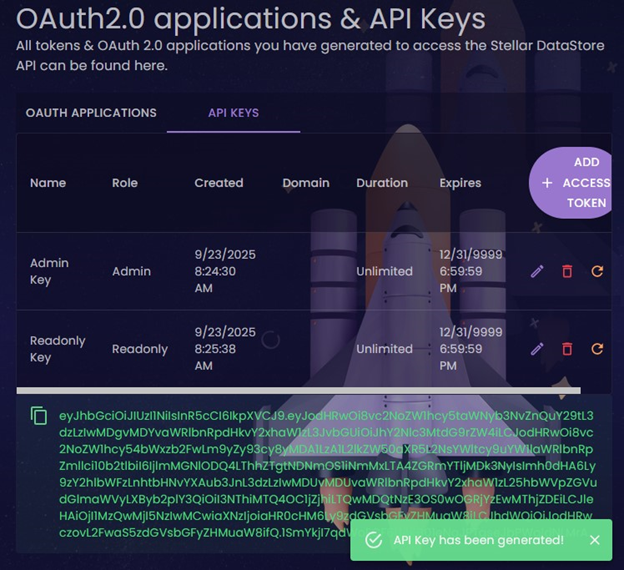
Once again, you need to copy and paste this new API Key somewhere safe using the same technique as you did above. We will now refer to this (second) API Key / Access Token as the "Read-only Key". Please be sure to label your new key as the Read-only Key to differentiate it from your Admin Key when storing it somewhere safe so not to confuse the two.
You should never share your Admin Key with anyone and it shall only be used to create the database table and populate it with data. Your Read-only Key however, needs to be embedded into and used by the web application to provide access to your data stored on StellarDS.io.
With both your Admin Key as well as your Read-only Key generated, we can now move to creating the database table and populating it using the CSV file with your data. In this case the CSV file provided with this blog contain fictious football player names along with their teams. You can use this CSV file to follow along as we go through the process of creating the database table on StellarDS.io using the fields specified by the first row in the CSV file along with importing the CSV data into the StellarDS.io database table.
Creating and populating a database table
A simple and unstyled example application
called the StellarDS_Table_Creator has been provided to simplify the process of
StellarDS.io table creation and data importing.
You should be able to find the StellarDS_Table_Creator web application
in the example applications directory of the latest version of your TMS WEB
Core installation. After locating it,
opening it, then running it from within Delphi or RAD Studio, you should see a
web application running in your preferred browser which looks like the following:
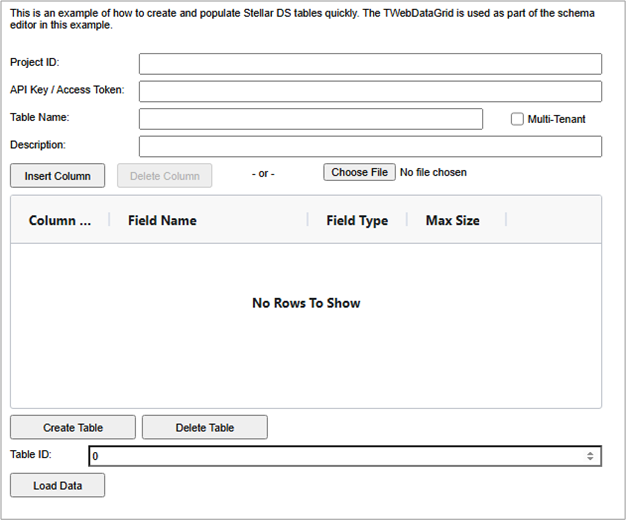
While this StellarDS_Table_Creator web application does not look fancy, it should help make things a little easier to get started. Looking at the screenshot above, you will notice that you will need to populate four fields (Project ID, API Key / Access Token, Table Name, and Description). The Project ID can be obtained when you first login to StellarDS.io or by going to the Overview. The GUID (e1e48885-378d-4387-ab74-79aa70e5615f) in the screenshot below is the Project ID. Your Project ID will be different!
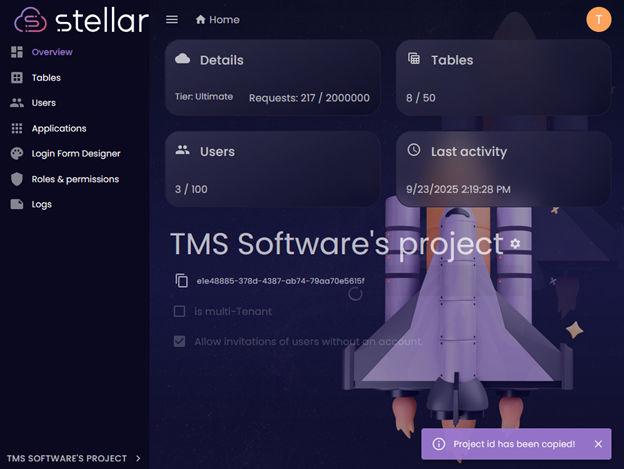
Copy and paste this value into the
StellarDS_Table_Creator web application to tell the application which Project
ID you would like to create the new database table under. Similar to how you copied your API Key / Access
Token above, you can click on the copy icon or the Project ID to copy your
Project ID. A notification should appear
(like the screenshot above) to let you know that your "Project id has been
copied!". Then paste this value
into the first text box of the
StellarDS_Table_Creator web application.
You may also want to save this value along with the API Keys that you
generated earlier. Because you lose all
the values every time you restart / reload the StellarDS_Table_Creator web
application, you may want to temporarily compile it into the
StellarDS_Table_Creator application by modifying the value from the
TForm1.WebFormCreate(Sender: TObject) procedure.
Next, you need to copy and paste the Admin Key and paste it into the API Key / Access Token text box. This API Key gets sent by the StellarDS_Table_Creator web application to the StellarDS.io server to tell it that you have the authority to create a new table because this API Key has been assigned an Admin role when you created the key above. You will also need to give it a Table Name. For this example, we are using "Football" as the Table Name. So you know the purpose of the table, you should also provide a short description in the Description text box.
Although you can create the database columns manually, this application can also use the first row of the CSV file to automatically populate the columns (aka Field Names). Simply click on the "Choose file" button and locate your desired CSV file. Please keep in mind that the CSV file must contain column names / field names as the first line of the CSV file. Once the file has been selected, you should now see something similar to the following:
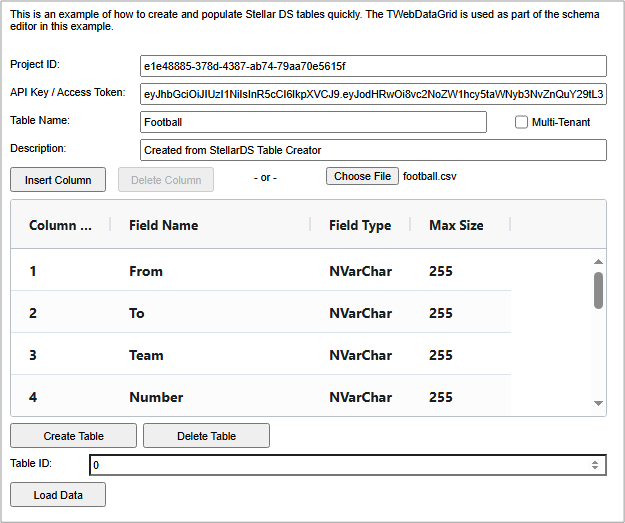
Since the CSV file does not specify the
field types for each column / field, the StellarDS_Table_Creator web
application assumes that they are all NVarChar(255). We can assign specific field types by double
clicking on the Field Type cell to change the type under the Field Type
column.
Assigning different field types changes how StellarDS.io sorts your data. For instance, if you have three records with Int (integer) field type, they will be sorted in the following order: "1", "2", and "10". However, if the same three records were defined as NVarChar field type, they will be sorted as: "1", "10", "2" instead.
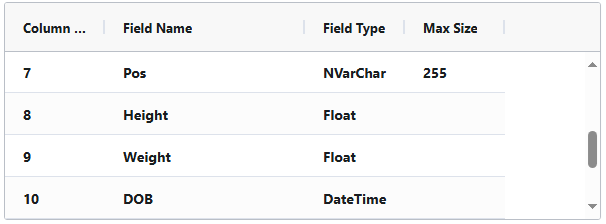
For the sake of our example, let's change the following fields to their respective field types:
• From: Int
• To: Int
• Height: Float
• Weight: Float
• DOB: DateTime
Your column definitions should now appear similar to the following:
If you were to import your own CSV file, you
can change your field names to anything else that StellarDS.io will accept as a
valid field name. Please keep in mind
that at the time of writing this blog, the use of spaces in the field name is
not fully supported and should be removed or replaced with underscores. For the provided CSV file, the column / field
names must match that of the example application. After changing the field types, you can now
click on the "Create Table" button to create your table on
StellarDS.io. Upon successful
completion, a new Table ID should be assigned and you should see a message
telling you that the table has been created successfully.
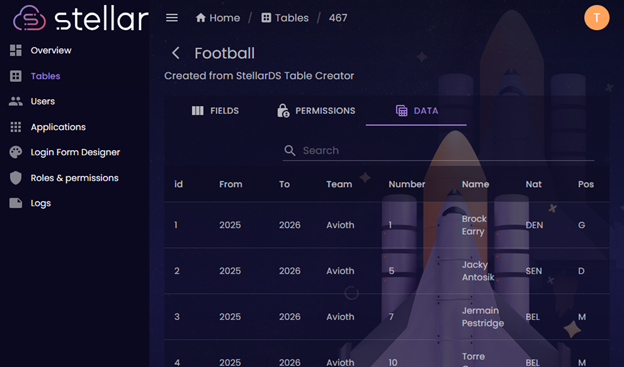
Checking your results
Next, you can load the data from the CSV file by clicking on the "Load Data" button. Once completed, you can check to see that the table has been created and the data loaded properly by going into Tables, and click the "Manage" link for the new table entry. By selecting the "DATA" tab, you should now see the entries from your CSV file in the Stellar.io database:
Setting up your example
application
Now that the data has been properly loaded into the StellarDS.io database, it's time to shift our focus to the front-end web application. The StellarDS_Blog example application provided demonstrates how you can use the TDGRestDataAdapter along with the TWebDataGrid to create a fast loading data grid that supports infinite scrolling while allowing you to perform server side sorting and filtering. This TMS WEB Core front-end app takes advantage of a HTML template, i.e. HTML & CSS determine the layout and look of the application and the TMS WEB Core controls are mapped onto HTML elements in the template by setting the Control.ElementID to the unique ID of HTML elements in the template.
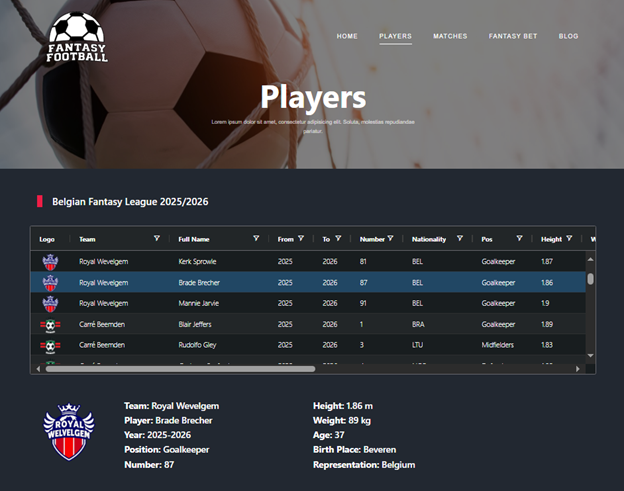
The TDGStellarRestDataAdapter component is the interface between the StellarDS.io back-end and the TWebDataGrid client control. These components are connected via
WebDataGrid1.ServerDataAdapter := DGStellarRestDataAdapter1
  DGStellarRestDataAdapter1.KeyField := 'id';
  DGStellarRestDataAdapter1.Project := ProjectID; // StellarDS project ID
  DGStellarRestDataAdapter1.TableID := TableID;   // The ID of the table on StellarDS.io
  DGStellarRestDataAdapter1.AccessToken := APIKey;  // The read-only API key obtained
  Columns := WebDataGrid1.ColumnDefs;
  Columns.Clear;
  with Columns.Add do
  begin
    Field := 'Logo';
    HeaderName := 'Logo';
    ViewModeType := crtImage;
    Width := 80;
    Resizable := True;
  end;
  with Columns.Add do
  begin
    Field := 'Team';
    HeaderName := 'Team';
    Resizable := True;

    Filter := True;
  end;
  with Columns.Add do
  begin
    Field := 'Name';
    HeaderName := 'Full Name';
    Resizable := True;

    Filter := True;
  end;

...with Columns.Add do
begin
Field := 'Nat';
HeaderName := 'Representation';
Width := 140;
Resizable := True;
Filter := True;
ValueFormatter := WebDataGrid1Column_NatValueFormatter;
end;
function TForm1.WebDataGrid1Column_NatValueFormatter(Value: string): string;
begin
// Decode the nation represented value from the 3 character value to the full
// region name.
//
// The _typeof(Value) = 'string' is used to check that it contains a valid
// string before calling the GetNationRep() function. While the user is
// scrolling, the Value passed in does not have a valid string. So this
// function returns '' if the Value is not of type string.
Result := '';
if _typeof(Value) = 'string' then
Result := GetNationRep(Value);
end;
function TForm1.GetNationRep(Value: JSValue): string;
begin
// Convert the 3 letter region identifier into the full region name.
Result := '-';
if Value = 'ALB' then Result := 'Albania'
else if Value = 'ALG' then Result := 'Algeria'
else if Value = 'ANG' then Result := 'Angola'
else if Value = 'ARG' then Result := 'Argentina'
else if Value = 'AUS' then Result := 'Australia'
else if Value = 'AUT' then Result := 'Austria'
...
end;
procedure TForm1.WebDataGrid1SelectionChanged(Event: TJSSelectionChangedEvent);
var
  SelectedRows: TJSRowNodes;
  RowNode: TJSRowNode;
  Data: TJSObject;
begin
  // Get the first selected row then populate all of the HTML div tags.
  SelectedRows := WebDataGrid1.AGGrid.getSelectedNodes;
  if Length(SelectedRows) > 0 then
  begin
    RowNode := SelectedRows[0];
    Data := RowNode.Data;
    Logo.URL := ValueAsString(Data['Logo']);
    AssignHtml(lblTeam, ValueAsString(Data['Team'], '<B>Team:</B>  '));
    AssignHtml(lblPlayer, ValueAsString(Data['Name'], '<B>Player:</B>  '));
    AssignHtml(lblYear, ValueAsString(Data['From'], '<B>Year:</B>  ') + '-' + ValueAsString(Data['To']));
    ...
  end;
end;
We get the value of the cells in the selected row via WebDataGrid1.AGGrid.getSelectedNodes and from this array, we get SelectedRows[0].Data that is an array of each value in each column.We then take this value and assign it as text to a DIV element:
procedure TForm1.AssignHtml(ADiv: TWebHTMLDiv; Value: string);
begin
  // Set the text node of the div tag with the specified Value.
  ADiv.HTML.Text := Value;
end;
Conclusion
By combining the power of TMS WEB Core with the simplicity of StellarDS.io, Delphi developers can rapidly build and deploy fully functional web applications that are both performant and maintainable. The TWebDataGrid component provides a modern, responsive way to handle large datasets with ease, while StellarDS.io eliminates the overhead of configuring and maintaining traditional database back-ends. Together, they create a seamless workflow for building SPAs that efficiently connect front-end data grids to a secure, cloud-hosted back-end—all using the language and tools Delphi developers know best.
Create your first full stack web app with Delphi!
If you’re ready to take your Delphi skills to the web, download the provided example projects and experiment with connecting TMS WEB Core applications to StellarDS.io. Explore how easily you can integrate RESTful data access, infinite scrolling, and server-side filtering into your own web apps.
Visit TMS Software to learn more about TMS WEB Core, discover additional components, and start creating powerful, data-driven web applications — all with Delphi.
Bruno Fierens

This blog post has not received any comments yet.
All Blog Posts | Next Post | Previous Post