TAdvStringGrid
Example 11 : Using cell nodes to expand/contract rows
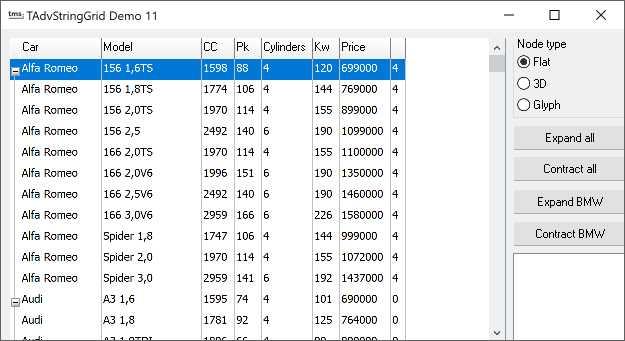 Demo 11, shows the basics of
adding nodes to the grid, with which you can automatically expand
and contract rows of the grid. Working with nodes involves three
topics:
Demo 11, shows the basics of
adding nodes to the grid, with which you can automatically expand
and contract rows of the grid. Working with nodes involves three
topics:
- putting nodes in the grid
- node appearance
- reacting to node click events
procedure AddNode(aRow,Span:integer);
procedure RemoveNode(aRow:integer);
function IsNode(aRow:integer):boolean;
function GetNodeState(ARow:integer):boolean;
procedure SetNodeState(ARow:integer;value:boolean);
procedure ExpandNode(aRow:integer);
procedure ContractNode(aRow:integer);
procedure ExpandAll;
procedure ContractAll;
Everything starts by adding a node to a grid and this is done with the AddNode method. Notice that the EnableGraphics property must be set to true, when working with nodes, as this is another visible graphic element in the grid. The first parameter is what we call the visible row position in the grid where you want to add a node. When working with hidden rows, there is a difference between visible row position and real row position which takes the hidden rows into account. (Whenever you wan to map the visible row position to a real row position, use the RealRowIndex method) The second parameter in the AddNode method is the span of the node, that is, the number of rows to expand or contract when clicking this node. If this span parameter is zero, the node will automatically expand or contract to the next found node in the grid.
The RemoveNode and IsNode methods are simply doing what their names refer to. Also notice in this case, that the row refers to the visible row position! With these function, you can start adding simple row expand/contract functionality to your grid. In the demo application, this is done by simply scanning column 1 for equal cars, and adding a node whenever a new car is encountered. You can find this initialization in the FormCreate event:
procedure TForm1.FormCreate(Sender: TObject);
var
  i,j:integer;
begin
  with advstringgrid1 do
  begin
    savefixedcells:=false;
    loadfromcsv('cars.csv');
    autosizecolumns(true,10);
    i := 1;
    j := 1;
    while (i<rowcount-1) do
    begin
      if cells[1,j]='BMW' then bmwnode:=j;
      while (cells[1,j]=cells[1,j+1]) and (j<rowcount-1) do inc(j);
      if (i<>j) then AddNode(i,j-i+1);
      i := j + 1;
      j := i;
    end;
    fixedcols:=0;
    row:=1; col:=1;
  end;
end;
In order to programmatically expand or contract nodes, either the function GetNodeState, SetNodeState or ExpandNode and ContractNode are available. The difference is the used row mapping. GetNodeState and SetNodeState work with this visible row index, while ExpandNode and ContractNode work with the real row index. Often, you will want to maintain the exact real row position of the node to expand and use the ExpandNode or ContractNode method. This is because the visible row position can change all the time by user interaction, while the real row position is under program control. In this demo, the real row position of the node at car type BMW is saved in a variable and used in the event handler to Expand or Contract the BMW node:
procedure TForm1.Button3Click(Sender: TObject);
begin
  advstringgrid1.ExpandNode(bmwnode);
end;

procedure TForm1.Button4Click(Sender: TObject);
begin
  advstringgrid1.ContractNode(bmwnode);
end;
A second topic involved in using nodes, is the node appearance. Nodes always appear in the first column (index 0) and can be one of 3 types : cnflat, cn3D or cnglyph. A flat node is simply a rectangle with the wellknown + / - sign in it. The 3D node type is a raised or sunken rectangle while you can also specify your own glyph for the expand or contract state. The appearance of the node is controlled through the CellNode property of TAdvStringGrid. You can speficy here the glyphs as well as the color of the flat and 3D node.
Last but not least, two event handlers give feedback on user node expansion or contraction through the OnExpandNode and OnContractNode event. Two additional parameters come with this event handler: the visible row index of the node clicked as well as the real row index of this node. In this sample application, the output is simply shown in a listbox:
procedure TForm1.AdvStringGrid1ExpandNode(Sender: TObject; arow,
  arowreal: Integer);
begin
 listbox1.items.add('Expand : '+inttostr(arow)+'-'+inttostr(arowreal));
end;
Delphi project & source files for downloading included in the main demos distribution for Delphi.
×
![]()