A single developer license allows 1 developer to use the components for development, obtain free updates & support for a full version cycle of the product. The license is not transferable.
A single developer license allows 1 developer to use the components for development, obtain free updates & support for 1 year. The license is not transferable.
A single developer license allows 1 developer to use the components for development, obtain free updates & support for 2 years. The license is not transferable.
A small team license allows 2 developers within the company to use the components for development, obtain free updates & support for a full version cycle of the product. The license is not transferable.
A small team license allows 2 developers within the company to use the components for development, obtain free updates & support for 1 year. The license is not transferable.
A small team license allows 2 developers within the company to use the components for development, obtain free updates & support for 2 years. The license is not transferable.
A site license allows an unlimited number of developers within the company to use the components for development, obtain free updates & support for a full version cycle of the product. Developers can be added at any time during the full version cycle.
A site license allows an unlimited number of developers within the company to use the components for development, obtain free updates & support for 1 year. Developers can be added at any time during the 1 year period.
A site license allows an unlimited number of developers within the company to use the components for development, obtain free updates & support for 2 years. Developers can be added at any time during the 2 year period.
TAdvStringGrid
Example 1 : An addresslabel printing application
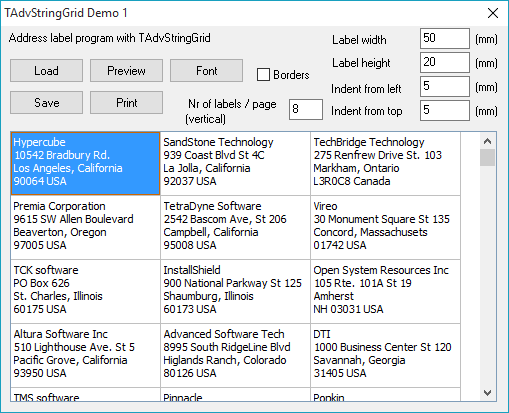
In the first example project, an address label printing application is constructed.
It shows the capabilities to specify cell sizes for printing as well as a technique
to make a quick preview page. Therefore, a form with TAdvStringGrid is used
and addresses are loaded into the cells. The addresses are loaded from a file
(adres.tbl) which is a format TAdvStringGrid can use. To display more than one
line of the address, the grid is set into multiline cell mode by setting MultiLineCells
to true. Editing is turned on in Options through setting goEditing to true.
Adding multiple lines when editing in the cell is done by pressing Ctrl-Enter
at the end of each line. Loading and saving the addresses is attached to two
buttons, the load and save button and the code :
procedure TForm1.saveClick(Sender: TObject);
begin
advstringgrid1.savetofile('adres.tbl');
end;
procedure TForm1.loadClick(Sender: TObject);
begin
advstringgrid1.loadfromfile('adres.tbl');
end;
The next step is to show the output either on the previewscreen or on paper.
As the previewscreen requires an extra form, this is explained first. The TAdvStringGrid
component has a method PrintPreview with 2 parameters : a canvas and the rectangle
in which to display the preview. To provide a canvas for the preview, a PaintBox
is choosen. This PaintBox is placed with alClient alignment on a form. As the
intention is to let the grid paint its preview on the PaintBox canvas during
the OnPaint event, a reference to the grid is needed in the form that holds
the PaintBox. The form is declared in the following way :
type
TPagePreview = class(TForm)
PaintBox1: TPaintBox;
procedure PaintBox1Paint(Sender: TObject);
private
asg:tAdvStringGrid;
{ Private declarations }
public
constructor Create(aOwner:tComponent; aStringGrid:tAdvStringGrid);
{ Public declarations }
end;
A reference to the grid is used in the constructor, so that the form can simply
let the grid display its preview during the OnPaint event handler of the PaintBox
component. The constructor is :
constructor TPagePreview.Create(aOwner:tComponent;aStringGrid:tAdvStringGrid);
begin
inherited Create(aOwner);
asg:=aStringGrid;
end;
while the OnPaint event handler is :
procedure TPagePreview.PaintBox1Paint(Sender: TObject);
begin
asg.printpreview(paintbox1.canvas,paintbox1.clientrect);
end;
To show the preview is just simply showing this form :
var
pagepreview:TPagePreview;
begin
pagepreview := TPagePreview.Create(Advstringgrid1);
try
pagepreview.ShowModal;
finally
pagepreview.Free;
end;
end;
To printing the grid to paper can be done by just calling its Print method.
Since nothing has been done yet about the size of the labels that will be printed,
some properties need to be explained to control sizes of cells. Normally, the
grid autosizes cells to the smallest box around the cell text. This is done
to fit as many cells on a sheet of paper as possible. To print the labels, we
need to overrule this default behaviour. First, the position of the left and
topmost label is specified with the PrintSettings.LeftSize and PrintSettings.HeaderSize
properties. All dimensions in the PrintSettings property are in 1/10 of mm.
So, to specify that the first label is positioned 1 inch from the top of the
page, the HeaderSize property needs to be 254. Then, the automatically calculated
minimum cell height needs to be overruled by using the FixedRowHeight and UseFixedRowHeight
properties. If UseFixedRowHeight is true, the dimension (again in 1/10mm) in
FixedRowHeight is used instead of the automatic calculated value. Now, all labels
will have height FixedRowHeight. The same is true for columns with the FixedColWidth
and UseFixedColWidth property. However, this demo uses a slightly different
method to set the column size, as this method allows to specify different sizes
of each column. TAdvStringGrid has an event to specify this :
procedure TForm1.AdvStringGrid1PrintSetColumnWidth(Sender:TObject;
aCol: Integer; var width: Integer);
begin
width := strtoint(edit1.text)*10;
end;
The parameter of the event is the column in aCol and the current automatic calculated
width. It's up to the application now to decide if it is required to overrule
this calculated value or not. Here, it's supposed that all labels have the same
width, so the value is taken from the edit control where the width is specified
in mm. Since the width parameter is also specified in 1/10mm, a multiplication
by 10 is required. The other settings are just a matter of setting the properties
:
with AdvStringGrid1.PrintSettings do
begin
usefixedheight := True;
fixedheight := strtoint(edit2.text)*10;
leftsize := strtoint(edit3.text)*10;
headersize := strtoint(edit4.text)*10;
if checkbox1.Checked then
Borders := pbSingle
else
Borders:=pbNoBorder;
end;
With the current setup, it's easy to print for example 8x3 labels on a single
page. Suppose that addresses are available for multiple pages then the maximum
number of labels per page (in vertical direction) should be set in most cases.
It's easy to extend the application to make sure not more rows are printed per
page than the number of labels available on the page. This is done through the
PrintNewPage event handler. This event handler is called after printing each
row and queries the application to start a new page if needed. The code here
forces a new page after the number of rows equals the number of labels (in vertical
direction) on the paper :
var
i:integer;
begin
i := strtoint(labelspage.text);
if (arow>0) and (arow mod i=0) then newpage:=true;
end;
The number of labels is converted from the edit control text to an integer,
and the equation (arow mod i=0) makes sure that every i rows, a new page is
started. And that concludes the simple addresslabel printing application. With
TAdvStringGrid it takes less than 30 lines of code you need to write yourself.
You can download this example application here and experiment for yourself.