Knowledge Base Alert February, 2016


VCL

FNC

FMX

TMS Cloud Pack:

Putting data in the cloud with myCloudData.net and component TAdvmyCloudData


If we’d want to persist application settings information in the cloud on http://myCloudData.net, this is very simple to do in Delphi.

After connecting with TAdvmyCloudData, we can test for the presence of the table that holds the data to persist, create table & metadata when it doesn’t exist and persist the data.

Code:

var
  table: TmyCloudDataTable;
  entity: TmyCloudDataEntity;
  doins: boolean;

begin
  table := AdvMyCloudData1.TableByName('APPDATA');

  // create table with metadata on the fly if it doesn’t exist for the myCloudData.net account
  if not Assigned(table) then
  begin
    table := AdvMyCloudData1.CreateTable('APPDATA');
    table.MetaData.Add('WINWIDTH', ftInteger);
    table.MetaData.Add(‘WINHEIGHT’,ftInteger);
    table.MetaData.Add('WINLEFT', ftInteger);
    table.MetaData.Add('WINTOP', ftInteger);
    table.MetaData.Add('USERNAME', ftString,50);
  end;

  // check for existing entity holding the data
  table.Query;
  doins := table.Entities.Count = 0;
  if doins then
    entity := table.Entities.Add
  else
    entity := table.Entities[0];
    
  // setting data to persist in the entity
  entity.Value[‘WINWIDTH’] := form.Width;
  entity.Value[‘WINHEIGHT’] := form.Height;
  entity.Value[‘WINLEFT’] := form.Left;
  entity.Value[‘WINTOP’] := form.Top;
  entity.Value[‘USERNAME’] := GetWindowsUser();      
  // inserting or updating entity
  if doins then
    entity.Insert
  else
    entity.Update;
end;


TAdvStringGrid:

Dealing with floating point number precision in TAdvStringGrid


When wanting to keep floating point numbers with high precision in the grid but display with less precision, the OnGetFloatFormat event can be used. In this code snippet, the grid cell value is set with a floating point number with 8 digits but is displayed with only 3 digits precision. Internally, we can keep calculating with values with 8 digits.

Sample:

// Set float value with full precision
begin
  advstringgrid1.FloatFormat := '%g';
  advstringgrid1.Floats[1,1] := 1.23456789;
  advstringgrid1.Floats[1,2] := 9.87654321;
end;

// ensure floating point number is only displayed with 3 digits
procedure TForm4.AdvStringGrid1GetFloatFormat(Sender: TObject; ACol,
  ARow: Integer; var IsFloat: Boolean; var FloatFormat: string);
begin
  FloatFormat := '%.3f';
end;

// do calculation at full precision
begin
  advstringgrid1.Floats[1,3] := advstringgrid1.Floats[1,1] + advstringgrid1.Floats[1,2];
end;
This displays the rounded numbers in the grid:
1.235
9.877
but the displayed result is
11.111
as the sum calculated is based on full precision.

TPlanner:

SelectPosRestricted property


When you want to control that when a user starts a selection within a position (resource) in the Planner, the select-drag will be restricted to the position where the select-drag started, a new property is available:
Planner.SelectPosRestricted: boolean;

Set this to true and even when columns or rows for resources are small and sometimes difficult to keep the mouse in the same resource during long select-drag operations, the selection will remain within the originally selected resource.

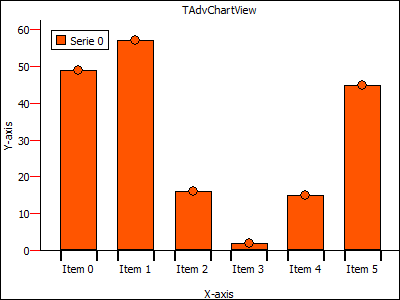
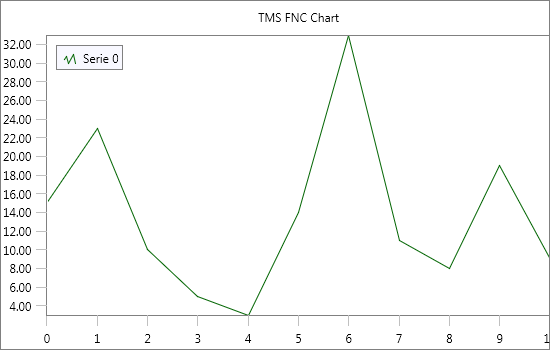
TMS Advanced Charts:

Custom X-Axis drawing


procedure TForm1.FormCreate(Sender: TObject);
var
  I: Integer;
begin
  AdvChartView1.BeginUpdate;
  AdvChartView1.Panes[0].Series[2].Free;
  AdvChartView1.Panes[0].Series[1].Free;
  AdvChartView1.Panes[0].Series[0].OnXAxisDrawValue := XAxisDrawVal; 
  AdvChartView1.Panes[0].Series[0].ChartType := ctBar; 
  AdvChartView1.Panes[0].Series[0].XAxis.AutoUnits := False;
  AdvChartView1.Panes[0].XAxis.AutoSize := False;
  AdvChartView1.Panes[0].Series[0].AutoRange := arEnabledZeroBased;
  AdvChartView1.Panes[0].XAxis.Size := 50;
  for I := 0 to 9 do
    AdvChartView1.Panes[0].Series[0].AddSinglePoint(Random(100), 'Item ' + inttostr(I));
  AdvChartView1.EndUpdate;
end;

procedure TForm1.XAxisDrawVal(Sender: TObject; Serie: TChartSerie;
  Canvas: TCanvas; ARect: TRect; ValueIndex, XMarker: integer; Top: Boolean;
  var defaultdraw: Boolean);
var
  bw, tw: Integer;
  s: string;
begin
  defaultdraw := False;
  bw := Serie.GetBarWidth(1) div 2;
  Canvas.Pen.Color := clBlack;
  Canvas.Pen.Width := 2;
  Canvas.MoveTo(XMarker - bw + 1 , ARect.Top);
  Canvas.LineTo(XMarker - bw + 1, ARect.Top + 10);
  Canvas.MoveTo(XMarker + bw + 1, ARect.Top);
  Canvas.LineTo(XMarker + bw + 1, ARect.Top + 10);
  s := Serie.Points[ValueIndex].LegendValue;
  tw := Canvas.TextWidth(s);
  Canvas.TextOut(XMarker - tw div 2, ARect.Top + 12, s);
end;


TMS TAdvGroupBox

Cloning a TAdvGroupBox at runtime


Cloning a TAdvGroupBox (or any other control) at runtime can be done with following code:

var
  grp: TAdvGroupBox;
begin
  RegisterClass(TAdvGroupBox);
  clipboard.SetComponent(advgroupbox1);
  grp := clipboard.GetComponent(self, self) as TAdvGroupBox;
  // force position of new clone to 0,0 position
  grp.Left := 0;
  grp.Top := 0;
end;


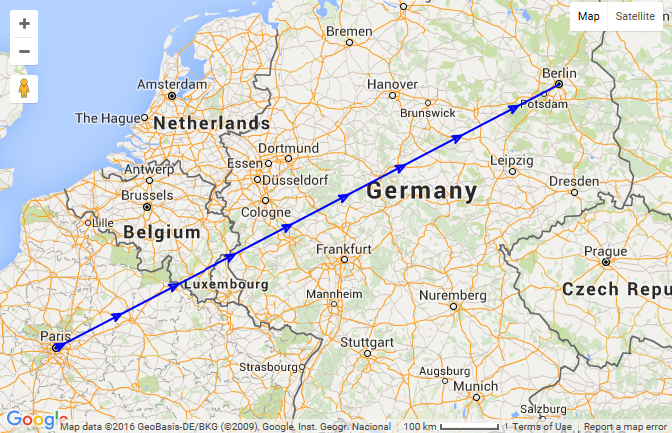
TMS WebGMaps:

How to add a Polyline with symbols to the map
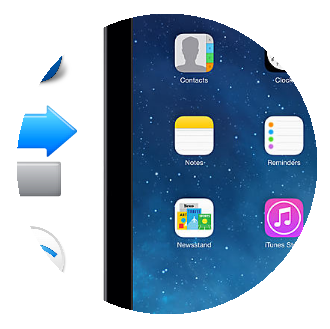


This is a sample of how to add a Polyline with symbols to the map:

var
 Symbols: TSymbols;
  Symbol: TSymbol;
  Path: TPath;
begin
  Path := TPath.Create;
  Path.Add(48.85, 2.35);
  Path.Add(52.51, 13.38);

  Symbols := TSymbols.Create;
  Symbol := Symbols.Add;
  Symbol.SymbolType := stForwardClosedArrow;
  Symbol.OffsetType := dtPixels;
  Symbol.Offset := 10;
  Symbol.RepeatValue := 64;
  Symbol.RepeatType := dtPixels;

  WebGMaps1.Polylines.Add(false, false, false, Symbols, Path, clBlue, 255, 2, true, 1);
end;


TMS TAdvSmoothPanel:

How to export/save an image, displayed in a TAdvSmoothPanel, in its rounded form


The picture is saved as the original picture. Here you can download a sample that demonstrates how you can save the picture as a rounded image .


TMS FNC Chart:

Add array of singles with one function.


const
  val: array[1..12] of Single = (15,23,10,5,3,14,33,11,8,19,9,22);
begin
  TMSFNCChart1.BeginUpdate;
  TMSFNCChart1.Clear;
  TMSFNCChart1.AddPointArray(val);
  TMSFNCChart1.EndUpdate; 
end;


TTMSFMXTileList:

Hiding elements at runtime


To hide the header / footer you can use the following code:

procedure TForm1.FormCreate(Sender: TObject); 
begin
  TMSFMXTileList1.NeedStyleLookup;
  TMSFMXTileList1.ApplyStyleLookup;
  TMSFMXTileList1.GetHeader.Visible := False;
  TMSFMXTileList1.GetFooter.Visible := False;
end;

To make sure the header and footer rectangle elements are created, call NeedStyleLookup and ApplyStyleLookup once. An alternative way of hiding the those elements is in the OnApplyStyleLookup event:

procedure TForm1.TMSFMXTileList1ApplyStyleLookup(Sender: TObject);
begin
  TMSFMXTileList1.GetHeader.Visible := False;
  TMSFMXTileList1.GetFooter.Visible := False;
end;


The same technique can be used in the TTMSFMXTableView to hide the header and footer.


TTMSFMXWebGMaps:

How to center & display all the markers on the map


You can use the Markers.Bounds call to retrieve the bounds coordinates of all markers, these bounds can then be used as a parameter in the MapZoomTo call.

Example:

  TMSFMXWebGMaps1.MapZoomTo(TMSFMXWebGMaps1.Markers.Bounds);


As always, we thank all users for the numerous inputs, feedback, comments and suggestions. This is an invaluable help to steer our developments here at TMS software. We continue to look forward to all your further communications to direct our team to provide you better tools and components for your needs.

Kind regards,
TMS software team
Email: info@tmssoftware.com
Web: http://www.tmssoftware.com
Support, FAQ & Manuals: http://www.tmssoftware.com/site/support.asp


Follow latest developments at tmssoftware.com


NOTICE: If you wish to unsubscribe from the TMS software Newsletter, please click here.