Blog
All Blog Posts | Next Post | Previous Post

 A Python library for using StellarDS.io effortlessly
Bookmarks:
Tuesday, April 16, 2024

Stellar DataStore, is our new fast and convenient solution, seamlessly offering data back-end services for your applications. The service leverages a robust REST API to retrieve and manage your data in the cloud. StellarDS.io takes care of all data storage, manipulation, security, and privacy concerns. Say goodbye to the complexities of hosting servers, developing REST APIs and implementing additional security protocols. Stellar DataStore takes care of everything, allowing you to dedicate more time to implementing your desired client application features.
Python, Raspberry Pi & StellarDS.io

![]()
In the world of Python development, efficient database integration is crucial for building applications. In this blog, we present the free StellarDS.io Python library, a tool designed to simplify database interactions. For developers looking to get started, you can easily access this on our GitHub repository, which includes a demo to help you get started with StellarDS.io. In this article, we'll explore the key features of StellarDS.io and demonstrate its functionality via this demo.
Demo: capturing & storing sensor data in the cloud
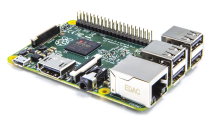
Let's dive into a practical example showcasing the StellarDS.io Python library in action running from a Raspberry Pi. In this demo, we'll use a Bosch BMP180 sensor for gathering and storing data via StellarDS.io. This sensor is connected via i²c with a Raspberry Pi which runs the Python code. Below are the key components of our Python code:
First, we define a Python class to represent sensor data readings. This class encapsulates attributes from the Bosch BMP180 sensor.
class SensorData:
    def __init__(self, chip_id, chip_version, temperature, pressure, measure_date):
        self.chip_id = chip_id
        self.chip_version = chip_version
        self.temperature = temperature
        self.pressure = pressure
        self.measure_date = measure_date
stellar_ds = StellarDS(is_oauth=oauth, is_persistent=persistent)
if oauth == False:
    stellar_ds.access_token(ACCESS_TOKEN)
else:
    stellar_ds.oauth(CLIENT_ID, CALLBACK_URL, CLIENT_SECRET)
ensure_table_exists(stellar_ds)
def ensure_table_exists(stellar_ds):
    global table_id
    tables = stellar_ds.table.get(PROJECT_ID)
    if tables.status_code == 200 and tables.is_success:
        for data in tables.data:
            if "Sensor" in data.name:
                table_id = data.id
                return True
        table_data = Table('Sensor', 'Table with BMP180 sensor data', True)
        table_response = stellar_ds.table.add(PROJECT_ID, table_data)
        if table_response.status_code == 200 and table_response.is_success:
            print("\nTable created with:")
            print(f"ID: {table_response.data.id}")
            print(f"Name: {table_response.data.name}")
            print(f"Description: {table_response.data.description}")
            print(f"Multitenant: {table_response.data.is_multitenant}")
            table_id = table_response.data.id
            fields = [
                Field('chip_id', 'TinyInt'),
                Field('chip_version', 'TinyInt'),
                Field('temperature', 'Real'),
                Field('pressure', 'Real'),
                Field('measure_date', 'DateTime')
            ]
            for field_data in fields:
                field_add_response = stellar_ds.field.add(PROJECT_ID, table_response.data.id, field_data)
                if field_add_response.status_code == 200 and field_add_response.is_success:
                    print("\nField created with:")
                    print(f"ID: {field_add_response.data.id}")
                    print(f"Name: {field_add_response.data.name}")
                    print(f"Type: {field_add_response.data.type}")
            return True
        else:
            print_error_message(table_response)
    else:
        print_error_message(tables)
return Falsedef print_error_message(response):
print("\nFailed to proceed.")
for message in response.messages:
print(f"\nCode: {message.code}\nMessage: {message.message}")
def main():
    global table_id
    data_response = stellar_ds.data.add(PROJECT_ID, table_id, read_sensor_data())
    if data_response.status_code != 201 or not data_response.is_success:
        print_error_message(data_response)
    else:
        print("\nData added with:")
        print(f"Chip ID: {data_response.data[0].chip_id}")
        print(f"Chip Version: {data_response.data[0].chip_version}")
        print(f"ID: {data_response.data[0].id}")
        print(f"Temperature: {data_response.data[0].temperature}")
        print(f"Pressure: {data_response.data[0].pressure}")
        print(f"Measure Date: {data_response.data[0].measure_date}")
    time.sleep(10)
Visualizing results in a web application with JavaScript
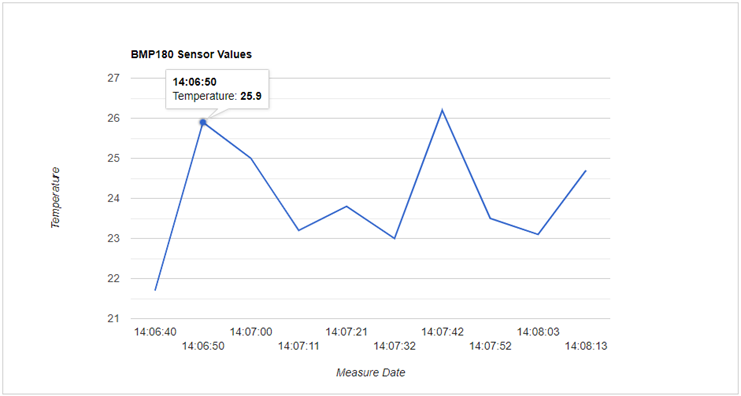
const headers = {'Authorization': 'Bearer yourAccessToken};
fetch("https://api.stellards.io/v1/data/table?project=4e15dbce-1e12-4859-3256-08dc3c3b3f31&table=401&Take=10", { headers })
  .then(response => response.json())
  .then(json => {
    data = json.data;
    const chartData = data.map(item => [new Date(item.measure_date).toLocaleTimeString(), item.temperature]);
    chartData.unshift(['Measure Date', 'Temperature']);
    google.charts.load('current',{packages:['corechart']});
    google.charts.setOnLoadCallback(() => drawChart(chartData));
  });
function drawChart(chartData) {
    const data = google.visualization.arrayToDataTable(chartData);

    const options = {
      title: 'BMP180 Sensor Values',
      hAxis: {title: 'Measure Date'},
      vAxis: {title: 'Temperature'},
      legend: 'none',
      width: '100%',
      height: '100%'
    };

    const chart = new google.visualization.LineChart(document.getElementById('myChart'));
    chart.draw(data, options);
}
Closed Beta
Eager to get started with StellarDS.io? We are at this moment in closed beta stage. Sign up here to get a chance to enter this beta and get a head start developing full-stack applications. We will invite people at regular intervals to the closed beta. When you are eligible to join, you will receive an invitation through e-mail with you credentials.
Follow us now!
Show us support and follow us on our social media to always be up to date about stellards.io
|
|
|
|
|

Niels Lefevre
Bruno Fierens
Bookmarks:

This blog post has received 1 comment.
All Blog Posts | Next Post | Previous Post
Randall Ken