Knowledge Base Alert January, 2016


VCL

LCL

FMX

DEVELOPER TOOLS

TAdvStringGrid:

Remove the context menu at right mouse click


When the inplace editor is active in the TAdvStringGrid, a menu appears when you right click the mouse. This is the default Windows context menu for an edit control. You also see this when dropping a standard VCL TEdit on the form. If you want to remove this, drop a new (empty) TPopupMenu on the form and use the event handler:

procedure TForm4.AdvStringGrid1GetEditorProp(Sender: TObject; ACol,
  ARow: Integer; AEditLink: TEditLink);
begin
  advstringgrid1.NormalEdit.PopupMenu := PopupMenu1;
end;


TAdvStringGrid:

Raw sort compare with virtual grid


Here you can download the raw sort compare with virtual grid sample.


TAdvStringGrid:

How to customize colors in the dropdown color cube


You can customize the colors of each cell in the color cube selection of TAdvColorPickerDropDown by implementing the OnDropDown event and in this event handler write the code:

procedure TForm4.AdvColorPickerDropDown1DropDown(Sender: TObject;
  var acceptdrop: Boolean);
begin
  AdvColorPickerDropDown1.CubePanel.CubeCellColor[0] := clred;
  AdvColorPickerDropDown1.CubePanel.CubeCellColor[1] := clgreen;
  AdvColorPickerDropDown1.CubePanel.CubeCellColor[2] := clblue;
  AdvColorPickerDropDown1.CubePanel.CubeCellColor[3] := clblack;
end;


T(DB)Planner:

Position gap area colors


With the new OnPositionGapProp() event in T(DB)Planner, it is now possible to color code particular things in the position gap area. The position gap is enabled with setting Planner.PositionGap to a value different from zero. When this is enabled, the event OnPositionGapProp is triggered and via ABrush & APen properties, the position gap area color can be dynamically changed.

Sample code:

var
    workhourstart: TDateTime;
    workhourend: TDateTime;
    lunchhourstart: TDateTime;
    lunchhourend: TDateTime;

procedure TForm4.FormCreate(Sender: TObject);
begin
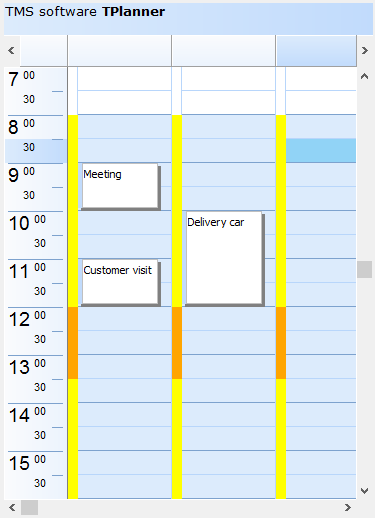
  Planner1.PositionGap := 10;

  workhourstart := EncodeTime(8,0,0,0);
  workhourend := EncodeTime(17,0,0,0);
  lunchhourstart := EncodeTime(12,0,0,0);
  lunchhourend := EncodeTime(13,0,0,0);
end;

procedure TForm4.Planner1PositionGapProp(Sender: TObject; Position,
  Index: Integer; ABrush: TBrush; APen: TPen);
var
  dt: TDateTime;
begin
  dt := Frac(Planner1.CellToTime(Position, Index));

  if (dt >= workhourstart) and (dt <= workhourend) then
  begin
    ABrush.Color := clYellow;
    APen.Color := clYellow;
  end;


  if (dt >= lunchhourstart) and (dt <= lunchhourend) then
  begin
    ABrush.Color := clWebOrange;
    APen.Color := clWebOrange;
  end;

end;


TMS Advanced Charts:

Custom x-axis value drawing


The distance between X-Axis values is determined by the X-Scale, which is calculated based on the RangeFrom and RangeTo properties on pane level. Additionally, the X-Axis can display major units and minor units with their own font size. Below is a sample that demonstrates this:

procedure TForm127.DrawXAxisValue(Sender: TObject; Serie: TChartSerie; Canvas: TCanvas; ARect: TRect; ValueIndex, XMarker: integer; Top: Boolean; var defaultdraw: Boolean);
var
  s: string;
  tw: Integer;
begin
  if Odd(ValueIndex) then
  begin
    DefaultDraw := False;
    s := IntToStr(ValueIndex);
    tw := Canvas.TextWidth(s);
    Canvas.Pen.Color := clRed;
    Canvas.MoveTo(XMarker, ARect.Top);
    Canvas.LineTo(XMarker, ARect.Top + 15);
    Canvas.Font.Color := clRed;
    Canvas.TextOut(XMarker - tw div 2, ARect.Top + 17, s);
  end;
end;

procedure TForm127.FormCreate(Sender: TObject);
var
  I: Integer;
begin
  AdvGDIPChartView1.BeginUpdate;
  AdvGDIPChartView1.InitSample;
  AdvGDIPChartView1.Panes[0].Range.RangeTo := 15;
  AdvGDIPChartView1.Panes[0].XAxis.AutoSize := True;
  AdvGDIPChartView1.Panes[0].Series[2].Free;
  AdvGDIPChartView1.Panes[0].Series[1].Free;
  AdvGDIPChartView1.Panes[0].Series[0].ClearPoints;
  AdvGDIPChartView1.Panes[0].Series[0].AutoRange := arEnabled;
  AdvGDIPChartView1.Panes[0].Series[0].XAxis.AutoUnits := False;
  AdvGDIPChartView1.Panes[0].Series[0].XAxis.MajorUnit := 2;
  AdvGDIPChartView1.Panes[0].Series[0].XAxis.MinorUnit := 1;
  AdvGDIPChartView1.Panes[0].Series[0].OnXAxisDrawValue := DrawXAxisValue;

  for I := 0 to 14 do
    AdvGDIPChartView1.Panes[0].Series[0].AddSinglePoint(Random(100));

  AdvGDIPChartView1.EndUpdate;
end;


TAdvRichEditor:

How to use a watermark


It is easy to use a watermark for TAdvRichEditor. To do this, simply implement the OnDrawBackground event and in this event, you can use the canvas to draw whatever watermark you may want for the TAdvRichEditor.

Example:

var
    png: TPNGImage;

procedure TForm4.FormCreate(Sender: TObject);
begin
  png := TPNGImage.Create;
  png.LoadFromFile('e:\tms\temp\watermark-news.png');
end;

procedure TForm4.FormClose(Sender: TObject; var Action: TCloseAction);
begin
  png.Free;
end;

procedure TForm4.AdvRichEditor1DrawBackground(Sender: TObject; ACanvas: TCanvas;
  ARect: TRect);
begin
  ACanvas.Draw(0,0,png);
end;


TAdvOfficeTabSet:

How to set the first left displayed tab


When there are a lot of tabs in TAdvOfficeTabSet, it is now possible to programmatically set the first left displayed tab so the user immediately sees the tab you want to focus instead of requiring a lengthy scroll operation. This is done via the new AdvOfficeTabSet.ScrollPosition property.

Example:

var
  i: integer;
begin
  AdvOfficeTabSet1.AdvOfficeTabs.Clear;
  // enable fast inserting of many tabs
  AdvOfficeTabSet1.BeginUpdate;

  for i := 0 to 50 do
  begin
    AdvOfficeTabSet1.AdvOfficeTabs.Add.Caption := 'Tab '+ inttostr(i + 1);
  end;

  AdvOfficeTabSet1.EndUpdate;
  // first tab will be tab 25
  AdvOfficeTabSet1.ScrollPosition := 25;
end;


TMS Cloud Pack:

Simplified code to have our cloud components connect to a cloud service


We have simplified the code that needs to be written to have our cloud components connect to a cloud service. Before it was needed to load persisted tokens, test the tokens, refresh tokens when needed or start a new authentication / authorization process. From now on, this is all simplified. When the cloud component application key & secret are set and the location where to persist tokens is specified, the code can be reduced to a call to Connect and handling the OnConnected event from where you can start calling the cloud service methods:

procedure TForm1.Button1Click(Sender: TObject);
begin
  AdvOneDrive1.Connect;
end;

procedure TForm1.AdvOneDrive1Connected(Sender: TObject);
begin
  Init;
end;

Using TMS LCL Components for Raspberry Pi


With the recently introduced TMS LCL Cloud Pack and the open-source TMS LCL HW Pack, building small Raspberry Pi based projects is easier than ever. In this example, the code for an appliance is presented that displays the number of visitors on a website on a Raspberry Pi 16x2 LCD backpanel.

This code fetches the page statistics from Google Analytics with the TMS LCL Cloud Pack TMSLCLCloudGAnalytics component

function TForm1.GetRTVisitors: string;
var
  RT: TRealtimeMetricsArray;
  StartDate, EndDate: string;
  i: integer;
  error: string;
  Res: TGStringArray;
begin
  Result := ‘’;
 StartDate := 'today';
  EndDate := 'today';
  SetLength(RT,1);
  RT[0] := rtActiveUsers;
  TMSLCLCloudGAnalytics1.RequestData.RealtimeMetrics := RT;
  // fetches data for the page coupled with Google Analytics ID set via ViewID 
  Error := TMSLCLCloudGAnalytics1.GetData(TMSLCLCloudGAnalytics1.App.ViewID);
  If Error = ‘’ then
  begin
     Res  := TMSLCLCloudGAnalytics1.Data.Data[0];
     Result := Res[0];
 end;
end;
When the button is clicked, the 16x2 LCD display is initialized and a connection is made to the Google Analytics service:

procedure TForm1.ButtonClick1 (Sender: TObject);
begin
  TMSLCLAdaDispl16x2.Init;
  TMSLCLCloudGAnalytics1.Connect;
end;
When the connection is ready, the number of realtime users is fetched and shown on the 16x2 LCD display:

procedure TForm1.TMSLCLCloudGAnalytics1Connected(Sender: TObject);
var
  s: string;
begin
  s := GetRTVisitors;
  TMSLCLAdaDispl16x2.DrawText(‘Visitors:’ +s);
end;

TTMSFMXTableView:

How to hide the header & footer


To hide the header / footer you can use the following code:

procedure TForm1.FormCreate(Sender: TObject); 
begin
  TMSFMXTableView1.NeedStyleLookup;
  TMSFMXTableView1.ApplyStyleLookup;
  TMSFMXTableView1.GetHeaderRectangle.Visible := False;
  TMSFMXTableView1.GetFooterRectangle.Visible := False; 
end;

To make sure the header and footer rectangle elements are created, call NeedStyleLookup and ApplyStyleLookup once. An alternative way of hiding the those elements is in the OnApplyStyleLookup event:

procedure TForm1.TMSFMXTableView1ApplyStyleLookup(Sender: TObject); 
begin
  TMSFMXTableView1.GetHeaderRectangle.Visible := False;
  TMSFMXTableView1.GetFooterRectangle.Visible := False; 
end;


TMS Sparkle:

Using client-certificates with Sparkle in Windows


You can send client-certificates when performing HTTP requests using Sparkle, from Windows. The following code snippet shows how to do it. Two comments about the code:

a) You have to declare TInternalHTTPClient in the same unit you use the code below, preferable in the implementation section

b) This code snippet shows also how to retrieve the certificate from Windows store. It’s there as an example but you can and should replace with your own code to retrieve the certificate. That part of the code is not Sparkle-related and you should be familiar with the Windows API that handles certificates. The relevant Sparkle code is highlighted in bold.

TInternalHTTPClient = class(THttpClient)
end;
 
var
  httpClient: THttpClient;
  httpEngine: TWinHttpEngine;
  httpRequest: THttpRequest;
  httpResponse: THttpResponse;
  Store: HCERTSTORE;
  Cert: PCERT_CONTEXT;
begin
  httpClient := THttpClient.Create;
 
  // Open the 'Personal' SSL certificate store for the local machine and locate the required client-side certificate
  Cert := nil;
  Store := CertOpenStore(CERT_STORE_PROV_SYSTEM, 0, 0, CERT_SYSTEM_STORE_LOCAL_MACHINE, PChar('MY'));
  if (Store <> nil) then
    Cert := CertFindCertificateInStore(Store, X509_ASN_ENCODING, 0, CERT_FIND_SUBJECT_STR, PChar('mycertsubject'), nil);
 
  // If a valid certificate was found then OK to create and send the HTTP request
  if (Cert <> nil) then
  begin
    // Setup HTTP request properties
    httpRequest := httpClient.CreateRequest;
    ...
 
    // Use 'BeforeWinHttpSendRequest' event to set any HTTP request properties such as client-side SSL certificate
    httpEngine := TWinHttpEngine(TInternalHTTPClient(httpClient).Engine);
    httpEngine.BeforeWinHttpSendRequest :=
      procedure (Req: HINTERNET)
      begin
        WinHttpCheck(WinHttpSetOption(Req, WINHTTP_OPTION_CLIENT_CERT_CONTEXT, Cert, SizeOf(CERT_CONTEXT)));
      end;
 
    // Execute HTTP request
    httpResponse := httpClient.Send(httpRequest);
  end;


As always, we thank all users for the numerous inputs, feedback, comments and suggestions. This is an invaluable help to steer our developments here at TMS software. We continue to look forward to all your further communications to direct our team to provide you better tools and components for your needs.

Kind regards,
TMS software team
Email: info@tmssoftware.com
Web: http://www.tmssoftware.com
Support, FAQ & Manuals: http://www.tmssoftware.com/site/support.asp


Follow latest developments at tmssoftware.com


NOTICE: If you wish to unsubscribe from the TMS software Newsletter, please click here.