Knowledge Base Alert November, 2015


VCL

FIREMONKEY

LCL

INTRAWEB

TAdvStringGrid:

How to get xls worksheets names


With TAdvGridExcelIO you can do this:

AdvGridExcelIO.LoadSheetNames(XLSfilename);
And then access sheetnames with

AdvGridExcelIO.Sheetnames[index]: string;
AdvGridExcelIO.SheetnameCount: integer;


TAdvSpreadGrid:

How to show negative values in red within a cell with a formula


This code snippet shows how to have negative values in red within a cell with a formula:

procedure TForm1.AdvSpreadGrid1GetCellColor(Sender: TObject; ARow,
  ACol: Integer; AState: TGridDrawState; ABrush: TBrush; AFont: TFont);
begin
   if AdvSpreadGrid1.CalculatedValue[acol,arow] < 0 then
    AFont.Color := clred;
end;


TMS FlexCel for VCL & FireMonkey:

Changing the background color of a cell in FlexCel


It can be confusing that the code to change the background of a cell is something like:

fmt1.FillPattern.Pattern := TFlxPatternStyle.Solid;
fmt1.FillPattern.FgColor := $00BCE4D8;

Why are we changing the FgColor instead of the BgColor in order to change the background color? And why does changing BgColor has no effect?

It can be a little confusing because of the names (which are the same the Excel documentation uses), but you need to understand that both FgColor and BgColor refer to the background color of a cell, and that’s why both are properties of the FillPattern. The foreground color is changed by changing the font color.

The thing is, in Excel, cells don’t need to have a solid fill, they can have a pattern fill. For example, here you have a “grid” pattern, where the foreground of the pattern is red, and the background of the pattern is yellow:


So, in FlexCel “FgColor” and “BgColor” both refer to the fill of the cell (never the foreground which as said is Font.Color). For the special case of Pattern = Solid (what we use in the 99.999% of the cases), then you set the FillPattern.Pattern to Solid, and BgColor doesn’t really matters. You can think of “Solid” as a pattern where everything is covered by the foreground color. The BgColor is still there, but not visible because FgColor covers all. If you set any other pattern than solid, you’ll see it more clearly.

TMS Cloud Pack:

Download files from cloud storage service with ID or DownloadURL only


Different APIs provide different information or use different techniques. For example, unlike the Google Drive API, the OneDrive API does not provide a specific download URL for each file. However only the ID of the file is required to be able download the file, so you can create a dummy CloudItem with only the ID property assigned to be able to use the Download call. In case of Google Drive, you can use the same technique, but assign the DownloadURL property instead of the ID.

Examples:

OneDrive / SkyDrive
var
  i: TSkyDriveItem;
begin
        i := TSkyDriveItem.Create(nil);
        i.ID := 'abc';
        i.FileName := 'filename.ext';
        AdvSkyDrive1.Download(i, i.FileName);
        i.Free;

Google Drive
var
  i: TGDriveItem;
begin
        i := TGDriveItem.Create(nil);
        i.DownloadURL := 'abc';
        i.FileName := 'filename.ext';
        AdvGDrive1.Download(i, i.FileName);
        i.Free;


TMS Cloud Pack:

How to avoid '401 error: invalid_client' when using Google services


Please make sure to enter the “Email address” and “Product name” fields on the “OAuth consent screen” page at https://console.developers.google.com/


TTMSFMXGrid:

How to use a TTrackBar in a cell to update the value of another cell


This code snippet shows how to use a TTrackBar in a cell to update the value of another cell:

type
  TTMSFMXGridProtected = class(TTMSFMXGrid);

procedure TForm1.FormCreate(Sender: TObject);
begin
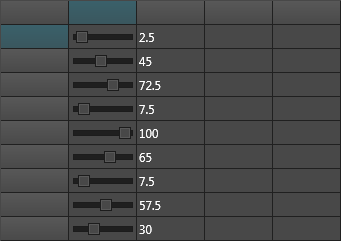
  TMSFMXGrid1.Options.Rendering.Mode := rmAddAsRealCell;
end;

procedure TForm1.TMSFMXGrid1GetCellClass(Sender: TObject; ACol, ARow: Integer;
  var CellClassType: TFmxObjectClass);
begin
  if (ACol = 1) and (ARow > 0) then
    CellClassType := TTrackBar;
end;

procedure TForm1.TMSFMXGrid1GetCellProperties(Sender: TObject; ACol,
  ARow: Integer; Cell: TFmxObject);
begin
  if (ACol = 1) and (ARow > 0) then
    (Cell as TTrackBar).OnChange := TrackBarChanged;
end;

procedure TForm1.TrackBarChanged(Sender: TObject);
var
  cl: TCell;
begin
  cl := TMSFMXGrid1.GetCellByObject(Sender as TFMXObject);
  TMSFMXGrid1.Cells[cl.Col + 1, cl.Row] := FloatToStr((Sender as TTrackBar).Value);
end;


TTMSFMXPlanner:

How to insert a new Item with dblclick on Windows and Long-Tap on Mobile


For touch screens:

1) Drop an instance of GestureManager on the form and assign it to the Touch.GestureManager property of the TTMSFMXPlanner and check LongTap and DoubleTap under options under the InteractiveGestures property.


2) Add the following code:

procedure TForm1.TMSFMXPlanner1Gesture(Sender: TObject;
  const [Ref] EventInfo: TGestureEventInfo; var Handled: Boolean);
begin
  if {$IFDEF MSWINDOWS}(EventInfo.GestureID = igiDoubleTap) or {$ENDIF} (EventInfo.GestureID = igiLongTap)
    and (TInteractiveGestureFlag.gfEnd in EventInfo.Flags) then
  begin
    if not Assigned(TMSFMXPlanner1.ActiveItem) then
      TMSFMXPlanner1.AddItemAtSelection;
  end
end;


For non-touch screens:

Simply implement the OnDblClick event and use the following code:

procedure TForm1.TMSFMXPlanner1DblClick(Sender: TObject);
begin
  if not Assigned(TMSFMXPlanner1.ActiveItem) then
    TMSFMXPlanner1.AddItemAtSelection;
end;

TMS Charts for FireMonkey:

Virtual mode


Where in earlier versions, the method for adding values to a chart was via multiple calls to TMSFMXChart.Series[x].AddSinglePoint(), the new virtual mode offers a faster solution that is more flexible and typically consumes less memory. This can of course make a welcome difference when creating applications for mobile devices.
To start using the new TMS FMX Chart virtual mode, two events need to be implemented:

TMSFMXChart.OnGetNumberOfPoints()
and
TMSFMXChart.OnGetPoint()

In the first event, OnGetNumberOfPoints(), that is triggered for each series in the chart, the number of desired data points can be returned via the ANumberOfPoints parameter.
In this sample event handler, the number of points is set to 10000 for each series in the chart:

procedure TForm1.TMSFMXChart1GetNumberOfPoints(Sender: TObject; ASerie: TTMSFMXChartSerie; var ANumberOfPoints: Integer);
begin
  ANumberOfPoints := 10000;
end;

The second event, OnGetPoint() is used to return the value for each point in the chart series. Here comes the flexibility that these values can be retrieved directly from another data structure (even a database). In this sample example, we assume the values are in a dynamic array of 10000 values and for the sake of this example filled with random floating point values. This is the code that initializes two dynamic arrays that have the data for 2 series:

var
  data_arr_1, data_arr_2: array of double;
begin
  SetLength(data_arr_1,10000);
  SetLength(data_arr_2,10000);
  for i := 0 to Length(data_arr) - 1 do
    begin
      data_arr_1[i] := random(100) / 33;
      data_arr_2[i] := random(200) / 25;
    end;
end;
and now the event handler that sets the values for the virtual chart:

procedure TForm1.TMSFMXChart1GetPoint(Sender: TObject; ASerie: TTMSFMXChartSerie; AIndex: Integer; var APoint: TTMSFMXChartPointVirtual);
begin
   case ASerie.Index of
   0: if AIndex < Length(data_arr_1) then  
          APoint.YValue  := data_arr_1[AIndex]
   1: if AIndex < Length(data_arr_2) then  
          APoint.YValue  := data_arr_2[AIndex]
   end;
end;

A final touch is to apply some settings that will let the Y-axis scale automatically adapt to the values in the series and define the number of visible points along the X-axis (in this case 100 points of 10000 simultaneously visible along the X-axis, other values are shown when the chart is horizontally scrolled). This is done with:

  
  TMSFMXChart1.Series[0].AutoYRange := arEnabled;
  TMSFMXChart1.Series[0].MaxX := 100;
  TMSFMXChart1.Series[1].AutoYRange := arEnabled;
  TMSFMXChart1.Series[1].MaxX := 100;


TMS LCL Cloud Pack:

TMS makes accessing cloud services from Raspberry Pi a piece of cake


The world of IoT opens fascinating & innovative capabilities to steer & sense the physical world from small programmable devices like the Raspberry Pi. It becomes even more interesting when this can be connected to cloud services. Imagine a device that unlocks a door at times controlled by a Google Calendar, a device monitoring noise levels in a room and sending a push notification to a mobile phone when a level is exceeded, a device automatically controlling a step motor with data retrieved from a Google Sheet, a device that counts people passing a door and logging this data in a DropBox data file, ... and so much more...

All this is nowadays not only possible, but it is also cheap to make and easy to write software for with the Pascal programming language.
With respect to writing the software that connects embedded apps to all kinds of popular cloud services, the all new TMS LCL Cloud Pack offers numerous easy to use components that seamlessly interact with these cloud services. It offers access to all popular cloud storage services, social media, calendering services, push notification services and more... See full list here.

In our lab, we had fun making a sample app that shows the number of visitors on our website that is retrieved with the Google Analytics realtime data API on a quad 7 segment LED with only a few lines of code.

In order to get started writing cloud-connected apps for the Raspberry Pi, all you need to do is download & install Lazarus v1.5 on your Raspberry Pi and then download & install the TMS LCL Cloud Pack. After install, over 30 new components are available for you. Then register for an application key & secret at your favorite cloud service and use our new Access Token generator app for Windows & Mac OS-X we created especially for TMS LCL Cloud Pack and have it generate the access token and export the token to your Raspberry Pi. With this mechanism, your embedded app can connect to cloud services without requiring any user interaction on the device for authentication & authorization for using a service. Once this is done, you're ready to let the cloud service component of your choice start consuming or producing data for the cloud service.

Finally, note that with Lazarus and our TMS LCL Cloud Pack, you're not limited to Raspberry Pi only. You can develop the prototype of the Raspberry Pi app on a Windows, Mac OS-X, Linux machine or can make full apps for these operating systems as well.


We hope you'll have as much fun creating this brand new type of applications as we had developing TMS LCL Cloud Pack and we're thrilled to learn about what your innovative apps will be!

TIWIPhoneList

How to populate the TIWIPhoneList asynchronously


You can use an asynchronous event (for example, the OnAsyncLeftButtonClick of the TIWIPhoneHeader component) to populate the TIWIPhoneList. It is also required to add a call to TIWIPhoneList1.AsyncItemsAdd after adding items asynchronously.

Example:

procedure TIWForm1.TIWIPhoneHeader1AsyncLeftButtonClick(Sender: TObject;
  EventParams: TStringList);
var
  I: integer;
begin
  for I := 0 to 50 - 1 do
  begin
    Inc(UserSession.pContaLin);
    with TIWIPhoneList1.Items.Add() do
    begin
      Caption := 'List Item ' + IntToStr(UserSession.pContaLin);
      Value := IntToStr(UserSession.pContaLin);
      Notes := 'notes: ' + IntToStr(UserSession.pContaLin);
    end;
  end;
  TIWIPhoneList1.AsyncItemsAdd;
end;


As always, we thank all users for the numerous inputs, feedback, comments and suggestions. This is an invaluable help to steer our developments here at TMS software. We continue to look forward to all your further communications to direct our team to provide you better tools and components for your needs.

Kind regards,
TMS software team
Email: info@tmssoftware.com
Web: http://www.tmssoftware.com
Support, FAQ & Manuals: http://www.tmssoftware.com/site/support.asp


Follow latest developments at tmssoftware.com


NOTICE: If you wish to unsubscribe from the TMS software Newsletter, please click here.