procedure TForm1.TMSFMXPlanner1AfterDrawCellVerticalLine(Sender: TObject;
ACanvas: TCanvas; ARect: TRectF; ACol, ARow: Integer; AStartTime,
AEndTime: TDateTime; APosition: Integer; AKind: TTMSFMXPlannerCacheItemKind);
begin
ACanvas.StrokeThickness := 2;
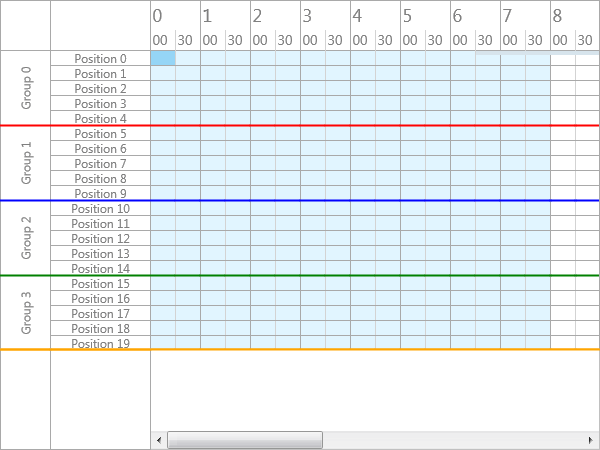
if ARow = 5 then
begin
ACanvas.Stroke.Color := claRed;
ACanvas.DrawLine(PointF(ARect.Left, ARect.Top), PointF(ARect.Right, ARect.Top), 1);
end;
if ARow = 10 then
begin
ACanvas.Stroke.Color := claBlue;
ACanvas.DrawLine(PointF(ARect.Left, ARect.Top), PointF(ARect.Right, ARect.Top), 1);
end;
if ARow = 15 then
begin
ACanvas.Stroke.Color := claGreen;
ACanvas.DrawLine(PointF(ARect.Left, ARect.Top), PointF(ARect.Right, ARect.Top), 1);
end;
if ARow = 19 then
begin
ACanvas.Stroke.Color := claOrange;
ACanvas.DrawLine(PointF(ARect.Left, ARect.Bottom - 1), PointF(ARect.Right, ARect.Bottom - 1), 1);
end;
end;
procedure TForm1.TMSFMXPlanner1AfterDrawGroup(Sender: TObject;
ACanvas: TCanvas; ARect: TRectF; AGroup, AStartPosition,
AEndPosition: Integer; AKind: TTMSFMXPlannerCacheItemKind);
begin
ACanvas.StrokeThickness := 2;
if AGroup in [1, 2, 3] then
begin
case AGroup of
1: ACanvas.Stroke.Color := claRed;
2: ACanvas.Stroke.Color := claBlue;
3: ACanvas.Stroke.Color := claGreen;
end;
ACanvas.DrawLine(PointF(ARect.Left, ARect.Top), PointF(ARect.Right, ARect.Top), 1);
end;
end;
procedure TForm1.TMSFMXPlanner1AfterDrawGroupEmptySpace(Sender: TObject;
ACanvas: TCanvas; ARect: TRectF; ASpace: TTMSFMXPlannerGroupEmptySpace);
begin
ACanvas.StrokeThickness := 2;
if ASpace = pgesTopRight then
begin
ACanvas.Stroke.Color := claOrange;
ACanvas.DrawLine(PointF(ARect.Left, ARect.Top), PointF(ARect.Right, ARect.Top), 1);
end;
end;
procedure TForm1.TMSFMXPlanner1AfterDrawPosition(Sender: TObject;
ACanvas: TCanvas; ARect: TRectF; APosition: Integer;
AKind: TTMSFMXPlannerCacheItemKind);
begin
ACanvas.StrokeThickness := 2;
if APosition = 5 then
begin
ACanvas.Stroke.Color := claRed;
ACanvas.DrawLine(PointF(ARect.Left, ARect.Top), PointF(ARect.Right, ARect.Top), 1);
end;
if APosition = 10 then
begin
ACanvas.Stroke.Color := claBlue;
ACanvas.DrawLine(PointF(ARect.Left, ARect.Top), PointF(ARect.Right, ARect.Top), 1);
end;
if APosition = 15 then
begin
ACanvas.Stroke.Color := claGreen;
ACanvas.DrawLine(PointF(ARect.Left, ARect.Top), PointF(ARect.Right, ARect.Top), 1);
end;
end;
procedure TForm1.TMSFMXPlanner1AfterDrawPositionEmptySpace(Sender: TObject;
ACanvas: TCanvas; ARect: TRectF; ASpace: TTMSFMXPlannerPositionEmptySpace);
begin
ACanvas.StrokeThickness := 2;
if ASpace = ppesTopRight then
begin
ACanvas.Stroke.Color := claOrange;
ACanvas.DrawLine(PointF(ARect.Left, ARect.Top), PointF(ARect.Right, ARect.Top), 1);
end;
end;
procedure TForm1.TMSFMXPlanner1Paint(Sender: TObject; Canvas: TCanvas;=const ARect: TRectF);
var
r: TRectF;
begin
Canvas.StrokeThickness := 2;
r := TMSFMXPlanner1.GetContentClipRect;
Canvas.Stroke.Color := claOrange;
Canvas.DrawLine(PointF(0, r.Bottom - 0.5), PointF(r.Right, r.Bottom - 0.5), 1);
end;