Blog Options
Archive
<< April 2024 >>-
Wednesday 17
- New free component for sophisticated file uploads with TMS WEB Core -
Tuesday 16
- Closing the gap with TMS FNC UI Pack new additions -
Thursday 11
- Unveiling the Latest Enhancements in TMS VCL UI Pack -
Friday 5
- TMS components and Delphi and C++Builder 12.1 -
Wednesday 3
- Customizing the login page of your application using TMS Sphinx
- A Python library for using StellarDS.io effortlessly
- Introducing: How it Works with Holger - Building a Pexels gallery app with TMS WEB Core video series
- TMS FNC Cloud Pack with StellarDS.io backend: unparalleled productivity in VCL & FMX
Authors
- Bernard Roussely (1)
- Wagner Landgraf (82)
- Roman Yankovsky (2)
- Bart Holvoet (27)
- Aaron Decramer (17)
- Pieter Scheldeman (99)
- Nancy Lescouhier (32)
- Adrian Gallero (33)
- Bruno Fierens (403)
- Marcos Douglas B. Santos (5)
- Wagner R. Landgraf (1)
- Bradley Velghe (16)
- Bernard (2)
- Andrew Simard (86)
- Holger Flick (15)
- Gjalt Vanhouwaert (30)
- Tunde Keller (22)
- Masiha Zemarai (119)
Blog
All Blog Posts | Next Post | Previous Post

 TMS WEB Core v1.0 Brescia tips & tricks
Bookmarks:
Friday, August 3, 2018
Since several months, many enthusiast Delphi developers that are on our TMS ALL-ACCESS subscription are exploring the new TMS WEB Core.
Since little over a week ago, we officially released the first version v1.0 named "Brescia edition" to symbolize the start of a new journey "Mille Miglia" and many more Delphi developers already joined us on this journey. From the numerous feedback we received so far, the two most commonly heard comments are:
"The more I work with TMS WEB Core, the more I love it"
and
"Wow, the possibilities of TMS WEB Core are virtually unlimited"
With so much possibilities comes a lot of knowledge. While our team also spends a significant amount of time on writing documentation and demos, we want to give in addition to this tips & tricks based on your questions at regular intervals. So, let's kick of with looking at two tips in depth:
Starting a TMS WEB Core application at a dynamically selected form
The default behavior is that a TMS WEB Core application starts with presenting the main form of the application, pretty much as is default the case for Delphi VCL applications. The code responsible for this is:
  Application.Initialize;
  Application.MainFormOnTaskbar := True;
  Application.CreateForm(TForm1, Form1);
  Application.Run;
Well, doing this is actually quite simple. To start the application with the wanted form, we'll use a request parameter 'form' and have 3 keywords: customers, products and sales. We have forms TCustomersForm, TProductsForm, TOrdersForm. Let's use the request parameter now to start the form we want:
begin
  Application.Initialize;
  Application.AutoFormRoute := true;
  Application.MainFormOnTaskbar := True;

  if HasQueryParam('form',s) then
  begin
    if CompareText(s, 'customers') = 0 then
      Application.CreateForm(TCustomersForm1, CustomersForm);

    if CompareText(s, 'products') = 0 then
      Application.CreateForm(TProductsForm1, ProductsForm);

    if CompareText(s, 'sales') = 0 then
      Application.CreateForm(TSalesForm1, SalesForm);
  end
  else
    Application.CreateForm(TMainForm, MainForm);

  Application.Run;
end.
Important note is that the function HasQueryParam() is a function working with URL request parameters found in the unit WEBLib.WebTools, so make sure to add this unit to the uses list when you want to use it.
Creating forms fully dynamical with components
By default, every form in a TMS WEB Core application has a HTML file associated with it and the default behavior is that when opening a new form, this form uses the entire browser window. TMS WEB Core also facilitates to show forms created with the designer as a popup form or host this form in a HTML element on the form. But in this tips & tricks blog, we want to show how you can also create a form fully in code and display it. Surprisingly, or rather unsurprisingly, doing this is almost identical to dynamically creating a form with controls in VCL.
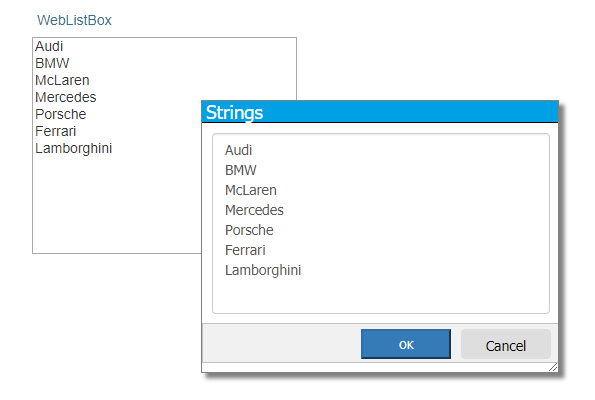
For the purpose of this example, we will create a form that will host a TWebMemo component and via this TWebMemo component, we will edit the contents of a TWebListBox on the form.
The form will contain a bottom aligned panel with an OK and Cancel button and a client memo control.
Let's jump into the code immediately:
procedure TForm1.WebButton1Click(Sender: TObject);
var
  btnOK,btnCancel: TWebButton;
  mem: TWebMemo;
  pnl: TWebPanel;
  frm: TWebForm;

  procedure HandleDialogClose(AValue: TModalResult);
  begin
    if AValue = mrOK then
    begin
      WebListBox1.Items.Assign(mem.Lines);
    end;
  end;

begin
  frm := TWebForm.CreateNew(self);
  frm.Caption := 'Strings';
  frm.Width := 600;
  frm.Height := 400;
  frm.Color := clWhite;
  frm.Shadow := true;
  frm.Position := poScreenCenter;
  frm.Border := fbSizeable;
  frm.Top := 100;
  frm.Left := 100;

  mem := TWebMemo.Create(frm);
  mem.Parent := frm;
  mem.AlignWithMargins := true;
  mem.Align := alClient;
  mem.Margins.Left := 10;
  mem.Margins.Right := 10;
  mem.Margins.Top := 10;
  mem.Margins.Bottom := 10;
  mem.ElementClassName := 'form-control';
  mem.Lines.Assign(WebListBox1.Items);

  pnl := TWebPanel.Create(frm);
  pnl.Parent := frm;
  pnl.Height := 40;
  pnl.Align := alBottom;

  btnOK := TWebButton.Create(pnl);
  btnOK.Parent := pnl;
  btnOK.Caption := 'OK';
  btnOK.Left := 400;
  btnOK.Top := 5;
  btnOK.Width := 90;
  btnOK.Height := 30;
  btnOK.Tag := mrOK;
  btnOK.ElementClassName := 'btn-primary';
  btnOK.OnClick := BtnClick;
  btnOK.Hint := 'Accept changes';
  btnOK.ShowHint := true;
  btnOK.Anchors := [akRight, akTop];

  btnCancel := TWebButton.Create(pnl);
  btnCancel.Parent := pnl;
  btnCancel.Caption := 'Cancel';
  btnCancel.Left := 500;
  btnCancel.Top := 5;
  btnCancel.Tag := mrCancel;
  btnCancel.Width := 90;
  btnCancel.Height := 30;
  btnCancel.OnClick := BtnClick;
  btnCancel.ElementClassName := 'btn';
  btnCancel.Hint := 'Exit dialog';
  btnCancel.ShowHint := true;
  btnCancel.Anchors := [akRight, akTop];

  if Assigned(frm.CaptionElement) then
  begin
    frm.CaptionElement.style.setProperty('background-color','#009FE4');
    frm.CaptionElement.style.setProperty('font-size','14pt');
  end;

  frm.ShowModal(@HandleDialogClose);
end;The form is at last displayed with the ShowModal() method. Here is an important difference. In the browser, there are no blocking calls! It would be a very bad idea to have blocking methods in the browser. As we do not have the concept of blocking calls, we need an alternative way to capture the result of closing the "modal" form and that is by using a procedure as parameter. This procedure will be called when the form closes and will return the "modal" result set by the buttons on the form. From this procedure, we can get the contents of the TWebMemo on this form and assign these to the TWebListbox on the main form.
Finally, we also had to add some code to handle the button click to set the modal result and close the form. This is done by assigning the button.OnClick event handler and this event handler code is:
procedure TForm1.BtnClick(Sender: TObject);
var
  lForm: TWebForm;
begin
  lForm := TWebForm((Sender as TWebButton).Parent.Parent);
  lForm.ModalResult := (Sender as TWebButton).Tag;
  lForm.Close;
  lForm.Free;
end;
The end result looks like:
We hope these first tips are useful and we wish you a further enjoyable journey with TMS WEB Core. Our team loves your challenges, so get in touch and we look forward to assist and create from this more tips & tricks for TMS WEB Core, TMS XData or TMS FNC controls for creating modern web applications.
Bruno Fierens
Bookmarks:

This blog post has received 2 comments.
 2. Saturday, October 6, 2018 at 8:48:37 AM
Sorry, at this moment we do not yet have support for form inheritance. It is on our todolist for investigation.
2. Saturday, October 6, 2018 at 8:48:37 AM
Sorry, at this moment we do not yet have support for form inheritance. It is on our todolist for investigation.
Bruno Fierens
All Blog Posts | Next Post | Previous Post
TWebForm is support inheritance mechanism
BS