Blog Options
Archive
<< April 2024 >>-
Wednesday 17
- New free component for sophisticated file uploads with TMS WEB Core -
Tuesday 16
- Closing the gap with TMS FNC UI Pack new additions -
Thursday 11
- Unveiling the Latest Enhancements in TMS VCL UI Pack -
Friday 5
- TMS components and Delphi and C++Builder 12.1 -
Wednesday 3
- Customizing the login page of your application using TMS Sphinx
- A Python library for using StellarDS.io effortlessly
- Introducing: How it Works with Holger - Building a Pexels gallery app with TMS WEB Core video series
- TMS FNC Cloud Pack with StellarDS.io backend: unparalleled productivity in VCL & FMX
Authors
- Bernard Roussely (1)
- Wagner Landgraf (82)
- Roman Yankovsky (2)
- Bart Holvoet (27)
- Aaron Decramer (17)
- Pieter Scheldeman (99)
- Nancy Lescouhier (32)
- Adrian Gallero (33)
- Bruno Fierens (403)
- Marcos Douglas B. Santos (5)
- Wagner R. Landgraf (1)
- Bradley Velghe (16)
- Bernard (2)
- Andrew Simard (86)
- Holger Flick (15)
- Gjalt Vanhouwaert (30)
- Tunde Keller (22)
- Masiha Zemarai (119)
Blog
All Blog Posts | Next Post | Previous Post

 Building custom blocks at runtime with TMS Diagram Studio
Bookmarks:
Wednesday, February 10, 2010
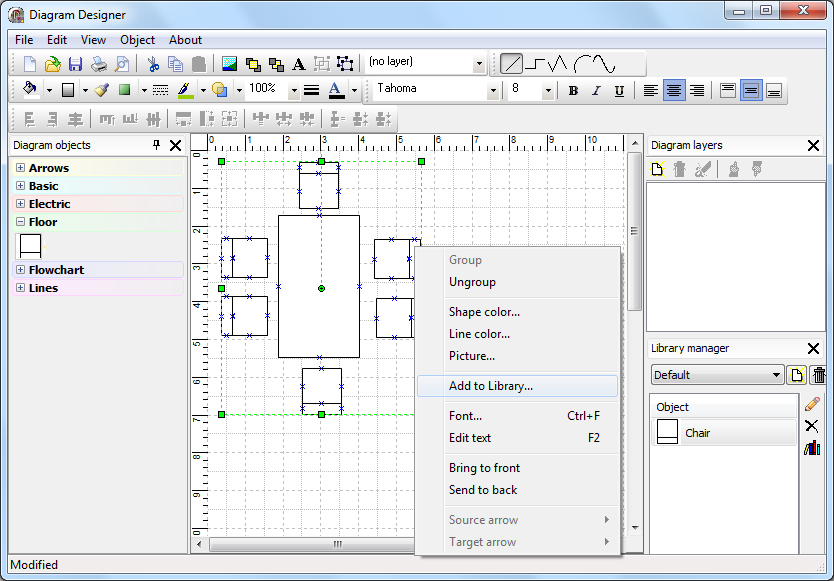
The latest version of TMS Diagram Studio brings several interesting new features. One of them is the possibility for building custom blocks. In other words, your end-users will be able to draw blocks and add them to the toolbar, having it persisted anywhere you want - current version saves custom blocks in files.You can do everything programatically, but here we will show the visual usage, using the diagram editor. Just build your custom block the way you want, placing individual blocks together. You can't add several blocks as a custom block - only one block is allowed. So, all you need to do is group the selected blocks to build a single group block. Once the individual blocks are grouped, right-click the group block and select "Add to the library..." menu item. In the example below, several simple rectangle blocks were placed and grouped to build a "Table" block.
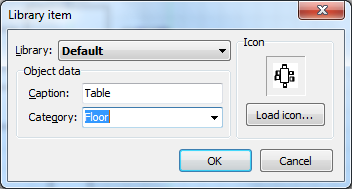
A dialog window will open for you to specify the name of the custom block, its category, and its icon - note that the dialog already suggests you an icon which is just your custom block shrinked to the icon size.
After you confirm the new custom block by pressing "Ok", it will be included in the toolbar.
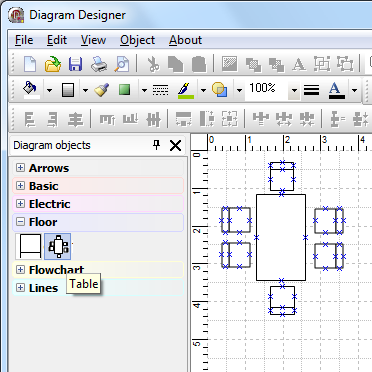
The custom block is persisted to a file, and from now on, you can use it just like any other block: click the custom block button and click the diagram to insert your brand new custom blocks!
Wagner Landgraf
Bookmarks:

This blog post has not received any comments yet.
All Blog Posts | Next Post | Previous Post